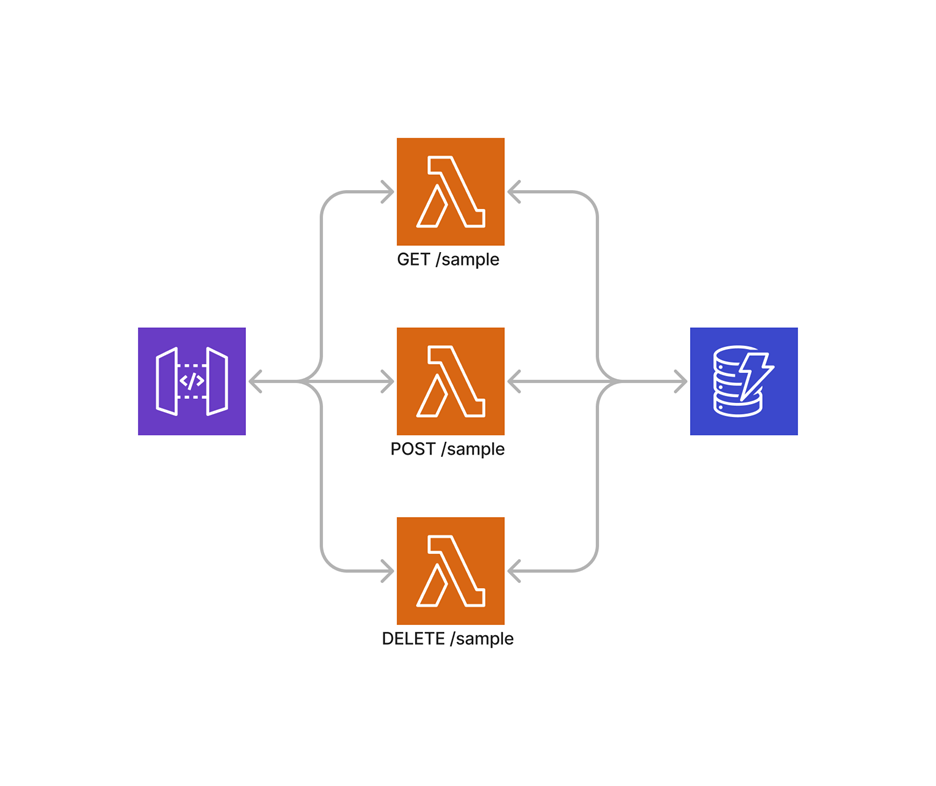
In the previous article, we delved into the fundamentals of AWS CDK, focusing on leveraging AWS’s pre-built constructs. We examined a straightforward Serverless REST API architecture, which integrates three primary serverless services from AWS. These include Amazon API Gateway as the REST API’s access point, AWS Lambda for computing, and Amazon DynamoDB for data storage. In contrast to the basic architecture previously discussed, it’s important to note that such a setup is not typically regarded as best practice for production-grade applications. The serverless community often debates the concept of “Fat Lambda,” a term used to describe scenarios where most, if not all, backend code is consolidated into a single Lambda Function. Reflecting on our earlier article, the coding approach used in our Lambda Function could potentially lead it to be categorized as a “Fat Lambda.” The code above is the handler of the Lambda Function we coded last time. As you can see, the flow of the code from top to bottom depends on the event the Lambda Function receives. When we further scale our overall application and at the same time add more and more features, this Lambda Function will eventually look like this: This code snippet only represents the handler of our Lambda Function, and it doesn’t include the underlying logic functions like writeToDynamoDB, readAllFromDynamoDB, editDataFromDynamoDB, and deleteDataFromDynamoDB. In a “Fat Lambda” architecture, as the Lambda Function grows with more features and complexity, it may become too large to manage effectively within the AWS Management Console. A notable example of “Fat Lambda” is embedding an entire ExpressJS application within a single Lambda Function. Some serverless experts have termed this as a “Lambda-lith,” akin to a monolithic application within a Lambda Function. For production-grade serverless applications, it’s recommended to adhere to the single responsibility principle, a widely recognized concept among serverless experts. This principle suggests that each Lambda Function should perform only one specific task. While this approach might seem challenging to maintain and less straightforward for sharing code across Lambda Functions, it offers significant benefits in terms of flexibility and optimization. Moreover, this architecture can help reduce cold starts, as each Lambda Function represents a smaller, more focused unit of logic. Going back to AWS CDK, to further appreciate this tutorial, we will be evolving our architecture into something like this: Adhering to the single responsibility principle in Lambda Function design is widely considered a best practice, especially for production-grade serverless applications. In this approach, each Lambda Function is dedicated to a single, specific purpose. While scaling the application might result in an increased number of Lambda Functions, potentially complicating management, this challenge is mitigated by using Infrastructure as Code (IaC) solutions like AWS CDK. The strength of IaC tools, particularly AWS CDK, lies in their ability to streamline the management of serverless architectures. They enable efficient optimization and configuration of AWS resources, including multiple Lambda Functions, a task that is challenging to accomplish through the AWS Management Console alone. Without an IaC solution, managing a complex architecture with hundreds of Lambda Functions can be daunting. More critically, the absence of such tools increases the risk of security vulnerabilities, which could lead to cyber-attacks, posing a significant threat to the integrity and survival of the enterprise. Now that we have already got our feet wet with implementing a serverless REST API using AWS CDK, implementing this new architecture we have may look pretty straightforward. Following what we did before, the thought process should be quite simple. Following this thought process, in the lib/tutorials-dojo-cdk-app-stack.ts, we first create 3 AWS CDK Lambda Function constructs. Next is to align the defined Lambda constructs with our existing project’s file structure. Here’s what needs to be done: This is what the updated file structure looks like: Now paste the following code for each inside the newly created index.ts files in their corresponding Lambda Function. For the lambda/getLambda/index.ts: For the lambda/postLambda/index.ts: For the lambda/deleteLambda/index.ts: The next step is to grant each and every Lambda Function read and write access to the DynamoDB table. Going back to the lib/tutorials-dojo-cdk-app-stack.ts, we can each Lambda Function read and write access to the DynamoDB table through the following lines of code: The next step is to attach the existing Lambda Layer to these three Lambda Functions. Now that we have already given the three Lambda Functions read and write access to the DynamoDB table and the Lambda Layer, the final step is to integrate each Lambda Function with the API Gateway. The LambdaIntegration construct is then used for each Lambda Function to be integrated into the API Gateway. Looking at the diagram, all Lambda Functions are accessed through the API Gateway with the /sample path, where each has different methods. getLambda is accessed through a GET method, postLambda is accessed through a POST method, while deleteLambda is accessed through a DELETE method. To do this, we then need to use the existing root resource to create the /sample resource on top of it. Finally, using this sample resource, we then assign a method to each of the corresponding Lambda Functions. The lib/tutorials-dojo-cdk-app-stack.ts should look like the following: In observing the final implementation shown above, the code seems to be somewhat odd. If you may have noticed, there are two important coding paradigms that are not met in the implementation. DRY — Don’t Repeat Yourself and KISS — Keep It Short and Simple. The final implementation in the lib/tutorials-dojo-cdk-app-stack.ts repeats too much code. First, we repeat 3 Lambda Function constructs; next, we repeat 3 DynamoDB permissions; next, we repeat Lambda Layer access; and lastly, we integrate each 3 Lambda Functions to the API Gateway. One great feature of AWS CDK is to be able to create your own custom construct. To understand this better, a custom construct in AWS CDK is basically a combination of constructs. If you are familiar with the frontend framework, React, the concept is similar to building custom React components or custom React hooks. AWS CDK grants the user the power to create levels of abstraction catering to the unique standards and requirements of an organization through custom constructs. In order to make a custom construct, we must first study the nature of our current CDK application. Since we know which parts of the stack are repeating, we can make a custom construct out of this knowledge. First, create a directory called constructs. This is where we put all the custom constructs we will be creating. Inside the constructs directory, create a file called TDLambdaApiIntegrtion.ts. The current file structure should look like this: In creating the TDLambdaApiIntegrtion.ts custom construct, we must first declare the props that it’s going to use. The technique here is to then look again at our implementation with built-in constructs. Although we used built-in constructs, the values of the props per repeating constructs are different, such as the code prop in the Lambda Function construct and the method prop in the sample resource construct. These props can be used as props for our custom construct. The first prop for our custom construct should be the dynamoDBTable to be used. This is important to know which DynamoDB table should grant read and write access to the Lambda Function. The next prop is the resource prop to know which resource is to be used by the custom construct. Then, the next prop should be the sourceCodePath. This is to know where the Lambda Function resides in our current file structure. Next is an optional prop, which is the lambdaLayer. Not all Lambda Functions have a Lambda Layer hence, this prop is optional. And lastly is the method prop. This is to know which method is used to invoke the Lambda Function through the API Gateway. In the constructs/TDLambdaApiIntegrtion.ts file declaring the props should look like this: And this is how the custom construct should look like: All in all, this is what constructs/TDLambdaApiIntegrtion.ts looks like: If you look closely, the custom construct follows our thought process where we first create a Lambda Function, grant it read and write access to the DynamoDB table, attach a Lambda Layer, and lastly, attach Lambda Function to the API gateway with the corresponding path and method. The big question now is: how do we use this custom construct? The answer is simple: use it like any other construct. In the lib/tutorials-dojo-cdk-app-stack.ts, we first import our new custom construct: Then we declare our custom construct inside the stack: This construct basically creates a Lambda Function located in the lambda/getLambda directory that has read and write access to the declared DynamoDB Table. Attached to the sampleResource resource and GET method of this resource of the declared API Gateway. Additionally, it also makes use of the declared Lambda Layer. Now we repeat this process for the remaining Lambda Functions: After creating all these constructs inside the lib/tutorials-dojo-cdk-app-stack.ts Stack. The file should look like this: To deploy the TutorialsDojoCdkAppStack AWS CDK Stack, run the following command in the root directory: We will be testing the POST request first. Make sure to enter the correct path, which is {{url}}/sample. The request body should be in JSON format, where id is required. See the configuration below. Upon hitting “Send,” expect a response mirroring the format illustrated above. Next is testing the GET request. Duplicate the initial POST request and change it to GET. The path is the same; however, this time, there will be no request body. See the configuration below. Upon clicking “Send”, you will see a successful response above. Note that it displays the newly posted object we sent through the POST request. Lastly, is testing the DELETE request. Just like the POST request, the DELETE request will have a request body with the same format. See the configuration below. Upon clicking “Send”, you will see a successful response above. This displays the deleted item, and the next time you send a GET request, you will no longer see that deleted item. In this article, we have delved deeply into the advanced features of AWS CDK, showcasing its powerful capabilities in building and managing sophisticated serverless architectures. The transition from basic constructs to custom constructs illustrates the flexibility and efficiency AWS CDK offers, especially in adhering to best practices like the single responsibility principle. This approach not only simplifies the management of serverless systems but also significantly improves their scalability, maintainability, and security. The provided practical examples serve as a comprehensive guide, demonstrating AWS CDK’s efficacy in developing robust, production-grade serverless applications. Furthermore, the discussion around the pitfalls of “Fat Lambda” architectures and the emphasis on modular Lambda Function designs underlines the importance of thoughtful architecture in cloud applications. By leveraging AWS CDK’s advanced features, developers can create more efficient, reliable, and scalable serverless solutions. This article, therefore, stands as an essential read for anyone looking to harness the full potential of AWS CDK in crafting state-of-the-art serverless applications, ensuring their projects are not only technically sound but also aligned with industry best practices. https://docs.aws.amazon.com/cdk/v2/guide/constructs.html https://cdkpatterns.com/patterns/ https://github.com/cdk-patterns/serverless/blob/main/the-lambda-trilogy/README.md
The Fat Lambda
exports.handler = async (event: any) => {
  const httpMethod = event.httpMethod;

  switch (httpMethod) {
    case 'POST':
      const item = JSON.parse(event.body);
      return await writeToDynamoDB(item);
    case 'GET':
      return await readAllFromDynamoDB();
    default:
      return {
        statusCode: 400,
        body: JSON.stringify('Invalid HTTP method')
      };
  }
};
exports.handler = async (event: any) => {
  const httpMethod = event.httpMethod;

  switch (httpMethod) {
    case 'POST':
      const item = JSON.parse(event.body);
      return await writeToDynamoDB(item);
    case 'GET':
      return await readAllFromDynamoDB();
    case 'PUT':
      return await editDataFromDynamoDB();
    case 'DELETE':
      return await deleteDataFromDynamo();

    default:
      return {
        statusCode: 400,
        body: JSON.stringify('Invalid HTTP method')
      };
  }
};
Prerequisites
Implementation with Built-In Constructs

// Create first Lambda function
const lambdaFunctionOne = new lambda.Function(this,
'TutorialsDojoLambdaFunctionOne', {
  runtime: lambda.Runtime.NODEJS_18_X,
  handler: 'index.handler',
  code: lambda.Code.fromAsset('lambda/getLambda'),
  environment: {
    DYNAMO_TABLE_NAME: dynamoTable.tableName,
  }
});

// Create second Lambda function
const lambdaFunctionTwo = new lambda.Function(this,
'TutorialsDojoLambdaFunctionTwo', {
  runtime: lambda.Runtime.NODEJS_18_X,
  handler: 'index.handler',
  code: lambda.Code.fromAsset('lambda/postLambda'),
  environment: {
    DYNAMO_TABLE_NAME: dynamoTable.tableName,
  }
});

// Create third Lambda function
const lambdaFunctionThree = new lambda.Function(this,
'TutorialsDojoLambdaFunctionThree', {
  runtime: lambda.Runtime.NODEJS_18_X,
  handler: 'index.handler',
  code: lambda.Code.fromAsset('lambda/deleteLambda'),
  environment: {
    DYNAMO_TABLE_NAME: dynamoTable.tableName,
  }
});

const AWS = require('aws-sdk');
const dynamodb = new AWS.DynamoDB.DocumentClient();
const tableName = process.env.DYNAMO_TABLE_NAME;

exports.handler = async (event) => {
  return await readAllFromDynamoDB();
};

const readAllFromDynamoDB = async () => {
  const params = {
    TableName: tableName
  };

  try {
    const result = await dynamodb.scan(params).promise();

    const body = {
      success: true,
      message: 'Successfully read all items',
      data: result.Items
    }
    return {
      statusCode: 200,
      body: JSON.stringify(body)
    };
  } catch (error) {
    return {
      statusCode: 500,
      body: JSON.stringify(error.message)
    };
  }
};
const AWS = require('aws-sdk');
const dynamodb = new AWS.DynamoDB.DocumentClient();
const tableName = process.env.DYNAMO_TABLE_NAME;

exports.handler = async (event) => {
  const item = JSON.parse(event.body);
  return await writeToDynamoDB(item);
};

const writeToDynamoDB = async (item) => {
  const params = {
    TableName: tableName,
    Item: item
  };

  try {
    await dynamodb.put(params).promise();

    const body = {
      success: true,
      message: 'Successfully wrote item',
    }

    return {
      statusCode: 200,
      body: JSON.stringify(body)
    };
  } catch (error) {
    return {
      statusCode: 500,
      body: JSON.stringify(error.message)
    };
  }
};
const AWS = require('aws-sdk');
const dynamodb = new AWS.DynamoDB.DocumentClient();
const tableName = process.env.DYNAMO_TABLE_NAME;

exports.handler = async (event) => {
  const item = JSON.parse(event.body);
  return await deleteFromDynamoDB(item);
};

const deleteFromDynamoDB = async (item) => {
  const params = {
    TableName: tableName,
    Key: {
      'id': item.id
    },
    ReturnValues: 'ALL_OLD'
  };

  try {
    const result = await dynamodb.delete(params).promise();

    const body = {
      success: true,
      message: 'Successfully deleted item',
      deletedItem: result.Attributes
    };

    return {
      statusCode: 200,
      body: JSON.stringify(body)
    };
  } catch (error) {
    return {
      statusCode: 500,
      body: JSON.stringify(error.message)
    };
  }
};
// Grant each Lambda function read/write permissions to the DynamoDB table
dynamoTable.grantReadWriteData(lambdaFunctionOne);
dynamoTable.grantReadWriteData(lambdaFunctionTwo);
dynamoTable.grantReadWriteData(lambdaFunctionThree);
// Add the Lambda layer to the Lambda function
lambdaFunctionOne.addLayers(lambdaLayer);
lambdaFunctionTwo.addLayers(lambdaLayer);
lambdaFunctionThree.addLayers(lambdaLayer);
// Integrate each Lambda function to the API Gateway
const lambdaOneIntegration = new api.LambdaIntegration(lambdaFunctionOne);
const lambdaTwoIntegration = new api.LambdaIntegration(lambdaFunctionTwo);
const lambdaThreeIntegration = new api.LambdaIntegration(lambdaFunctionThree);
// Create the sample resource under the API Gateway
const sampleResource = apiGateway.root.addResource("sample");
// Add the GET, POST, and DELETE methods to the sample resource
sampleResource.addMethod("GET", lambdaOneIntegration);
sampleResource.addMethod("POST", lambdaTwoIntegration);
sampleResource.addMethod("DELETE", lambdaThreeIntegration);

Implementation with Custom Constructs

interface TDLambdaApiIntegrationProps {
  dynamoDBTable: dynamodb.Table;
  resource: api.Resource;
  sourceCodePath: string;
  lambdaLayer?: lambda.LayerVersion;
  method: string;
}
export class TDLambdaApiIntegration extends Construct {
  constructor(scope: Construct, id: string, props: TDLambdaApiIntegrationProps) {
    super(scope, id);

    // Create a Lambda function
    const lambdaFunction = new lambda.Function(this,
'TutorialsDojoLambdaFunction', {
      runtime: lambda.Runtime.NODEJS_18_X,
      handler: 'index.handler',
      code: lambda.Code.fromAsset(props.sourceCodePath),
      environment: {
        DYNAMO_TABLE_NAME: props.dynamoDBTable.tableName,
      },
    });

    // Grant Lambda function read/write permissions to the DynamoDB table
    props.dynamoDBTable.grantReadWriteData(lambdaFunction);

    // Add Lambda Layer
    if (props.lambdaLayer) {
      lambdaFunction.addLayers(props.lambdaLayer);
    }

    // Create Lambda Integration
    const lambdaIntegration = new api.LambdaIntegration(lambdaFunction);

    // Create API Gateway Method
    props.resource.addMethod(props.method, lambdaIntegration);
  }
}

import { TDLambdaApiIntegration } from
 "../constructs/TDLambdaApiIntegration";
// Create the Lambda API Integration
new TDLambdaApiIntegration(this, "TutorialsDojoLambdaApiIntegration", {
	dynamoDBTable: dynamoTable,
	resource: sampleResource,
	sourceCodePath: "lambda/getLambda",
	lambdaLayer: lambdaLayer,
	method: "GET",
});
});
// Create the Lambda API Integration
new TDLambdaApiIntegration(this, "TutorialsDojoLambdaApiIntegration", {
	dynamoDBTable: dynamoTable,
	resource: sampleResource,
	sourceCodePath: "lambda/getLambda",
	lambdaLayer: lambdaLayer,
	method: "GET",
});

new TDLambdaApiIntegration(this, "TutorialsDojoLambdaApiIntegration2", {
	dynamoDBTable: dynamoTable,
	resource: sampleResource,
	sourceCodePath: "lambda/postLambda",
	lambdaLayer: lambdaLayer,
	method: "POST",
});

new TDLambdaApiIntegration(this, "TutorialsDojoLambdaApiIntegration3", {
	dynamoDBTable: dynamoTable,
	resource: sampleResource,
	sourceCodePath: "lambda/deleteLambda",
	lambdaLayer: lambdaLayer,
	method: "DELETE",
});
Deployment of the CDK Application

tsc
cdk deploy
Testing the Serverless REST API
Prerequisites

Testing


Final Remarks
References:
🤖 $3.49 eBooks Start Here – Get Up to 30% OFF All AI & Machine Learning Reviewers

Turn Your Team Into Cloud-Ready Professionals Today

Learn AWS with our PlayCloud Hands-On Labs

$2.99 AWS and Azure Exam Study Guide eBooks

New Claude Certified Architect Foundations CCA-F

Learn GCP By Doing! Try Our GCP PlayCloud

Learn Azure with our Azure PlayCloud

FREE AI and AWS Digital Courses

FREE AWS, Azure, GCP Practice Test Samplers


Subscribe to our YouTube Channel

Follow Us On Linkedin


Iggy is a DevOps engineer in the Philippines with a niche in cloud-native applications in AWS. He possesses extensive skills in developing full-stack solutions for both web and mobile platforms. His area of expertise lies in implementing serverless architectures in AWS. Outside of work, he enjoys playing basketball and competitive gaming.


