Last updated on November 6, 2024
Here are 10 Google Certified Associate Cloud Engineer (ACE) practice exam questions to help you gauge your readiness for the actual exam.
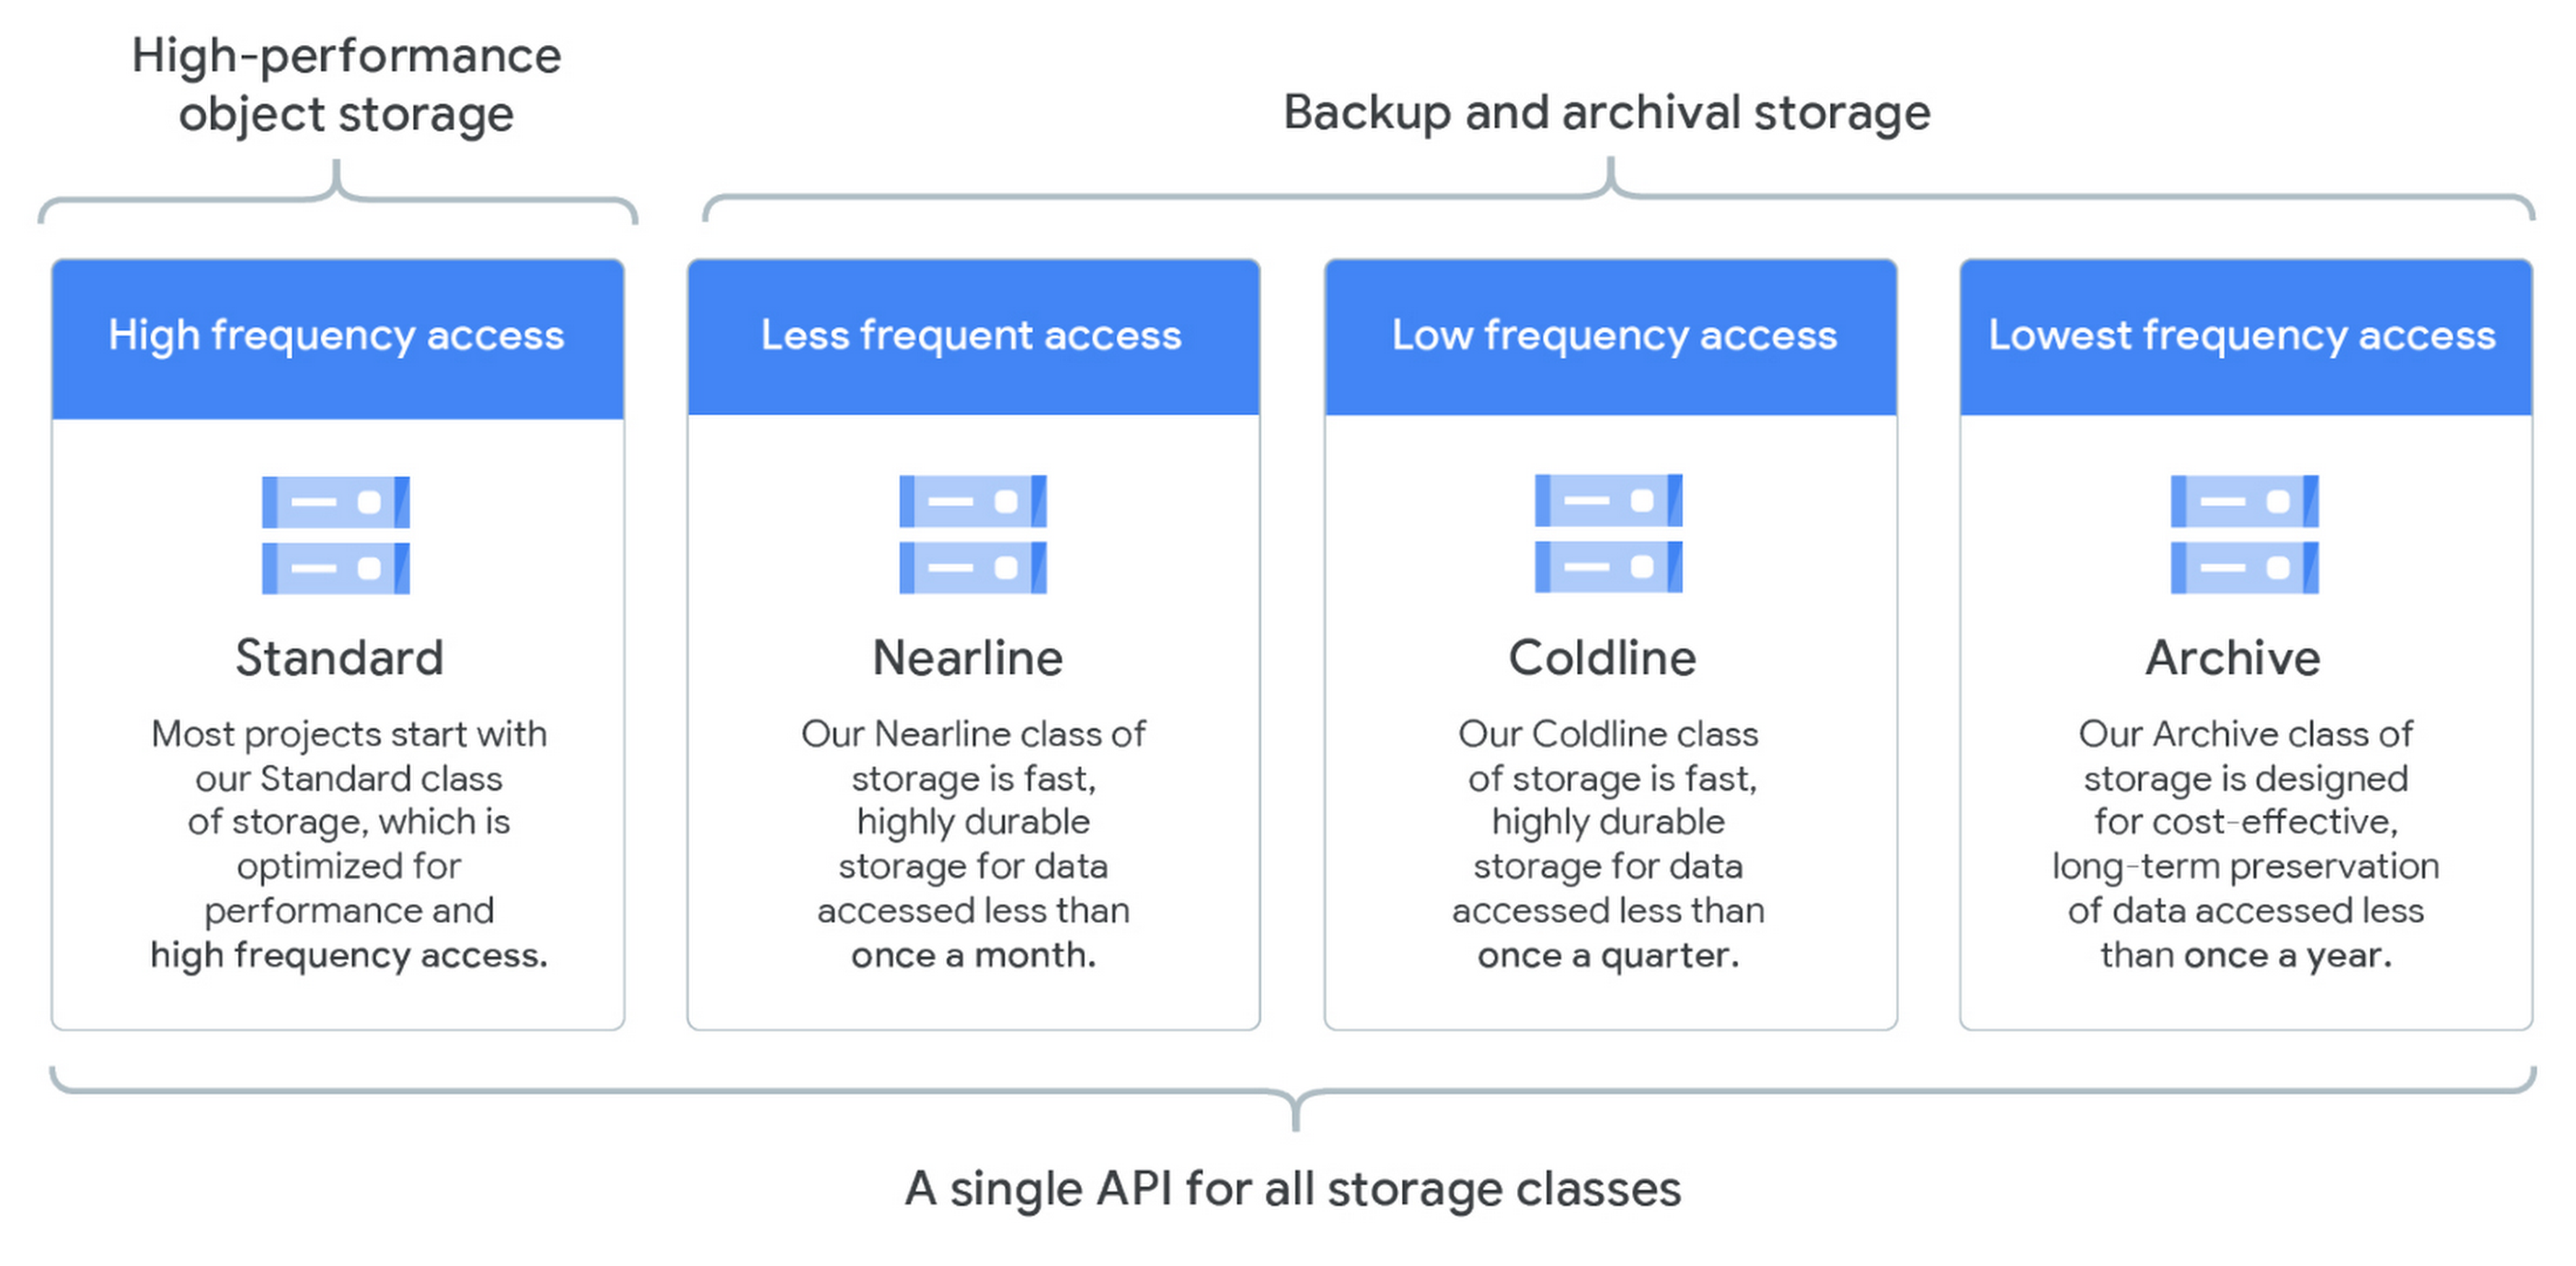
Question 1
Your company’s finance team needs to back up data on a Cloud Storage bucket for disaster recovery purposes. You want to comply with Google’s recommended practices in implementing the solution for this task.
Which storage class do you think would be the best option?
- Multi-Regional Storage
- Nearline Storage
- Coldline Storage
- Archive Storage
Correct Answer: 4
There are three Google-recommended storage classes for archiving data in Cloud Storage. Nearline, Coldline, and Archive offer ultra-low-cost, highly-durable, highly available archival storage. For data accessed less than once a year, Archive is a cost-effective storage option for the long-term preservation of data. Coldline is also ideal for cold storage—data your business expects to touch less than once a quarter. For warmer storage, choose Nearline: data you expect to access less than once a month, but possibly multiple times throughout the year.
Archive Storage is the lowest-cost, highly durable storage service for data archiving, online backup, and disaster recovery. Unlike the “coldest” storage services offered by other Cloud providers, your data is available within milliseconds, not hours or days.
Unlike other Cloud Storage storage classes, Archive Storage has no availability SLA, though the typical availability is comparable to Nearline Storage and Coldline Storage. Archive Storage also has higher costs for data access and operations, as well as a 365-day minimum storage duration. Archive Storage is the best choice for data that you plan to access less than once a year. For example:
Cold data storage – Archived data, such as data stored for legal or regulatory reasons, can be stored at low cost as Archive Storage, yet still be available if you need it.
Disaster recovery – In the event of a disaster recovery event, recovery time is key. Cloud Storage provides low latency access to data stored as Archive Storage.
In the scenario, you were asked to identify which among the storage classes is the best option to store disaster recovery data. This means that we are more concerned about lowering the cost of storing data into the storage rather than the frequency of your access to the bucket. For disaster recovery, the data stored in the bucket is rarely used and is only accessed when an outage occurred. Cloud Storage also offers geo-redundancy where you can store your data in a multi-region or dual-region setup.
Hence, the correct answer is: Archive Storage.
Multi-Regional Storage is incorrect because this type is just like the Standard Storage class which is more suitable for frequently accessed data. This storage class is not suitable for disaster recovery due to its high cost. The Archive Storage class is a better option as it can provide a reliable, durable, and fast recovery time at a fraction of the cost.
Coldline Storage is incorrect. While this storage class is also low-cost, it is only good for storing data that is accessed less than once a quarter. This used to be Google’s recommended way to store cold data until Archive Storage was released to the public.
Nearline Storage is incorrect since this storage class is suitable for storing warmer data that is accessed less than once a month. Picking this option will be the most expensive choice among the other storage classes provided.
References:
https://cloud.google.com/storage/docs/storage-classes#archive
https://cloud.google.com/storage/archival
https://cloud.google.com/storage/docs/locations
Check out these Google Cloud Storage Services Cheat Sheets:
https://tutorialsdojo.com/google-cloud-platform-gcp-storage-services/
Question 2
All employees in your organization have a Google account. Your operations team needs to manage over a hundred Compute Engine instances. The members of this team must be provided only with administrative access to the VM instances. Moreover, the security team wants to audit instance logins and ensure that the provision of credentials is operationally efficient.
What should you do?
- Create a new SSH key pair. Issue the private key to each member of the team. Configure the public key in the metadata of each instance.
- Require each member of the team to generate a new SSH key pair. Have them send their public key to you. Utilize a configuration management tool to deploy those SSH keys on each instance.
- Require each member of the team to generate a new SSH key pair and to add the public key to their respective Google account. Then grant the
compute.osAdminLoginrole to the corresponding Google group of the operations team. - Create a new SSH key pair. Issue the private key to each member of the operations team. Configure the public key as a project-wide public SSH key in your project. Lastly, allow project-wide public SSH keys on each instance.
Correct Answer: 3
If you need to manage user access to your Linux VM instances, you can use one of the following methods:
– OS Login
– Managing SSH keys in metadata
– Temporarily grant a user access to an instance
In most scenarios, Google recommends using OS Login. The OS Login feature lets you use Compute Engine IAM roles to manage SSH access to Linux instances. You can add an extra layer of security by setting up OS Login with two-factor authentication and manage access at the organization level by setting up organization policies.

After you enable OS Login on one or more instances in your project, those instances accept connections only from user accounts that have the necessary IAM roles in your project or organization. There are two predefined roles that you can utilize.
– roles/compute.osLogin, which does not grant administrator permissions
– roles/compute.osAdminLogin, which grants administrator permissions
OS Login lets you use Compute Engine IAM roles to efficiently manage SSH access to Linux instances and is an alternative to manually managing instance access by adding and removing SSH keys in the metadata.
To manage instance access using IAM roles, you must enable the OS Login feature by setting a metadata key-value pair in your project or in your instance’s metadata: enable-oslogin=TRUE.

After you enable OS Login on one or more instances in your project, those VMs accept connections only from user accounts that have the necessary IAM roles in your project or organization.
Therefore, the correct answer is: Require each member of the team to generate a new SSH key pair and to add the public key to their respective Google account. Then grant the compute.osAdminLogin role to the corresponding Google group of the operations team.
The option that says: Create a new SSH key pair. Issue the private key to each member of the team. Configure the public key in the metadata of each instance is incorrect because reusing a single SSH key pair with all employees is a poor security practice as auditing instance login for each user becomes impossible.
The option that says: Require each member of the team to generate a new SSH key pair. Have them send their public key to you. Utilize a configuration management tool to deploy those SSH keys on each instance is incorrect because this approach is not operationally efficient. Doing this would mean that you will have to add SSH keys to each instance whenever there is a new member. Similarly, you will have to remove the SSH keys on each instance whenever you want to remove their access.
The option that says: Create a new SSH key pair. Issue the private key to each member of the operations team. Configure the public key as a project-wide public SSH key in your project. Lastly, allow project-wide public SSH keys on each instance is incorrect because reusing a single SSH key pair with all employees is not a good security practice. Auditing instance login is difficult in this approach.
References:
https://cloud.google.com/compute/docs/instances/access-overview
https://cloud.google.com/compute/docs/instances/managing-instance-access
Check out this Google Compute Engine Cheat Sheet:
https://tutorialsdojo.com/google-compute-engine-gce/
Question 3
Your team manager wants you to configure a group of autohealing Compute Engine instances that run on multiple zones for network load balancing. You want to accomplish this task with the least amount of steps possible.
You have to ensure that all the Compute Engine instances are automatically recreated if they are unresponsive after three attempts with a 10-second interval.
What should you do?
- Provision an HTTP load balancer that references its backend to an existing instance group. Configure the health check to healthy (HTTP).
- Build a managed instance group. Set the Autohealing health check to healthy (HTTP).
- Provision an HTTP load balancer that references its backend to an existing instance group. Specify a balancing mode and set the maximum RPS (request per second) to 10.
- Build a managed instance group. Activate the autoscaling setting.
Correct Answer: 2
Managed instance groups (MIGs) maintain high availability of your applications by proactively keeping your virtual machine (VM) instances available, which means in RUNNING state. If a managed instance stops running, but the change of state was not initiated by the MIG, then the MIG automatically recreates that instance. On the other hand, if the MIG intentionally stops an instance from RUNNING—for example, when an autoscaler deletes an instance—then the MIG doesn’t recreate that instance.

However, relying on an instance’s state to determine application health might not be sufficient. For example, a check for whether an instance is RUNNING does not detect application failures, such as freezing, overloading, or crashing.
To further improve the availability of your application and to verify that your application is responding, you can configure an autohealing policy for your MIG.
Hence, the correct answer is: Build a managed instance group. Set the Autohealing health check to healthy (HTTP).
The option that says: Build a managed instance group. Activate the autoscaling setting is incorrect because activating autoscaling only helps you in adding and removing instances from the instance group. It does not help you recreate instances.
The option that says: Provision an HTTP load balancer that references its backend to an existing instance group. Configure the health check to healthy (HTTP) is incorrect because this just determines whether the backend instances are responding to traffic properly. This does not recreate instances when they are unresponsive.
The option that says: Provision an HTTP load balancer that references its backend to an existing instance group. Specify a balancing mode and set the maximum RPS to 10 is incorrect because specifying RPS only sets how many connections shall the load balancer handle every second. This does not help create autohealing instances.
References:
https://cloud.google.com/compute/docs/instance-groups/autohealing-instances-in-migs
https://cloud.google.com/compute/docs/instance-groups#managed_instance_groups
Tutorials Dojo’s GCP Associate Cloud Engineer Exam Study Guide:
https://tutorialsdojo.com/gcp-associate-cloud-engineer-exam-study-guide/
Question 4
In your organization, employees pay for their Google Cloud Platform projects using their personal credit cards, which will be refunded by the finance team at the end of each month. Your management team decided to centralize all projects under a new single billing account.
What should you do?
- Using the GCP Console, create a new billing account and set up a payment method. Afterward, associate all of the projects in this newly created billing account.
- Create a support ticket with Google Support and be ready for their call when they ask to share the corporate credit card details over the phone.
- Send an email to cloud-billing@google.com detailing your bank account information. Afterward, request a corporate billing account for your organization.
- In the GCP Console, navigate to the Resource Manage section and move all projects to the root Organization.
Correct Answer: 4
Google recommends the creation of one central Cloud Billing account that lives in your Organization. For most customers, adding additional billing accounts creates unneeded extra overhead, making them more difficult to track and manage.
Once a Google Cloud Organization resource has been created for your domain, you can move your existing projects into the organization.
The link between projects and billing accounts is preserved, irrespective of the hierarchy. When you move your existing projects into the organization they will continue to work and be billed as they used to before the migration, even if the corresponding billing account has not been migrated yet. Similarly, if you move a billing account into the organization, all projects linked to it will continue to work even if they are still outside of the organization.

You may need multiple Cloud Billing accounts if you have any of these requirements:
– You need to split charges for legal or accounting reasons.
– You need to pay in multiple currencies.
Hence, the correct answer is: In the GCP Console, navigate to the Resource Manage section and move all projects to the root Organization because this option puts all projects in a hierarchy where you can centrally apply a single billing account on the root organization.
The option that says: Create a support ticket with Google Support and be ready for their call when they ask to share the corporate credit card details over the phone is incorrect because setting up billing for your organization can be performed by your organization via the GCP console instead of creating a support ticket. It is also a security risk to share your corporate credit card details over the phone. Thus, this method is not recommended.
The option that says: Send an email to cloud-billing@google.com detailing your bank account information. Afterward, request a corporate billing account for your organization is incorrect because setting up a billing account can be done in the GCP console. After setting up the billing account, you can also set the payments profile to store your debit/credit card information.
The option that says: Using the GCP Console, create a new billing account, and set up a payment method. Afterward, associate all of the projects in this newly created billing account is incorrect because this just creates a new billing account. Moreover, it is best practice to move all projects into an organization and set up a billing account on the root organization.
References:
https://cloud.google.com/billing/docs/onboarding-checklist#cloud-billing-accounts
https://cloud.google.com/resource-manager/docs/migrating-projects-billing#top_of_page
Check out this Google Cloud Billing Cheat Sheet:
https://tutorialsdojo.com/google-cloud-billing/
Question 5
Your DevOps team plans to provision a Jenkins server for their project on the Google Cloud Platform. The server needs to be deployed quickly, so the group decided to minimize the number of steps necessary to accomplish this task.
What should you do?
- Download the Jenkins Java WAR file and deploy it to App Engine Standard.
- Build a new Compute Engine instance and install Jenkins through the Google Cloud Shell command-line interface.
- Provision a Kubernetes cluster on Compute Engine and build a deployment using the Jenkins Docker image.
- Utilize the GCP Marketplace to launch the Jenkins server.
Correct Answer: 4
Google Cloud Marketplace lets you quickly deploy functional software packages that run on Google Cloud. Even if you are unfamiliar with services like Compute Engine or Cloud Storage, you can start up a familiar software package without having to manually configure the software, virtual machine (VM) instances, storage, or network settings. You can deploy a software package now, and scale that deployment later when your apps require additional capacity.

Hence, the correct answer is: Utilize the GCP Marketplace to launch the Jenkins server.
The option that says: Download the Jenkins Java WAR file and deploy it to App Engine Standard is incorrect because you will need to download the java WAR file, enable App Engine, and run gcloud app deploy to provision a Jenkins server. While this is possible, this involves more steps to accomplish than just launching the software via GCP Marketplace.
The option that says: Build a new Compute Engine instance and install Jenkins through the Google Cloud Shell command-line interface is incorrect because you will have to spin up a Compute Engine instance and then install Jenkins on the VM you provisioned. This makes it more complicated than just setting it up through the Google Cloud Marketplace.
The option that says: Provision a Kubernetes cluster on Compute Engine and build a deployment using the Jenkins Docker image is incorrect because you will have to create a cluster first, and build a deployment file based on Docker image before deploying it to the cluster. This process does not help you deploy a Jenkin server quickly.
References:
https://cloud.google.com/marketplace/docs
https://cloud.google.com/jenkins
Check out this Google Compute Engine Cheat Sheet:
https://tutorialsdojo.com/google-compute-engine-gce/
Question 6
You are working for a finance company and are assigned to configure a relational database solution on Google Cloud Platform to support a small set of operational data in a particular geographical location. Your company requires the database to be highly reliable and supports point-in-time recovery while minimizing operating costs.
What should you do?
- Choose Cloud SQL (MySQL) and verify that the enable binary logging option is selected.
- Choose Cloud SQL (MySQL) and select the create failover replicas option.
- Choose Cloud Spanner and configure your instance with 2 nodes.
- Choose Cloud Spanner and set up your instance as multi-regional.
Correct Answer: 1
Cloud SQL for MySQL is a fully-managed database service that helps you set up, maintain, manage, and administer your MySQL relational databases on Google Cloud Platform.
If you use Cloud SQL, the fully managed Google Cloud MySQL database, you should enable automated backups and binary logging for your Cloud SQL instances. This allows you to perform a point-in-time recovery, which restores your database from a backup and recovers it to a fresh Cloud SQL instance.

In Cloud SQL, point-in-time recovery (PITR) uses binary logs. These logs update regularly and use storage space. The binary logs are automatically deleted with their associated automatic backup, which generally happens after about 7 days. If the size of your binary logs is causing an issue for your instance, you can increase the instance storage size, but the binary log size increase in disk usage might be temporary. To avoid unexpected storage issues, it is recommended to enable automatic storage increases when using PITR.
Cloud Spanner is a fully managed, mission-critical, relational database service that offers transactional consistency at a global scale, schemas, SQL (ANSI 2011 with extensions), and automatic, synchronous replication for high availability.
Hence, the correct answer is: Choose Cloud SQL (MySQL) and verify that the enable binary logging option is selected.
The option that says: Choose Cloud SQL (MySQL) and select the create failover replicas is incorrect because this just helps in creating a standby instance that serves data when the primary instance fails. You have to enable the binary logging option to enable point-in-time recovery.
The option that says: Choose Cloud Spanner and configure your instance with 2 nodes is incorrect because this is expensive and does not support point-in-time recovery. Cloud Spanner is most suitable for serving data in multiple geographic locations.
The option that says: Choose Cloud Spanner and set up your instance as multi-regional is incorrect because this is not a cost-effective solution when compared to using Cloud SQL. Moreover, Cloud Spanner does not support point-in-time recovery.
References:
https://cloud.google.com/sql/docs/
https://cloud.google.com/sql/docs/mysql/backup-recovery/pitr
Check out this Google Cloud SQL Cheat Sheet:
https://tutorialsdojo.com/google-cloud-sql/
Question 7
You have deployed a standalone application in a Compute Engine VM hosted in a private VPC. You want the application to be accessed through angat.tutorialsdojo.com URL within its VPC. You also don’t want the IP address to change in case the VM reboots or has recovered from a crash. You want to deploy a solution with minimal cost and setup. What should you do?
- Deploy a DNS Server from Google Cloud Marketplace. Configure the VM IP address to resolve to
angat.tutorialsdojo.com. - Reserve a static internal IP address for the VM. Create a private zone on Cloud DNS with
tutorialsdojo.comas DNS. Configure the static internal IP address to resolve toangat.tutorialsdojo.comusing the record set. - Reserve a static internal IP address for the VM. Create a public zone on Cloud DNS with
tutorialsdojo.comas DNS. Configure the static internal IP address to resolve toangat.tutorialsdojo.comusing the record set. - Configure the DNS route using Cloud DNS. Monitor the VM status using Google Cloud’s operations suite. Modify the Cloud DNS record set if there are changes from the VM IP Address.
Correct Answer: 2
Cloud DNS is a high-performance, resilient, global Domain Name System (DNS) service that publishes your domain names to the global DNS in a cost-effective way.
DNS is a hierarchical distributed database that lets you store IP addresses and other data and look them up by name. Cloud DNS lets you publish your zones and records in DNS without the burden of managing your own DNS servers and software.
Cloud DNS offers both public zones and private managed DNS zones. A public zone is visible to the public internet, while a private zone is visible only from one or more Virtual Private Cloud (VPC) networks that you specify.

A resource record set is a collection of DNS records with the same label, class, and type but with different data. Resource record sets hold the current state of the DNS records that make up a managed zone.
You can add or remove DNS records in a record set by creating and executing a transaction that specifies the operations that you want to perform. A transaction is a group of one or more record changes that must be propagated together. The entire transaction either succeeds or fails, so your data is never left in an intermediate state.

If a virtual machine (VM) instance requires a fixed internal IP address that does not change, you can obtain a static internal IP address for that VM using one of the following options:
-Reserve a new static internal IP address and then assign the address when creating the VM.
-Promote an existing ephemeral internal IP address to become a static internal IP address.
Google Cloud’s operations suite (formerly Stackdriver) is used for integrated monitoring, logging, and trace-managed services for applications and systems running on Google Cloud and other sources. It includes the following services:

-Cloud Logging
-Cloud Monitoring
-Managed Service for Prometheus
-Application Performance Management
Hence, the correct answer is: Reserve a static internal IP address for the VM. Create a private zone on Cloud DNS with tutorialsdojo.com as DNS. Configure the static internal IP address to resolve to angat.tutorialsdojo.com using the record set.
The option that says: Deploy a DNS Server from Google Cloud Marketplace. Configure the VM IP address to resolve to tutorialsdojo.com is incorrect because it will take extra steps and management to spin up the VM for the DNS server and configure the DNS policy. It also doesn’t address the requirement of the VM to have a non-changing IP address.
The option that says: Reserve a static internal IP address for the VM. Create a public zone on Cloud DNS with tutorialsdojo.com as DNS. Configure the static internal IP address to resolve to angat.tutorialsdojo.com using the record set is incorrect because creating a public zone will expose the VM to the public internet. A private zone should be created instead.
The option that says: Configure the DNS route using Cloud DNS. Monitor the VM status using Google Cloud’s operations suite. Modify the Cloud DNS record set if there are changes from the VM IP Address is incorrect. Although you can use Cloud Monitoring from Google Cloud’s operations suite to monitor the VM, you still have to configure the IP address from the record set manually. It also doesn’t address the requirement of the VM to have a non-changing IP address.
References:
https://cloud.google.com/dns/docs/zones
https://cloud.google.com/dns/docs/records
https://cloud.google.com/compute/docs/ip-addresses/reserve-static-internal-ip-address
https://cloud.google.com/products/operations
Check out this Google Cloud Cheat Sheet:
https://tutorialsdojo.com/google-cloud-platform-gcp-cheat-sheets/
Question 8
Your company is planning to launch a web application to App Engine. It is crucial that your application can dynamically scale up and down based on the request rate. Moreover, you want to ensure that you have at least 3 unoccupied VMs at all times.
How should you configure your App Engine to support these scaling requirements?
- Configure Basic Scaling setting with
min_instancesset to 3. - Configure Basic Scaling setting with
max_instancesset to 3. - Set Automatic Scaling settings with
min_idle_instancesset to 3. - Set Manual Scaling settings to 3 instances.
Correct Answer: 3
Automatic scaling creates instances based on request rate, response latencies, and other application metrics. You can specify thresholds for each of these metrics, as well as a minimum number of instances to keep running at all times.
App Engine calculates the number of instances necessary to serve your current application traffic based on scaling settings such as target_cpu_utilization and target_throughput_utilization. Setting the min_idle_instances element specifies the number of instances to run in addition to this calculated number. For example, if App Engine calculates that 5 instances are necessary to serve traffic, and min_idle_instances is set to 2, App Engine will run 7 instances (5, calculated based on traffic, plus 2 additional per min_idle_instances).

Note that you are charged for the number of instances specified whether they are receiving traffic or not. This setting only applies to the version that receives most of the traffic. Keep the following in mind:
– A low minimum helps keep your running costs down during idle periods but means that fewer instances might be immediately available to respond to a sudden load spike.
– A high minimum allows you to prime the application for rapid spikes in request load. App Engine keeps the minimum number of instances running to serve incoming requests. You are charged for the number of instances specified, whether or not they are handling requests.
If you set a minimum number of idle instances, pending latency will have less effect on your application’s performance.
Hence, the correct answer is: Set Automatic Scaling settings with min_idle_instances set to 3.
The option that says: Set Manual Scaling settings to 3 instances is incorrect because it only allows you to specify the number of instances to run regardless of the load level. This will not dynamically scale your compute resources based on the request rate.
The option that says: Configure Basic Scaling setting with min_instances set to 3 is incorrect because the Basic Scaling setting simply shuts down instances if the application becomes idle and does not scale based on request rate. This is useful for applications that are intermittent and is driven by user activity, but not for this scenario.
The option that says: Configure Basic Scaling setting with max_instances set to 3 is incorrect because this type of scaling just shuts down idle instances and is more suitable only when working with applications that are driven by user activity.
References:
https://cloud.google.com/appengine/docs/standard/python/how-instances-are-managed
https://cloud.google.com/appengine/docs/standard/python/config/appref
Check out this Google App Engine Cheat Sheet:
https://tutorialsdojo.com/google-app-engine/
Question 9
You created a Dockerfile, and you plan to deploy it on Google Kubernetes Engine (GKE).
What should you do?
- Run kubectl app deploy
dockerfilenameon Cloud Console. - Run gcloud app deploy
dockerfilenameon Cloud Console. - Build a Docker image using the Dockerfile and upload it to the Google Artifact Registry (AR). Create a Deployment YAML file to point to the image you just uploaded on the Artifact Registry. Utilize the
kubectlcommand to create the deployment using the YAML file. - Build a docker image using the Dockerfile and upload it to Cloud Storage. Then, create a Deployment YAML file to point to the image you uploaded on Cloud Storage. Utilize the
kubectlcommand to create the deployment using the YAML file.
Correct Answer: 3
Kubernetes represents applications as Pods, which are scalable units holding one or more containers. The Pod is the smallest deployable unit in Kubernetes. Usually, you deploy Pods as a set of replicas that can be scaled and distributed together across your cluster. One way to deploy a set of replicas is through a Kubernetes Deployment.

To deploy an application on Kubernetes once you have a dockerfile, you need to do the following:
1. Build an image using the Dockerfile you created.
2. Push the image to the Artifact Registry.
3. Create a deployment YAML file referencing the image you pushed on the artifact registry.
4. Deploy the application using kubectl command. (Assuming the Kubernetes cluster was created ahead).
Hence, the correct answer is: Build a Docker image using the Dockerfile and upload it to the Google Artifact Registry (AR). Create a Deployment YAML file to point to the image you just uploaded on the Artifact Registry. Utilize the kubectl command to create the deployment using the YAML file.
The option that says: Build a docker image using the Dockerfile and upload it to Cloud Storage. Then, create a Deployment YAML file to point to the image you uploaded in Cloud Storage. Utilize the kubectl command to create the deployment using the YAML file is incorrect because it is not recommended to upload Docker images on Cloud Storage if you are using the Google Kubernetes Engine (GKE) service. You have to push the Docker images to docker repositories like Google Artifact Registry (AR) or Dockerhub.
The option that says: Run kubectl app deploy <dockerfilename> on the Cloud Console is incorrect because you can’t deploy a dockerfile directly to Kubernetes. You need to build an image first and store it in a docker repository like Google Artifact Registry where you can reference the image.
The option that says: Run the gcloud app deploy <dockerfilename> on the Cloud Console is incorrect because the gcloud app deploy command is only used for deploying an application to App Engine and not to Kubernetes Engine.
References:
https://cloud.google.com/community/tutorials/gke-quickstart
https://cloud.google.com/cloud-build/docs/building/store-build-artifacts#store-artifact-registrhttps://cloud.google.com/kubernetes-engine
Check out this Google Container Registry Cheat Sheet:
Question 10
You are assigned to set up a storage policy on a specific Cloud Storage Regional bucket that stores CCTV videos for your company. The files must be moved to Coldline storage after 3 months (90 days) and then automatically be deleted after a year from their creation date.
What policy should you set up?
- Specify Object Lifecycle Management conditions on the Cloud Storage bucket then configure the
SetStorageClassaction to 90 days and configure theDeleteaction to 275 days. - Specify Object Lifecycle Management conditions on the Cloud Storage bucket then configure the
SetStorageClassaction to 90 days and configure theDeleteaction to 365 days. - Utilize the
gsutiltool on Cloud Shell and execute thegsutil rewritecommand then set theDeleteaction to 275 days. - Utilize the
gsutiltool on Cloud Shell and execute thegsutil rewritecommand then set theDeleteaction to 365 days.
Correct Answer: 2
You can assign a lifecycle management configuration to a bucket. The configuration contains a set of rules which apply to current and future objects in the bucket. When an object meets the criteria of one of the rules, Cloud Storage automatically performs a specified action on the object.
The SetStorageClass action that switches the object to the storage class with the lowest at-rest storage pricing takes precedence.
The Delete action deletes an object when the object meets all conditions specified in the lifecycle rule.
The Age condition is satisfied when an object reaches the specified age (in days). Age is measured from the object’s creation time.

The Object Lifecycle Management does not rewrite objects inside a bucket. This means that when objects are transitioned to a different storage class, the basis for deletion and succeeding charges will be solely based on the original creation time of the object. This means that when we set the Age condition for setting SetStorageClass action, we don’t need to subtract the time difference when the object was created and when the object was transitioned to another storage class.
Hence, the correct answer is: Specify Object Lifecycle Management conditions on the Cloud Storage bucket then configure the SetStorageClass action to 90 days and configure the Delete action to 365 days.
The option that says: Specify Object Lifecycle Management conditions on the Cloud Storage bucket then configure the SetStorageClass action to 90 days and configure the Delete action to 275 days is incorrect. The Object Lifecycle Management does not rewrite the objects in the bucket. This means that when the objects are transitioned to a different storage class, the basis for succeeding charges and deletion is the object’s original creation time. Therefore, you have to set the Delete action to 365 days and not 275.
The option that says: Utilize the gsutil tool on Cloud Shell and execute the gsutil rewrite command then set the Delete action to 275 days is incorrect because this command can only overwrite the objects in the bucket and change the bucket’s storage class. This command does not support the automated delete action required in the scenario.
The option that says: Utilize the gsutil tool on Cloud Shell and execute the gsutil rewrite command then set the Delete action to 365 days is incorrect because this can only change the storage class of the buckets by overwriting the objects. Keep in mind that the gsutil rewrite command does not support delete action in Cloud Storage.
References:
https://cloud.google.com/storage/docs/lifecycle
https://cloud.google.com/storage/docs/gsutil/commands/rewrite
Check out this Google Cloud Storage Cheat Sheet:
https://tutorialsdojo.com/google-cloud-storage-gcs/
For more practice questions like these and to further prepare you for the actual Google Certified Associate Cloud Engineer (ACE) exam, we recommend that you take our top-notch Google Certified Associate Cloud Engineer Practice Exams, which have been regarded as the best in the market.
Also, check out our Google Certified Associate Cloud Engineer Exam Study Guide here.
🔥 43% OFF AWS & Azure Pro-Level Reviewers

Turn Your Team Into Cloud-Ready Professionals Today

Learn AWS with our PlayCloud Hands-On Labs

$2.99 AWS and Azure Exam Study Guide eBooks

New Claude Certified Architect Foundations CCA-F

Learn GCP By Doing! Try Our GCP PlayCloud

Learn Azure with our Azure PlayCloud

FREE AI and AWS Digital Courses

FREE AWS, Azure, GCP Practice Test Samplers


Subscribe to our YouTube Channel

Follow Us On Linkedin


