Last updated on January 7, 2026
Wanna start your first ML Ops Project? How about we start with Amazon SageMaker AI and Terraform?
As SageMaker AI became popular throughout the years in the realm of AI and Cloud Computing, the number one challenge to it is how will you provision it. This is without costing you too much or risking yourself getting charged for unwanted or unused resources.
Hence, in this post, this will offer you an entry point as an aspiring cloud data scientist to successfully launch your SageMaker studio using Infrastructure as a Code (IaC) via Terraform. This is to simplify the complex setup of SageMaker and also ensures security by having a dedicated VPC backed by IAM-based authentication.
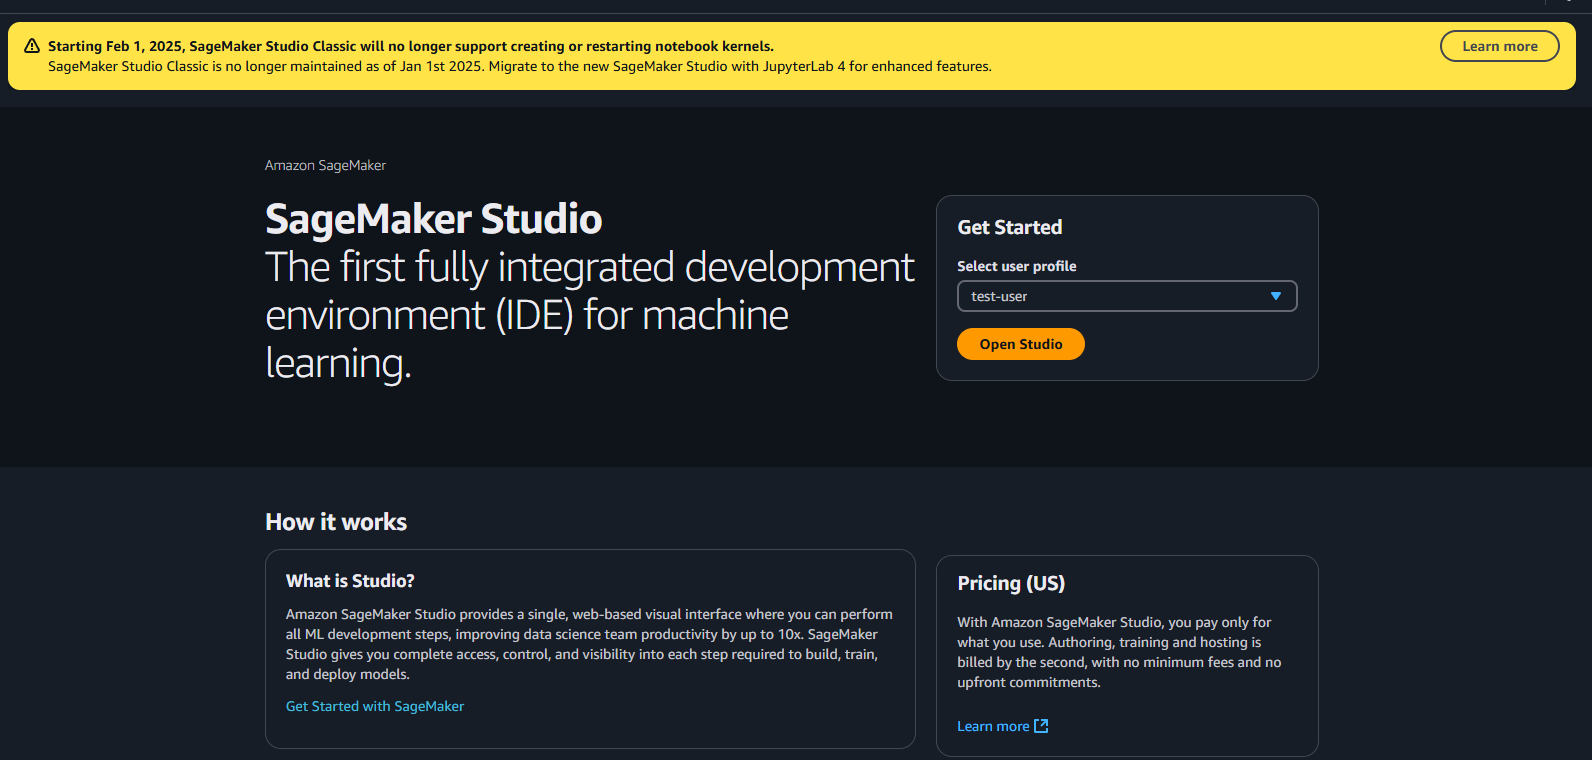
With Amazon SageMaker AI, you can utilize its machine learning (ML) services for your own use-case. You can build, train, evaluate, and deploy ML models to production-ready environment with ease of use due to its user-friendly UI design through the Amazon SageMaker studio.
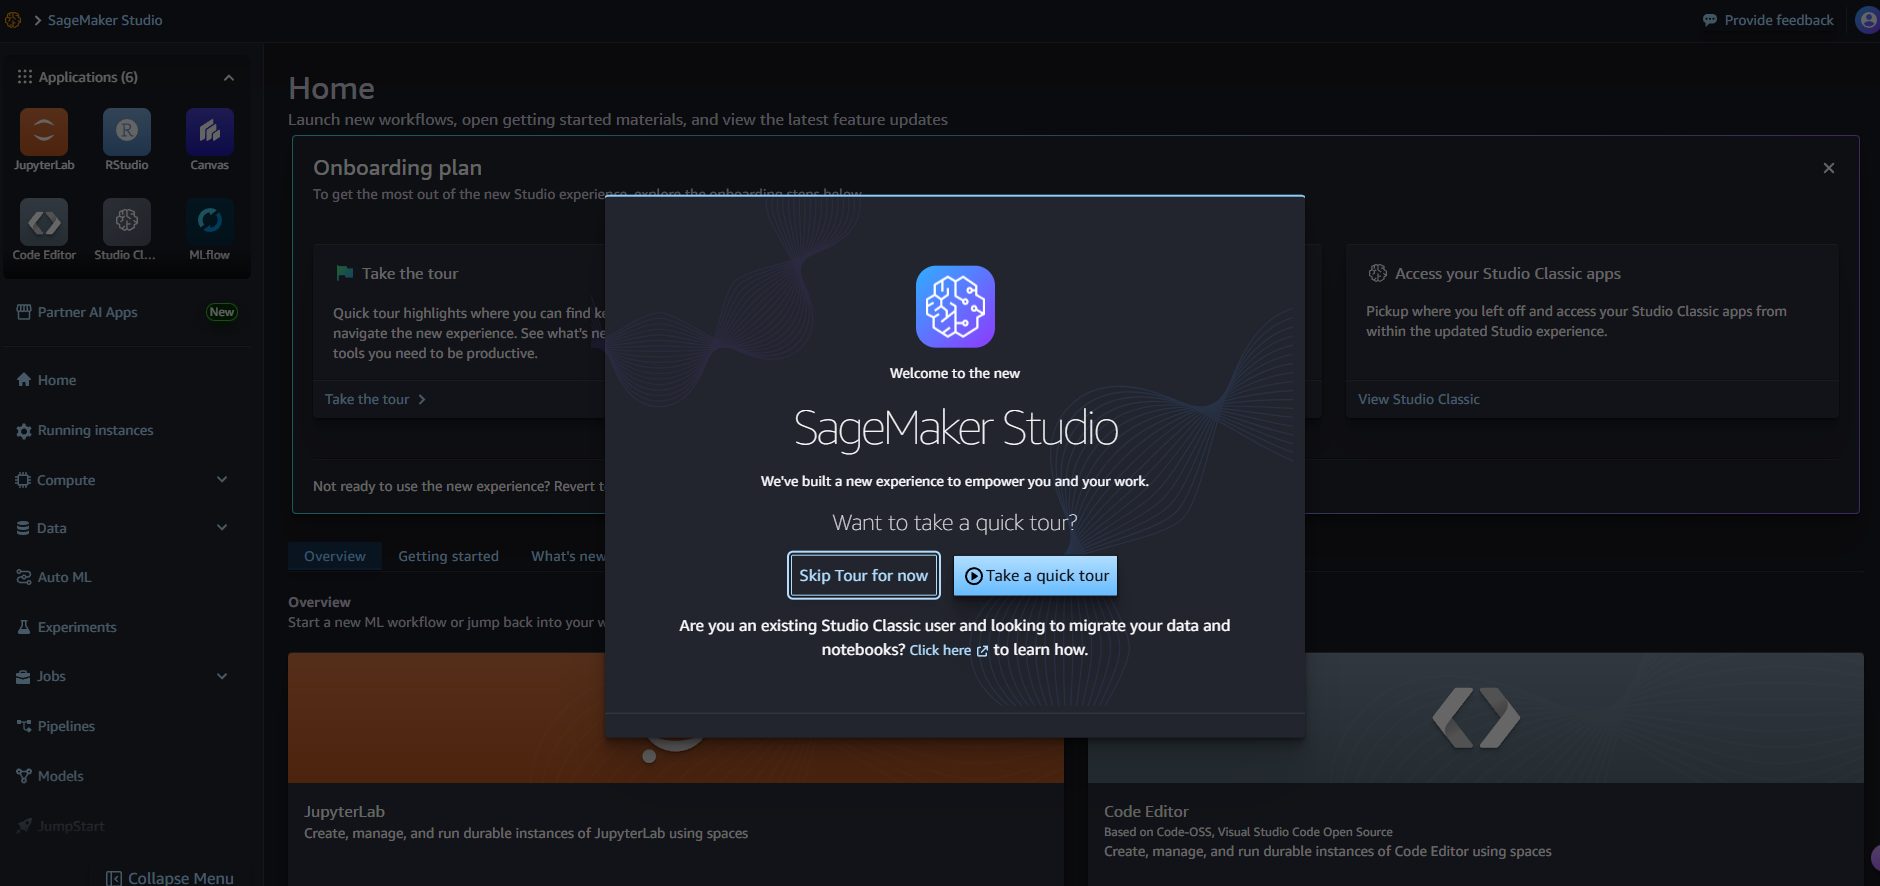
Using the Amazon SageMaker Studio, you can access or do the following:
-
Fully Managed IDEs such as Jupyter Notebooks, Visual Studio Code Open Source, and RStudio, all with the aim of performing your data science tasks.
-
Then, perform your ML workflow from training, building, and deploying with the ease of use and generative AI support.
-
Easily fine-tune your Foundational Models through Amazon SageMaker Jump Start, enabling you to receive access to 15 pre-built solutions. However, for this setup, it will require you to request access to g instances for it to work, which will cost more.
-
Access your IDEs through your browser without an underlying server running in your local computer.
Overall, with SageMaker Studio, an interface that provisions SageMaker AI, you can easily develop generative AI solutions, create a centralized ML workflow for your development up to production level use, and combine data analytics tasks with predictive analytics using machine learning algorithms.
On the other hand, I want you to be able to handle the deployments easily using Terraform. Terraform is an IaC tool that allows you to manage your AWS resources using HashiCorp Configuration Language (HCL), a declarative language for you to deploy your resources easily.
Advantages of using Terraform in SageMaker AI
1. Infrastructure as Code (IaC)

-
A full environment is defined as code for consistency plus it allows for reproducibility.
-
The configuration is simple to deploy to several environments.
-
Deployment to different AWS accounts is also straightforward.
2. Network Isolation
-
A custom VPC includes appropriate network parts – subnet, gateway to the internet, routing.
-
Security groups provide controlled egress rules.
3. State Management
-
Remote state exists in S3. DynamoDB locking is used for team collaboration.
-
This setup blocks state corruption as modifications happens concurrently.
4. Automation
-
Manual steps for SageMaker Studio setup are removed.
-
Resource dependencies are managed correctly.
5. Resource Organization
-
There is a separation into logical files. Examples include “main.tf”, correspondingly “providers.tf.”
-
Output variables show important resource identifiers.
Disadvantages of using Terraform in SageMaker AI
For this part, it’s pretty much in the configuration of the code. You may customize it in your end for high availability and resilient to single point of failure. I just designed the code for simplicity, where beginners can follow as well.
-
Limited High Availability — works in single subnet, which lacks redundancy.
-
Security Concerns—broad IAM permissions with `AmazonSageMakerFullAccess`, no encryption to Server Side, and No private VPC endpoints for AWS services.
-
Limited Scalability — single subnet architecture.
Solution Overview
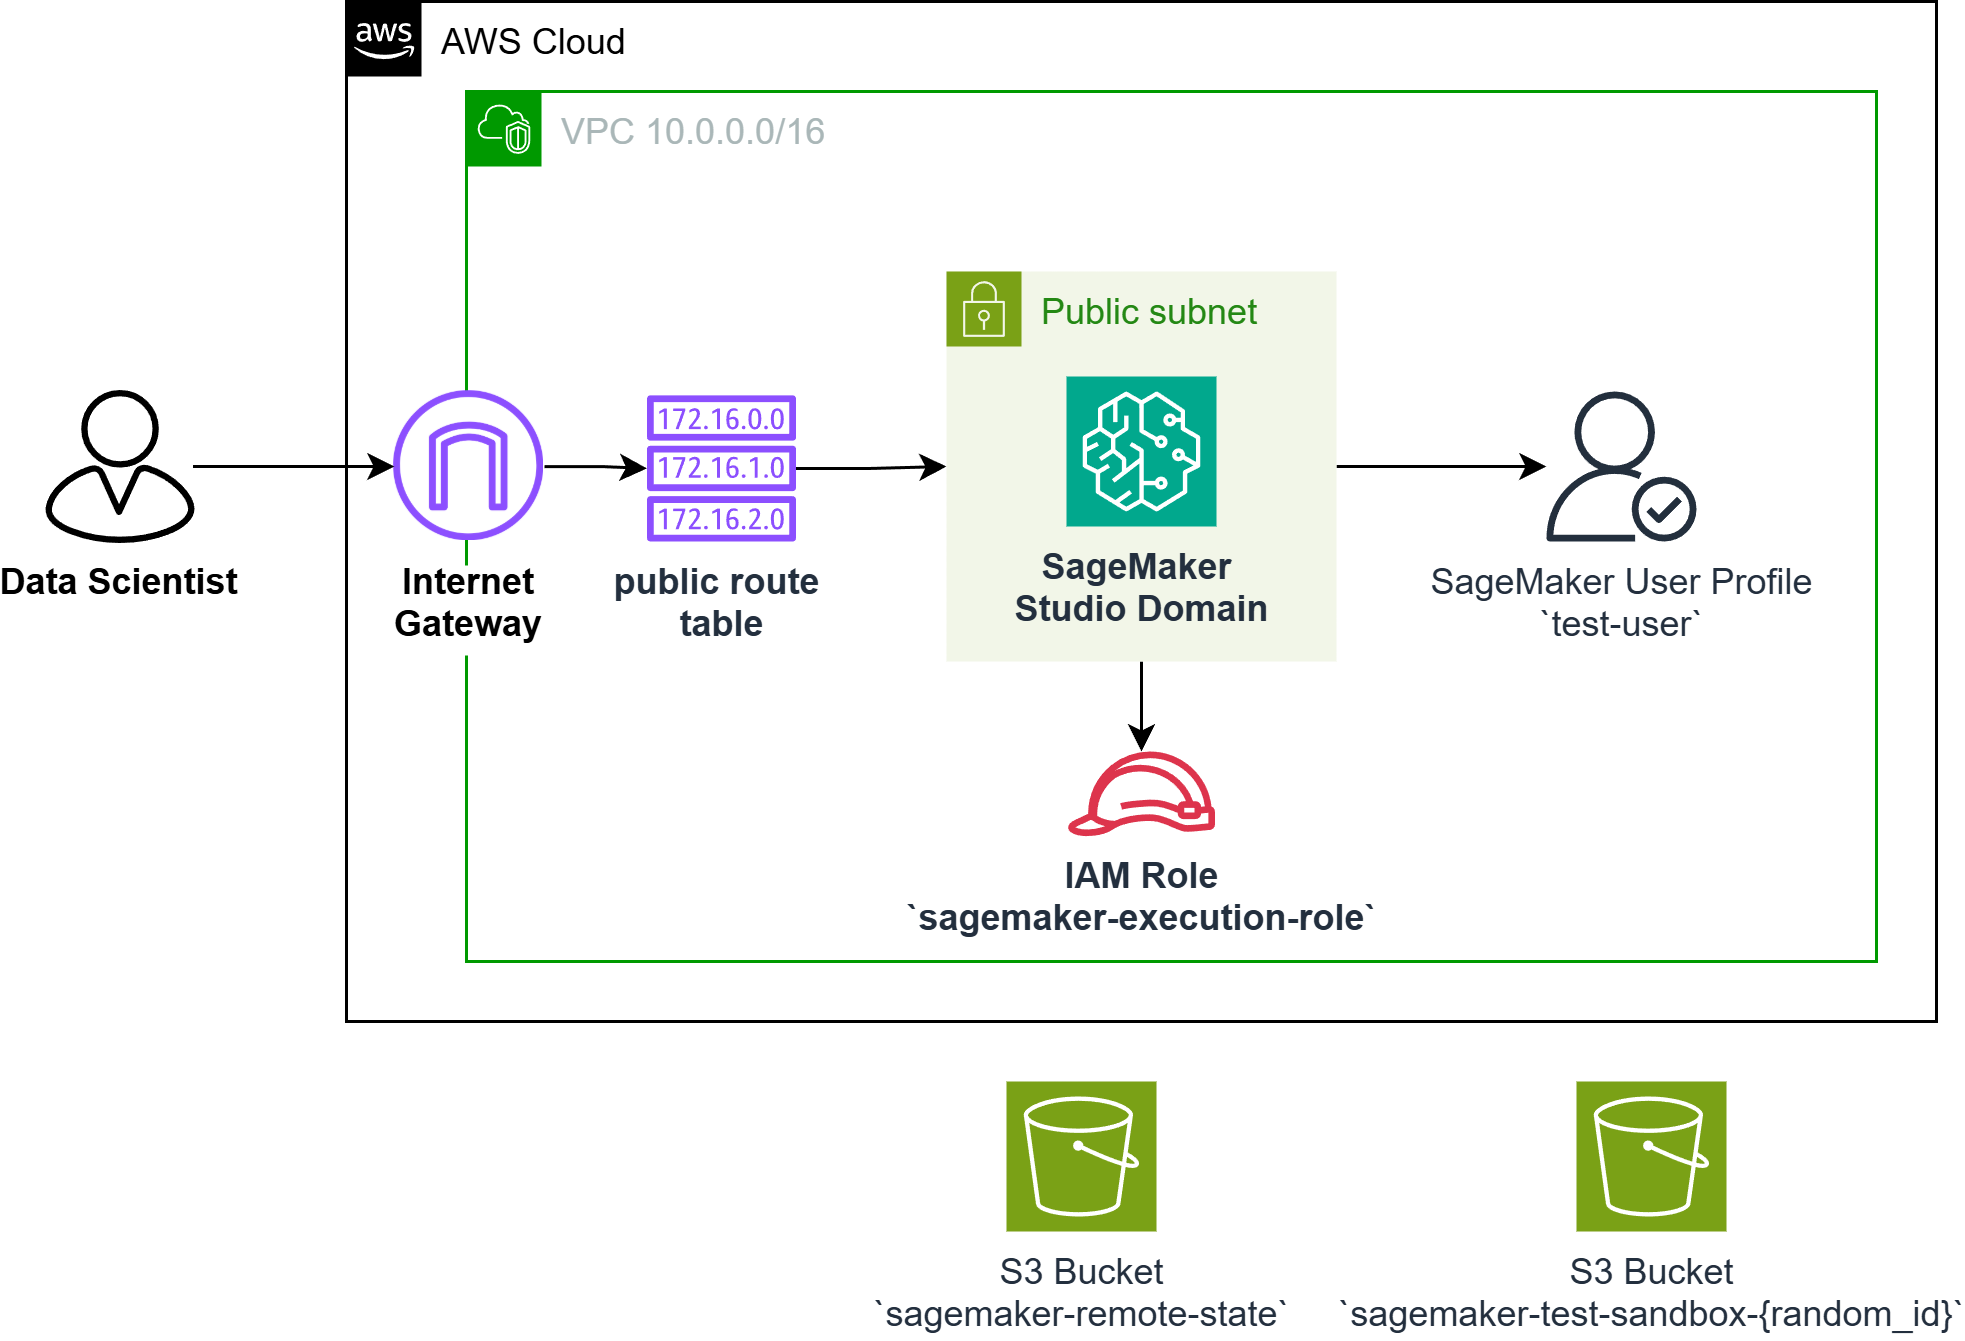
Solution
The user workflow includes the following steps:
-
Firstly, the user must log in through the aws cli using aws configure.
-
Following that the user must have their own pem key available.
-
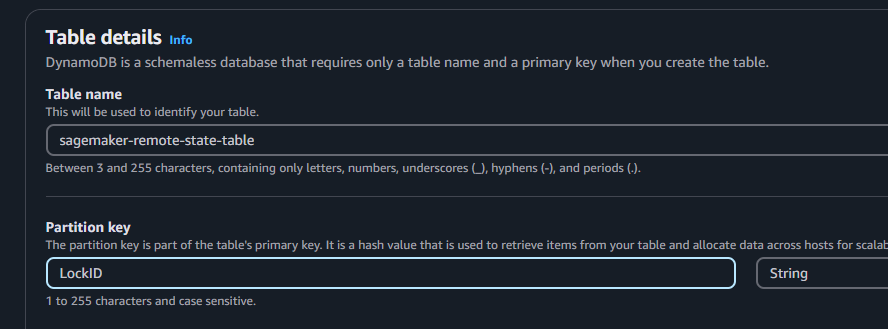
The user must configure their remote state by particularly creating an S3 bucket called sagemaker-remote-state and DynamoDB called sagemaker-remote-state-table
-
Terraform S3 – sagemaker-remote-state
-
Terraform Table via Dynamo DB – sagemaker-remote-state-table with LockID as the partition key
-
-
The user runs terraform init which creates the tfstate remotely
-
The user then runs terraform apply which will run the terraform files, provisioning the whole architecture, and will return the following:
-
SageMaker Domain ID — the identifier that you will use as a reference when accessing the SageMaker studio in the Management Console
-
SageMaker User Profile— the username in sagemaker
-
s3 bucket name— bucket where you will store your data to be used for training (optional)
-
The high-level steps to implement this solution with Terraform
-
Create the S3 Bucket and DynamoDB for Remote State
-
Establish the Terraform Project structure.
-
Make the required IAM Resources.
-
Put in place Storage Resources (S3).
-
Build Network Infrastructure via VPC.
-
Deploy your SageMaker Resources.
-
Make the Outputs.
-
Test your deployment.
Here are the Pre-requisites to provision SageMaker AI Studio with Terraform
This solution requires the following pre-requisites:
-
An AWS Account (free tier).
-
An IAM role configured in AWS CLI that has the sufficient policy to create service roles, being able to make and upload files to s3 bucket.
-
Terraform version v1.10.5 configured in your CLI (mine I use ubuntu WSL)
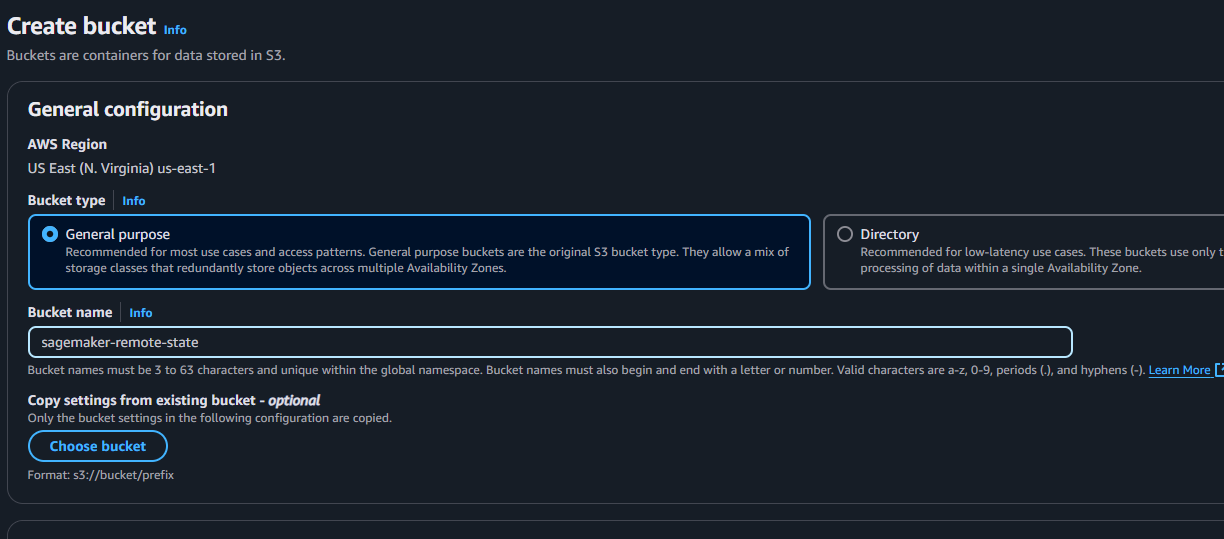
Create the S3 Bucket and DynamoDB for Remote State
-
In your management console, search for S3 and create a bucket.
-
Name your bucket sagemaker-remote-state

-
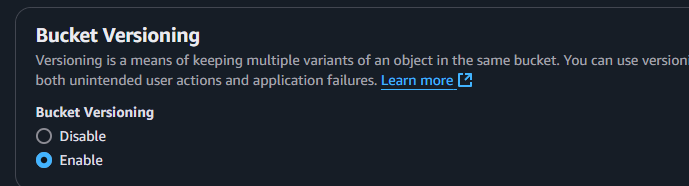
Scroll down until you see the bucket versioning and enable it and click create.

-
Search for DynamoDB and create a table named sagemaker-remote-state-table and enter LockID as the partition key. Then click create.

Let’s implement the Terraform Project Structure for your SageMaker AI
- Open your terminal, then create a new folder named sagemaker-env (or other name will do). This will serve as the root directory.
mkdir sagemaker-env # use md if windows
cd sagemaker-env
- Now open your preferred text editor, it can preferably VS Code. You create the required files (i.e. main.tf, providers.tf, variable.tf, and output.tf).
-
main.tf– serves as the main script for the configuration, where we setup the resources needed.
-
providers.tf – serves as the script where we setup the connection between our local configuration towards the cloud.
-
variable.tf – serves as a way to declare input variables, and reference it to your main configuration file, where you can customize it later on using .tfvars file.
-
ouputs.tf – simply returns the necessary information needed.
-
- In the providers.tf enter the terraform block configuration reference and the AWS provider block.
-
terraform {
  required_providers {
    aws = {
      source  = "hashicorp/aws" # the source from terraform
      version = "5.9"}
  }
  backend "s3" {
    bucket         = "sagemaker-remote-state" # name of the bucket
    region         = "us-east-1" # default region
    key            = "terraform.tfstate"
    dynamodb_table = "sagemaker-remote-state-table" # default table in dynamodb
    profile        = "default" # default profile
  }
}

provider "aws" {
  region  = "us-east-1"
  profile = "default"
}
-
- Save the file and check accordingly if it’s working by entering terraform init. However, make sure that you already have configured your AWS account using aws configure.
-
An output will contain a successful message: “Terraform has been successfully initialized”
-
- Nicely done! Now validate your syntax using terraform fmt and then terraform validate.
Make the required IAM Resources.
In the main.tf
-
Make a SageMaker IAM role that has a proper trust policy.
-
Attach the managed AmazonSageMakerFullAccess policy to this role.
-
# Create an IAM role for SageMaker execution
resource "aws_iam_role" "sagemaker_execution_role" {
  name = "sagemaker-execution-role"

  assume_role_policy = jsonencode({
    Version = "2012-10-17"
    Statement = [
      {
        Action = "sts:AssumeRole"
        Effect = "Allow"
        Principal = {
          Service = "sagemaker.amazonaws.com"
        }
      }
    ]
  })
}

# Attach AmazonSageMakerFullAccess policy to the role
resource "aws_iam_role_policy_attachment" "sagemaker_full_access" {
  role       = aws_iam_role.sagemaker_execution_role.name
  policy_arn = "arn:aws:iam::aws:policy/AmazonSageMakerFullAccess"
}
-

Put in place Storage Resources (S3)
In the main.tf file:
-
Make an S3 bucket; use a distinct name with a random suffix.
-
Version control on the S3 bucket should be active.
-
Set up lifecycle rules for right cleanup – force_destroy must equal true.
-
# Create an S3 bucket for SageMaker artifacts
resource "aws_s3_bucket" "sagemaker_bucket" {
  bucket = "sagemaker-test-sandbox-${random_id.suffix.hex}"
  force_destroy = true # Allows terraform destroy to remove the bucket even if it contains objects
}

# random suffix to make it distinct
resource "random_id" "suffix" {
  byte_length = 4
}

# Enable bucket versioning
resource "aws_s3_bucket_versioning" "versioning" {
  bucket = aws_s3_bucket.sagemaker_bucket.id
  versioning_configuration {
    status = "Enabled"
  }
}
-
Build Network Infrastructure via VPC.
Do the following in order:
-
First, you implement a dedicated VPC for your SageMaker’s domain.
-
Next, we configure a subnet for your VPC. This will be used for the AZ.
-
To follow, we now create the Internet Gateway to establish an outbound internet connectivity using the subnet.
-
Then, create your route tables and a route table association.
-
Finally, you add the appropriate egress rule to your security group. Take note that no need for ingress since you only access the SageMaker Studio in the management console.
-
# Create a basic VPC for SageMaker
resource "aws_vpc" "sagemaker_vpc" {
    cidr_block = "10.0.0.0/16"
    enable_dns_support = true
    enable_dns_hostnames = true

    tags = {
       Name = "sagemaker-vpc"
    }
}

# Create a subnet in the VPC
resource "aws_subnet" "sagemaker_subnet" {
    vpc_id = aws_vpc.sagemaker_vpc.id
    cidr_block = "10.0.1.0/24"
    availability_zone = "${var.aws_region}a"

    tags = {
        Name = "sagemaker-subnet"
    }
}

# Create an Internet Gateway
resource "aws_internet_gateway" "igw" {
    vpc_id = aws_vpc.sagemaker_vpc.id

    tags = {
        Name = "sagemaker-igw"
    }
}

# Associate route table with subnet
resource "aws_route_table_association" "rta" {
    subnet_id = aws_subnet.sagemaker_subnet.id
    route_table_id = aws_route_table.rt.id
}

# Create a security group for SageMaker
resource "aws_security_group" "sagemaker_sg" {
    name = "sagemaker-sg"
    description = "Security group for SageMaker"
    vpc_id = aws_vpc.sagemaker_vpc.id

    egress {
        from_port = 0
        to_port = 0
        protocol = "-1"
        cidr_blocks = ["0.0.0.0/0"]
    }

    tags = {
        Name = "sagemaker-sg"
    }
}

# Create a route table for internet access
resource "aws_route_table" "rt" {
    vpc_id = aws_vpc.sagemaker_vpc.id
    route {
        cidr_block = "0.0.0.0/0"
        gateway_id = aws_internet_gateway.igw.id
    }
    tags = {
        Name = "sagemaker-rt"
    }
}
-
Deploy your SageMaker AI Resources using Terraform.
-
Establish a SageMaker domain that connects to the VPC infrastructure.
-
Then, define a dependency chain for you to ensure resources get created correctly.
-
Additionally, configure the domain’s authentication mode, set to IAM.
-
Furthermore, you can now establish a user profile under SageMaker’s domain.
-
# Create a SageMaker domain
resource "aws_sagemaker_domain" "test_domain" {
  domain_name = "sagemaker-test-domain"
  auth_mode   = "IAM"
  vpc_id      = aws_vpc.sagemaker_vpc.id
  subnet_ids  = [aws_subnet.sagemaker_subnet.id]

  default_user_settings {
    execution_role = aws_iam_role.sagemaker_execution_role.arn
  }

  # Add lifecycle configuration to ensure proper cleanup
  lifecycle {
    create_before_destroy = true
  }

  depends_on = [
    aws_route_table_association.rta,
    aws_security_group.sagemaker_sg
  ]
}

# Create a user profile
resource "aws_sagemaker_user_profile" "test_user" {
  domain_id         = aws_sagemaker_domain.test_domain.id
  user_profile_name = "test-user"

  user_settings {
    execution_role = aws_iam_role.sagemaker_execution_role.arn
  }
}
-
Make the Outputs.
-
Firstly, identify outputs of notable resource IDs.
-
Reveal the SageMaker domain ID, the user profile name, also the S3 bucket name-this permits simple access for your reference.
-
# Output important information
output "sagemaker_domain_id" {
  value = aws_sagemaker_domain.test_domain.id
}

output "sagemaker_user_profile" {
  value = aws_sagemaker_user_profile.test_user.user_profile_name
}

output "s3_bucket_name" {
  value = aws_s3_bucket.sagemaker_bucket.bucket
}
-
Test your deployment in SageMaker AI with Terraform
-
Execute terraform init, terraform plan, and terraform apply commands.
-
Then, confirm creation success for all resources.
-
Lastly, examine access to the SageMaker setting.
Final Output:
Now you can access your SageMaker Studio!
How to delete SageMaker AI with Terraform properly:
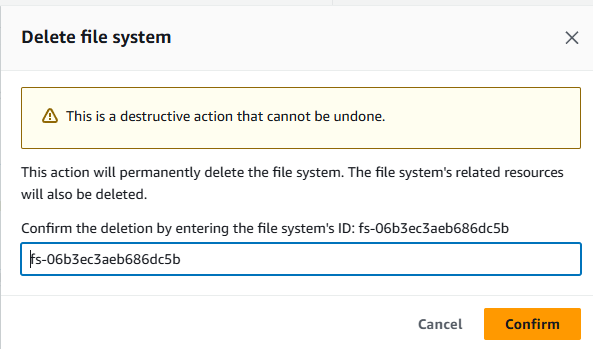
- Go to https://us-east-1.console.aws.amazon.com/efs/home?region=us-east-1#/file-systems . Then, delete the EFS instance, which was created during the network config.

- Click Confirm and wait for it to be deleted shortly.

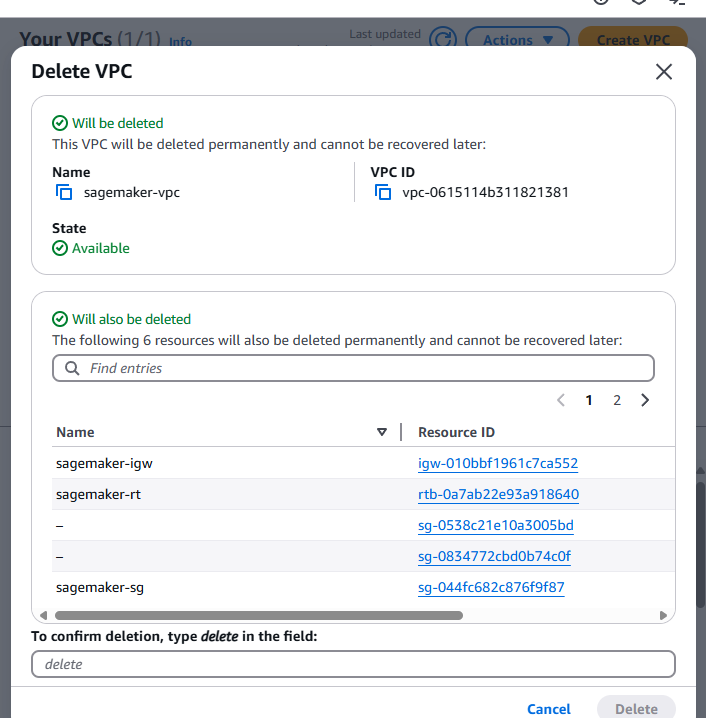
- Till the EFS instance is deleted, go to VPC and delete the sagemaker-vpc.

- Enter delete and click Delete.
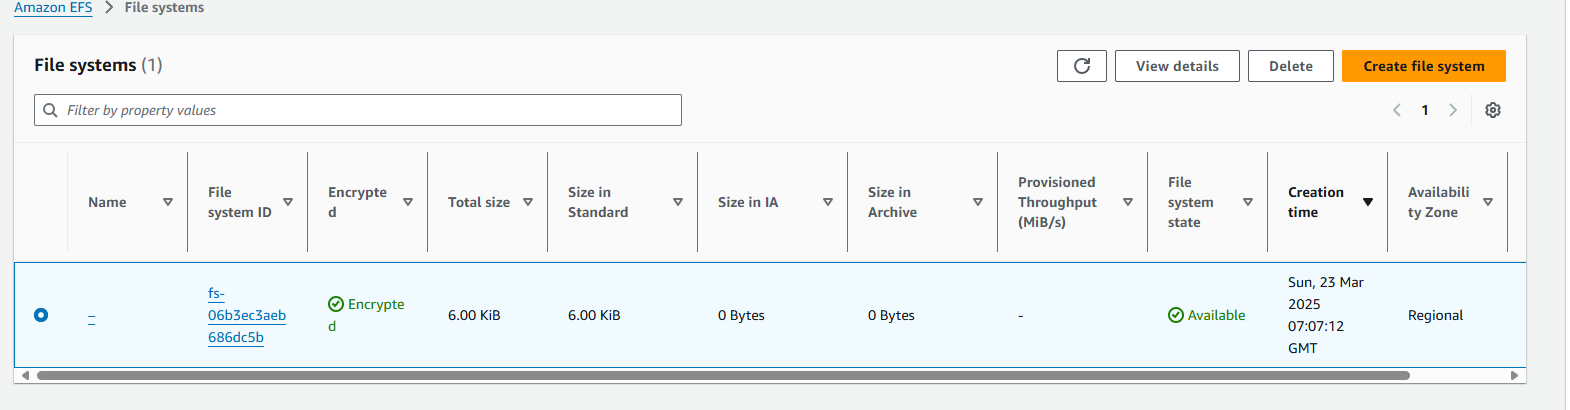
Lastly, in your terminal, open it, then enter terraform destroy.
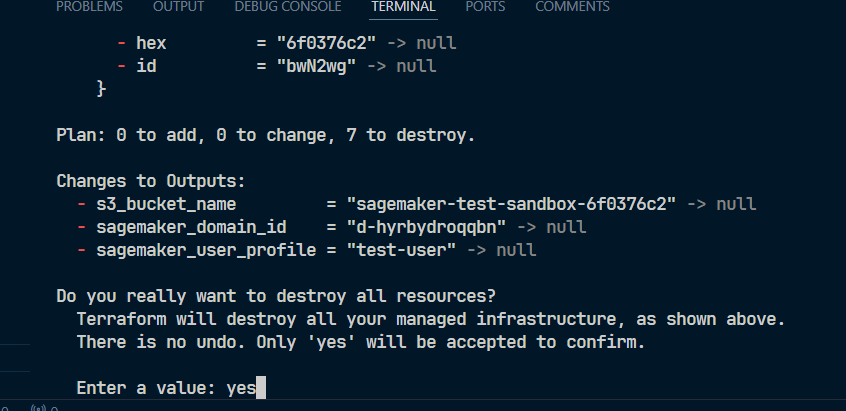

- Done.
Conclusion
In conclusion, using Infrastructure as a Code (IaCs) such as Terraform really does help you provision your SageMaker workload easily with lines of code. Thus, the risk of misconfiguration and overlooking your resources via ClickOps is reduced. While the learning curve of using this language is a bit high for beginners, especially without programming background, it can undoubtedly help you start your ML Ops journey since Terraform is one of the most popular IaC tools out in the DevOps industry.
However, due to the limitation of Terraform to completely destroy the infrastructure, minimal click ops actions are required to fully clear your account. Moreover, some of you may have to debug your code as well that fits to your configuration account. Nevertheless, once utilized properly, it will certainly save you a lot of time and money in provisioning your SageMaker projects using the Amazon SageMaker Studio.
🔥20% OFF All GitHub Reviewers & Video Course!

Turn Your Team Into Cloud-Ready Professionals Today

Learn AWS with our PlayCloud Hands-On Labs

$2.99 AWS and Azure Exam Study Guide eBooks

New Claude Certified Architect Foundations CCA-F

Learn GCP By Doing! Try Our GCP PlayCloud

Learn Azure with our Azure PlayCloud

FREE AI and AWS Digital Courses

FREE AWS, Azure, GCP Practice Test Samplers


Subscribe to our YouTube Channel

Follow Us On Linkedin


