Monitoring the health and performance of your applications is essential for maintaining reliable operations, detecting issues, and troubleshooting efficiently. Monitoring logs can provide invaluable insights into server behavior, user activity, and error occurrences regarding web services. However, tracking logs across distributed systems can be challenging. Amazon CloudWatch Agent is a powerful tool that collects metrics and logs from your EC2 instances and on-premises servers and centralizes them in Amazon CloudWatch. With centralized monitoring, teams can quickly detect anomalies, respond to incidents, and ensure smooth operation across different environments.
In this article, we’ll explore how you can use the CloudWatch Agent to monitor logs from an Nginx web server running on an EC2 instance. We’ll walk through a step-by-step example, where we configure the agent to capture logs and forward them to CloudWatch Logs for real-time monitoring and analysis. This guide will demonstrate the practical steps to enhance your observability of web server performance and security issues.
Why Use CloudWatch for Nginx Logs?
While several log monitoring solutions are available, Amazon CloudWatch stands out for its seamless integration with AWS services and its robust features. Monitoring Nginx logs with CloudWatch can be invaluable in various real-world scenarios, such as:
- Performance Optimization: By analyzing access logs, you can identify bottlenecks, optimize resource utilization, and ensure your web server can handle peak traffic periods without compromising performance.
- Security Monitoring: Error logs can provide insights into potential security breaches, unauthorized access attempts, or other malicious activities. Monitoring these logs can help you promptly detect and respond to threats, protecting your application and user data.
- Troubleshooting: When issues arise, log analysis can be a powerful tool for identifying the root cause and resolving problems efficiently. Instead of sifting through logs manually, you can leverage CloudWatch’s search and filtering capabilities to pinpoint relevant log entries quickly.
- Compliance and Auditing: Maintaining comprehensive logs is often a compliance requirement in regulated industries. By centralizing your Nginx logs in CloudWatch, you can ensure proper log retention, access control, and auditing capabilities.
CloudWatch offers a more streamlined and scalable approach than traditional log monitoring solutions, particularly for AWS-based environments. Its tight integration with other AWS services, such as EC2 and Lambda, makes it a natural choice for monitoring web applications hosted on the AWS platform.
Collecting Nginx Logs with CloudWatch Agent
Now, let’s dive into how you can configure CloudWatch Agent to capture and send Nginx logs to CloudWatch Logs.
Step 1: Create and Configure an EC2 Instance
Launch an EC2 instance to serve as your Nginx web server (For this demo, we used Ubuntu as OS). During the instance creation process, ensure that:
- HTTP traffic is allowed on port 80.
- SSH traffic is allowed on port 22.
Step 2: Set up IAM Role for CloudWatch Agent and Assign it to your Instance
Create an IAM role with permissions for the CloudWatch Agent to send logs to CloudWatch Logs. Attach the CloudWatchAgentServerPolicy managed policy to the role and assign the role to your EC2 instance. You can assign it by selecting your instance > Actions > Security > Modify IAM role.
Step 3: Install Nginx and CloudWatch Agent
-
Connect to the EC2 instance via SSH and install Nginx using the following commands:
sudo apt update
sudo apt install nginx -y
sudo systemctl start nginx
- Verify that Nginx is running by navigating to your instance’s public IP in a browser. You should see the default Nginx welcome page.
-
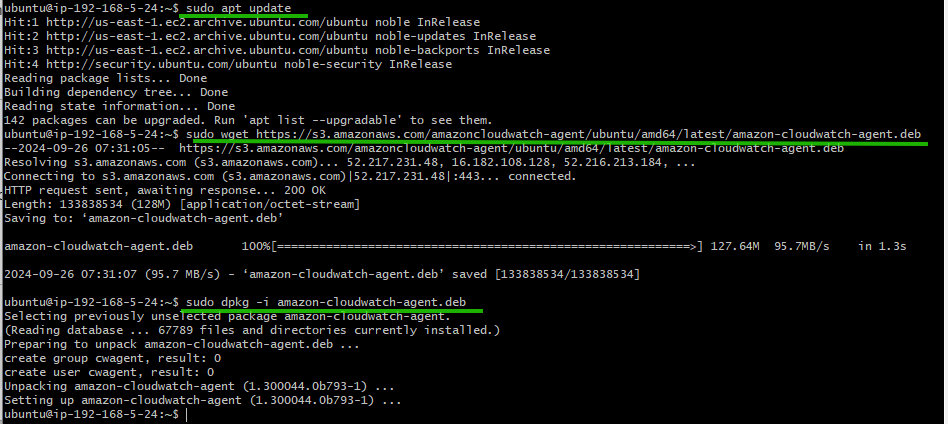
Add the CloudWatch Agent to your instance by downloading it directly from AWS:
sudo apt update
sudo wget https://s3.amazonaws.com/amazoncloudwatch-agent/ubuntu/amd64/latest/amazon-cloudwatch-agent.deb
sudo dpkg -i amazon-cloudwatch-agent.deb
Step 4: Create CloudWatch Logs Configuration
Create a configuration file for the CloudWatch Agent to specify that it should collect logs from Nginx’s log directory /var/log/nginx. Create the configuration file:
sudo vi /opt/aws/amazon-cloudwatch-agent/bin/cloudwatch-config.json
Paste the following configuration and save it using :wq! :
{
  "logs": {
    "logs_collected": {
      "files": {
        "collect_list": [
          {
            "file_path": "/var/log/nginx/access.log",
            "log_group_name": "NginxLogGroup",
            "log_stream_name": "{instance_id}/access.log",
            "timestamp_format": "%Y-%m-%d %H:%M:%S"
          },
          {
            "file_path": "/var/log/nginx/error.log",
            "log_group_name": "NginxLogGroup",
            "log_stream_name": "{instance_id}/error.log",
            "timestamp_format": "%Y-%m-%d %H:%M:%S"
          }
        ]
      }
    }
  }
}
This configuration specifies that:
- Nginx logs from
/var/log/nginx/access.logand/var/log/nginx/error.logwill be collected. - Logs will be sent to a CloudWatch log group named
NginxLogGroup. - Logs will be organized by stream name using
{instance_id}/access.logand{instance_id}/error.log. - The timestamp format is set to a readable format for logs.
Step 5: Start and Configure CloudWatch Agent
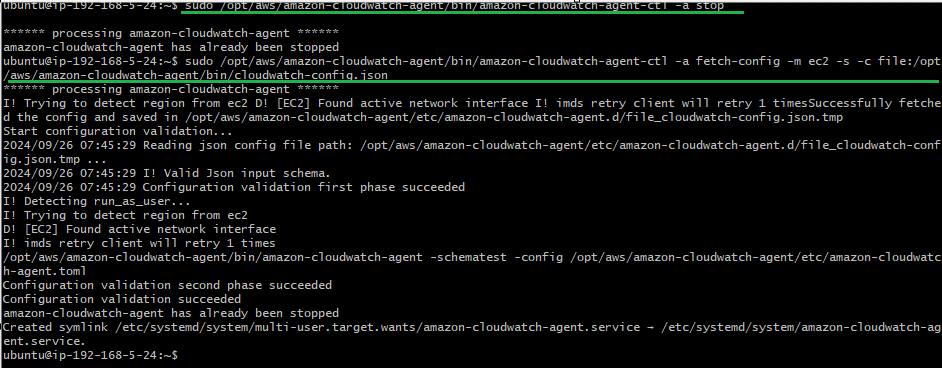
Apply the configuration and start the CloudWatch Agent using the following commands:
sudo /opt/aws/amazon-cloudwatch-agent/bin/amazon-cloudwatch-agent-ctl -a stop
sudo /opt/aws/amazon-cloudwatch-agent/bin/amazon-cloudwatch-agent-ctl -a fetch-config -m ec2 -s -c file:/opt/aws/amazon-cloudwatch-agent/bin/cloudwatch-config.json
Step 6: Verify Logs in CloudWatch
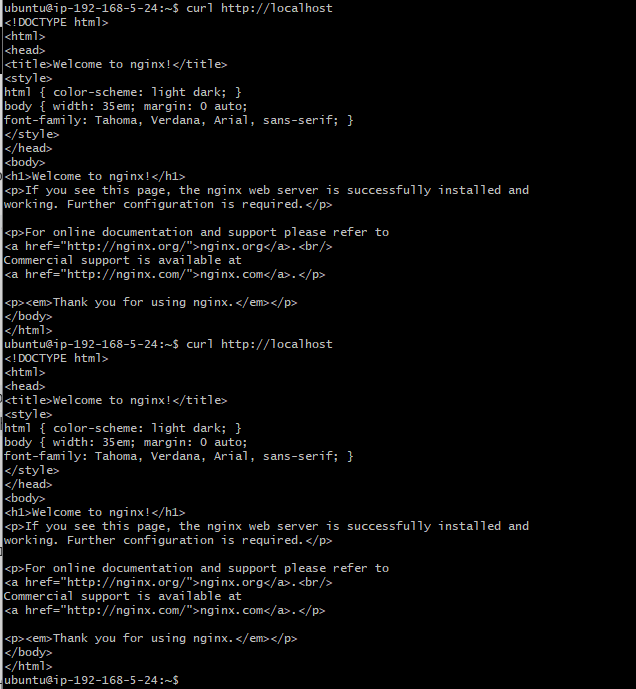
Generate traffic to your Nginx server by using curl http://localhost multiple times.
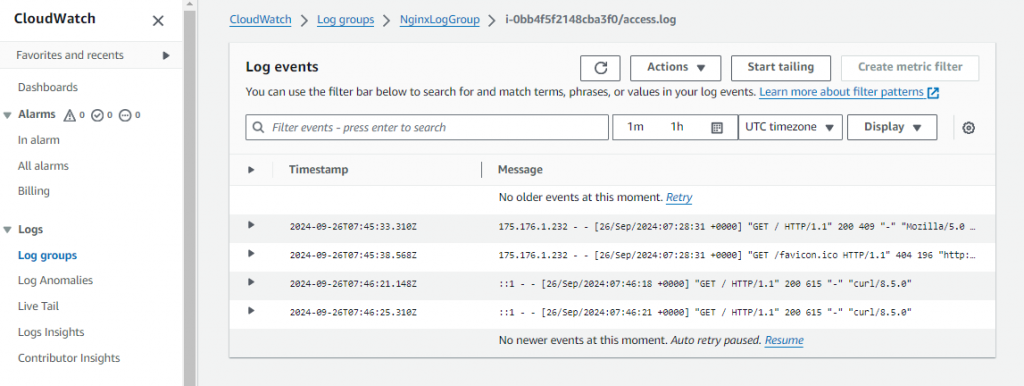
Then, navigate to the CloudWatch console to view the logs in the NginxLogGroup log group.

Conclusion
Monitoring Nginx logs is crucial for ensuring the smooth operation, performance, and security of your web applications. By leveraging Amazon CloudWatch Agent, you can streamline the process of collecting and analyzing Nginx logs, enabling you to stay ahead of potential issues and provide a seamless user experience.
With the steps outlined in this article, you now have the knowledge and tools to implement a robust log monitoring solution for your Nginx web servers. Don’t wait until it’s too late – take proactive steps to monitor your web server logs and ensure your applications remain reliable, secure, and high-performing.
Remember, the key to successful log monitoring is not just collecting data but also analyzing it effectively and taking action based on the insights gained. Embrace the power of CloudWatch and unlock the full potential of your Nginx web server logs.
Thank you for reading this article. We hope it has provided you with a comprehensive understanding of how to leverage Amazon CloudWatch Agent to monitor your Nginx logs and improve the overall observability of your web applications.
References:
https://docs.aws.amazon.com/AmazonCloudWatch/latest/monitoring/Install-CloudWatch-Agent.html


