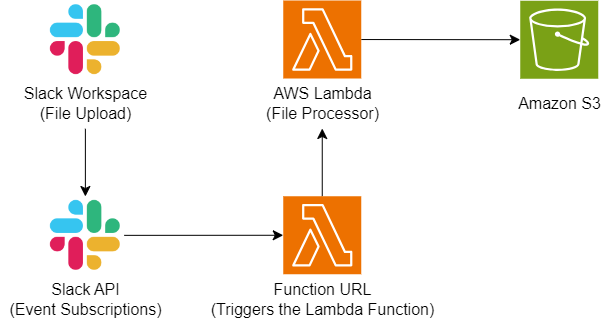
Efficient management and storage of files is vital for any team’s productivity. Automating the process of uploading files from Slack directly to Amazon S3 using AWS Lambda provides a streamlined and secure method for file storage. This integration guarantees that files shared on Slack are systematically stored in a scalable manner, ensuring they are easily accessible for future reference. Leveraging AWS Lambda and the Slack API, this solution minimizes the risk of data loss and removes the need for manual file management, allowing your team to focus on more critical tasks.
This article will guide you through the implementation steps to set up this seamless integration. By following these instructions, you’ll be able to automate the file upload process, ensuring that your workflow remains efficient and your files are securely stored in Amazon S3. Whether you are a developer looking to enhance your team’s productivity or an IT manager aiming to improve data management, this guide will provide you with all the necessary information to get started.
Prerequisite
Before you begin, ensure you have a Slack app set up in your Slack workspace. This app will be used to handle the file uploads and interact with AWS Lambda.
Implementation Steps
Creating an AWS Lambda Function
Step 1: Create a Lambda Function First, you need to create a Lambda function that will handle the file upload process.
-
Title:
slack-uploader -
Runtime: Python 3.13 This runtime allows you to write the function in Python, leveraging its libraries and frameworks for efficient processing.
Step 2: Copy the code into lambda_function.py
The provided code initializes the necessary AWS and Slack clients, parses incoming events, validates Slack requests, and processes file uploads.
Here’s the code for lambda_function.py:
Step 3: Configure the Environmental Variables You will need to set up several environmental variables for the Slack-related credentials. This ensures secure communication between the Lambda function and Slack. Refer to the Slack API to obtain these credentials.
Step 4: Create an inline policy for the Lambda Function Next, you need to grant your Lambda function permission to upload files to your S3 bucket. This is done by creating an inline policy:
Go to Lambda Configuration → Permissions → Select the Role name and add the following policy:
{
  "Version": "2012-10-17",
  "Statement": [
    {
      "Sid": "VisualEditor0",
      "Effect": "Allow",
      "Action": "s3:PutObject",
      "Resource": "*"
    }
  ]
}
Configuring the Slack API
Step 1: Go to https://api.slack.com/apps and Choose Slack Commands App
Navigate to the Slack API and select your Slack Commands App. This will be the app responsible for interfacing with Slack, handling file uploads, and interacting with your Lambda function.
Step 2: Set Up OAuth Scopes
OAuth scopes define the permissions your app has within Slack. These permissions are necessary to read and write files, and access channel and group information.
-
In the left sidebar, click “OAuth & Permissions”.
-
Scroll down to Scopes and add the following Bot Token Scopes:
-
files:read– To read files uploaded to Slack. -
files:write– To upload or modify files. -
channels:read– To access channel information (optional for public channels). -
groups:read– To access private channel information (optional for private channels).
-
Adding these scopes ensures that your app has the necessary permissions to perform the required actions within Slack.
Step 3: Re-Install the App
After setting up the scopes, you need to reinstall the app to apply the new permissions.
-
Scroll up and click “Reinstall to Workspace”.
-
Grant the required permissions to re-install the app to your workspace.
-
After installation, note down the OAuth Token (starts with
xoxb-). You’ll use this token in your Lambda function to authenticate Slack requests.
Step 4: Go to Event Subscriptions
Event subscriptions allow your app to receive real-time updates from Slack.
-
In the left sidebar, click “Event Subscriptions”.
-
Enable Events: Toggle the Enable Events switch to
On. -
Provide a Request URL: Add the Function URL as the Request URL. Slack will send a verification challenge request to this URL. Ensure your Lambda function handles the challenge by responding with the challenge token.
By enabling events and providing a request URL, you allow Slack to send events to your Lambda function, ensuring that it can handle file uploads.
-
Subscribe to Events: Under Subscribe to bot events, click “Add Bot User Event” and add:
-
file_shared– To listen for file uploads in Slack.
-
Adding the file_shared event ensures that your app is notified whenever a file is shared in Slack, triggering the Lambda function to handle the file upload process.
Step 5: Configure Bot Settings
Configuring bot settings is crucial to ensure that your app is always available to handle file uploads.
-
In the left sidebar, click “App Home”.
-
Enable the Always Show My Bot as Online.
This setting ensures that your bot appears online at all times, ready to process file uploads.
Step 6: Add the App to a Channel
To start using the app, you need to add it to a channel where it can listen for file uploads.
-
Open Slack and invite the app to a channel by typing
/invite @YourAppNamein the desired channel.
Verifications
- Upload a File – Upload any file in the channel where the app is active. This step verifies that the app can handle file uploads as expected.
- Monitor the Lambda Function – Check the Lambda function’s logs to verify that it receives the event and processes the file. Monitoring the logs helps you ensure that the function is working correctly and troubleshoot any issues that arise.
- Monitor the S3 Bucket – Ensure that the file is successfully uploaded to the S3 Bucket. Verifying the upload to Amazon S3 confirms that the entire integration is functioning as intended.
That’s it! By following these steps, you have successfully automated the process of uploading files from Slack directly to Amazon S3 using AWS Lambda. This integration ensures that your files are systematically stored and easily accessible, enhancing productivity and streamlining your workflow. With the combination of AWS Lambda’s serverless architecture and the powerful Slack API, you can focus more on your core tasks without worrying about manual file management. Should you need to further customize this solution, the provided code and configuration steps offer a solid foundation to build upon. Happy automating!


