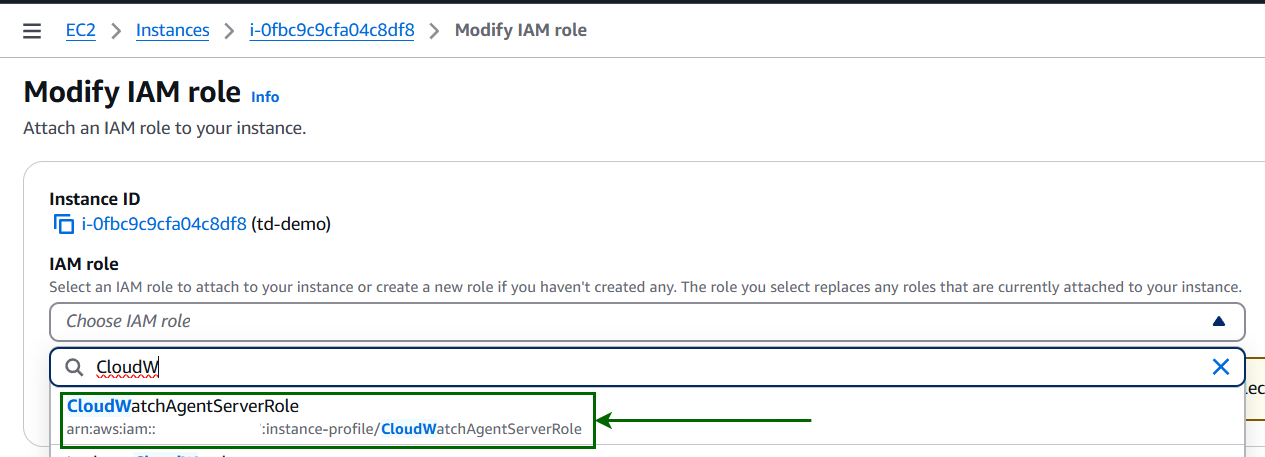
In my previous article, I mentioned how you can use your application logs hosted on an Amazon Lightsail instance to create a subscription filter in Amazon CloudWatch. But have you ever wondered how to push your application logs from your Lightsail instance to CloudWatch? Unlike in the EC2 instance, which allows you to easily modify the IAM role and attach the CloudWatchAgentServerPolicy, Amazon Lightsail lacks this capability in its default configuration.
Pushing application logs to Amazon CloudWatch is invaluable for maintaining a robust monitoring system. It allows you to track application performance, diagnose issues in real-time, and gain deeper insights through log analysis. Although Lightsail has certain limitations, you can still achieve seamless log integration by following a few extra steps.
In this article, we will be discussing the step-by-step process to bridge this gap. This approach will help you fully leverage CloudWatch’s capabilities for your Lightsail-hosted applications. Whether you are troubleshooting application errors, tracking key metrics, or setting up alerts, this integration can enhance your application’s reliability and streamline your ability to address issues effectively.
Solution Overview
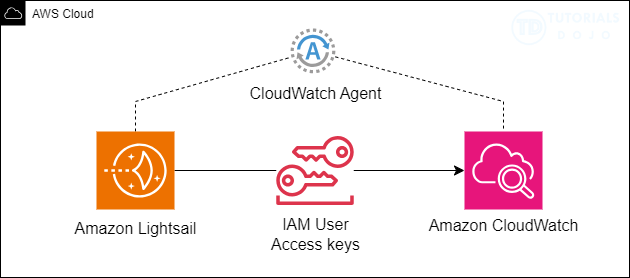
The goal of this solution is to enable seamless integration between Amazon Lightsail and Amazon CloudWatch for centralized log monitoring and analysis. Application logs are generated on the Lightsail instance where the application is hosted.
To achieve this, the solution involves the following key components:
-
Amazon Lightsail: This service hosts the application and generates the logs to be monitored.
-
IAM User Access Keys: Since Amazon Lightsail does not allow you to attach an IAM role, you will use IAM user access keys for authentication. These keys are securely configured on the Lightsail instance via the AWS CLI to enable interaction with AWS services.
-
CloudWatch Agent: Installed on the Lightsail instance, the CloudWatch Agent collects application logs and pushes them to CloudWatch. The agent also allows customization, such as specifying log file paths and defining log groups and streams.
-
Amazon CloudWatch: This service provides a centralized platform to store, analyze, and monitor logs. Logs are organized into log groups and streams, simplifying the tracking and analysis of specific applications or instances.
This solution bridges the gap between Lightsail and CloudWatch, even though Lightsail lacks the built-in capability to modify IAM roles for attaching policies like CloudWatchAgentServerPolicy. By using IAM user access keys, the CloudWatch Agent, and the AWS CLI, you can manually set up and configure log ingestion. This integration enhances monitoring capabilities, ensuring your application runs reliably and efficiently.
Prerequisites:
Before you begin, ensure the following:

-
An active Amazon Lightsail instance where your application is hosted.
- You have access to an IAM user or key pair with the required permissions to write logs to CloudWatch.
Step 1: Install the AWS CLI
The AWS CLI is essential for interacting with AWS services directly from your Lightsail instance.
-
Connect to the instance: Use an SSH client or the built-in browser-based SSH terminal from the Lightsail console to access your instance.
-
Update the package repository: Ensure that your repository is up to date to avoid compatibility issues:
sudo apt-get update -
Install the AWS CLI:
sudo apt-get install awscli -y - Verify the installation: Confirm that the CLI was installed successfully:
aws --versionYou should see the installed version of the AWS CLI.
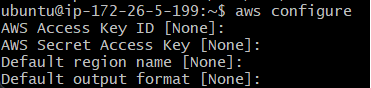
Step 2: Configure the AWS CLI
The AWS CLI must be set up with your credentials to authenticate and interact with AWS resources.
-
Run the configuration command:
aws configure
-
Provide your AWS Access Key and Secret Key: These credentials are generated in the AWS Management Console under IAM > Users > Security Credentials.
- Specify your default region: For example, if your Lightsail instance is in the Singapore region, input
ap-southeast-1. - Select the output format: You can choose
json,text, ortable. For most cases,jsonis recommended.
By configuring the CLI, your instance can now interact with AWS services such as CloudWatch.
Step 3: Install the CloudWatch Agent
The CloudWatch Agent facilitates the collection and transfer of application logs to CloudWatch.
-
Download the agent:
wget https://s3.amazonaws.com/amazoncloudwatch-agent/amazon_linux/amd64/latest/amazon-cloudwatch-agent.rpm - Install the agent:
sudo rpm -U ./amazon-cloudwatch-agent.rpm - Verify the installation: Check if the CloudWatch Agent was installed correctly:
amazon-cloudwatch-agent-ctl -h
The agent is now ready to be configured to collect and push logs.
Step 4: Configure the CloudWatch Agent
You need to define what logs the agent should collect and where to send them in CloudWatch.
-
Create the configuration file: Open the file for editing:
sudo vi /opt/aws/amazon-cloudwatch-agent/bin/config.json - Specify the configuration settings: Paste the following JSON content into the file:
Note: This configuration is provided as an example for pushing application logs to CloudWatch when using the Nginx web server. Feel free to customize it to suit your specific requirements.
-
file_path: Update this to the actual path of your application log file on the Lightsail instance (e.g.,
/var/log/nginx/access.log). -
log_group_name: Provide a name for the CloudWatch log group where logs will be stored (e.g.,
LightsailAppLogs). -
log_stream_name: Use placeholders like
{instance_id}to dynamically generate unique stream names.
-
- Save and close the file.
Press ESC ->:wq!
Step 5: Start the CloudWatch Agent
With the configuration in place, start the agent to begin pushing logs to CloudWatch.
-
Launch the agent:
sudo /opt/aws/amazon-cloudwatch-agent/bin/start-amazon-cloudwatch-agent - Check if the agent is running:
ps aux | grep amazon-cloudwatch-agentThis command ensures the agent is active.
Step 6: Verify Log Ingestion in CloudWatch

Finally, ensure that the logs are being pushed to CloudWatch successfully.
-
Open the CloudWatch console: Navigate to the Log Groups section.
-
Locate your log group: Look for the log group name you defined in the agent configuration (e.g.,
LightsailAppLogs). -
Inspect the log stream: Select a log stream (e.g., the one named after your instance ID) and confirm that logs are appearing as expected.
Additional Considerations
-
Permissions: Ensure your IAM user or key pair has the necessary permissions to write logs to CloudWatch. Attach the
CloudWatchAgentServerPolicyto the IAM user if needed. -
Retention Policies: Set a retention policy for your log group in the CloudWatch console to manage storage costs.
-
Custom Metrics: Beyond logs, the CloudWatch Agent can also be configured to collect custom metrics like CPU or memory utilization.
Reference:
https://aws.amazon.com/blogs/compute/monitoring-memory-usage-lightsail-instance/
🐰 25% OFF Easter Sale! Use code TDPLAYCLOUD-04022026 for 10% OFF ALL PlayClouds Subscription & 5% OFF gift cards!

Learn AWS with our PlayCloud Hands-On Labs

$2.99 AWS and Azure Exam Study Guide eBooks

New AWS Generative AI Developer Professional Course AIP-C01

Learn GCP By Doing! Try Our GCP PlayCloud

Learn Azure with our Azure PlayCloud

FREE AI and AWS Digital Courses

FREE AWS, Azure, GCP Practice Test Samplers


Subscribe to our YouTube Channel

Follow Us On Linkedin


