Last updated on May 2, 2023
AWS Systems Manager
allows your organization to monitor and control their infrastructure on AWS and on-premises environments. Systems Manager provides a unified interface to which you can monitor thousands of servers and services of AWS. Essentially, Systems Manager simplifies resource and application management, shortens the time to detect and resolve operational problems, and makes it easy to operate and manage your infrastructure securely at scale.
The following are the capabilities of AWS Systems Manager for your Hybrid Environment:
- Centrally define the configuration options and policies for your managed instances.
- Automate or schedule a variety of maintenance and deployment tasks.
- Use and create runbook-style SSM documents that define the actions to perform on your managed instances.
- Run a command, with rate and error controls, that targets an entire fleet of managed instances.
- Securely connect to a managed instance with a single click, without having to open an inbound port or manage SSH keys.
- Perform automated inventory by collecting metadata about your Amazon EC2 and on-premises managed instances. Metadata can include information about applications, network configurations, and more.
- View consolidated inventory data from multiple AWS Regions and accounts that you manage.
- Quickly see which resources in your account are out of compliance and take corrective action from a centralized dashboard.
In this article, we will be talking about deploying the Systems Manager agent to hybrid environments such as on-premises servers or servers of other cloud providers using Windows and Ubuntu workloads. This essentially allows you to manage your on-premises VMs or servers the same way as your managed EC2 instances registered on Systems Manager.
Set up Systems Manager Hybrid Activation
The first part of Hybrid activation is to “create an activation” on Systems Manager which will be used to register your on-premises servers. The following steps outline how to do this.
- Login to your AWS Console.
- Under the services tab, search for “Systems Manager”
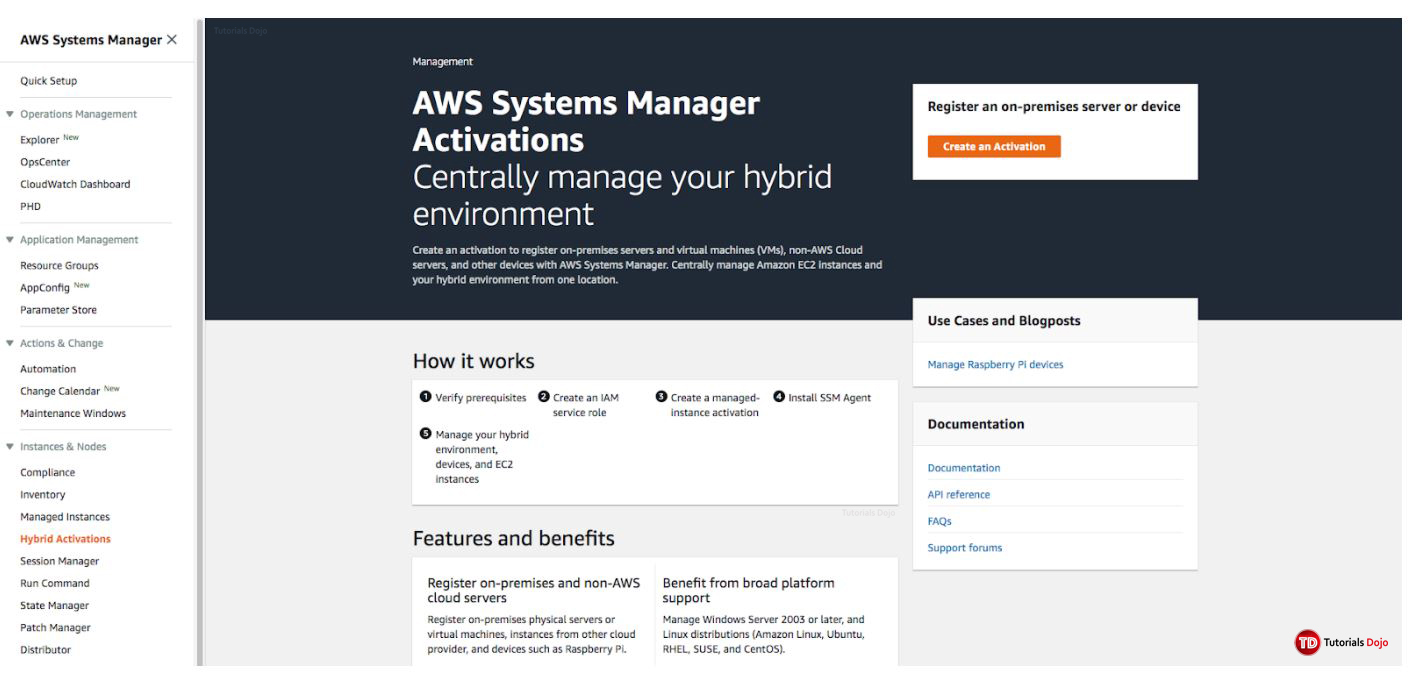
- Click on “Hybrid Activations” and click “Create an Activation”
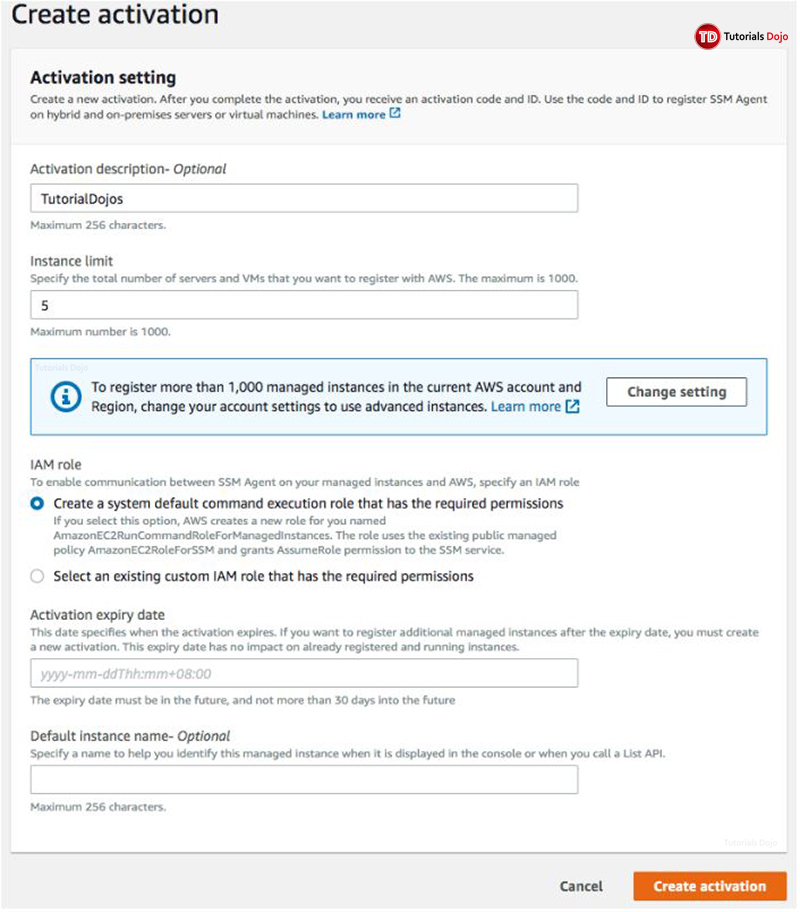
4. On the Create Activation page, input the following details:
-
- Activation Description: Specify the name of your activation
- Instance Limit: Specify the maximum amount of servers you want to deploy the agent to.
- IAM Role: Pick “Create a System Default Command”
- Activation Expiry Date: Specify your preferred expiration date
- If you will add additional servers after the expiry date, you need to create a new activation
- Default Instance Name: Specify the preferred name of your servers that will appear on the console.
- Click “Create Activation” to create this activation.
5. Once you’ve created your activation, you will be redirected to the Hybrid Activations page and at the top, you should see your activation code and activation ID. Take note of these values as you will need them on the next section where you will install the SSM agent.
Installation and Registration your Hybrid Environment servers
The second part for Hybrid Activation is to install the Systems Manager agent on the on-premises servers or VMs. The following sections show installation steps for Windows and Ubuntu based machines.
WINDOWS 64 BIT INSTALLATION CODE
- RDP into your Windows server.
- Launch Powershell with administrator privileges
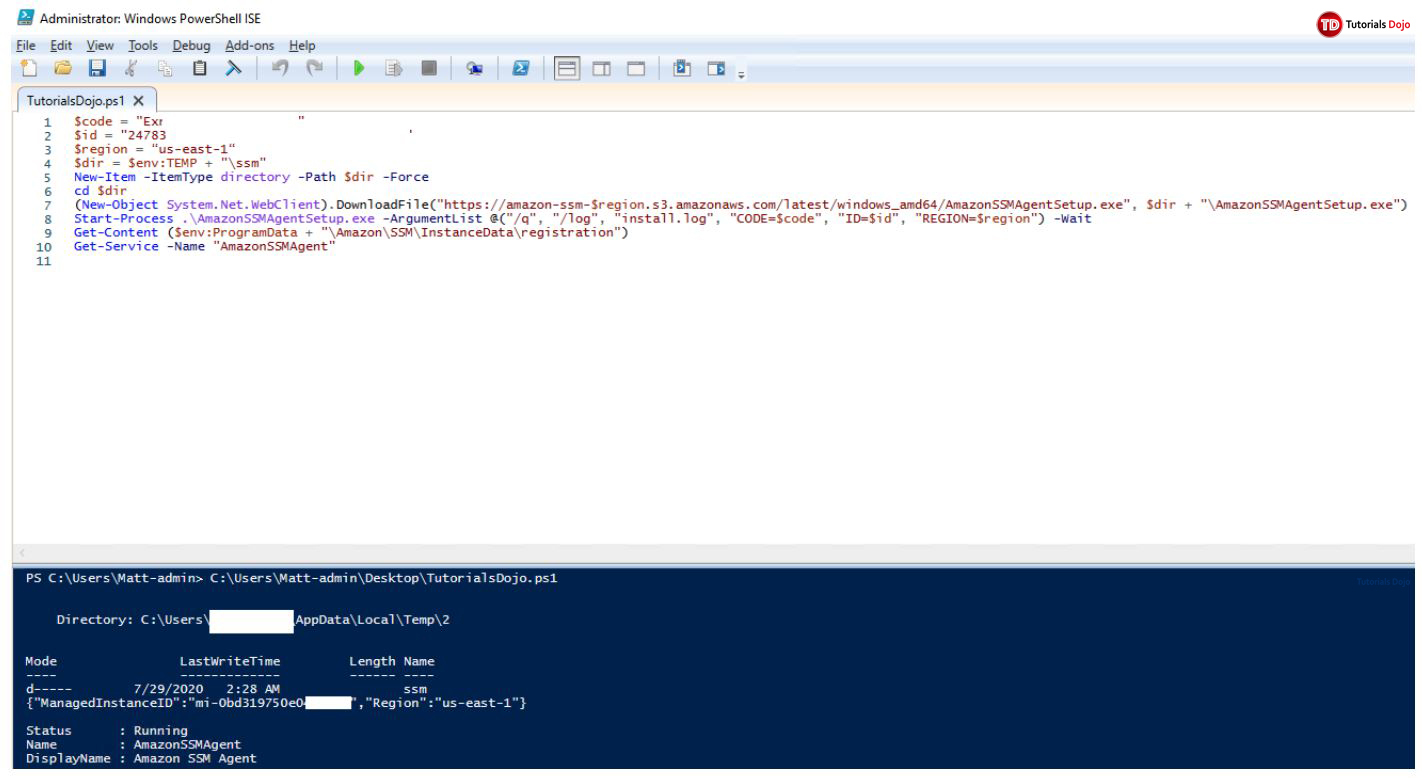
- Copy and paste the code below to your PowerShell.
- Substitute the Activation code and activation ID to the values given before when you created your Hybrid Activation
- Specify the AWS region your Systems Manager resides at.
$code = "activation-code"
$id = "activation-id"
$region = "region"
$dir = $env:TEMP + "\ssm"
New-Item -ItemType directory -Path $dir -Force
cd $dir
(New-Object
System.Net.WebClient).DownloadFile("https://amazonssm-$region.s3.amazonaws.co
m/latest/windows_amd64/AmazonSSMAgentSetup.exe",           $dir             +
"\AmazonSSMAgentSetup.exe")
Start-Process   .\AmazonSSMAgentSetup.exe   -ArgumentList  @("/q",    "/log",
"install.log", "CODE=$code", "ID=$id", "REGION=$region") -Wait
Get-Content ($env:ProgramData + "\Amazon\SSM\InstanceData\registration")
Get-Service -Name "AmazonSSMAgent"
4. Run the PowerShell file. After installation, it will return a response.
UBUNTU INSTALLATION CODE
- SSH into your Ubuntu server.
- Create a script with sudo privileges
- Copy and paste the code below to your script:
- Substitute the Activation code and activation ID to the values given before when you created your Hybrid Activation
- Specify the AWS region your Systems Manager resides at.
mkdir /tmp/ssm
curl
https://s3.amazonaws.com/ec2-downloads-windows/SSMAgent/latest/debian_amd64/am
azon-ssm-agent.deb -o /tmp/ssm/amazon-ssm-agent.deb
sudo dpkg -i /tmp/ssm/amazon-ssm-agent.deb
sudo service amazon-ssm-agent stop
sudo amazon-ssm-agent -register -code "activation-code" -id "activation-id"
-region "region"
sudo service amazon-ssm-agent start
4. Run the script. After installation, a successful response will be returned as shown below.
Monitoring Managed Instances
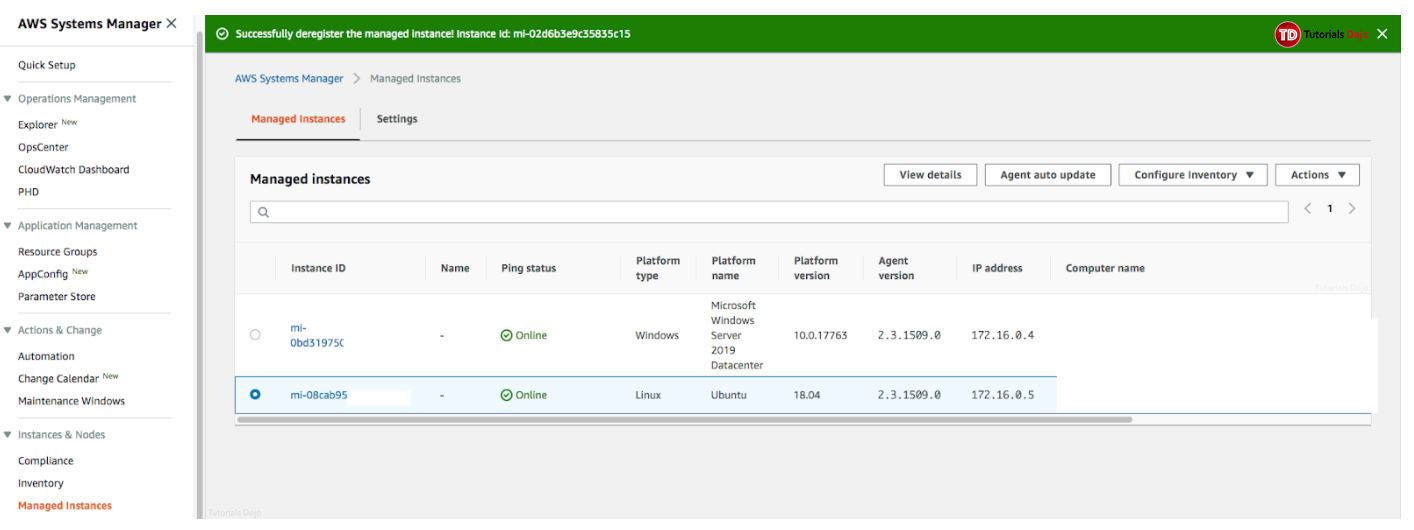
You can now monitor your registered instances under the “Managed Instances” tab.
It is important to note that hybrid activations have a prefix of “mi-” instead of “i-” for AWS hosted EC2 instances. This way, you can easily identify which are hybrid instances from Amazon EC2 instances. You can now perform the same actions on these hybrid instances with the tools provided by Systems Manager such as create Maintenance Windows, schedule patches with Patch Manager, use the Run Command to send commands on the servers, or use Session Manager to create an RDP or SSH connection to the servers from a web browser.
References:
https://docs.aws.amazon.com/systems-manager/latest/userguide/what-is-systems-manager.html
https://docs.aws.amazon.com/systems-manager/latest/userguide/sysman-install-managed-win.html


