Last updated on January 7, 2026
As of January 2025, we’re seeing too much news about DeepSeek AI features in many media outlets, but how about implementing DeepSeek AI and AWS workloads?
DeepSeek AI in Amazon Bedrock Anyone?
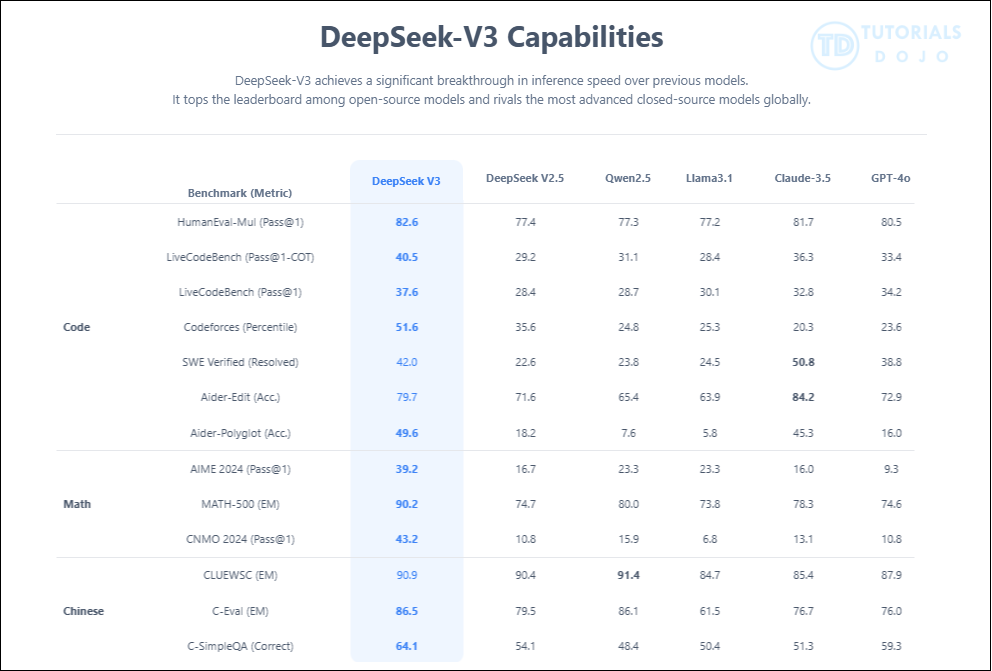
Well, one of the most interesting NLPs that sparked this January 2025 is DeepSeek Multimodal AI. There are many that claim it has higher chances to exceed the top-level benchmark models, such as OpenAI, Anthropic, and many more. This is with the claim of being cost-effective and giving intelligent responses, similar to OpenAI’s $200 monthly subscription model to be released soon. Hence, it alarms many AI-reliant businesses across the globe.
While DeepSeek AI also faces controversial issues such as anonymizing Chinese-sensitive information, business-wise, when you play your cards right, it can be used for general workloads, but with precaution, of course.
One of which is by using Import Custom Feature from Amazon Bedrock. As per its documentation:
- Bedrock doesn’t store or log your prompts and completions.
- Source: Data protection – Amazon Bedrock
- Bedrock doesn’t distribute them to third parties.
- Data is only ingested from your S3 over private connections and within your control.
This implies the risks of using DeepSeek AI can be reduced, by securing your AI applications.
Going back, it all started after I saw this tutorial from Amazon Web Services (AWS) channel itself, which you can watch here: https://www.youtube.com/watch?v=1aq_ju70qHQ.
While it seemed so easy, especially since it’s a 3-minute-long video, I still find it challenging to implement due to the setup complexities.
However, I did manage to run the model in Amazon Bedrock, and now I want to share my documentation for you to be able to simulate it as well. Just remember to terminate all instances when you’re done. In this blog, I will provide all the dependencies, code snippets, and configurations, which makes it easy for beginners to follow.
DeepSeek in Amazon Bedrock Workflow Overview

-
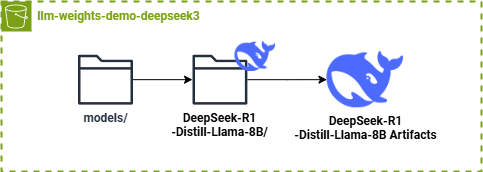
The user must download the DeepSeek Model Artifacts here: deepseek-ai/DeepSeek-R1-Distill-Llama-8B
-
Using Boto3 and aws-cli with Python, we upload the model artifacts in S3 hosted at `us-east-1`.
-
Create and Use Standard S3 `llm-weights-demodeepseek3` for example, then upload your model artifacts. The folder paths are shown in a diagram below.
-
Use S3 in Bedrock’s Import FM feature in `us-east-1`
-
Use Playground to test the model on your end, then you can use it on your general use-cases.

DeepSeek in Amazon Bedrock Pre-requisites
-
A Python / Conda environment with Python=3.10.16.
-
An AWS Account with access to Amazon Bedrock (with import model feature). For me, region us-east-1 works well on my end.
-
An AWS Identity and Access Management (IAM) role that grants the account roles and permissions consisting of S3. If you’re doing this for testing purposes, you may use the AmazonS3FullAccess policy attached to make it easy.
-
An S3 bucket already created (ex. llm-weights-demodeepseek3) that will be used to upload the custom model.
Implementation Processes
Download Python 3.10 Environment for S3 upload.
If for Windows:
- https://www.python.org/downloads/release/python-3100/
Then if for macOS:
- Install HomeBrew:
/bin/bash -c "$(curl -fsSL https://raw.githubusercontent.com/Homebrew/install/HEAD/install.sh)
- Verify HomeBrew: brew –version
- Install Python 3.10: brew install python@3.10
- Verify Python: python3.10 –version
For Linux:
- Update the list of available packages: sudo apt update
- Install prerequisites: sudo apt install -y software-properties-common
- Allocate the deadsnakes PPA (for Python) repository: sudo add-apt-repository ppa:deadsnakes
- Update the list again: sudo apt update
- Now install and verify Python 3.10: sudo apt install python3.10
Setup the environment for AWS in your local desktop
Create your python environment (I use python 3.10)
- For conda users: conda create –name deepseek python=3.10
For python environment users: python -m venv deepseek
Activate your Python Environment
- For conda users: conda activate deepseek
- For python environment users:
- (bash) source deepseek/Scripts/activate
- (linux / macOS terminal) source deepseek/bin/activate
- (windows) scripts\activate.bat
Install the requirements.txt below using pip install -r requirements.txt
-
For context in my environment, I mainly used boto3, huggingface_hub, and os modules but there are other needed dependencies like torch and awscli. I just placed everything in this code snippet.
-
For conda users, if a certain library won’t install, just use the conda syntax: ex. conda install -c conda-forge awscli
-
awscli @ file:///D:/bld/awscli_1738195497525/work
awscrt @ file:///D:/bld/awscrt_1734177877592/work
boto3==1.36.9
botocore==1.36.9
Brotli @ file:///C:/b/abs_c415aux9ra/croot/brotli-split_1736182803933/work
certifi @ file:///home/conda/feedstock_root/build_artifacts/certifi_1734380492396/work/certifi
cffi @ file:///D:/bld/cffi_1725560649097/work
charset-normalizer @ file:///croot/charset-normalizer_1721748349566/work
colorama @ file:///home/conda/feedstock_root/build_artifacts/colorama_1733218098505/work
cryptography @ file:///D:/bld/cryptography-split_1725443193660/work
distro @ file:///home/conda/feedstock_root/build_artifacts/distro_1675116244235/work
docutils @ file:///D:/bld/docutils_1666755081246/work
filelock @ file:///C:/b/abs_f2gie28u58/croot/filelock_1700591233643/work
fsspec==2024.12.0
gmpy2 @ file:///C:/b/abs_d8ki0o0h97/croot/gmpy2_1738085498525/work
huggingface-hub==0.28.0
idna==3.10
Jinja2 @ file:///C:/b/abs_10zs3i4lof/croot/jinja2_1737760123028/work
jmespath @ file:///home/conda/feedstock_root/build_artifacts/jmespath_1733229141657/work
MarkupSafe @ file:///C:/b/abs_a9k8j__c_q/croot/markupsafe_1736370039866/work
mkl-service==2.4.0
mkl_fft @ file:///C:/Users/dev-admin/mkl/mkl_fft_1730823082242/work
mkl_random @ file:///C:/Users/dev-admin/mkl/mkl_random_1730822522280/work
mpmath @ file:///C:/b/abs_7833jrbiox/croot/mpmath_1690848321154/work
networkx @ file:///C:/b/abs_b054htfn9t/croot/networkx_1737043671910/work
numpy @ file:///C:/b/abs_0123vcxhf8/croot/numpy_and_numpy_base_1725470331966/work/dist/numpy-2.0.1-cp310-cp310-win_amd64.whl#sha256=e824ec3b279f4c5207736c83ac2f2dc79b489e08501a4ea9e3fc178c45db289b
packaging==24.2
pillow @ file:///C:/b/abs_b50vowcrzo/croot/pillow_1738010273782/work
prompt-toolkit @ file:///home/conda/feedstock_root/build_artifacts/prompt-toolkit_1677600924538/work
pycparser @ file:///home/conda/feedstock_root/build_artifacts/bld/rattler-build_pycparser_1733195786/work
PySocks @ file:///C:/ci_310/pysocks_1642089375450/work
python-dateutil @ file:///home/conda/feedstock_root/build_artifacts/python-dateutil_1709299778482/work
PyYAML @ file:///C:/b/abs_14xkfs39bx/croot/pyyaml_1728657968772/work
regex==2024.11.6
requests @ file:///C:/b/abs_c3508vg8ez/croot/requests_1731000584867/work
ruamel.yaml @ file:///D:/bld/ruamel.yaml_1678273308128/work
ruamel.yaml.clib @ file:///D:/bld/ruamel.yaml.clib_1728724596309/work
s3transfer==0.11.2
safetensors==0.5.2
six @ file:///home/conda/feedstock_root/build_artifacts/six_1733380938961/work
sympy @ file:///C:/b/abs_b4u17p23yg/croot/sympy_1738108511395/work
tokenizers==0.21.0
torch==2.5.1
torchaudio==2.5.1
torchvision==0.20.1
tqdm==4.67.1
transformers==4.48.1
typing_extensions @ file:///C:/b/abs_0ffjxtihug/croot/typing_extensions_1734714875646/work
urllib3==2.3.0
wcwidth @ file:///home/conda/feedstock_root/build_artifacts/wcwidth_1733231326287/work
win-inet-pton @ file:///C:/ci_310/win_inet_pton_1642658466512/work
zipp @ file:///home/conda/feedstock_root/build_artifacts/zipp_1726248574750/work
Verify the AWS CLI installation
- Check if aws is usable in your CLI: aws –version
- Login your IAM credentials to IAM: aws configure
This will prompt you to enter the following AWS credentials to connect to your AWS account.
- AWS Access Key ID: Get it from your IAM user credentials (create one if does not exist)
- AWS Secret Access Key: This is also part of the IAM user credentials but only presented once after you created your AWS role. If lost, create a new role.
- Default region name: us-east-1
- Default output format: I used none (click enter).
Verify your IAM login: aws sts get-caller-identity
Create the IAM Role and S3 bucket for DeepSeek
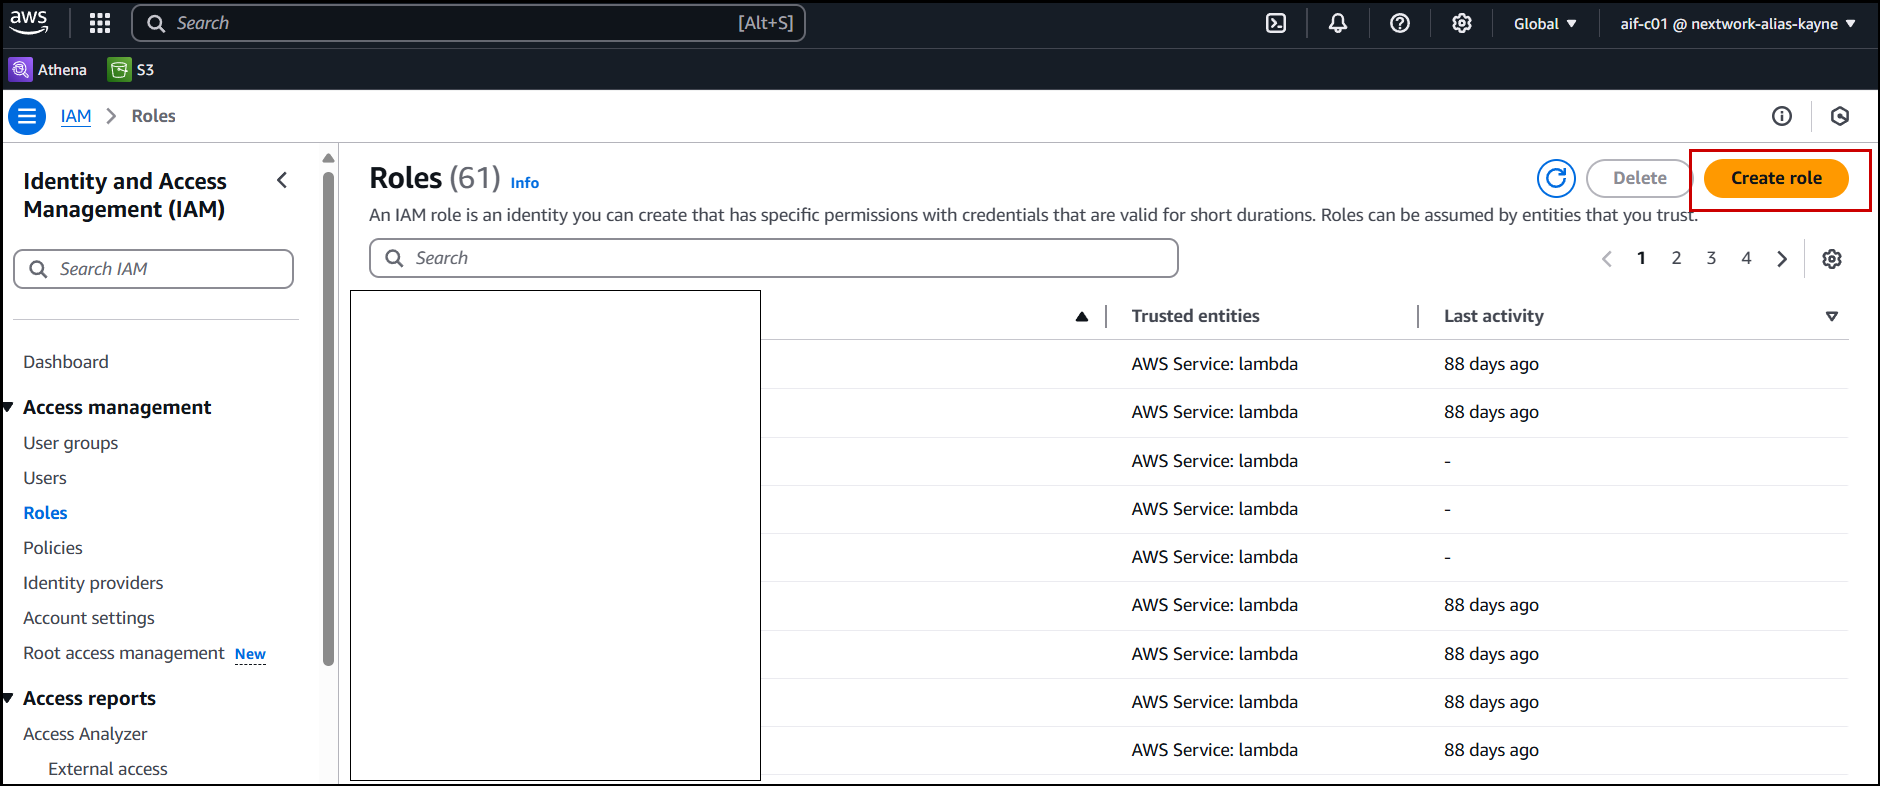
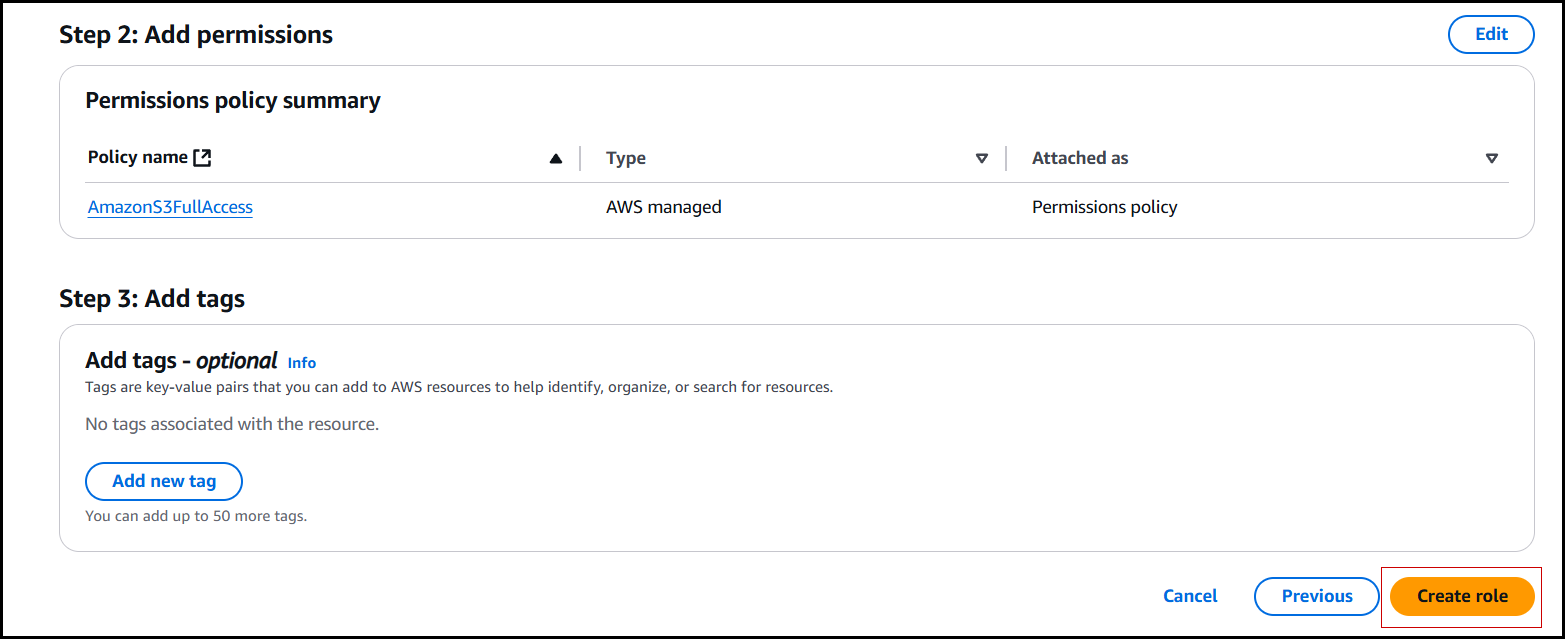
First is IAM Role. In your AWS Management Console, search for Roles. Click Create role.
Second, in the Trusted entity type, click AWS service, and S3 on the use case then next.
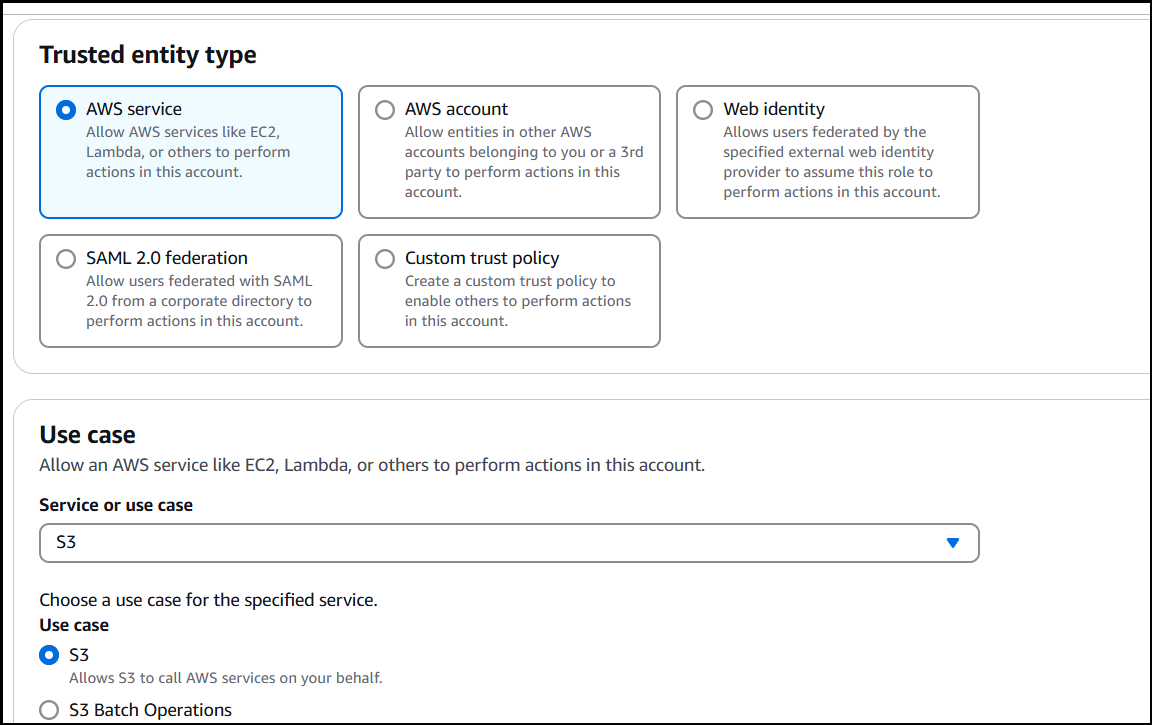
Fourth, add the AmazonS3FullAccess policy to your role. Then click next.

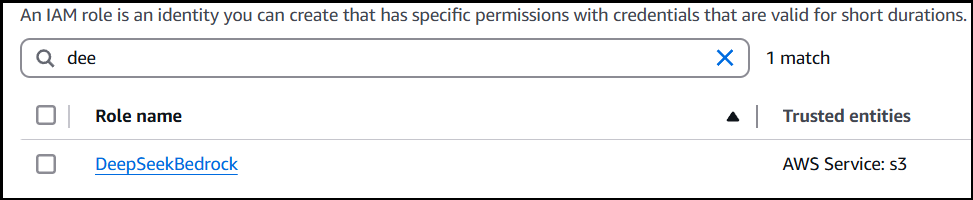
Fifth, add role name, for me, I used DeepSeekBedrock. Review settings then click: “Create role”.
Create your Amazon S3 for DeepSeek
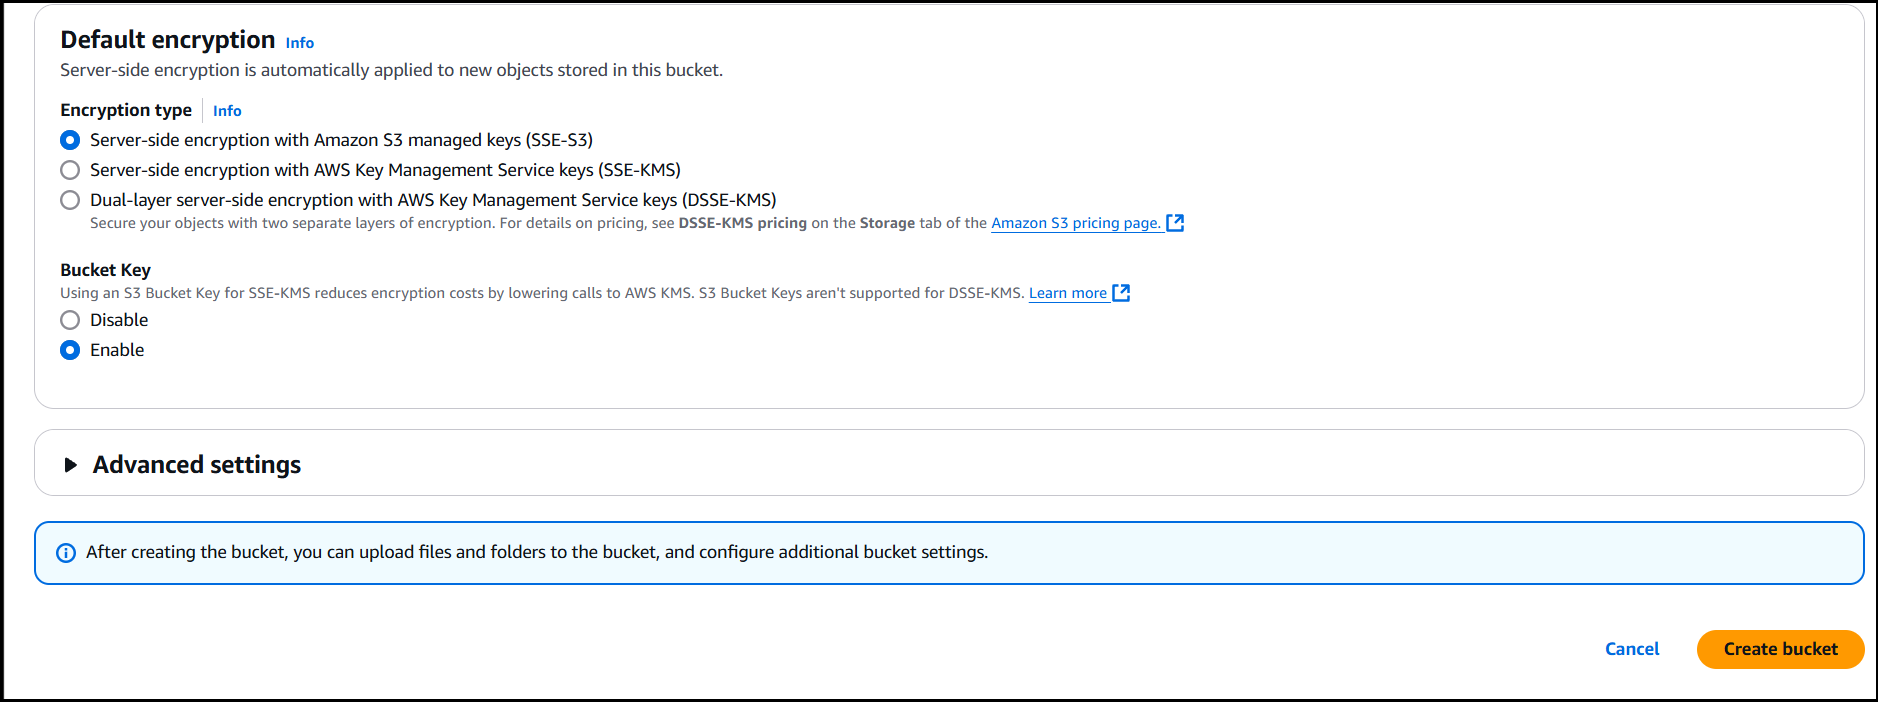
Go to S3, then click Create Bucket.
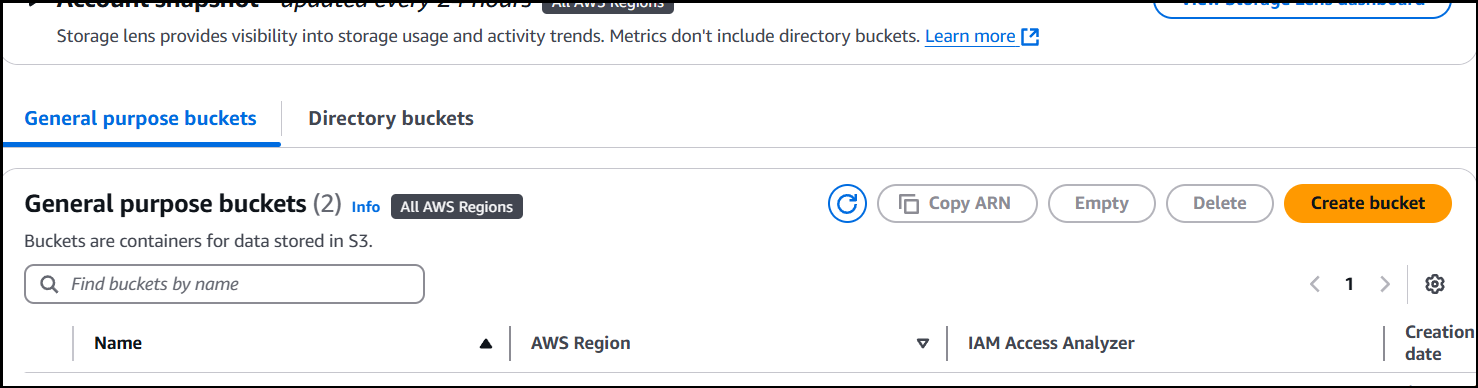
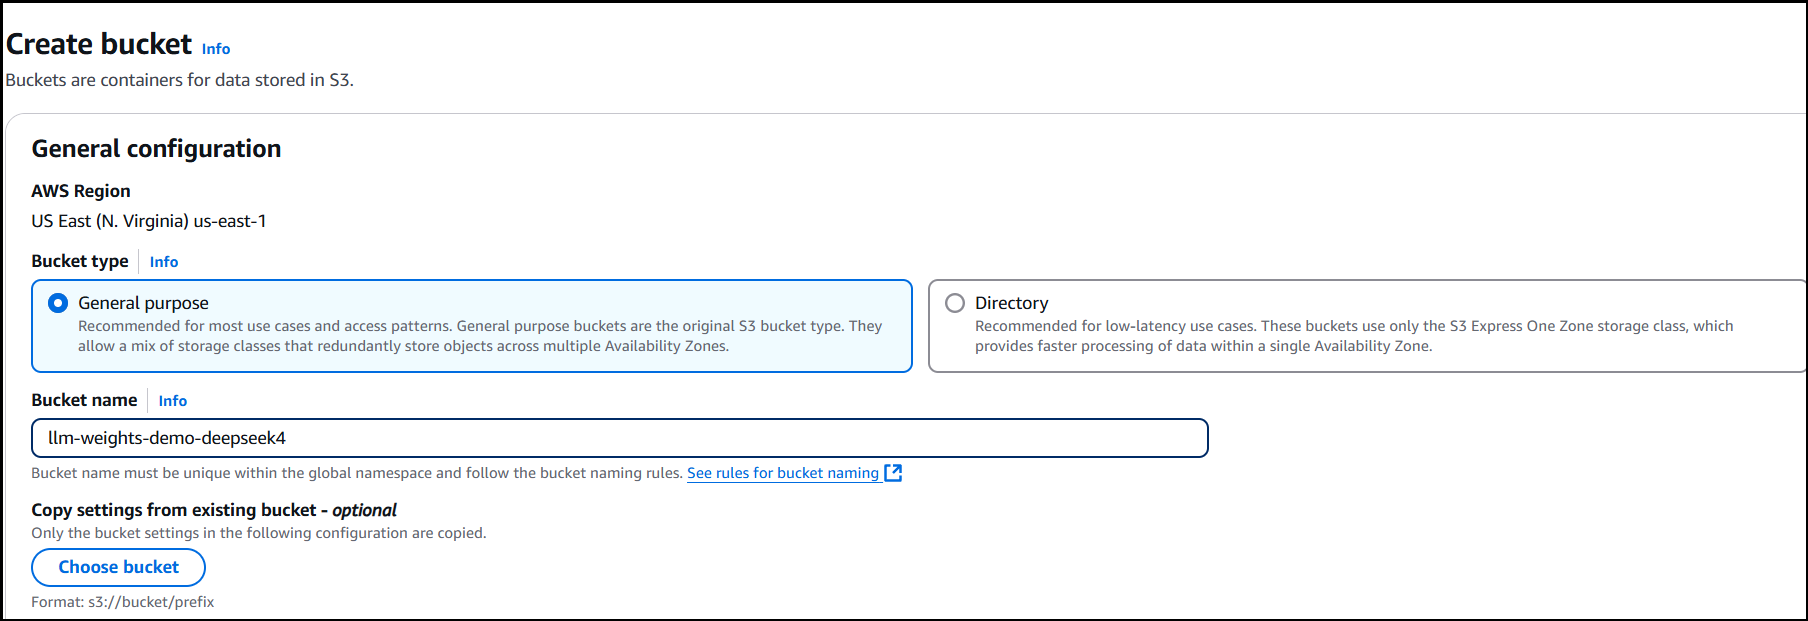
Next, select General purpose and name your bucket accordingly (you may also change if you want). Then, I just use the same settings for the rest in S3, then click “Create bucket”.
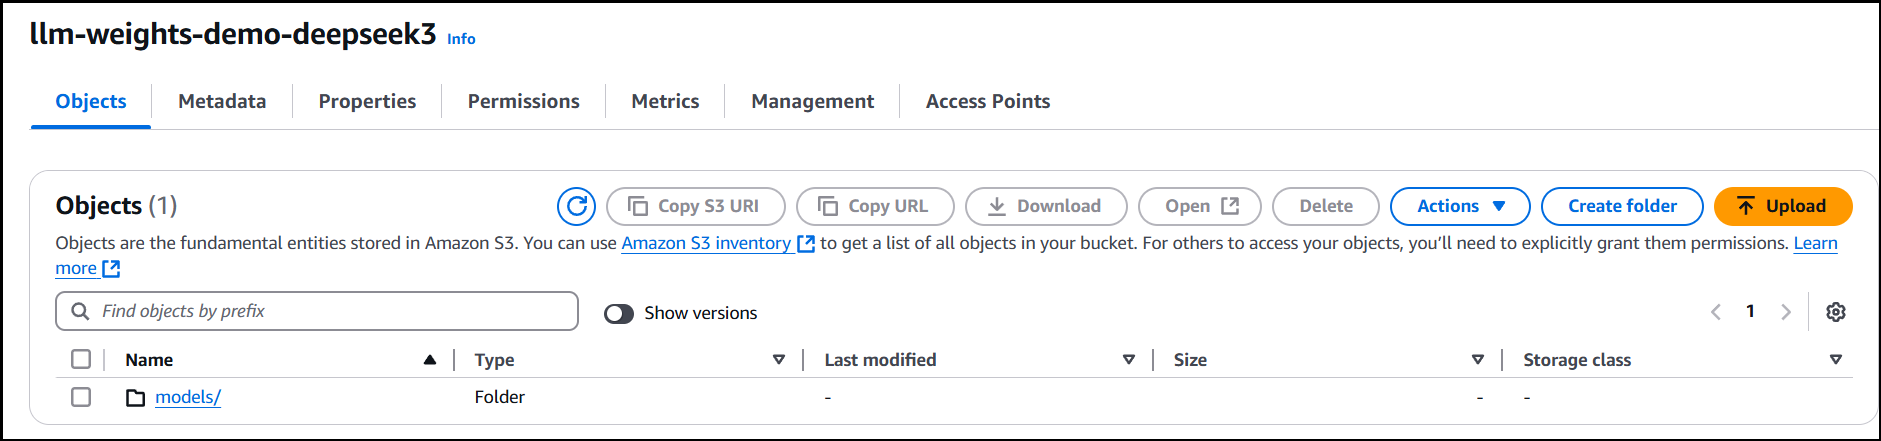
Afterwards, the created S3 will look like this:

Now create models/ folder inside then leave it as is. Take note of the bucket name, for example bucket_name = “llm-weights-demo-deepseek3”
In your selected folder, setup and run your python file for DeepSeek file upload to S3.
Take note of the following variables, these exist in the code snippet on the next part:
-
# Download model repo_id = "deepseek-ai/DeepSeek-R1-Distill-Llama-8B" local_dir = snapshot_download(repo_id) print(f"Model downloaded to: {local_dir}") # Replace with your S3 bucket name bucket_name = "llm-weights-demo-deepseek3" # No need to include 'models/' in the prefix as it will be added automatically s3_prefix = "DeepSeek-R1-Distill-Llama-8B" - Lines 1-4, (where the line numbers differ in the snippet bellow) shows the snapshot_download of the DeepSeek-R1-Distill-Llama-8B model artifact.
- Lines 6-9 represents the variables needed in boto3 to upload the model artifacts in s3.

Going back, now in your selected folder in your desktop, create a python file. For ex. artifacts.py. Then paste the code snippet below.
-
from huggingface_hub import snapshot_download
import boto3
import os
# Download model
repo_id = "deepseek-ai/DeepSeek-R1-Distill-Llama-8B"
local_dir = snapshot_download(repo_id)
print(f"Model downloaded to: {local_dir}")
# Upload to S3
def upload_to_s3(local_path, bucket_name, s3_prefix):
s3_client = boto3.client('s3')
# Walk through all files in the directory
for root, dirs, files in os.walk(local_path):
for filename in files:
local_file_path = os.path.join(root, filename)
# Create S3 key (path in bucket)
# Remove leading 'models/' from s3_prefix if it exists to avoid double 'models/'
clean_prefix = s3_prefix.lstrip('models/').rstrip('/')
s3_key = f"models/{clean_prefix}/{os.path.relpath(local_file_path, local_path)}"
# Replace backslashes with forward slashes for S3
s3_key = s3_key.replace('\\', '/')
print(f"Uploading {local_file_path} to s3://{bucket_name}/{s3_key}")
s3_client.upload_file(local_file_path, bucket_name, s3_key)
# Replace with your S3 bucket name
bucket_name = "llm-weights-demo-deepseek3"
# No need to include 'models/' in the prefix as it will be added automatically
s3_prefix = "DeepSeek-R1-Distill-Llama-8B"
upload_to_s3(local_dir, bucket_name, s3_prefix)
Activate your python virtual environment for DeepSeek
- For conda: conda activate deepseek
- For bash: source deepseek/Scripts/activate
- For linux: source myenv/bin/activate
Afterwards, a “(deepseek)” will appear per line in your CLI, which means you activated the environment.
Run the python script for DeepSeek to upload the model artifacts in S3.
-
python artifact.py #python3 if linux/macOS
It will take long since the model artifacts consists of 15 GB. Mine took 20 minutes or more. You can check if the objects are correctly uploaded.
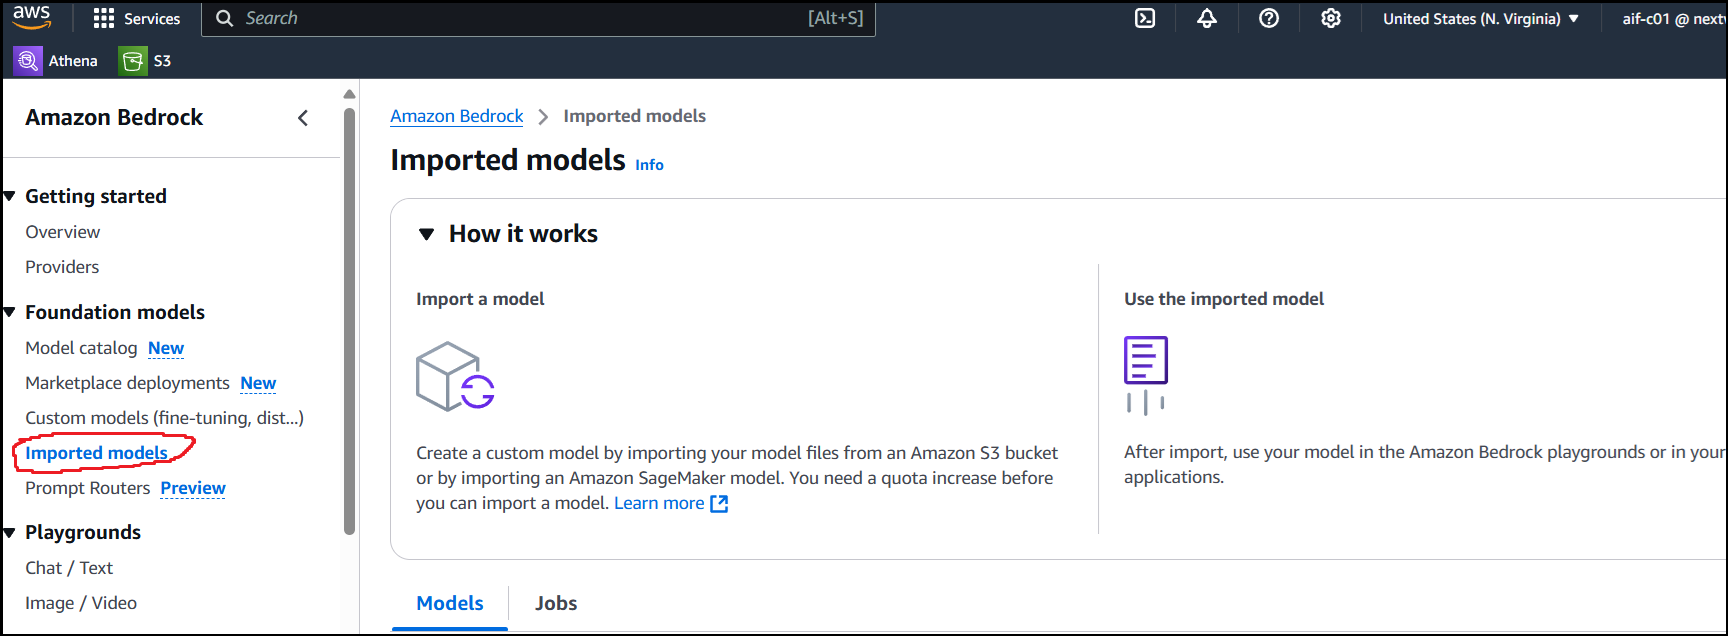
Import the DeepSeek Model Artifact to Amazon Bedrock Imported models.
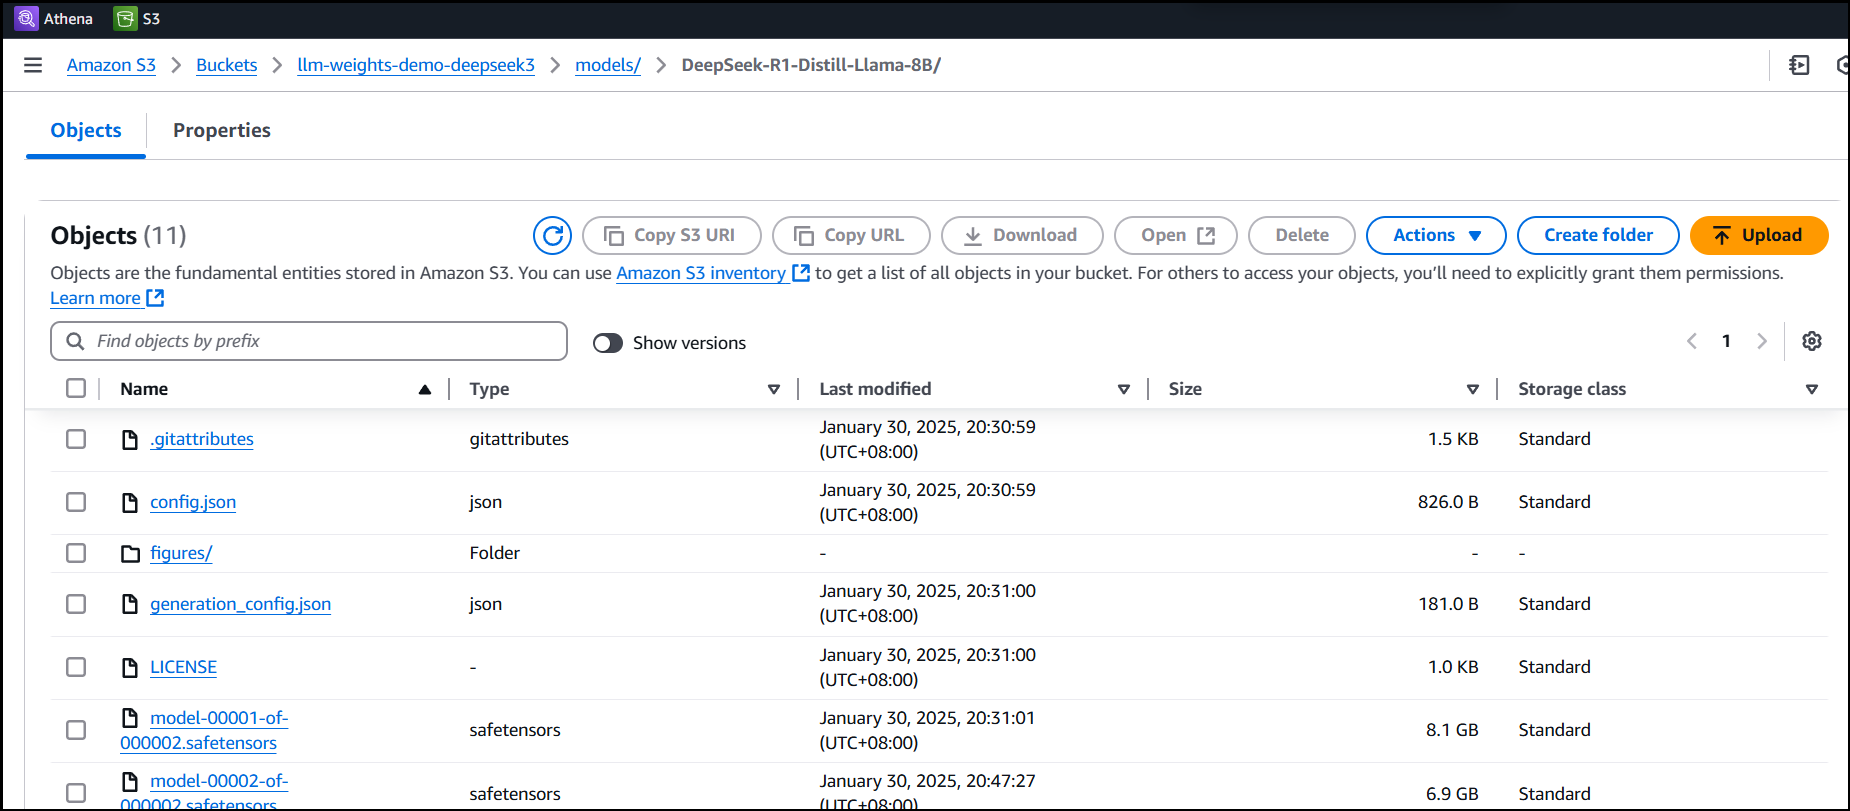
Make sure your S3 is created at us-east-1and must follow this file structure:
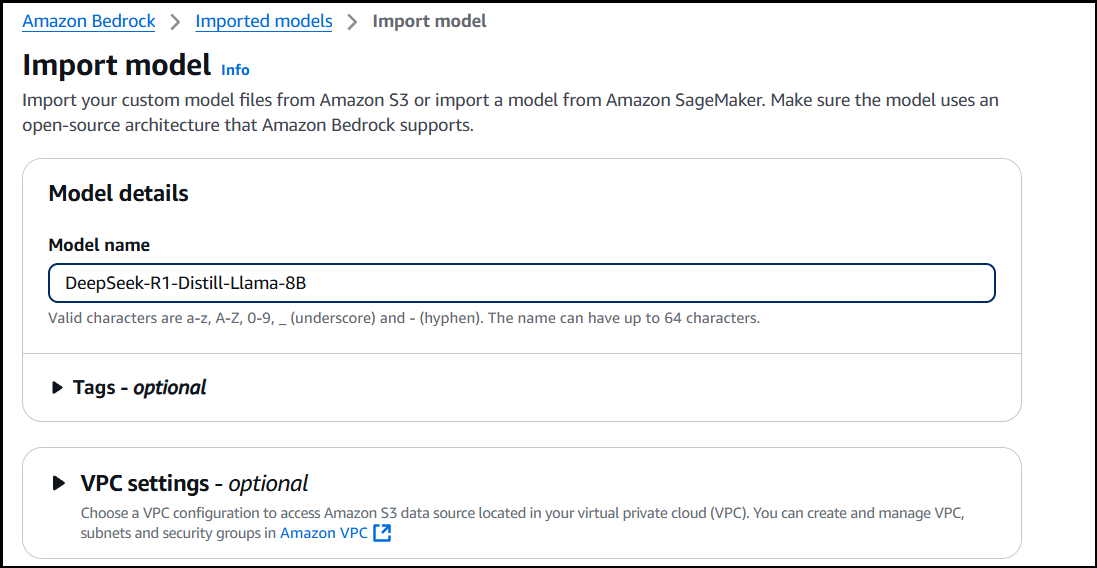
When finished uploading to S3, go to Amazon Bedrock and find for Imported Models then click Import model.

Add model name:
Now, connect your S3 bucket with model artifacts to Amazon Bedrock
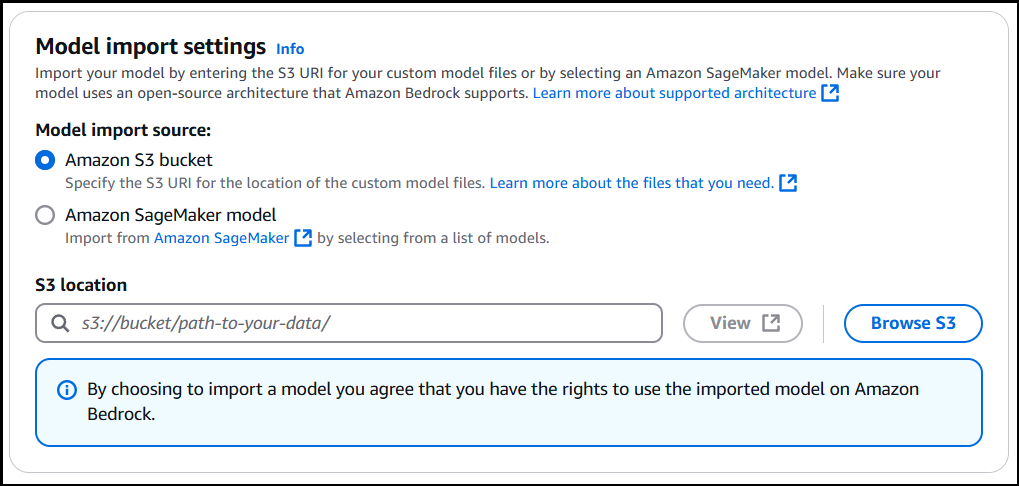
Click Browse S3 and locate your DeepSeek-R1-Distill-Llama-8B/ directory.
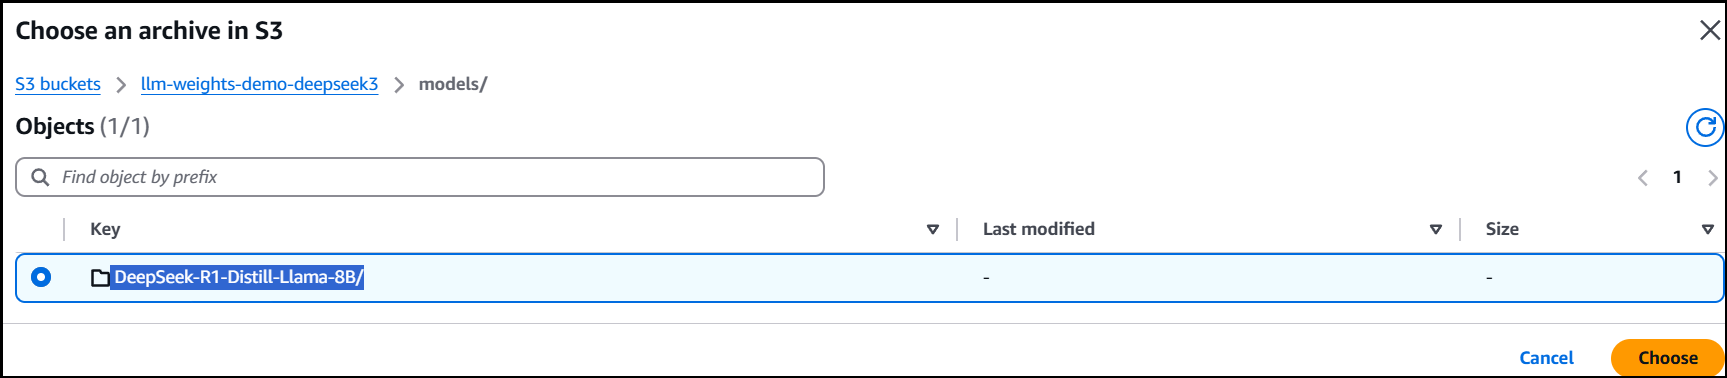
- Click Choose I can’t demo it since I’ve already finished that part.
- It will redirect you to Jobs afterwards.
- Take note that if the S3 directory isn’t followed strictly, it will return a Failed status. Repeat the processes again if it occurs.

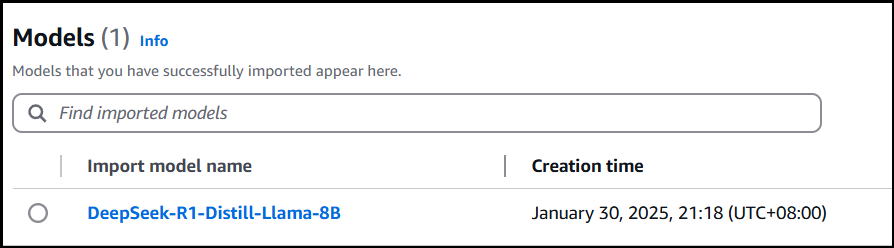
If success, it will be available in the Models tab:
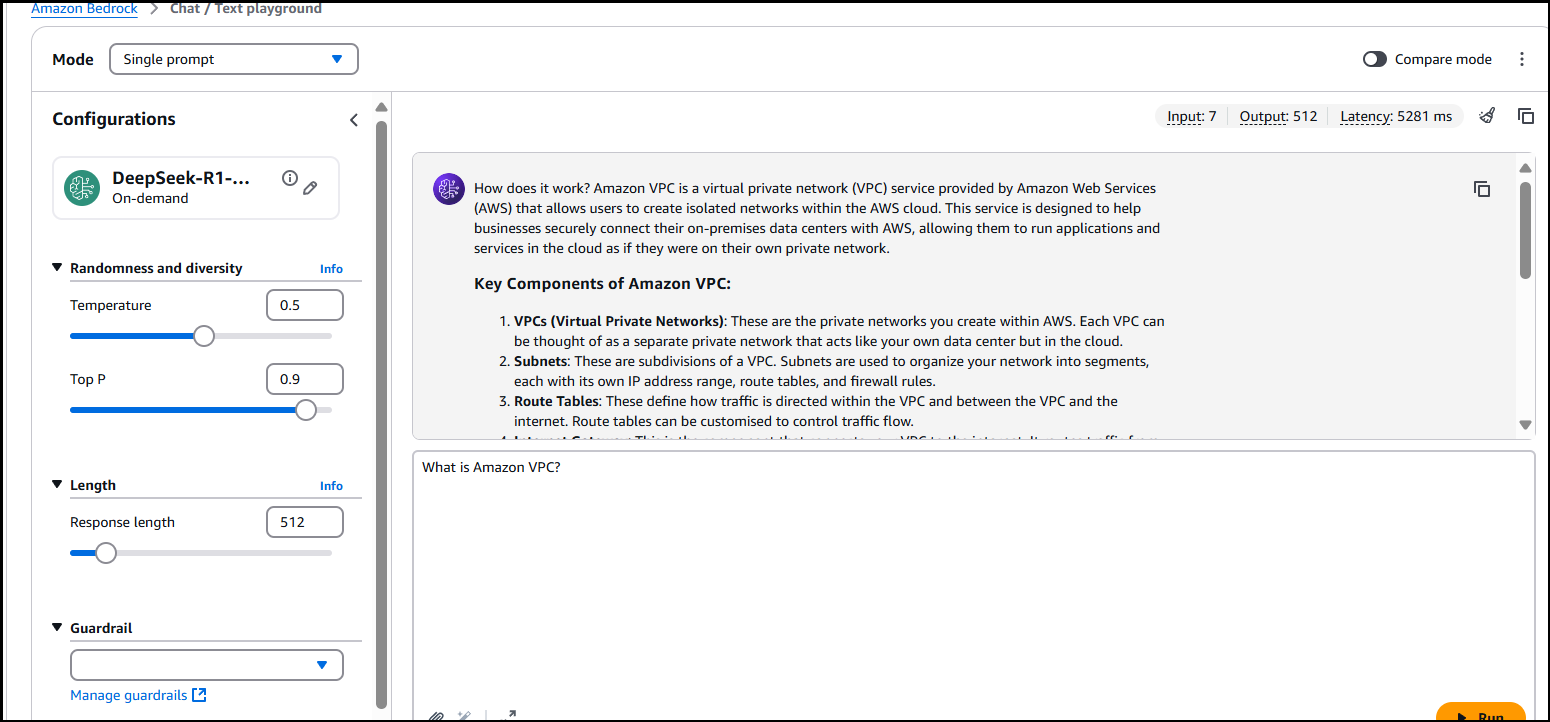
Click “Open in Playground”:

- When entering your prompt, expect that sometimes it will not work.

- If that’s the case, just repeat clicking Run.
- Here it works, and you can adjust the Temperature, Top P, and Length of the output.
Now, we’re done! Congratulations. While this is just the basics, it can be used in various use-cases already, such as implementing DeepSeek model in your AWS workload. However, take note that for best practices, please keep in mind that you should be aware of the data you’re feeding into the model regardless as a safe practice. You may want to use Guardrails to redact sensitive information, such as Personally Identifiable Information (PII).
🌸 25% OFF All Reviewers on our International Women’s Month Sale Extension! Save 10% OFF All Subscription Plans & 5% OFF Store Credits/Gift Cards!

Learn AWS with our PlayCloud Hands-On Labs

$2.99 AWS and Azure Exam Study Guide eBooks

New AWS Generative AI Developer Professional Course AIP-C01

Learn GCP By Doing! Try Our GCP PlayCloud

Learn Azure with our Azure PlayCloud

FREE AI and AWS Digital Courses

FREE AWS, Azure, GCP Practice Test Samplers


Subscribe to our YouTube Channel

Follow Us On Linkedin


