Setting up Kubernetes locally often becomes the most challenging part of learning it. Between installing Docker Desktop, configuring kubectl and Minikube, resolving version mismatches, and managing heavy resource usage, hours can be lost before a single workload is successfully deployed.
There’s a better way to approach Kubernetes development without the overhead of local setup and maintenance.
GitHub Codespaces provides a fully configured Kubernetes development environment that runs entirely in your browser. By removing local installations, dependency conflicts, and hardware constraints, it allows you to focus on understanding Kubernetes concepts and applying them in practice rather than troubleshooting your machine.
In this article, you’ll learn Kubernetes fundamentals by building something practical: a dynamic QR code generator capable of handling URLs, contact cards, WiFi credentials, and more. The focus is hands-on implementation, using real Kubernetes resources to demonstrate how modern applications are deployed and managed.
Understanding Kubernetes: The Core Concepts
Before touching any code, it’s important to understand what Kubernetes actually does and why it has become a foundation for modern cloud applications. It’s not just a tool for running containers—it’s the system that keeps apps reliable, scalable, and resilient under real-world conditions. By learning these concepts first, you’ll avoid confusion when you start deploying workloads, and everything you do afterward will make sense, and your hands-on experience will be meaningful, not just trial and error. Think of Kubernetes as the invisible manager that orchestrates your applications so you can focus on building features instead of babysitting infrastructure.
What Problem Does Kubernetes Solve?
Running an application in a single container might work at first, but real-world conditions quickly expose limitations. Traffic spikes can overwhelm a single container, leaving requests unserved. When a container crashes, the application can go offline until it is manually restarted. Deploying updates often interrupts services and frustrates users, and managing dozens of services by hand quickly becomes chaotic. Kubernetes addresses all of this automatically, orchestrating containers so applications stay resilient, scalable, and reliable.
The Building Blocks
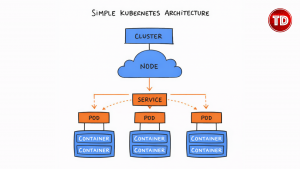
Kubernetes is composed of several core components that work together to make containerized applications manageable and resilient. Each piece has a specific role, and understanding these building blocks makes the system predictable and approachable.
Key components include:
- Container – Packages your application along with all its runtime, libraries, and dependencies, ensuring it runs the same way everywhere, whether on a laptop, a server, or the cloud.
- Cluster – A collection of machines, called nodes, managed together as a single system to run containers reliably.
- Node – An individual machine in the cluster responsible for running pods and reporting status back to the system.
- Pod – The smallest deployable unit in Kubernetes, typically containing one container. Pods are ephemeral and can be created, destroyed, and replaced automatically.
- Deployment – Defines how many pods should run and manages updates, allowing applications to scale and recover without manual intervention.
- Service – Provides a stable network endpoint for accessing pods while distributing traffic and balancing loads across them.
- kubectl – The command-line interface for interacting with the cluster, letting you inspect and manage workloads as needed.
- Minikube – A local tool for running a single-node Kubernetes cluster, ideal for learning and testing.
How These Pieces Work Together
Here’s where the magic happens.
- You start by writing a Deployment configuration that specifies how many pods to run and which container image to use.
- Kubernetes takes this configuration and automatically creates the specified pods across the available nodes.
- Then you set up a Service, which provides a stable network endpoint so that your pods are always reachable, no matter what happens to individual pods.
- If a pod crashes, Kubernetes replaces it immediately.
- Updates are rolled out gradually to avoid downtime, and if your traffic increases, you can scale the number of pods up. Kubernetes handles the rest.
This is why companies like Spotify, Airbnb, and Reddit use Kubernetes. It turns infrastructure management from a full-time job into a configuration file.
Why GitHub Codespaces for Kubernetes?
GitHub Codespaces provides a fully pre-configured Kubernetes development environment directly in your browser, so you can skip the installation and version conflicts entirely. It gives you a consistent, cloud-powered workspace that works the same on any device, letting you focus on coding and experimenting rather than troubleshooting your local setup.
VS Code is ready to go with all Kubernetes extensions installed, and the environment is powerful enough to handle clusters without slowing down your machine. With just a few clicks, you have a production-grade setup, making learning, testing, and scaling applications fast, seamless, and surprisingly accessible.
You get a production-grade development environment in 60 seconds.
Setting Up Your Kubernetes Environment
Let’s get your environment running.
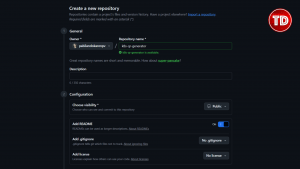
Step 1: Create a new GitHub repository
Go to GitHub and create a new repository called k8s-qr-generator. Make it public or private—doesn’t matter.
Step 2: Launch GitHub Codespaces
Click the green “Code” button on your repository, switch to the “Codespaces” tab, and click “Create codespace on main”.
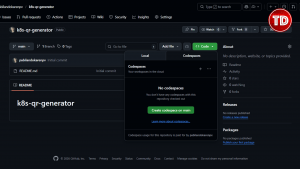
Wait about 30-60 seconds while GitHub provisions your development environment.
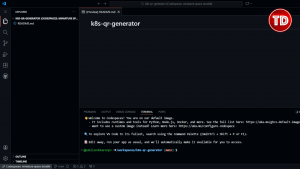
You’ll see VS Code load in your browser. This is a full Linux VM with VS Code—running in the cloud, accessible from anywhere.
Configuring Codespaces for Kubernetes
A fresh Codespace doesn’t have Kubernetes installed. Let’s fix that with a configuration file that tells GitHub what to install.
Step 1: Create the devcontainer configuration
In your Codespace, create a new folder called .devcontainer and inside it, create a file called devcontainer.json. Add this configuration:
{
  "name": "Kubernetes Development Environment",
  "image": "mcr.microsoft.com/devcontainers/base:ubuntu",
  "features": {
    "ghcr.io/devcontainers/features/docker-in-docker:2": {},
    "ghcr.io/devcontainers/features/kubectl-helm-minikube:1": {
      "version": "latest",
      "helm": "latest",
      "minikube": "latest"
    }
  },
  "postCreateCommand": "minikube start --driver=docker --container-runtime=docker",
  "customizations": {
    "vscode": {
      "extensions": [
        "ms-kubernetes-tools.vscode-kubernetes-tools"
      ]
    }
  }
}
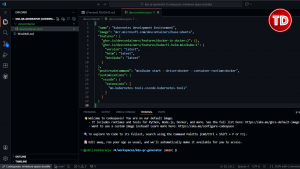
What this does:
- image – Base Ubuntu environment
- docker-in-docker – Installs Docker inside the Codespace
- kubectl-helm-minikube – Installs Kubernetes tools
- postCreateCommand – Automatically starts minikube when the container is created
- extensions – Installs the Kubernetes VS Code extension for visual cluster management
Step 2: Rebuild your Codespace
Press Cmd+Shift+P (Mac) or Ctrl+Shift+P (Windows/Linux) to open the Command Palette. Type “Rebuild Container” and select “Codespaces: Rebuild Container“.

This will take 2-3 minutes. GitHub is:
- Installing Docker
- Installing kubectl
- Installing minikube
- Starting a Kubernetes cluster
- Installing the Kubernetes VS Code extension

Step 3: Verify your Kubernetes setup
Once the rebuild completes, open the terminal (it should already be open at the bottom of VS Code) and run:
bash
# Check kubectl is installed
kubectl version --client

# Check Docker is available
docker --version

# Check minikube is running
minikube status
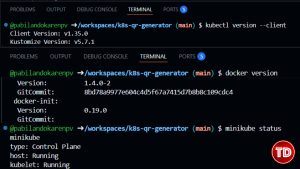
You should see:
- kubectl version information
- minikube showing “Running” for host, kubelet, and apiserver
- Docker version number
Congratulations! You now have a fully functional Kubernetes cluster running in the cloud, accessible from your browser.
Understanding Your Kubernetes Cluster
Let’s explore what you just created.
# View cluster information
kubectl cluster-info

# List all nodes in your cluster
kubectl get nodes

# See all running pods across all namespaces
kubectl get pods --all-namespaces
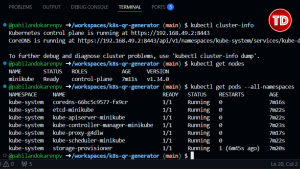
You’ll see:
- Cluster info – Shows your Kubernetes API server address
- One node – Minikube runs a single-node cluster
- System pods – Kubernetes runs its own services as pods
This is your playground. Everything you deploy will run here.
What We’re Building: Dynamic QR Code Generator
Now that you understand Kubernetes and have your environment ready, let’s build something real.
We’re creating a microservice that generates QR codes for multiple use cases:
URL Sharing – Turn any link into a scannable QR code
Contact Cards (vCard) – Share name, phone, email via QR code
WiFi Credentials – Let people connect to your network by scanning
Plain Text – Encode any message or secret
This is perfect for learning Kubernetes because:
- It’s stateless (no database needed, perfect for scaling)
- It’s practical (QR codes are everywhere—restaurants, tickets, payments)
- It demonstrates load balancing (you’ll see which Pod handled each request)
It’s simple enough to understand, complex enough to be useful
Building the Application
Let’s write the code. We’ll keep it clean and organized.
Step 1: Create the project structure
# Create app directory
mkdir app
cd app
Step 2: Create app/qr_types.py – handles different QR code formats
This module takes raw data and formats it correctly for each QR code type:
"""QR Code type generators"""

def format_url(data):
    """Format URL data - adds https:// if missing"""
    url = data.get('url', '')
    if not url.startswith(('http://', 'https://')):
        url = 'https://' + url
    return url

def format_vcard(data):
    """Format vCard contact data - creates a contact card"""
    name = data.get('name', '')
    phone = data.get('phone', '')
    email = data.get('email', '')
    organization = data.get('organization', '')

    vcard = f"""BEGIN:VCARD
VERSION:3.0
FN:{name}
TEL:{phone}
EMAIL:{email}
ORG:{organization}
END:VCARD"""
    return vcard

def format_wifi(data):
    """Format WiFi credentials - auto-connect format"""
    ssid = data.get('ssid', '')
    password = data.get('password', '')
    security = data.get('security', 'WPA')  # WPA, WEP, or nopass

    # WiFi QR format: WIFI:T:WPA;S:network_name;P:password;;
    wifi_string = f"WIFI:T:{security};S:{ssid};P:{password};;"
    return wifi_string

def format_text(data):
    """Format plain text - returns as-is"""
    return data.get('text', '')

# Map QR types to their formatter functions
QR_FORMATTERS = {
    'url': format_url,
    'vcard': format_vcard,
    'wifi': format_wifi,
    'text': format_text
}
Step 3: Create app/app.py – the main Flask application
This is your web service that receives requests and generates QR codes:
from flask import Flask, request, jsonify
import qrcode
import io
import base64
import os
from qr_types import QR_FORMATTERS

app = Flask(__name__)

def generate_qr_code(data_string, size=10):
    """Generate QR code image and return as base64"""
    qr = qrcode.QRCode(
        version=1,
        error_correction=qrcode.constants.ERROR_CORRECT_L,
        box_size=size,
        border=4,
    )
    qr.add_data(data_string)
    qr.make(fit=True)

    img = qr.make_image(fill_color="black", back_color="white")

    # Convert to base64 so it can be sent as JSON
    buffer = io.BytesIO()
    img.save(buffer, format='PNG')
    img_base64 = base64.b64encode(buffer.getvalue()).decode()

    return img_base64

@app.route('/')
def home():
    """API documentation and examples"""
    pod_name = os.environ.get('HOSTNAME', 'unknown')
    return jsonify({
        "service": "Dynamic QR Code Generator",
        "version": "1.0",
        "pod": pod_name,
        "endpoints": {
            "/generate": "POST - Generate QR code",
            "/health": "GET - Health check"
        },
        "supported_types": list(QR_FORMATTERS.keys()),
        "examples": {
            "url": {
                "type": "url",
                "data": {"url": "https://tutorialsdojo.com"}
            },
            "vcard": {
                "type": "vcard",
                "data": {
                    "name": "Jon Bonso",
                    "phone": "+1234567890",
                    "email": "jon@tutorialsdojo.com",
                    "organization": "Tutorials Dojo"
                }
            },
            "wifi": {
                "type": "wifi",
                "data": {
                    "ssid": "MyNetwork",
                    "password": "MyPassword",
                    "security": "WPA"
                }
            },
            "text": {
                "type": "text",
                "data": {"text": "Hello, Kubernetes!"}
            }
        }
    })

@app.route('/generate', methods=['POST'])
def generate():
    """Generate QR code based on type and data"""
    try:
        request_data = request.get_json()

        if not request_data:
            return jsonify({"error": "No JSON data provided"}), 400

        qr_type = request_data.get('type', 'text')
        data = request_data.get('data', {})
        size = request_data.get('size', 10)

        # Validate type
        if qr_type not in QR_FORMATTERS:
            return jsonify({
                "error": f"Invalid type. Supported: {list(QR_FORMATTERS.keys())}"
            }), 400

        # Format data based on type
        formatter = QR_FORMATTERS[qr_type]
        formatted_data = formatter(data)

        if not formatted_data:
            return jsonify({"error": "Invalid or empty data"}), 400

        # Generate QR code
        qr_image = generate_qr_code(formatted_data, size)

        pod_name = os.environ.get('HOSTNAME', 'unknown')

        return jsonify({
            "success": True,
            "type": qr_type,
            "qr_code": f"data:image/png;base64,{qr_image}",
            "generated_by_pod": pod_name
        })

    except Exception as e:
        return jsonify({"error": str(e)}), 500

@app.route('/health')
def health():
    """Health check endpoint - Kubernetes uses this"""
    return jsonify({
        "status": "healthy",
        "pod": os.environ.get('HOSTNAME', 'unknown')
    }), 200

if __name__ == '__main__':
    port = int(os.environ.get('PORT', 5000))
    app.run(host='0.0.0.0', port=port, debug=False)
```
Key points in this code:
- HOSTNAME environment variable – Shows which Pod generated the QR code (demonstrates load balancing)
- /health endpoint – Kubernetes will ping this to check if the Pod is alive
- Base64 encoding – QR codes are returned as base64 strings that can be embedded directly in HTML
Step 4: Create `requirements.txt` – Python dependencies
Flask==3.0.0
qrcode[pil]==7.4.2
Pillow==10.1.0
Step 5: Navigate back to root and create Dockerfile – containerizes the application.
cd ..
Create dockerfile:
FROM python:3.11-slim

WORKDIR /app

# Install Python dependencies
COPY requirements.txt .
RUN pip install --no-cache-dir -r requirements.txt

# Copy application code
COPY app/ .

# Expose port 5000
EXPOSE 5000

# Run the Flask app
CMD ["python", "app.py"]
```
What this Dockerfile does:
- FROM python:3.11-slim – Uses a lightweight Python base image
- WORKDIR /app – Sets working directory inside container
- COPY requirements.txt + RUN pip install – Installs dependencies
- COPY app/ – Adds your application code
- EXPOSE 5000 – Documents that the container listens on port 5000
- CMD – Command to run when container starts
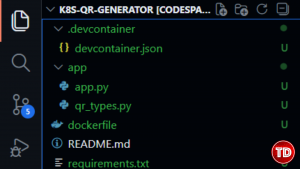
Your project structure should now look like:
```
k8s-qr-generator/
├── .devcontainer/
│   └── devcontainer.json
├── app/
│   ├── app.py
│   └── qr_types.py
├── requirements.txt
└── Dockerfile
Testing with Docker Before Kubernetes
Before deploying to Kubernetes, verify the application works with Docker:
# Build the Docker image
docker build -t qr-generator:v1 .

# Run it locally
docker run -p 5000:5000 qr-generator:v1
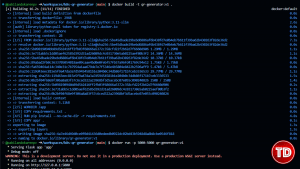
Open a new terminal and test:
# Test URL QR code
curl -X POST http://localhost:5000/generate \
  -H "Content-Type: application/json" \
  -d '{
    "type": "url",
    "data": {"url": "https://tutorialsdojo.com"}
  }'
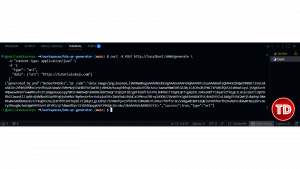
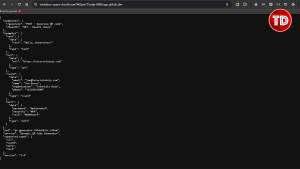
You should get JSON back with a base64-encoded QR code. The generated_by_pod field shows the container hostname.
Stop the container with Ctrl+C in the first terminal.
Creating Kubernetes Configuration Files
Now comes the Kubernetes magic. You’ll create configuration files that tell Kubernetes how to deploy and manage your application.
Step 1: Create a k8s/ directory for Kubernetes configs
mkdir k8s
Step 2: Create k8s/deployment.yaml – defines how to run your Pods
This is where you apply the Deployment and Pod concepts:
apiVersion: apps/v1
kind: Deployment
metadata:
  name: qr-generator
  labels:
    app: qr-generator
spec:
  replicas: 3
  selector:
    matchLabels:
      app: qr-generator
  template:
    metadata:
      labels:
        app: qr-generator
    spec:
      containers:
      - name: qr-generator
        image: qr-generator:v1
        imagePullPolicy: Never
        ports:
        - containerPort: 5000
          name: http
        env:
        - name: PORT
          value: "5000"
        resources:
          requests:
            memory: "128Mi"
            cpu: "100m"
          limits:
            memory: "256Mi"
            cpu: "200m"
        livenessProbe:
          httpGet:
            path: /health
            port: 5000
          initialDelaySeconds: 10
          periodSeconds: 10
          timeoutSeconds: 5
        readinessProbe:
          httpGet:
            path: /health
            port: 5000
          initialDelaySeconds: 5
          periodSeconds: 5
          timeoutSeconds: 3
Breaking down this configuration:
- kind: Deployment – This creates a Deployment resource
- replicas: 3 – Kubernetes will run 3 Pods (3 instances of your app)
- selector.matchLabels – How the Deployment finds its Pods
- template – The Pod template (what each Pod looks like)
- image: qr-generator:v1 – The container image to run
- imagePullPolicy: Never – Use the local image (since we built it in minikube)
- resources – CPU and memory limits per Pod
- livenessProbe – Kubernetes checks /health every 10 seconds; if it fails, the Pod is restarted
- readinessProbe – Kubernetes checks if the Pod is ready to receive traffic
Step 3: Create k8s/service.yaml – exposes your Pods to the network
This is where you apply the Service concept:
apiVersion: v1
kind: Service
metadata:
  name: qr-generator-service
  labels:
    app: qr-generator
spec:
  type: NodePort
  selector:
    app: qr-generator
  ports:
    - protocol: TCP
      port: 80
      targetPort: 5000
      nodePort: 30100
Breaking down this configuration:
- kind: Service – Creates a Service resource
- type: NodePort – Exposes the Service on a static port on each Node
- selector: app: qr-generator – Routes traffic to Pods with this label
- port: 80 – The Service listens on port 80
- targetPort: 5000 – Forwards traffic to the Pod’s port 5000
- nodePort: 30100 – You can access the Service externally on port 30100
The Service acts as a load balancer, distributing incoming requests across all 3 Pods.
Deploying to Kubernetes
Now you’ll use kubectl to deploy your application to the cluster.
Step 1: Make your Docker image available to minikube
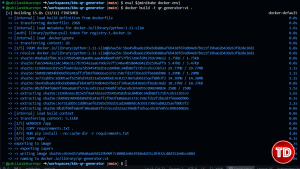
Minikube runs in its own Docker environment, so you need to build the image there:
# Point your terminal to use minikube's Docker daemon
eval $(minikube docker-env)

# Build the image inside minikube's Docker
docker build -t qr-generator:v1 .
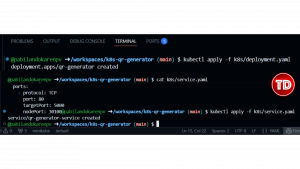
Step 2: Deploy to Kubernetes
# Apply the Deployment configuration
kubectl apply -f k8s/deployment.yaml

# Apply the Service configuration
kubectl apply -f k8s/service.yaml
Step 3: Watch your Pods start
# Watch pods being created in real-time
kubectl get pods -w
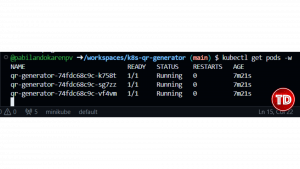
You’ll see:
- 3 Pods being created
- STATUS changing from ContainerCreating to Running
- Each Pod gets a unique name like qr-generator-7d4b9f8c5d-xxxxx
Press Ctrl+C once all 3 Pods show Running.
Step 4: Verify your deployment
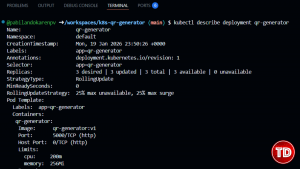
# List all pods
kubectl get pods

# List all services
kubectl get services

# Get detailed deployment info
kubectl get deployment qr-generator
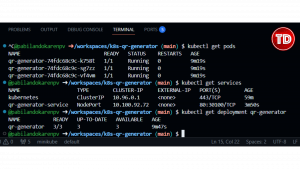
You should see:
- 3 Pods in Running state
- 1 Service of type NodePort
- READY showing 3/3 (all 3 replicas are ready)
Testing Your Kubernetes Deployment
Your application is now running in Kubernetes. Let’s access it.
Step 1: Get the Service URL
# Get the URL to access your service
minikube service qr-generator-service --url
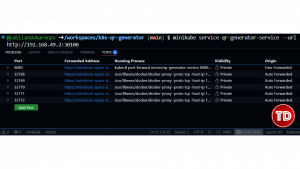
You’ll see an internal IP like 192.168.49.2:30100. This confirms your service is running, but you can’t access this URL directly from your browser.
Now set up port forwarding to make it accessible:
Method 1: Add the port manually then forward
- Go to the PORTS panel (bottom panel, next to TERMINAL)
- Click the “Add Port” button (green button)
- Type 8080
Press Enter
Then in your terminal, run:
kubectl port-forward service/qr-generator-service 8080:80
This returns the IP and port where your Service is accessible.
What happens:
- Terminal shows: Forwarding from 127.0.0.1:8080 -> 5000
- GitHub Codespaces automatically detects port 8080
- Port 8080 appears in the PORTS panel automatically
- You may see a notification popup in the bottom-right

Access Your Service in the Browser
Once port 8080 appears in the PORTS panel:
- Hover over the row for port 8080
- Click the globe icon (🌐) that appears in the Forwarded Address column
- Or right-click the row → “Open in Browser”.
This opens your QR generator API in a new browser tab!
Step 2: Open a new terminal and run this command to test the deployment.
# Save the URL
SERVICE_URL=$(minikube service qr-generator-service --url)

# Test the home endpoint
curl $SERVICE_URL/

# Generate a URL QR code
curl -X POST $SERVICE_URL/generate \
  -H "Content-Type: application/json" \
  -d '{
    "type": "url",
    "data": {"url": "https://tutorialsdojo.com"}
  }'

# Generate a vCard QR code
curl -X POST $SERVICE_URL/generate \
  -H "Content-Type: application/json" \
  -d '{
    "type": "vcard",
    "data": {
      "name": "Any Name",
      "phone": "+1234567890",
      "email": "name@tutorialsdojo.com",
      "organization": "Tutorials Dojo"
    }
  }'

# Generate a WiFi QR code
curl -X POST $SERVICE_URL/generate \
  -H "Content-Type: application/json" \
  -d '{
    "type": "wifi",
    "data": {
      "ssid": "TutorialsDojo-WiFi",
      "password": "kubernetes123",
      "security": "WPA"
    }
  }'
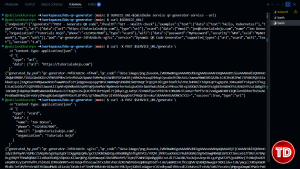
Notice the generated_by_pod field in the responses—it changes between different Pod names. This proves the Service is load balancing requests across all 3 Pods.
Seeing Kubernetes in Action
Now let’s see why Kubernetes is powerful.
Viewing Pod Details
# Get detailed info about all pods
kubectl get pods -o wide
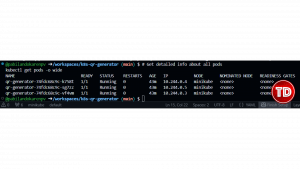
You’ll see each Pod has:
- Its own IP address
- A unique name
- Status information
- Which Node it’s running on
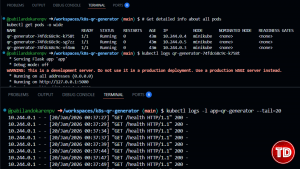
Checking Logs
# View logs from a specific pod (replace with your actual pod name)
kubectl logs qr-generator-7d4b9f8c5d-xxxxx

# View logs from all pods with this label
kubectl logs -l app=qr-generator --tail=20
Describing Resources
# Get detailed information about the deployment
kubectl describe deployment qr-generator

# Get detailed information about a specific pod
kubectl describe pod qr-generator-7d4b9f8c5d-xxxxx
Demonstrating Self-Healing
Here’s where Kubernetes shows its superpower: self-healing.
Step 1: Delete a Pod
# List pods and copy one pod name
kubectl get pods

# Delete a specific pod (replace with actual name)
kubectl delete pod qr-generator-7d4b9f8c5d-xxxxx
Step 2: Watch what happens
# Immediately check pods again
kubectl get pods
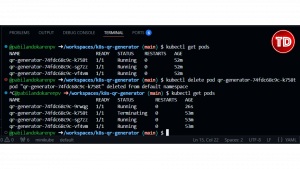
You’ll see:
- The deleted Pod shows Terminating
- A new Pod is automatically created with a different name
- Within seconds, you’re back to 3 running Pods
This is the Deployment in action. You told Kubernetes “I want 3 replicas,” and it maintains that state automatically.
Step 3: Test the service while a Pod is restarting
# Generate a QR code while Kubernetes is replacing the pod
curl -X POST $SERVICE_URL/generate \
  -H "Content-Type: application/json" \
  -d '{"type": "text", "data": {"text": "Kubernetes is healing itself!"}}'
The request succeeds! The Service routes traffic to the healthy Pods while the new one spins up.
Scaling Your Application
Want to handle more traffic? Just change the number of replicas.
Step 1: Scale up
# Scale to 5 replicas
kubectl scale deployment qr-generator --replicas=5

# Watch the new pods start
kubectl get pods -w
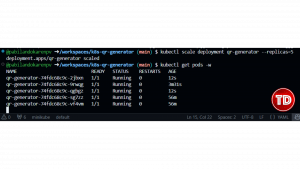
Kubernetes creates 2 more Pods instantly. Now you have 5 instances handling requests.
Step 2: Scale down
# Scale back to 2 replicas
kubectl scale deployment qr-generator --replicas=2

# Watch pods terminate
kubectl get pods
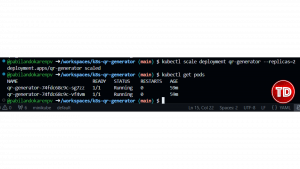
Kubernetes gracefully terminates 3 Pods, keeping 2 running.
Step 3: Test load balancing with current replicas
# Make multiple requests and see which pods respond
for i in {1..6}; do
  curl -s -X POST $SERVICE_URL/generate \
    -H "Content-Type: application/json" \
    -d '{"type": "text", "data": {"text": "Request '$i'"}}' \
    | grep -o '"generated_by_pod":"[^"]*"'
done
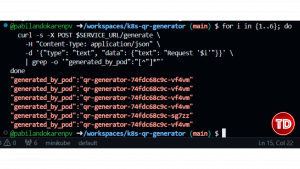
The Service distributes requests evenly across available Pods.
Updating Your Application (Rolling Updates)
Let’s update the application with zero downtime.
Step 1: Modify the code
Edit app/app.py and add a version field to the home endpoint:
@app.route('/')
def home():
    """API documentation and examples"""
    pod_name = os.environ.get('HOSTNAME', 'unknown')
    return jsonify({
        "service": "Dynamic QR Code Generator",
        "version": "2.0",  # Changed from 1.0
        "pod": pod_name,
        # ... rest of the response
    })
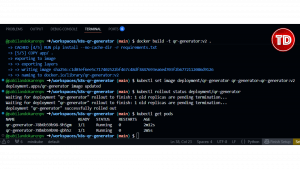
Step 2: Build the new version
# Make sure you're using minikube's Docker
eval $(minikube docker-env)

# Build version 2
docker build -t qr-generator:v2 .
Step 3: Update the deployment
# Update the image in the deployment
kubectl set image deployment/qr-generator qr-generator=qr-generator:v2

# Watch the rollout
kubectl rollout status deployment/qr-generator
Step 4: See what happened
# Check pod ages
kubectl get pods
Kubernetes:
- Created new Pods with v2 image
- Waited for them to be ready
- Terminated old v1 Pods
- Kept the service running the entire time (zero downtime)
Step 5: Verify the update
# Check the version
curl $SERVICE_URL/
Rollback (When Things Go Wrong)
What if v2 had a bug? Kubernetes makes rollbacks trivial.
# View rollout history
kubectl rollout history deployment/qr-generator

# Rollback to previous version
kubectl rollout undo deployment/qr-generator

# Watch it rollback
kubectl rollout status deployment/qr-generator
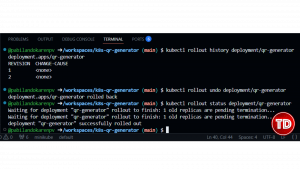
Kubernetes rolls back to v1. Check the version:
curl $SERVICE_URL/
You will see that it’s back to “version”: “1.0”.
Cleaning Up
When you’re done:
# Delete your deployment and service
kubectl delete -f k8s/deployment.yaml
kubectl delete -f k8s/service.yaml

# Or delete everything at once
kubectl delete -f k8s/

# Stop minikube
minikube stop

# Delete the cluster completely (optional)
minikube delete
What You Just Mastered
Let’s recap what you learned by doing:
- Containers – You containerized a Python app with Docker
- Cluster – You ran a Kubernetes cluster with minikube
- Nodes – You understood that minikube is a single-node cluster
- Pods – You deployed multiple Pod replicas and watched them run
- Deployments – You managed app versions, scaling, and rollbacks
- Services – You exposed your app with load balancing
- kubectl – You controlled everything via command line
- Self-healing – You deleted Pods and watched Kubernetes recreate them\
- Scaling – You scaled from 3 to 5 to 2 replicas instantly
- Rolling updates – You updated your app with zero downtime
- Rollbacks – You reverted to a previous version safely
You didn’t just read about Kubernetes—you deployed, scaled, updated, and managed a real microservice.
Next Steps
Ready to go deeper?
- Add persistent storage – Use Volumes to store data across Pod restarts
- Multi-service architecture – Deploy a frontend + backend + database
- ConfigMaps and Secrets – Manage configuration and sensitive data
- Ingress controllers – Set up proper HTTP routing and domains
- Horizontal Pod Autoscaling – Auto-scale based on CPU/memory usage
- Helm charts – Package your entire application for easy deployment
- Deploy to real cloud – Try AWS EKS, Google GKE, or Azure AKS
Useful Resources
- Kubernetes Official Documentation
- Kubernetes Tutorials
- kubectl Cheat Sheet
- GitHub Codespaces Documentation
- Minikube Documentation
- Docker Documentation
- Tutorials Dojo Kubernetes Resources
GitHub Repository
https://github.com/pabilandokarenpv/k8s-qr-generator
All the code from this article is available in this repository. Fork it, clone it to your Codespace, and start experimenting.
You now know more about Kubernetes than most developers who’ve never touched it. You’ve done what many put off for months because “it’s too complicated.”
The best part? You did it all in your browser, without filling your hard drive with Docker images or melting your laptop.
Kubernetes isn’t scary anymore. It’s just YAML files and kubectl commands. Keep experimenting, keep breaking things, fix them, and keep learning.
Now go build something real.
🎭 GET 22% OFF our AWS Security Specialty and AZ-500 Azure Security Engineer Associate Practice Exams – Master Cloud Security Now!

Learn AWS with our PlayCloud Hands-On Labs

$2.99 AWS and Azure Exam Study Guide eBooks

New AWS Generative AI Developer Professional Course AIP-C01

Learn GCP By Doing! Try Our GCP PlayCloud

Learn Azure with our Azure PlayCloud

FREE AI and AWS Digital Courses

FREE AWS, Azure, GCP Practice Test Samplers


Subscribe to our YouTube Channel

Follow Us On Linkedin


