Last updated on August 27, 2025
For a long time now, LLMs or large language models have been going around the tech industry with its massive knowledge on languages. They can comprehend and even generate human language with bull’s-eye fluency. Nevertheless, despite their strengths, powerful as they are, these intelligent models act in isolation. They have no hands to implement and interact with the world; they lack the ability to connect to databases, fetch data, or even trigger an action in a completely different application. Consequently, this lack of ability incapacitates the LLM’s high potential when communicating with machines. This is why the introduction of the Model Context Protocol or MCP is so important.
In recent years, the rise of complex and sophisticated AI systems has enabled the creation of MCP to solve the problem of LLMs. In short, this new solution provides a way for LLMs to safely and predictably access the world of tools and data that existed outside the model’s training.
Think of MCP as a universal translator for AI. In other words, this protocol is a standardized language for AI that lets them connect and communicate with external services like APIs, databases, or scripts. This finally gives them hands to do the things they weren’t able to before; it bridges the gap between just an AI thought process and the action it needs to perform.
The Architecture Behind the Model Context Protocol

The power behind MCP lies in its architecture, which is built on a simple client-server model. Essentially, MCP is just an open standard that gives definition to a set of rules when two components, the host and the client, are exchanging information. Now, let’s look closer at the components of MCP:
- MCP Host: An AI application that users use to interact with the system. This host application manages workflows and included in it are the LLMs.
- MCP Client: The client resides within the host, and it acts like a project manager, where it understands what needs to be done, finds, and assigns the task to the right expert. In short, the MCP client handles the direct connection and communication with the MCP server.
- MCP Server: MCP Server acts as the expert, unlike the MCP client, which only understands the task. The MCP server knows how to perform a specific set of tasks, serving as the hands the LLMs never had.
- Local/ Remote Sources: The third-party systems that MCP servers talk to that have your data and information.
Meanwhile, the communication between the server and client happens through the transport layer, like standard input/output, and in a JSON-RPC 2.0 format.
Building To Do List Manager MCP Server
Now that we’ve covered what Model Context Protocol is, let’s move on from concept to code and explore how you can implement a beginner-friendly MCP server. I’ll help you create a simple To-Do List Manager MCP Server that we can later interact with using Claude Desktop!
Step 1: Setting up the environment
To start, your system should have at least Python 3.10 or higher installed before you can proceed. If not, visit this page and download the latest Python version. Download Python | Python.org
Alright! First, we need to install ‘uv’ as our package manager. This manager is designed to be faster than past managers like ‘pip’. To do this, enter this command in the terminal to start the installation.
curl -LsSf https://astral.sh/uv/install.sh | sh
Restart your terminal after successful installation to make sure the terminal can pick up the commands.
Next, we begin by setting up the project environment. This is handled through the uv command-line tool, which simplifies project creation and dependency management. By running:
uv init project-name
cd project-name
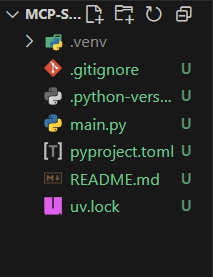
This automatically sets up several files alongside the important one, which is the main.py, where we will put our MCP server logic. The ‘pyproject.toml’ contains the configuration details for dependencies, and ‘uv.lock’ locks the dependencies in their specific versions to be consistent.

However, before proceeding, we must first add the MCP library to our project. You do this by running:
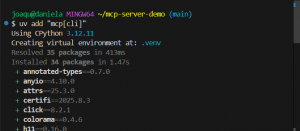
uv add "mcp[cli]".
Here you are installing the MCP package plus the CLI addition for the command-line tools that we can use to connect our server to Claude Desktop later.
Step 2: Building the MCP Server
We can now move on to building our MCP Server. Remember the main.py file? We import the FastMCP from the MCP library so we can create a new server instance. FastMCP is a Python framework that makes creating servers easier for us.
from mcp.server.fastmcp import FastMCP

mcp = FastMCP("To-Do List Manager")

todo_list = []
Tools
But of course, an MCP server is nothing without its tools. In this part of the code, we need to define tools our server will use to act.
@mcp.tool()
def add_todo(item: str) -> str:
    """
    Add a new to-do to the list.

    Args:
        item (str): The task to be added to the list.

    Returns:
        str: Confirmation message the task was added.
    """
    todo_list.append(item)
    return f"Added to-do: '{item}'"
You can play around and create your own tools, but you could also visit Thaniela/MCP-server-demo for the code!
Resource
These are just structured data sources that models can read and access.
@mcp.resource("todos://latest")
def get_latest_todo() -> str:
    """
    Get the most recently added to-do item.

    Returns:
        str: The latest task or a default message if list is empty.
    """
    return todo_list[-1] if todo_list else "No to-dos yet."
Prompt
As the name suggests, prompts are predefined reusable templates that models can fill and execute.
@mcp.prompt()
def todo_summary_prompt() -> str:
    """
    Generate a prompt asking the AI to summarize the current to-do list.

    Returns:
        str: AI-ready prompt string, or a default message if list is empty.
    """
    if not todo_list:
        return "There are no to-do items."
    return f"Summarize the following to-do items: {', '.join(todo_list)}"
Step 3: Run MCP Server in Claude Desktop
The server is done, but that’s only half of the work. Running it with an MCP Host/Client is still required, so you can use your server to its fullest!
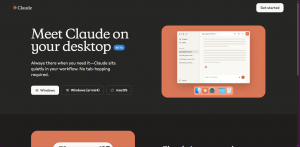
For that, we use Claude Desktop, which already supports MCP server connections directly. You can also try Cursor too. First, let’s download and install Claude Desktop from the creator of MCP Server, Anthropic.
- Visit Anthrophic’s official site: Download Claude.

- Install Claude Desktop and set up your account.
- And finally, the welcome page will show up and we can start connecting it with our MCP To-do List Manager Server.

Do you remember the added ‘cli’ when we added MCP to our project? We will now use that to easily install our server on Claude Desktop. To connect our to-do list, go back to the project and run this in the terminal:
uv run mcp install main.py
Note: if you have a different name file, use that instead of main
This command helps Claude Desktop to know about our MCP server, and it also installs the server into Claude’s configuration.

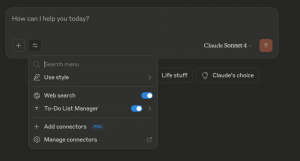
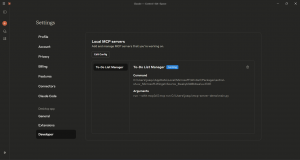
You can now go to Claude Desktop to check if the server works. However, sometimes the server is not going to work immediately, so we need to change the Claude Configuration to include it.
- Go to the Settings of Claude Desktop
- Open the Developer tab

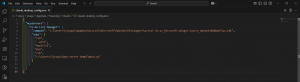
- Select the Edit Config and once clicked it will pop up a file manager where you will see the ‘claude_desktop_config.json’ file.
- The command might be set to just ‘uv’, but what we want is to change it into where we installed our ‘uv’ when we are setting up our environment before. To see this, enter this command
which uv

- Copy the directory and proceed to paste it into the command part of the JSON file.

- Save and restart the Claude Desktop.
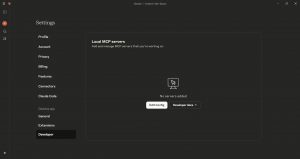

You should be able to see the server’s name in the tools part or at the Developer Setting:

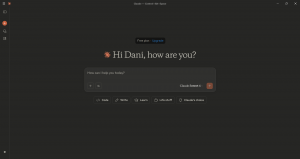
Congrats! You can now play around with your first MCP server!
Step 4: Play around with the MCP Server
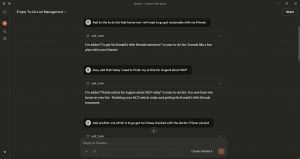
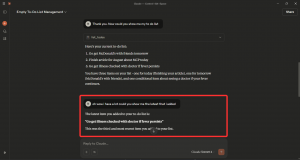
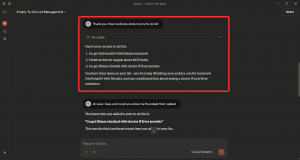
Check out what our To-Do List server can do:
- Add to-do list items to our list:

- Update and Delete items:

- Show the latest addition:

- Summary of the full list:

Since the development of MCP early this year, there’s been a surge of verified servers that you can use and implement on your own projects. These will give you another set of helping hand whether in managing your business, academics, work, or even your entertainment. We really can’t deny the advancement of AI, so we must embrace it and make full use of its intelligence to our advantage.
🌸 25% OFF All Reviewers on our International Women’s Month Sale! Save 10% OFF All Subscriptions Plans & 5% OFF Store Credits/Gift Cards!

Learn AWS with our PlayCloud Hands-On Labs

$2.99 AWS and Azure Exam Study Guide eBooks

New AWS Generative AI Developer Professional Course AIP-C01

Learn GCP By Doing! Try Our GCP PlayCloud

Learn Azure with our Azure PlayCloud

FREE AI and AWS Digital Courses

FREE AWS, Azure, GCP Practice Test Samplers


Subscribe to our YouTube Channel

Follow Us On Linkedin


