Last updated on September 4, 2025
In a world full of repetitive tasks, automation is not a new thing. For years, humanity designed machines and systems to take over the monotonous or large-scale work from humans. We’ve come a long way from industrial automation, it now uses the algorithms to create system that can automatically check, send, or even sort your emails and documents, manage your store’s inventory, and even drive (would I still need a license in this case?).
With all the power automation gave us, we still crave more. We thought ‘what if automation could learn, adapt, and create?’ a thought that is coming into reality with the help of artificial intelligence (AI). We made learning available to mere automating tools; we give hands to once just a brain. Automation is now smarter, faster, and even more powerful.
Why use n8n to Automate?
n8n is a powerful open-sourced automation tool. It is free and contains advance tools where we can design and customize our own automated workflow. Unlike other tools in the market, n8n is preferred due to its ability to be self-hosted which is important for when you or your business needs privacy and security.
Low-code and easy drag and drop pre-built integration in the user interface also is great for beginners but if the pre-built tools are not acting like you want it too, there is an option to customize with JavaScript to create your own logic, manipulate data, and connect to services.
Well, let’s stop the introduction and proceed where the actual action is in!
Step 1: Docker installation
n8n deployment does not really need a docker, however life will get more easier with one!
- Go to the official Docker Desktop Download.
- Download the right version for your device.
- Install Docker and choose ‘yes’ if asked to download a WSL.

All done! Docker is first made for Linux, but with the help of Docker Desktop, we can use it in another operating system.
Step 2: Getting started with n8n
So, setting up n8n is actually the one of the easiest things you might encounter in tech because with n8n, they already got it all-ready for you with just 2 commands. Now, you can go and check the main documentation repo of n8n here: n8n GitHub or just follow along with me in this article!

- To start, open your terminal, any will do but, in this project, I used Git Bash.
- Enter this command to create a volume named n8n_data in Docker:
docker volume create n8n_data - After the volume is created, run this command
docker run -it --rm --name n8n -p 5678:5678 -v n8n_data:/home/node/.n8n docker.n8n.io/n8nio/n8n
-
- Docker run : will run a new container.
- -it : attaches an interactive terminal so you can view the logs.
- –rm : this will automatically remove the container we created when we stop it.
- –name n8n : we do this to give our container a meaningful name instead of remembering the container ID.
- -p 5678:5678 : this is where we do port binding the 5678 in our host to the 5678 port of the container, so we can access the n8n in our browser.
- -v n8n_data:/home/node/.n8n : mounts the created n8n_data volume into the container’s directory /home/node/.n8n, this is done so we don’t wipe out the files and data we have in our container.
- docker.n8n.io/n8nio/n8n : this is the image we are running pulled from the latest official n8n image.
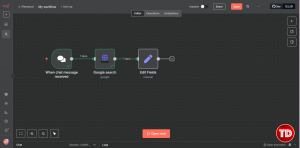
Step 3: Constructing your first n8n workflow
To try out the automation workflow, let’s create a simple Chatbot that uses an LLM and is capable of using Google search!
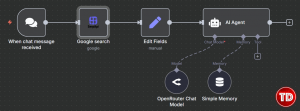
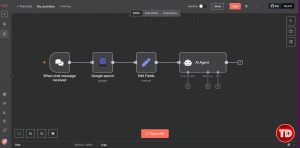
All starts with a trigger! 👆
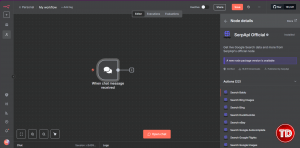
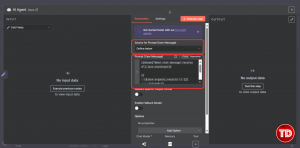
- To create a workflow, click the ‘Create Workflow’ button.
- A clean Figma like interface will show up. Click the plus button so we can add our trigger. Choose the ‘Chat Trigger’.
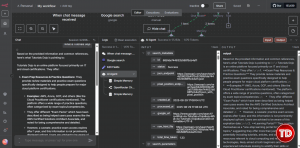
Adding Google Search Superpowers to Chat
Now to make our chatbot be able to use Google Search🔍, we can either add it now or later in the Agent AI as a tool. However, adding a tool to the AI Agent means you will use an LLM model that can call and use tools (and that will need a subscription!). So as a work around, we will add it now and feed the information later to our AI Agent 🤖.
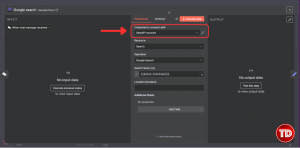
- Search SerpApi, this will allow our chatbot to search Google.
- Install the node and look for Google Search amongst the options. This will add the node to our canvas.
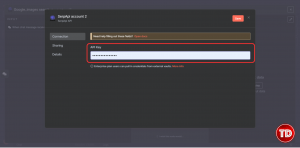
- Click the create new credential and to use SerpApi we need to get API Keys.

- To do that, go to SerpApi: Google Search API and register. You will get 250 free searches per month! Sweet.
- Copy your API Keys and go back to n8n to paste the API key.
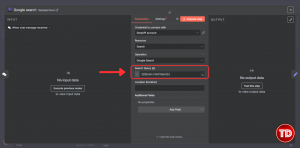
- We also need to edit the Search Query field with {{$json.chatInput}} so it sees the chat input we gave to the trigger.
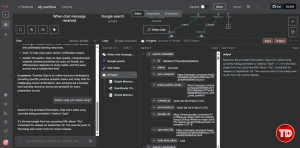
Preparing Search Data for the AI Agent
Now, these actions will fail if we just connect it straight to an AI Agent. We need to add a buffer where we can normalize the top searches we get so our AI Agent can read them as sources.
- We do that with a set field and custom JavaScript code.

- In the Include other input Fields, select the Expression tab and paste this JavaScript code:
{{
  ($json.organic_results || [])
    .slice(0,5)
    .map((r,i) => `${i+1}. ${r.title} — ${r.snippet} (${r.link})`)
    .join('\n')
}}

Making Conversation Smarter with LLM and Memory
Now, we can go and finally add our AI Agent!!
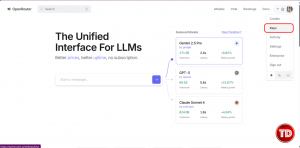
To give our AI Agent the power to understand the chat input, we add an LLM to the mix. In n8n, you can use any of the LLM, however as mentioned before, we are making this project FREE OF CHARGE :b so we will choose OpenRouter.
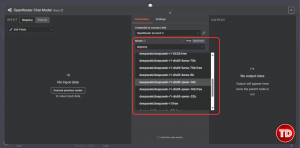
- Click the chat model plus and choose OpenRouter Chat Model.
- Create a new credential. And get an API key from OpenRouter:
- Go to keys section

- Create a new API key. You can name it anything you want. And ensure that you copy and keep it somewhere safe ><.
- Go to keys section
- Paste the API keys into n8n and we need to choose a model that is free. (Just search free and choose any;>).

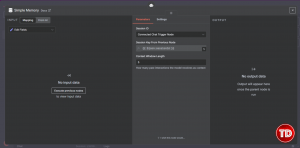
- To make the AI Agent remember our conversation, add a Simple Memory to it by clicking the plus button in the memory node.

The last configuration!
We prep our searched data before, but we still need it to be presented into readable structure for our AI buddy.
- Change the option into ‘Define below’ and;
- Paste this code to the AI Agent to make it fully understand the chat input of the user and the top Google Search as context!
{{$node["When chat message received"].json.chatInput}}

{{
($json.organic_results || [])
.slice(0,5)
.map((r,i) => `${i+1}. ${r.title} — ${r.snippet} (${r.link})`)
.join('\n')
}}
Open the chat and have fun with your very own chat AI buddy!
You can ask it with anything, kind of like any AI chat model out there~ However, it is limited right now with text since we are using free API plans haha! If you feel like splurging, all the power to you but n8n even as a free tool can be modified and design to be of use to our daily repetitive tasks!
Nonetheless, n8n is not just a simple script that you run once, and it’s done. In real context, it needs to be running continuously in the background to finish complex automation. You can do this with hosting it in cloud, you can try watching this video tutorial to make a self-hosted n8n workflow: The REAL Way to Host n8n for Free – AWS EC2 & Docker Guide.
References:
🌸 25% OFF All Reviewers on our International Women’s Month Sale! Save 10% OFF All Subscriptions Plans & 5% OFF Store Credits/Gift Cards!

Learn AWS with our PlayCloud Hands-On Labs

$2.99 AWS and Azure Exam Study Guide eBooks

New AWS Generative AI Developer Professional Course AIP-C01

Learn GCP By Doing! Try Our GCP PlayCloud

Learn Azure with our Azure PlayCloud

FREE AI and AWS Digital Courses

FREE AWS, Azure, GCP Practice Test Samplers


Subscribe to our YouTube Channel

Follow Us On Linkedin


