Get your laptop or PC ready since we’ll be making your computer send its first “Hello World” message from the cloud. Woot woo~
It won’t be AWS today, neither Azure nor Google Cloud Platform, but… Beam! (only if you’ve ever heard of it)
So Beam connects the code you write on your local machine to the servers in the cloud. You get to write standard Python, but when you’re ready to run it, Beam sends it to a remote server to do the nitty-gritty work. It handles all the complicated cloud setup for you, so you can focus on what really matters: your code. -^^-
You’ll see just how simple it can be. Ready?
What is Beam?
Beam is a tool that lets you run your Python code on a way more powerful computer in the cloud, without all the complex and hassle workload.
You know that one function in your script that does all the heavy lifting? You just add a special one-line comment (@function) above it. That’s your signal to Beam. When you run your script, Beam sees that signal, grabs that piece of code, and sends it off to a server to run.
It handles pretty much the tedious work—packaging your code, finding a server, getting the results—and streams the output right back to your terminal as if it all happened on your machine.
Prerequisites Before We Start
Let’s get our toolkit ready. You only need two things installed and running on your computer for this to work.
Python
You’ll need a modern version of Python and its package manager, pip. If you can run
python --versionpip --version
in your terminal and see version numbers (e.g., Python 3.12.2 and pip 24.0), you’re good to go.

Docker Desktop
This is a crucial piece. Beam uses Docker to create a clean, consistent “container” for your code. This means all your dependencies and libraries are bundled up neatly, so your code runs the exact same way in the cloud as it does on your machine. Make sure Docker Desktop is installed and running before you proceed.
Step 1: Installing the Beam CLI
The first thing we need to do is install the Beam Command Line Interface (CLI). This is the main tool you’ll use to communicate with Beam from your terminal.
To keep things tidy and avoid messing with your system’s Python packages, we’ll be using a virtual environment. It’s like giving our project its own little sandbox to play in.
First, create a folder for our project and move into it
mkdir beam-hello-worldcd beam-hello-world
Create a virtual environment inside the folder
python -m venv .venv

Activate it:
On macOS/Linux:
-
source .venv/bin/activate
On Windows (Command Prompt):
-
.venv\Scripts\activate
On Windows (PowerShell):
-
.venv\Scripts\Activate.ps1
Finally, let’s install Beam!
pip install beam-client
When this finishes, you’ve officially installed Beam on your machine. Easy, right?
Step 2: Connecting Your Machine to Beam
Now that Beam is installed, you need to introduce your computer to your Beam account. This is a secure, one-time handshake that allows your CLI to send commands and code to the cloud on your behalf.
For this step, you’ll need an API token.
- Head over to the Beam Dashboard and sign up for an account.
- Once you’re in, go to Settings → API Keys section.
- Create a new key and copy it to your clipboard.
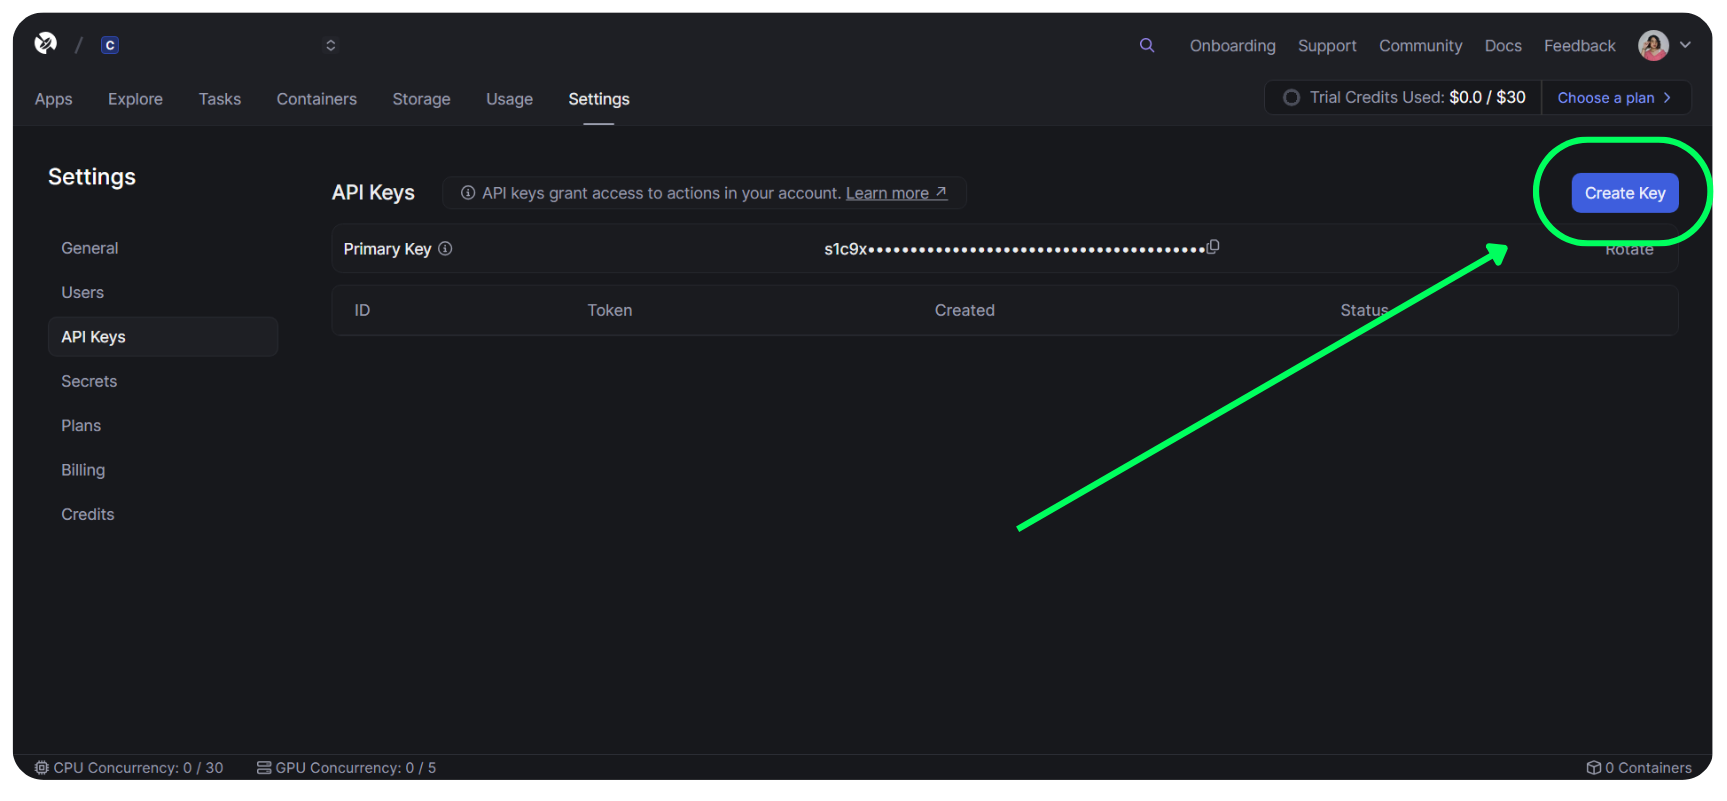
Got your token? Perfect. Now, head back to your terminal and run this command. Just paste your token where it says [TOKEN].
beam configure --token [TOKEN]
This command securely saves your credentials in a local configuration file. You won’t have to do this again.
Step 3: Writing Your First Cloud-Ready App
Alright, time for some coding! The thing about Beam is that you don’t have to learn a new language or framework. It’s just Python, with a little extra instruction for Beam. Let’s do this within your IDE or code editor (VS Code).
Open your project in VS Code
- Open VS Code.
- Go to File → Open Folder and select your
beam-hello-worldfolder.
You should now see your folder name in the Explorer panel on the left.
Create app.py in VS Code
-
In the Explorer panel, click the New File icon (📄).
-
Type the name exactly:
app.py
Press Enter — the file will open, ready for editing.
Paste in the Beam code
Technically, the @function() line is a decorator. It’s Beam’s way of knowing that the hello_world() function is special and can be executed remotely. When you call hello_world.remote(), you’re not running the code on your laptop; you’re sending a command to Beam to run it in the cloud.
Step 4: Let’s Launch It!
You have everything in place: Beam is installed, your account is configured, and your script is written. All that’s left to do is run it.
In your terminal, make sure you’re in your beam-hello-world directory and simply run your Python file like you normally would:

python app.py
Now, watch your terminal. You’ll see something happen in this order:
- Your local print statement:
Okay, I'm about to send our function to the Beam cloud... - A short pause while Beam packages your code, finds a server in the cloud, and starts running your function.
- Output from the cloud itself:
Hello World! - Final messages and returned dictionary from your local script.
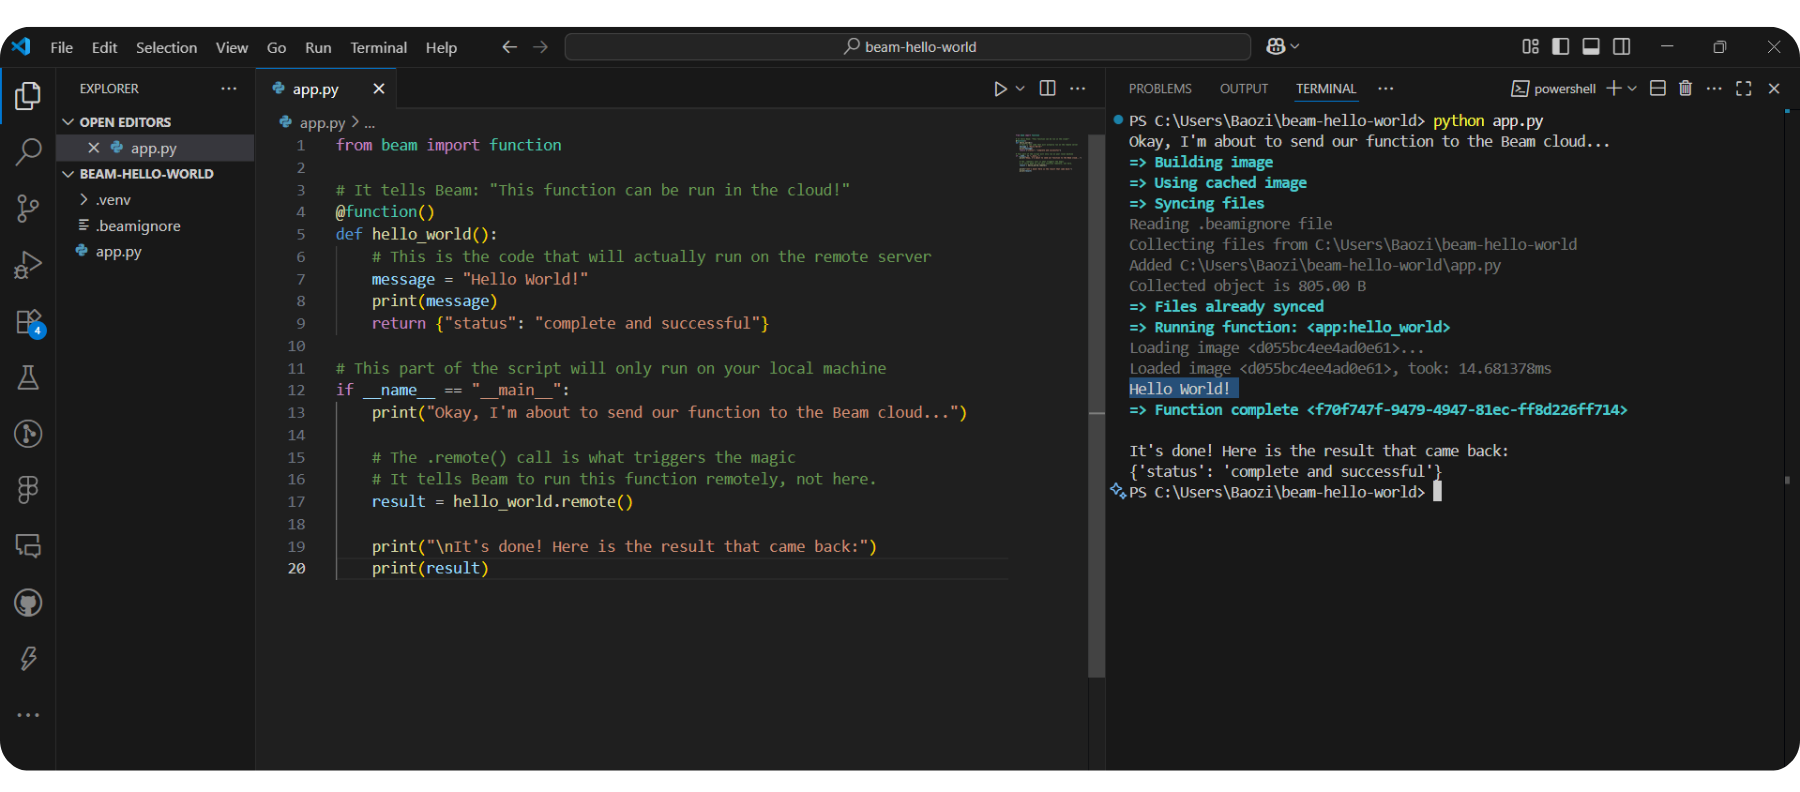
So that’s it! Your Beam app is ready to run in the cloud.
You Did It! What’s Next?
And there you have it! You just wrote a standard Python script on your computer and, with a single command, executed part of it on a powerful cloud server. The message “Hello World!“ was streamed directly from that remote machine back to your terminal.
This “Hello World!” example is just the beginning. Imagine replacing that simple print() statement with more complex tasks. You could:
- Use a powerful GPU for a machine learning model.
- Process a massive dataset.
- Run thousands of tasks in parallel.
You now have the ability to run your code on a scale far beyond your local machine. Try it on your own now! :3
References
- https://docs.beam.cloud/v2/sandbox/overview
- https://docs.beam.cloud/v2/getting-started/installation
- https://docs.beam.cloud/v2/getting-started/introduction
- https://docs.beam.cloud/v2/getting-started/quickstart
- https://docs.beam.cloud/v2/getting-started/core-concepts
- https://tutorialsdojo.com/lets-learn-firecracker-microvm-with-go-firecracker-sdk/
🎭 GET 22% OFF our AWS Security Specialty and AZ-500 Azure Security Engineer Associate Practice Exams – Master Cloud Security Now!

Learn AWS with our PlayCloud Hands-On Labs

$2.99 AWS and Azure Exam Study Guide eBooks

New AWS Generative AI Developer Professional Course AIP-C01

Learn GCP By Doing! Try Our GCP PlayCloud

Learn Azure with our Azure PlayCloud

FREE AI and AWS Digital Courses

FREE AWS, Azure, GCP Practice Test Samplers


Subscribe to our YouTube Channel

Follow Us On Linkedin


