Last updated on July 8, 2025
You’ve seen the warnings: “This comment may violate our community guidelines,” or you’ve watched online posts or videos get flagged and removed due to their hate speech content. This means that the platform is already using models to detect harmful content. However, have you ever questioned how these models work? How are these models able to understand human sarcasm, cultural slang, and even multilingual language in one sentence?
In this guide, we’ll walk through the process of building your OWN speech classifier using a well-known transformer model, BERT. This article guides you to a beginner-friendly beginning in modeling and machine learning. So, are you ready to begin?

What is BERT?
Let me introduce you to BERT or, in its fancy name, Bidirectional Encoder Representations from Transformers. This pre-trained model utilizes the same neural network as Transformers but only applies the encoder part of the Transformer models. Unlike Transformers, BERT focuses on comprehending the input instead of generating output, hence the decision to remove the decoder part.
In addition, BERT is extra powerful in understanding inputs because of its bidirectional nature, like a CCTV that rotates 180 degrees to look from left to right and vice versa. This means that it simultaneously processes the context of an input based on the left and right inputs beside it. This allows the model to understand the nuance and get a better understanding of the meaning of the input.
BERT is now then being fine-tuned to perform specific tasks like classification, summarization, and other NLP. In this article, we will fine-tune BERT to detect whether or not a text contains hate speech.
Prerequisite
For this project, we assume that you have basic Python knowledge and have a little familiarity with machine learning concepts. The good thing is this project does not require you to perform advanced mathematics or even deeper NLP processes. All we need is your curiosity, patience, and willingness to learn!
Step 1: Setting Up Your Environment
First, let’s tackle the available environments where we can do this project. There are two that I know of: Google Colab or your Local Environment.
Google Colab
✅Free GPU/TPU Access so you can run your model even in potato specs.
✅No setting up required since Google Colab comes pre-installed with libraries.
✅Accessible everywhere because it is cloud-based.
✅As the name suggests, Google Colab is collaboration-friendly
❌Since this is online, there are session timeouts after a while of idle sessions.

❌Google Colab has limited resources for its free tier.
❌Slower file I/O reading huge files.
Local Environment
✅You have complete control over how you’ll customize your system.
✅There is unlimited time per session.
✅Much faster File I/O, even with larger datasets or files.
✅Offline capability.
❌Hardware limitations since you will access the specs of your machine.
❌Setting up is manually done by installing all the necessary libraries and dependencies.
❌Harder to collaborate since you now require version control.
In this project, we will use Google Colab to simplify our process and allow simple machines to follow along.
import torch
import torch.nn as nn
from torch.utils.data import Dataset, DataLoader
from transformers import AutoTokenizer, AutoModel, get_linear_schedule_with_warmup
from torch.optim import AdamW
from sklearn.model_selection import train_test_split
from sklearn.metrics import accuracy_score, classification_report
import pandas as pd
import numpy as np
import re
class Config:
    MODEL_NAME = "bert-base-multilingual-cased"
    BATCH_SIZE = 16
    LEARNING_RATE = 2e-5
    EPOCHS = 4
    MAX_LENGTH = 128 # Max token length for sentences
    RANDOM_STATE = 42

# Set random seed for reproducibility
np.random.seed(Config.RANDOM_STATE)
torch.manual_seed(Config.RANDOM_STATE)
torch.cuda.manual_seed_all(Config.RANDOM_STATE)

# Set device (use GPU if available)
device = torch.device("cuda" if torch.cuda.is_available() else "cpu")
Since Google Colab is pre-installed with libraries, we need to import the necessary libraries such as torch for deep learning, transformers for our pre-trained model and tokenizers (BERT), pandas for the data manipulation of mostly tabled data, and lastly, scikit-learn for the data splitting and the metrics we’ll use to evaluate our model.
Also, we need to configure our hyperparameters. In this case, a Config class is defined so that our hyperparameters are centralized with the model being the “bert-base-multilingual-cased,” the batch size is 16 for every training, our learning rate is set to 2e-5, the most commonly used, an epoch of 4 or the total number of training that the model have gone through the total dataset, maximum length of 128 a commonly used hyperparameter too for BERT, and a random state so that the model can be reproduce. We’ll use the GPU. You need to change the runtime from RAM to GPU for faster execution of the cells.
Step 2: The Data and Data Preprocessing
The dataset is the tricky part of this project. In the current body of knowledge, hate speech is a well-searched topic. However, Tagalog datasets are still rare, or even if they exist, they are datasets from the election times, hence non-generalized for a typical hate speech you might encounter on social media on a day-to-day basis.
That is why, in this project, we utilized AI to generate 319 non-hate speech texts that include Tagalog and Taglish language. On the other hand, the hate speech dataset is extracted from a publicly available dataset from BERT-MLTHSC/dataset at main · syke9p3/BERT-MLTHSC. We extracted 370 data from this dataset. However, since their study is for multilabel hate speech detection, we just converted the data’s label to binary.
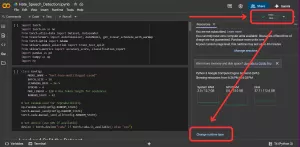
# IMPORTANT: Replace "Dataset - Sheet1.csv" with the actual path to your file.
try:
df = pd.read_csv("/content/Dataset - Sheet1.csv")
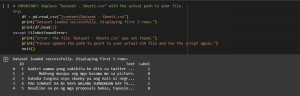
print("Dataset loaded successfully. Displaying first 5 rows:")
print(df.head())
except FileNotFoundError:
print("Error: The file 'Dataset - Sheet1.csv' was not found.")
print("Please update the path to point to your actual CSV file and run the script again.")
exit()
Note: Google Drive mounting is another way to read/load your data
After the dataset is loaded, it is still very messy data. Therefore, we need to preprocess it before feeding them to the model.
# Ensure no missing values in critical columns
df = df.dropna(subset=['Text', 'Label']).reset_index(drop=True)
# Ensure labels are integers
df['Label'] = df['Label'].astype(int)

stopwords_tl = {'ang', 'ng', 'sa', 'na', 'at', 'ay', 'ni', 'kay'}
def preprocess_text(text):
    text = str(text).lower()
    text = re.sub(r'http\S+|www\S+', '', text)
    text = re.sub(r'[^a-z\s]', '', text)
    tokens = text.split()
    filtered_tokens = [word for word in tokens if word not in stopwords_tl]
    return ' '.join(filtered_tokens)

df['clean_text'] = df['Text'].apply(preprocess_text)
We did just the typical data preprocessing steps of:
- Remove missing values from our text and label column.
- We ensure that the label column is converted into integers (it already is).
- We normalized the text case into lowercase.
- Removes URLs, special characters, unnecessary white spaces, and emoticons.
- We also removed the typical stop words in Tagalog, which are ‘ang,’ ‘ng,’ ‘a,’ ‘na,’ ‘at,’ ‘ay,’ ‘ni,’ and ‘kay.’
Data Splitting
This cleaned and preprocessed data are then divided into a 60/30/10 split where 60% is allotted for training data, 30% is for testing the model, and the last 10% is for validation.
train_val_df, test_df = train_test_split(
    df,
    test_size=0.30,
    random_state=Config.RANDOM_STATE,
    stratify=df['Label']
)

val_df, train_df = train_test_split(
    train_val_df,
    test_size=0.8571,
    random_state=Config.RANDOM_STATE,
    stratify=train_val_df['Label']
)

# Print the final split sizes
print(f"Training set size: {len(train_df)} ({len(train_df)/len(df):.0%})")
print(f"Test set size: {len(test_df)} ({len(test_df)/len(df):.0%})")
print(f"Validation set size: {len(val_df)} ({len(val_df)/len(df):.0%})")
Tokenizing
Even after this split, the BERT model still could not use this data. We need to convert it to a BERT-readable dataset, tokenized using the AutoTokenizer.from_pretrained(Config.MODEL_NAME). It prepares the inputs for the DataLoader, which is responsible for loading the training, validation, and test sets.
tokenizer = AutoTokenizer.from_pretrained(Config.MODEL_NAME)

class HateSpeechDataset(Dataset):
    def __init__(self, texts, labels, tokenizer, max_len):
        self.texts = texts
        self.labels = labels
        self.tokenizer = tokenizer
        self.max_len = max_len
    def __len__(self):
        return len(self.texts)
    def __getitem__(self, item):
        text = str(self.texts[item])
        label = self.labels[item]
        encoding = self.tokenizer.encode_plus(
            text, add_special_tokens=True, max_length=self.max_len,
            return_token_type_ids=False, padding='max_length',
            truncation=True, return_attention_mask=True, return_tensors='pt',
        )
        return {
            'text': text, 'input_ids': encoding['input_ids'].flatten(),
            'attention_mask': encoding['attention_mask'].flatten(),
            'labels': torch.tensor(label, dtype=torch.long)
        }

def create_data_loader(df, tokenizer, max_len, batch_size):
    ds = HateSpeechDataset(texts=df.clean_text.to_numpy(), labels=df.Label.to_numpy(), tokenizer=tokenizer, max_len=max_len)
    return DataLoader(ds, batch_size=batch_size, num_workers=2)

train_data_loader = create_data_loader(train_df, tokenizer, Config.MAX_LENGTH, Config.BATCH_SIZE)
val_data_loader = create_data_loader(val_df, tokenizer, Config.MAX_LENGTH, Config.BATCH_SIZE)
test_data_loader = create_data_loader(test_df, tokenizer, Config.MAX_LENGTH, Config.BATCH_SIZE)
Step 3: Training BERT
We are nearing the training phase of this journey, but before that, we need to define what our BERT will be.
class BertClassifier(nn.Module):
    def __init__(self, n_classes):
        super(BertClassifier, self).__init__()
        self.bert = AutoModel.from_pretrained(Config.MODEL_NAME)
        self.drop = nn.Dropout(p=0.3)
        self.out = nn.Linear(self.bert.config.hidden_size, n_classes)
    def forward(self, input_ids, attention_mask):
        outputs = self.bert(input_ids=input_ids, attention_mask=attention_mask)
        pooled_output = outputs.pooler_output
        output = self.drop(pooled_output)
        return self.out(output)

model = BertClassifier(n_classes=2).to(device)
BERT is defined as taking the tokenized input from the previous steps and then feeding it into the pre-trained BERT model so that we can get the contextual representation of these texts. In this, we also define the BERT to apply a regularizing step or dropout so we can avoid overfitting. We then used a linear layer to produce a classification logit for our two classes (hate or non-hate).
Training and Evaluation Function
Now, create a training function that manages the training process of each epoch. This function will iterate through the data_loader where our datasets are being loaded, and then this function is responsible for executing a forward and backward pass to calculate the CrossEntropyLoss of each iteration. It is also the one that updates the parameters of the model with the help of AdamW optimizer.
def train_epoch(model, data_loader, loss_fn, optimizer, device, scheduler):
    model = model.train()
    losses = []
    total_predictions = 0
    correct_predictions = 0

    print("Starting training epoch...")
    for d in data_loader:
        input_ids = d["input_ids"].to(device)
        attention_mask = d["attention_mask"].to(device)
        labels = d["labels"].to(device)

        outputs = model(input_ids=input_ids, attention_mask=attention_mask)
        _, preds = torch.max(outputs, dim=1)
        loss = loss_fn(outputs, labels)

        total_predictions += len(labels)
        correct_predictions += torch.sum(preds == labels)
        losses.append(loss.item())

        loss.backward()
        nn.utils.clip_grad_norm_(model.parameters(), max_norm=1.0)
        optimizer.step()
        scheduler.step()
        optimizer.zero_grad()

    print("Training epoch finished.")
    accuracy = correct_predictions.double() / total_predictions
    return accuracy, np.mean(losses)
At the same cell, we also defined the evaluation function for when the model performance is being evaluated instead of train.
def eval_model(model, data_loader, loss_fn, device):
    model = model.eval()
    losses = []
    all_labels = []
    all_preds = []

    print("Starting evaluation...")
    with torch.no_grad():
        for d in data_loader:
            input_ids = d["input_ids"].to(device)
            attention_mask = d["attention_mask"].to(device)
            labels = d["labels"].to(device)

            outputs = model(input_ids=input_ids, attention_mask=attention_mask)
            _, preds = torch.max(outputs, dim=1)
            loss = loss_fn(outputs, labels)

            losses.append(loss.item())
            all_labels.extend(labels.cpu().numpy())
            all_preds.extend(preds.cpu().numpy())

    print("Evaluation finished.")
    report = classification_report(all_labels, all_preds, target_names=['Non-Hate', 'Hate'], output_dict=True, zero_division=0)
    return np.mean(losses), report
In this function, it helps evaluate the model by switching the model into the evaluation mode (where no changes will then be made). This function returns the mean loss and gives us the detailed report using the scikit-learn metrics library.
You might think we are done. But we have yet to train the model :> We are just creating functions that help in executing the training phase. But here we go now!!
Training the Model
optimizer = AdamW(model.parameters(), lr=Config.LEARNING_RATE)
total_steps = len(train_data_loader) * Config.EPOCHS
scheduler = get_linear_schedule_with_warmup(optimizer, num_warmup_steps=0, num_training_steps=total_steps)
loss_fn = nn.CrossEntropyLoss().to(device)
history = {'train_acc': [], 'train_loss': [], 'val_acc': [], 'val_loss': [], 'val_f1': []}
best_accuracy = 0
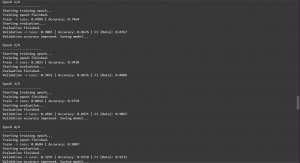
for epoch in range(Config.EPOCHS):
print(f'\nEpoch {epoch + 1}/{Config.EPOCHS}')
print('-' * 20)
train_acc, train_loss = train_epoch(model, train_data_loader, loss_fn, optimizer, device, scheduler)
print(f'Train -> Loss: {train_loss:.4f} | Accuracy: {train_acc:.4f}')
val_loss, val_report = eval_model(model, val_data_loader, loss_fn, device)
val_acc = val_report['accuracy']
val_f1 = val_report['Hate']['f1-score']
print(f'Validation -> Loss: {val_loss:.4f} | Accuracy: {val_acc:.4f} | F1 (Hate): {val_f1:.4f}')
history['train_acc'].append(train_acc)
history['train_loss'].append(train_loss)
history['val_acc'].append(val_acc)
history['val_loss'].append(val_loss)
history['val_f1'].append(val_f1)
if val_acc > best_accuracy:
print("Validation accuracy improved. Saving model...")
torch.save(model.state_dict(), 'best_model_state.bin')
best_accuracy = val_acc
Now, the model learns by iteratively going through our dataset with the AdamW optimizer, optimizing our model with the best parameter weights. The linear scheduler will adjust the learning rate we set during the training, and the CrossEntropyLoss will serve as our loss criterion where our goal is to have the lower score, the better the performance. The model’s best state is then saved as best_model_state.bin.
Step 4: Model Evaluation
Of course, we need to evaluate the overall performance of our model.
model.load_state_dict(torch.load('best_model_state.bin'))

# Generate the final classification report string
all_labels_test = []
all_preds_test = []
with torch.no_grad():
    for d in test_data_loader:
        outputs = model(input_ids=d["input_ids"].to(device), attention_mask=d["attention_mask"].to(device))
        _, preds = torch.max(outputs, dim=1)
        all_labels_test.extend(d["labels"].cpu().numpy())
        all_preds_test.extend(preds.cpu().numpy())

final_report_str = classification_report(all_labels_test, all_preds_test, target_names=['Non-Hate', 'Hate'])
print("\nFinal Test Set Performance Report:")
print(final_report_str)

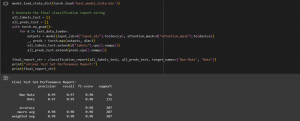
The accuracy of our model is 98%, suggesting that all predictions made by our model on the test set were correct. We had an F1 score of 98% for both our hate and non-hate classes, which indicates a balance between our precision and recall for both classes. The results suggest that our model is strong and highly accurate. HOWEVER, these might be due to the following:
- Since our dataset is tiny in total, there is a high chance that our model will suffer from overfitting. We can resolve this by collecting more quality data in your future projects.
- There is limited generalization since our data is a combination of publicly available datasets and AI-generated data. The model might not be able to look into quality data diversity.
Step 5: Interactive Inference
We created an interactive inference input where users can type their text, and the model will predict what class that input is. Explore more of the model at Thaniela/Hate-Speech-BERT.
# Load the best model checkpoint
inference_model = BertClassifier(n_classes=2)
inference_model.load_state_dict(torch.load('best_model_state.bin'))
inference_model = inference_model.to(device)
inference_model.eval()
def predict_hate_speech(text, model, tokenizer, device, max_len=128):
cleaned_text = preprocess_text(text)
encoding = tokenizer.encode_plus(
cleaned_text,
add_special_tokens=True,
max_length=max_len,
return_token_type_ids=False,
padding='max_length',
truncation=True,
return_attention_mask=True,
return_tensors='pt',
)
input_ids = encoding['input_ids'].to(device)
attention_mask = encoding['attention_mask'].to(device)
with torch.no_grad():
outputs = model(input_ids=input_ids, attention_mask=attention_mask)
_, prediction = torch.max(outputs, dim=1)
class_names = ['Non-Hate Speech', 'Hate Speech']
return class_names[prediction.item()]
# Start inference loop
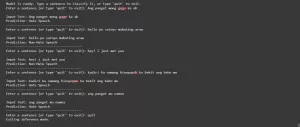
print("\nModel is ready. Type a sentence to classify it, or type 'quit' to exit.")
while True:
user_input = input("Enter a sentence (or type 'quit' to exit): ")
if user_input.lower().strip() == 'quit':
print("Exiting inference mode.")
break
prediction = predict_hate_speech(user_input, inference_model, tokenizer, device, Config.MAX_LENGTH)
print(f"\nInput Text: {user_input}")
print(f"Prediction: {prediction}")
print("-" * 40)
Why This Matters
With the rise of technology, online interactions increased exponentially. In this bubble, the spread of hate speech is an inevitable phenomenon due to anonymity in online platforms. But hate speech isn’t just offensive; it is far more destructive if left unchecked because there is a possibility of escalation into more dangerous territory like discrimination and even violence.
With this in mind, it is crucial for every platform to catch and prevent harmful content, hence the development of automatic detection and moderation. However, the detection of hate speech is not easy because of technical challenges and language barriers. However, the advancement in NLP allows us to create models that are fine-tuned to perform tasks such as hate speech detection to offer practical solutions. BERT is one of the powerful models we can utilize to protect our community from any harm.
This guide is just a beginner approach to creating your own model. It has its limitations, especially with the dataset, but we hope that you learn the skills needed when you make your own model. There is a lot to improve in this model, which you can do so on your own later on.
References:
🎭 GET 22% OFF our AWS Security Specialty and AZ-500 Azure Security Engineer Associate Practice Exams – Master Cloud Security Now!

Learn AWS with our PlayCloud Hands-On Labs

$2.99 AWS and Azure Exam Study Guide eBooks

New AWS Generative AI Developer Professional Course AIP-C01

Learn GCP By Doing! Try Our GCP PlayCloud

Learn Azure with our Azure PlayCloud

FREE AI and AWS Digital Courses

FREE AWS, Azure, GCP Practice Test Samplers


Subscribe to our YouTube Channel

Follow Us On Linkedin


