Browser extensions are a great way to bring AI directly into your everyday workflows. Instead of copying text into external tools and websites to be summarized, you can do it right on the page.
In this tutorial, we’ll build a lightweight, model-agnostic Chrome extension that summarizes selected text using AI. With a simple right-click, users can send any highlighted text to an AI model of their choice and instantly view a concise summary in the extension popup.
Rather than focusing on a single provider, this project is designed to be beginner-friendly and privacy-focused. API keys are supplied by the user and stored locally, no backend is required, and the summarization logic is abstracted away so different AI models can be swapped in with minimal changes.
By the end of this tutorial, you’ll be able to (hopefully):
- Integrate custom context menu actions in a Chrome extension
- Capture and process selected text from web pages
- Connect a client-side extension to AI APIs safely
- Build a clean, responsive popup UI with React and TypeScript
This repository serves as the code companion to the tutorial that you can follow along step by step and experiment with your own as you cruise through this article.
Who this tutorial is for
This tutorial assumes familiarity with React and TypeScript, but no prior experience with browser extension or AI APIs.
Tech Stack & Requirements
We’ll be building the web extension using:
- CRXJS – Simplifies Chrome Extension (Manifest V3) development and bundling
- React/Vite – For building a fast, modern popup UI
- TypeScript – Adds type safety and improves maintainability
- Tailwind CSS – Utility-first styling for rapid UI development
- shadcn/ui – Prebuilt, accessible UI components
Before getting started, make sure you have the following installed on your machine:
- Node.js (v18 or later recommended)
- npm (comes bundled with Node.js)
- Chromium-based browser (Chrome, Brave, Edge)
- A code editor
The extension runs entirely client-side and communicates directly with the selected AI providers.
Project Setup
To get started, follow the official CRXJS project creation guide to scaffold a new extension using React and Vite:
https://crxjs.dev/guide/installation/create-crxjs

Additional UI dependencies
This project uses Tailwind CSS for styling and shadcn/ui for prebuilt, accessible UI components (dialogs, selects, inputs, etc.). After scaffolding the extension, make sure to install and configure both in your project before moving on:
- Set up Tailwind CSS for a Vite + React project
- Install shadcn/ui and initialize it in the same project
Also, ensure that the following shadcn/ui components are installed:
- dialog
- input
- select
Once Tailwind CSS and shadcn/ui are configured correctly, you can continue with the next section.
Folder Structure
web-ext-llm-summarizer/
├─ dist/ # Production build output (loaded into Chrome)
├─ node_modules/ # Project dependencies
├─ public/ # Static assets copied directly into the build
├─ release/ # Packaged extension builds for distribution
├─ src/
│ ├─ assets/ # Images and static assets used by the extension
│ ├─ background/ # Background logic (context menu, event listeners)
│ ├─ components/ # Reusable React components
│ │ └─ ui/ # shadcn/ui components
│ ├─ content/ # Content scripts that run on web pages
│ ├─ lib/ # Shared utilities and helper functions
│ ├─ popup/ # Extension popup UI
│ └─ scripts/ # Core extension logic (e.g., AI summarization)
If you’re following this tutorial closely, you can go ahead and create these folders ahead in time!
Loading the extension locally
Once the project is built, you can load the extension into Chrome (or any Chromium-based browser) for local testing.
1. Build the extension
2. Open Chrome (or your browser) and navigate to:
chrome://extensions
3. Enable Developer mode (top-right corner) if you haven’t already
4. Click Load unpacked select the dist folder automatically generated for you by CRXJS.
What is manifest.json?
manifest.json is essentially a file that describes your extension. It defines several characteristics such as name, version, and permissions. Think of it as a blueprint for how it should behave in the browser and essential for every web extension that you’ll create.
Copy and paste this into your manifest.config.ts file (replace its contents):
import { defineManifest } from "@crxjs/vite-plugin";
import pkg from "./package.json";
export default defineManifest({
manifest_version: 3,
name: pkg.name,
version: pkg.version,
icons: {
48: "public/logo.png",
},
action: {
default_icon: {
48: "public/logo.png",
},
default_popup: "src/popup/index.html",
},
permissions: ["contentSettings", "contextMenus", "storage"],
background: {
service_worker: "src/background/index.ts",
type: "module",
},
});
For the icons, you are free to change it to anything that you want. Icons comes in four sizes: 16×16, 32×32, 48×48, and 128×128.
There are two fields that you should pay attention to, namely permissions and background.
What are permissions?
Permissions are essentially, well, permissions for your extension. At the same time, it both limits and gives you the ability to interact with the user’s browser. Without explicitly stating the permissions that you need, your web extension will not work properly and follow the behavior that you had for it in mind.
Currently, we have three permissions: contentSettings, contextMenus, and storage.
contentSettings: Change site settings like cookies or JavaScript.contextMenus: Add custom right-click menu items (such as “Summarize with AI” which is what we are going to be using for allowing the user to highlight text and summarize it using our web extension)storage: Save and retrieve extension data.
What are background scripts (or Service Workers now in Manifest V3)?
Background scripts, now also known as Service Workers in Manifest V3, is a program that constantly runs in the background of the browser. You can use it to listen for events such as when the user first installs the extension to redirect them to a greeting page in a website, or detect when the user clicks a context menu item and we want our extension to react to it.
Copy and paste this into src/background/index.ts. If you don’t have the folder and file already, go ahead and create it. Note that if you want to place it elsewhere, you are free to do so as long as you update the manifest and point the service_worker field to the new location.
import { TCompressionLevel } from "@/popup/App";
import { summarizeText } from "@/scripts/summarize-text";
chrome.runtime.onInstalled.addListener((details) => {
if (details.reason === "install") {
setTimeout(() => {
chrome.tabs.create({ url: "https://tutorialsdojo.com/" });
}, 1000);
}
chrome.contextMenus.create({
id: "summarize-text",
title: "Summarize with AI",
contexts: ["selection"],
});
});
chrome.contextMenus.onClicked.addListener(async (info) => {
if (info.menuItemId === "summarize-text") {
const {
aiModel = "groq/compound-mini",
compressionLevel = "Low",
apiKey,
} = (await chrome.storage.local.get([
"aiModel",
"compressionLevel",
"apiKey",
])) as {
aiModel?: string;
compressionLevel?: TCompressionLevel;
apiKey?: string;
};
if (!apiKey) {
console.error("API key does not exist!");
return;
}
const res = await summarizeText(
info!.selectionText!,
aiModel,
compressionLevel,
apiKey,
);
await chrome.storage.local.set({
originalSummarizedText: info!.selectionText!,
summary: res,
compressionLevel,
});
chrome.action.openPopup();
}
});
Explanation: This background (service worker) script handles extension lifecycle and user interactions.
When the extension is first installed, it opens a welcome page in a new tab and registers a “Summarize with AI” context menu that appears when text is selected.
When the user clicks this menu item, the script retrieves the saved AI settings and API key, sends the selected text to the summarization function, stores the resulting summary in local storage, and then opens the extension popup to display the result.
Currently, by default, we will be using groq as our AI provider for its generous free tier and particularly its groq/compound-mini. You are free to change this later as we dive into the summarization logic behind the scenes.
Building the Extension UI

This is the part where we build the popup UI for our extension. It is built with React, and while it may look long at first glance, most of it is just UI stuff and small interaction handlers.
Don’t worry about understanding everything right away. Focus on what the UI is responsible for and how the pieces connect. You can always come back and dig into specific sections later. If you have any confusions along the way, feel free to message me! I have lots of time.
What the UI essentially does
- At a high level, our popup UI handles four things:
- Displays the original text and the generated summary
- Lets the user trigger summarization
- Provides a settings dialog (AI model, compression level, API key)
- Listens for updates from the background script via Chrome storage
How data flows in the popup
Instead of directly talking to the background script (which, as you may remember, runs in the background and deals with user interactions), the popup relies on the local browser storage, or chrome.storage.local.
- When the popup opens, it loads any saved API key, summary, and compression level
- When the background script writes a new summary to storage, the popup automatically updates
- When the user changes settings, they’re saved locally so they persist across sessions
This keeps the popup simple and avoids unnecessary message passing.
Configuration
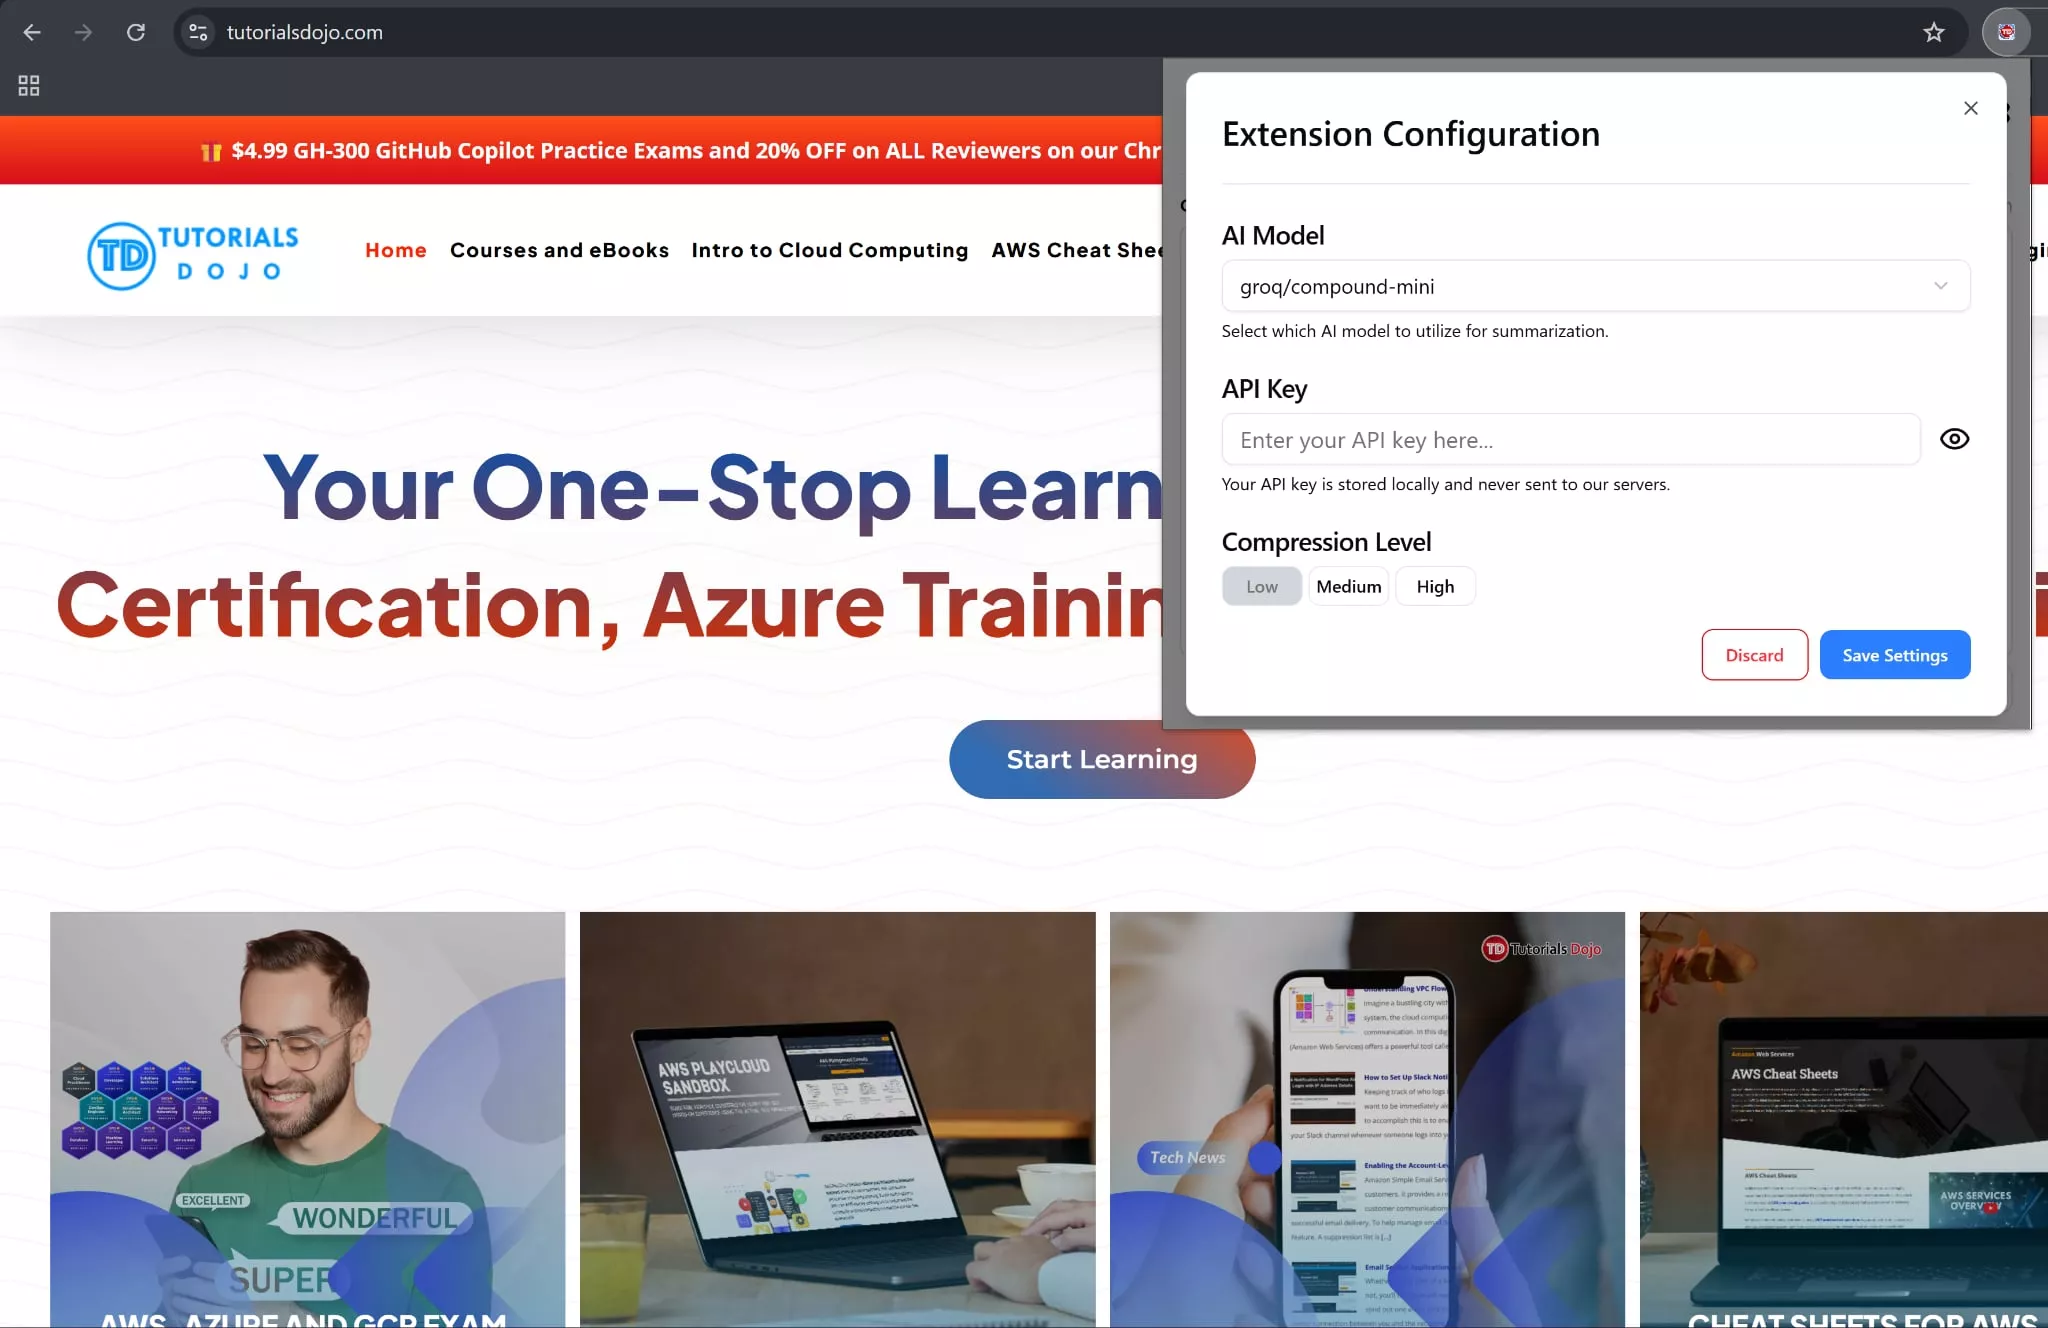

We want to keep our main UI clean, so configuration options should live in a separate dialog:
- AI model selection (right now, our options shall only be
groq/compound-mini, but remember, you can always change it!) - API key input (with show/hide toggle)
- Compression Level (Low, Medium, High)
Settings are first stored in a draft state, which means unless the user chooses to save it by clicking a save button, changes aren’t going to reflect or persist.
What happens when the user clicks “Summarize”
Simply put, when the Summarize button is clicked by the user:
1. A loading state is shown
2. The selected or previously stored text is sent to to the summarizeText() function, either through the background script (through the context menu) OR directly from the UI
3. The result is saved to the local browser storage or chrome.local.storage
4. The UI updates immediately with the new summary and necessary info such as the compression level
Full Popup UI Code
Below is the complete App.tsx file in the popup/ folder. You don’t need to memorize this. Treat this as a reference while following the explanations above.
https://github.com/waffensultan/web-ext-llm summarizer/blob/main/src/popup/App.tsx
If you are following the tutorial closely, copy and paste the contents into your own App.tsx file located in the popup/ folder.
AI Text Summarization Logic
Phew! We’ve reached the core logic of our web extension. Ideally, our summarizeText() function should accept these paremeters: the chosen AI model, the compression level, and the user’s API key.
If the model, is something like groq/compound-mini, it sends the text to Groq’s API along with clear instructions on how condensed the summary should be (Low, Medium, and High).
The selected AI provider and model will return a clean, plain-text summary, which the function extracts and sends back either to the popup UI or the service worker.
Use this as a reference for your own function. If you are closely following this tutorial, copy and paste the content into the scripts/summarize-text.ts file directory.
import { TCompressionLevel } from "@/popup/App";
export const summarizeText = async (
text: string,
aiModel: string,
compressionLevel: TCompressionLevel,
apiKey: string,
) => {
if (aiModel === "groq/compound-mini") {
const response = await fetch(
"https://api.groq.com/openai/v1/chat/completions",
{
method: "POST",
headers: {
"Content-Type": "application/json",
Authorization: `Bearer ${apiKey}`,
},
body: JSON.stringify({
model: "groq/compound-mini",
messages: [
{
role: "system",
content: `
You are a highly intelligent AI summarization assistant.
Context about the application:
- This is a lightweight Chrome extension called "web-ext-llm-summarizer" created by Waffen Sultan in collaboration with TutorialsDojo.
- The extension allows users to highlight text on any webpage, right-click, and select "Summarize with AI."
- The summary appears instantly in a clean, responsive popup UI.
- Users can configure AI models, provide their own API keys (stored locally), and choose the compression level: Low, Medium, or High.
- The extension is fully client-side, privacy-friendly, and stores summaries in chrome.storage.local.
- Only summaries should be displayed to the user; no extra explanation is needed.
Rules for summarization:
1. Use the following compression level: ${compressionLevel}
- Low: retain most details, slightly condensed.
- Medium: keep only essential points.
- High: concise key points only.
2. Remove any markdown or special formatting (** __ *, etc.).
3. Make the summary natural, coherent, and readable.
4. Preserve the main ideas; do not invent information.
5. Avoid repetition or filler words.
6. If the input text is empty, random symbols, or otherwise unsuitable for summarization, respond with: "Input is not suitable for summarization."
7. Output ONLY the summary text; no headers, explanations, or commentary.
`.trim(),
},
{ role: "user", content: text },
],
}),
},
);
const data = await response.json();
const summarizedText = data.choices[0].message.content;
return summarizedText;
}
};
As you can see, we wrote the code in such a way that it was tailored for a response for the groq API.
You can extend the code to make it accept more AI models. Just don’t forget to also update the popup UI as you do.
Testing the Extension
To test the extension and see whether it truly works:
1. Open any webpage and highlight some text
2. Right-click and select “Summarize with AI”
3. The extension popup should open and display the generated summary
If nothing happens, double-check that your API key is saved in the settings and that the extension is loaded correctly.
Remember that we also save values in the local browser storage? Tip: You can use developer tools, specifically the Application tab to debug possible issues.
A Closing Note
We’ve built a fully client-side web extension (that works in any Chromium-based browser) that summarizes text using AI. Along the way, you learned how to work with background service workers, context menus, Chrome storage, and a React-based popup UI.
This project is intentionally designed to be simple, privacy-friendly, and easy to extend.
Source Code & Next Steps
The full source code for this project is available on GitHub:
https://github.com/waffensultan/web-ext-llm-summarizer
You can try:
- Adding support for more AI models or providers
- Improving the popup or UI layout (and trust me, there are still issues left for you to solve!)
- Publishing the extension to the Chrome web store
- Adding features like history, export, or auto-summarization
You can also download the ready-to-install version of the extension from the official release page: Download here.
I encourage you to make a fork of the GitHub repository and experiment with it and make it truly your own. Thanks for reading!
🌸 25% OFF All Reviewers on our International Women’s Month Sale! Save 10% OFF All Subscriptions Plans & 5% OFF Store Credits/Gift Cards!

Learn AWS with our PlayCloud Hands-On Labs

$2.99 AWS and Azure Exam Study Guide eBooks

New AWS Generative AI Developer Professional Course AIP-C01

Learn GCP By Doing! Try Our GCP PlayCloud

Learn Azure with our Azure PlayCloud

FREE AI and AWS Digital Courses

FREE AWS, Azure, GCP Practice Test Samplers


Subscribe to our YouTube Channel

Follow Us On Linkedin


