Last updated on October 31, 2025
If you ever want to build your own AI chatbot on Amazon, this guide will show you how. You’ll create a working, serverless chatbot powered by Amazon Bedrock Nova, one of the easiest ways to try foundation models on Amazon. The setup is simple, fully managed, and does not require hosting your own model or dealing with complex infrastructure.
We’ll use Amazon Bedrock, AWS’s service for running and managing foundation models. It gives you easy API access to large language models without worrying about scaling, infrastructure, or maintenance.
The Nova family is Amazon’s own set of models available in Bedrock. We’ll default to Nova Micro for the best price-to-performance ratio. Later, you can switch to Lite or Pro by editing your configuration. It comes in three tiers that balance cost, speed, and reasoning ability:
-
Nova Micro – the fastest and most cost-effective for basic chat and prototypes
-
Nova Lite – balanced in performance and reasoning
-
Nova Pro – strongest reasoning and better long-form understanding
Amazon Nova models are designed for efficiency, speed, and cost control. Nova Micro, Lite, and Pro provide a range of reasoning power at a fraction of the price of larger foundation models. When paired with Amazon Lambda, you only pay per request with no idle compute time, making it ideal for small, serverless AI chat workloads. This combination offers real conversational intelligence at cloud-native scale and cost levels that remain practical even for frequent testing and iteration.
Prerequisite
Before we get started, make sure you have:
-
An AWS account with Bedrock access in your region
-
IAM permissions to create roles, Lambda functions, and HTTP API
Create a Least-Privilege IAM Role for Lambda
-
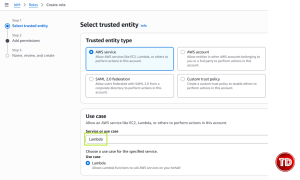
Create an IAM role. Go to IAM > Roles > Create role > AWS service > Lambda
-
Service or use case: Lambda
-
Name: my-chatbot-role
-
-
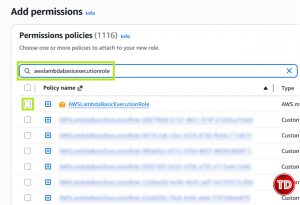
Attach managed policy
-
AWSLambdaBasicExecutionRole (CloudWatch logs)
-

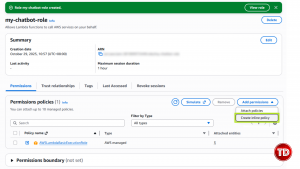
- Add inline Bedrock-invoke policy JSON
JSON:
{
  "Version": "2012-10-17",
  "Statement": [
    {
      "Sid": "BedrockInvoke",
      "Effect": "Allow",
      "Action": [
        "bedrock:InvokeModel",
        "bedrock:InvokeModelWithResponseStream"
      ],
      "Resource": [
        "arn:aws:bedrock:ap-southeast-1::foundation-model/*",
        "arn:aws:bedrock:ap-southeast-1:*:inference-profile/*"
      ]
    }
  ]
}
NOTE: This policy lets your Lambda call Bedrock’s model runtime APIs. Later, you can limit “Resource” to your specific Nova model ARNs for tighter security.
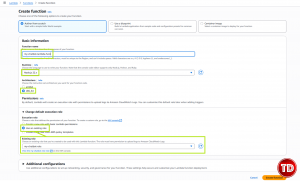
Create the Lambda Function
-
Lambda > Create function
-
Name: my-chatbot-lambda func
-
Runtime: Node.js 22 (default)
-
Architecture: x86_64
-
Role: my-chatbot-role (the role we created earlier)
-
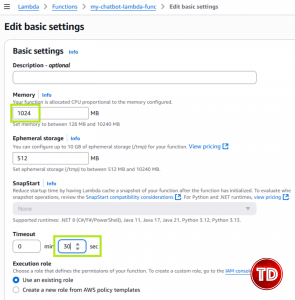
- General configuration > Edit
-
Memory: 1024 MB (Nova-Pro answers can be chunky!)
-
Timeout: 30s
-
Ephemeral storage: 512 MB (default OK)
-
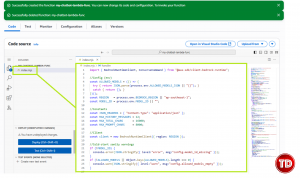
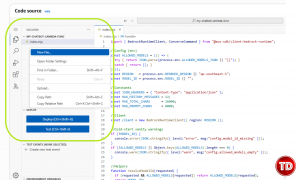
Amazon Lambda Console Code Editor
-
Write your AI Chatbot logic inside “index.mjs”.
-
Don’t know what to write? Don’t worry, I have a template ready for you to use and configure to your liking 🙂
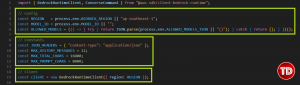
- Config:
-
Pulls region, default model ARN, and allowed model list from Lambda environment variables.
-
Keeps settings editable without changing code.
-
- Constants:
-
Defines reusable constants for headers and size limits (to control cost and avoid timeouts).
-
- Client
- Creates a Bedrock client that actually sends requests to Amazon.
- Config:
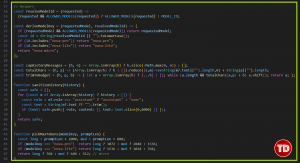
- Helpers
-
resolveModelId: chooses the correct model ARN (from key > ARN map).
-
deriveModelKey: figures out which model family (“nova-micro”, etc.) for token limits.
-
capHistoryMessages: keeps only the last N messages for short context.
-
totalChars / trimToBudget: trims conversation if it exceeds total char budget.
-
sanitizeHistory: cleans up messages so Bedrock gets the right shape.
-
pickMaxTokens: adjusts output length depending on model and prompt size.
-
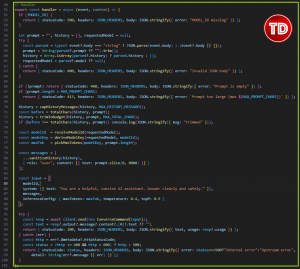
- Handler
-
Parses request: reads prompt, history, and model from the incoming JSON body.
-
Validates input: checks missing or too-long prompt, bad JSON.
-
Caps & trims: ensures the request stays within limits.
-
Resolves model: decides which model ID to use and how many tokens to allow.
-
Builds messages: converts the user’s prompt + history into Bedrock’s message format.
-
Defines system prompt: sets behavior (“helpful, concise assistant”).
-
Sends to Bedrock: calls ConverseCommand and awaits the model’s text reply.
-
Returns response: outputs {text, usage} to the client.
-
Error catch: cleanly reports any 4xx/5xx errors instead of crashing.
-
-
-
Why this design?
-
Env-based config for easy setup.
-
Allow-list keeps model use safe.
-
Prompt/history caps control cost.
-
Short memory keeps context light.
-
Adaptive tokens prevent overuse.
-
Clean JSON validation and output.
-
Well filtered logs for quick debugging.
-
Neutral system prompt for safe replies.
-
Compact structure for clarity and reuse.
-
-
-
Lastly, create a package.json file
Then, paste this inside of pacakge.json: { “type”: “module”, “dependencies”: { “@aws-sdk/client-bedrock-runtime”: “^3.654.0” } }
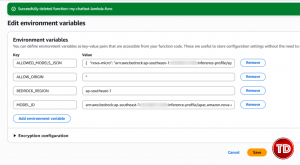
Configure Environment Variables
-
Lambda > Configuration > Environment variables > Edit
-
BEDROCK_REGION = ap-southeast-1
-
MODEL_ID = <nova-micro ARN>
-
ALLOWED_MODELS_JSON = {“nova-micro”:”<nova-micro ARN>”,”nova-lite”:”<nova-lite ARN>”,”nova-pro”:”<nova-pro ARN>”}
-
NOTE: you can find the ARN of your model in Cross-region inference!
-
-
ALLOW_ORIGIN = *
-
-
Before wiring it up to API Gateway, let’s make sure the Lambda can actually talk to Bedrock.
-
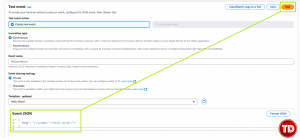
Now, go to Lambda > Test then scroll down until you see Event JSON.
-
Paste this: {
“body”: “{\”prompt\”:\”Hello world!\”}”
}
-
Click Test!
-
-
-
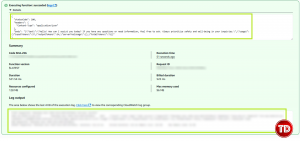
After that, click Details and you should see a Status Code 200 in the response and a JSON body similar to:
-
-
If you get a 500 or timeout, check:
-
That MODEL_ID and ALLOWED_MODELS_JSON match valid Nova inference profiles
-
That your IAM role allows bedrock:InvokeModel for those ARNs
-
That BEDROCK_REGION is correct and Bedrock is enabled in that region
-
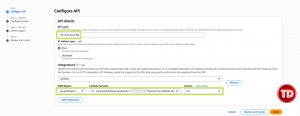
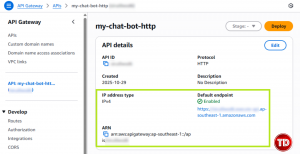
Amazon API Gateway (HTTP API)
-
API Gateway > Create API > HTTP API
-
Name: my-chat-bot-http
-
Integration: Lambda: my-chatbot-lambda-func
-
Route: POST /chatbot
-
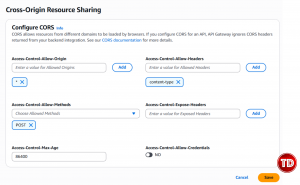
- CORS (on the API):
-
Allow Origins: https://localhost:3000, https://127.0.0.1:3000 (add your prod origin)
-
Allow Methods: POST
-
Allow Headers: content-type, authorization
-
Max Age: 86400
-

Quick API Tests (curl)
You’re almost done! The final step is to set up a simple UI frontend and link it to your backend endpoint. But before we jump into the sample code, let’s verify that your API connection is set up correctly!
- Open AWS CloudShell then insert this:
- API=”https://<apigw-id>.ap-southeast-1.amazonaws.com/chatbot”
curl -s -X POST “$API” \
-H “Content-Type: application/json” \
-d ‘{“prompt”:”Give me one fun fact about cats!.”}’ - NOTE: you can find your API Gateway ID here:
- API=”https://<apigw-id>.ap-southeast-1.amazonaws.com/chatbot”
- After pasting, you should see a response like this!
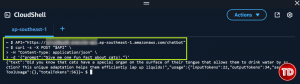
Testing your API endpoint with curl confirms that your Lambda and Bedrock connection actually works before any frontend code runs! It’s a simple way to validate your integration, security policies, and model invocation behavior directly from the command line. If the Lambda responds correctly to a curl request, you can trust that your application stack is wired correctly end-to-end 😀
Frontend Code
index.html:
<!doctype html>
<html>
<head>
    <meta charset="utf-8" />
    <title>Amazon Nova AI Chatbot</title>
    <link rel="stylesheet" href="./style.css" />
    <meta name="viewport" content="width=device-width, initial-scale=1" />
</head>
<body>
    <header>
        <h1>Amazon Nova AI Chatbot</h1>
        <small>This assistant answers <strong>AWS</strong> questions only.</small>
    </header>
    <main>
        <div id="chat"></div>
        <form id="f">
            <div class="row">
                <select id="model"></select>
            </div>
            <textarea id="prompt" rows="4" placeholder="Ask an AWS question…"></textarea>
            <button type="submit">Send</button>
        </form>
    </main>
    <script src="./app.js" type="module"></script>
</body>
</html>
Backend Code
app.js:
const chat = document.getElementById('chat');
const form = document.getElementById('f');
const promptEl = document.getElementById('prompt');
const modelSel = document.getElementById('model');

let API = null;
let DEFAULT_MODEL = "nova-micro";
let MODELS = [];
const history = [];

function add(role, text) {
  const div = document.createElement('div');
  div.className = `msg ${role === 'user' ? 'user' : 'bot'}`;
  div.textContent = text;
  chat.appendChild(div);
  chat.scrollTop = chat.scrollHeight;
}

async function loadConfig() {
  const res = await fetch('./config.json', { cache: 'no-store' });
  if (!res.ok) throw new Error('config.json not found');
  const cfg = await res.json();

  API = cfg.CHAT_API;
  DEFAULT_MODEL = cfg.DEFAULT_MODEL || DEFAULT_MODEL;
  MODELS = Array.isArray(cfg.MODELS) ? cfg.MODELS : [{ key: "nova-micro", label: "Nova Micro" }];

  modelSel.innerHTML = "";
  for (const m of MODELS) {
    const opt = document.createElement('option');
    opt.value = m.key;
    opt.textContent = m.label || m.key;
    if (m.key === DEFAULT_MODEL) opt.selected = true;
    modelSel.appendChild(opt);
  }
}

async function init() {
  await loadConfig();

  promptEl.addEventListener('keydown', (e) => {
    if (e.key === 'Enter' && !e.shiftKey) {
      e.preventDefault();
      form.dispatchEvent(new Event('submit', { bubbles: true, cancelable: true }));
    }
  });

  form.addEventListener('submit', async (e) => {
    e.preventDefault();
    const prompt = promptEl.value.trim();
    if (!prompt) return;

    add('user', prompt);
    promptEl.value = '';
    const btn = document.getElementById('send');
    btn.disabled = true;

    try {
      const selectedModel = modelSel.value || DEFAULT_MODEL;

      const res = await fetch(API, {
        method: 'POST',
        headers: { 'Content-Type': 'application/json' },
        body: JSON.stringify({ prompt, history, model: selectedModel })
      });

      if (!res.ok) {
        const errText = await res.text().catch(() => '');
        add('bot', `Error ${res.status}: ${errText || 'Request failed'}`);
        return;
      }

      const data = await res.json();
      const text = data.text || '(no response)';
      add('bot', text);
      history.push({ role: 'user', text: prompt }, { role: 'assistant', text });
      const CAP = 12;
      if (history.length > CAP) history.splice(0, history.length - CAP);
    } catch (err) {
      add('bot', `Network error: ${err?.message || err}`);
    } finally {
      btn.disabled = false;
      promptEl.focus();
    }
  });
}

if (document.readyState === 'loading') {
  document.addEventListener('DOMContentLoaded', init);
} else {
  init();
}
Configure API Connection
config.json:
{
  "CHAT_API": "https://<apigw-id>.execute-api.ap-southeast-1.amazonaws.com/chatbot",
  "DEFAULT_MODEL": "nova-micro",
  "MODELS": [
    { "key": "nova-micro", "label": "Nova Micro" },
    { "key": "nova-lite",  "label": "Nova Lite" },
    { "key": "nova-pro",   "label": "Nova Pro" }
  ]
}
You now have your frontend, backend logic, and config.json for API connectivity! I’ll leave the styling up to you 😉
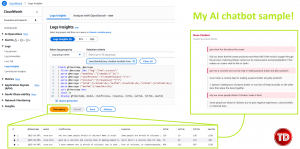
Amazon CloudWatch Logs Insights Queries
- CloudWatch Logs Insights helps you monitor every real-time chat and model response. The queries will make it easy to track token consumption, user chat and chatbot preview, and quickly diagnose issues without extra setup. Having structured logs means you can measure performance, cost impact, and request quality using one centralized dashboard!
fields @timestamp, @message
| filter @message like /"msg":"chat\.success"/
| parse @message /"modelKey":"(?<model>[^"]+)"/
| parse @message /"userPreview":"(?<chatPreview>[^"]*)"/
| parse @message /"preview":"(?<response>[^"]*)"/
| parse @message /"inTok":(?<inTok>\d+),"outTok":(?<outTok>\d+),"totTok":(?<totTok>\d+)/
| parse @message /"maxTok":(?<maxTok>\d+)/
| sort @timestamp desc
| limit 50
| display @timestamp, model, chatPreview, response, inTok, outTok, totTok, maxTok
Conclusion
You’ve now built a complete Amazon Bedrock chatbot that runs securely, scales automatically, and logs everything you need for visibility! You created a cost-efficient, production-ready AI assistant powered entirely by AWS services by combining Lambda, API Gateway, and Amazon Nova models. This foundation can grow into anything from an internal support bot to a public knowledge assistant while staying lightweight, secure, and easy to maintain.
References:
🌸 25% OFF All Reviewers on our International Women’s Month Sale! Save 10% OFF All Subscriptions Plans & 5% OFF Store Credits/Gift Cards!

Learn AWS with our PlayCloud Hands-On Labs

$2.99 AWS and Azure Exam Study Guide eBooks

New AWS Generative AI Developer Professional Course AIP-C01

Learn GCP By Doing! Try Our GCP PlayCloud

Learn Azure with our Azure PlayCloud

FREE AI and AWS Digital Courses

FREE AWS, Azure, GCP Practice Test Samplers


Subscribe to our YouTube Channel

Follow Us On Linkedin


