Last updated on January 3, 2026
Hey, this is Step 2 of our 9-step website portfolio building with AWS and WordPress!
Got lost? Click here to go to the main article, and here for the first step!
Now that you’ve secured your domain, it’s time to bring your website to life! In this step, we’ll launch an Amazon EC2 instance, a cloud-based virtual server that will host your portfolio.
History 101: From Physical Servers to the Cloud
Before diving into EC2 instances, let me brief you first with a history 101!
Before the advent of cloud computing, websites, and applications depended on physical servers. These large, expensive machines required special accommodation, constant maintenance, and upfront investments. Businesses bought, configured, and managed servers at great expense and with limited scalability. The minute demand loads increased, companies would acquire one or the other piece of hardware, leaving it underutilized when demand eventually receded.
With cloud computing, those limitations disappeared. Rather than owning physical servers, users can now rent virtual machines on-demand, paying for only the resources used. This makes website hosting a game-changer: it opens up and offers a cheaper option for developers and businesses alike.
What Do I Do with Virtual Machines?
If this is your first time encountering the word Virtual Machine, don’t worry, I got you!
A virtual machine is a simulated physical computer that is purely software-based. It runs on your existing hardware through a hypervisor (like VMware, VirtualBox, or Microsoft Hyper-V) and behaves like a real computer, complete with an operating system, applications, storage, and memory.
Think of it like running a second computer inside your computer.
What is Amazon EC2?
Amazon Elastic Compute Cloud (EC2) is a web service that provides scalable computing power in the cloud. Think of it as renting a virtual computer where you can install applications, run websites, and handle workloads without managing physical hardware.
Why Use Amazon EC2 for Your Portfolio?
-
Scalability – Easily upgrade your server resources as your website grows.
-
Flexibility – Choose your preferred operating system and configuration.
-
Cost-Effective – Pay only for what you use, with options for free-tier instances.
-
Security – Benefit from built-in security features and access controls.
How to Launch an Amazon EC2 Instance
Tip: When you click the “Info” button next to the section title, a sidebar will appear with details about that section, along with a helpful tutorial for beginners. Try it out!
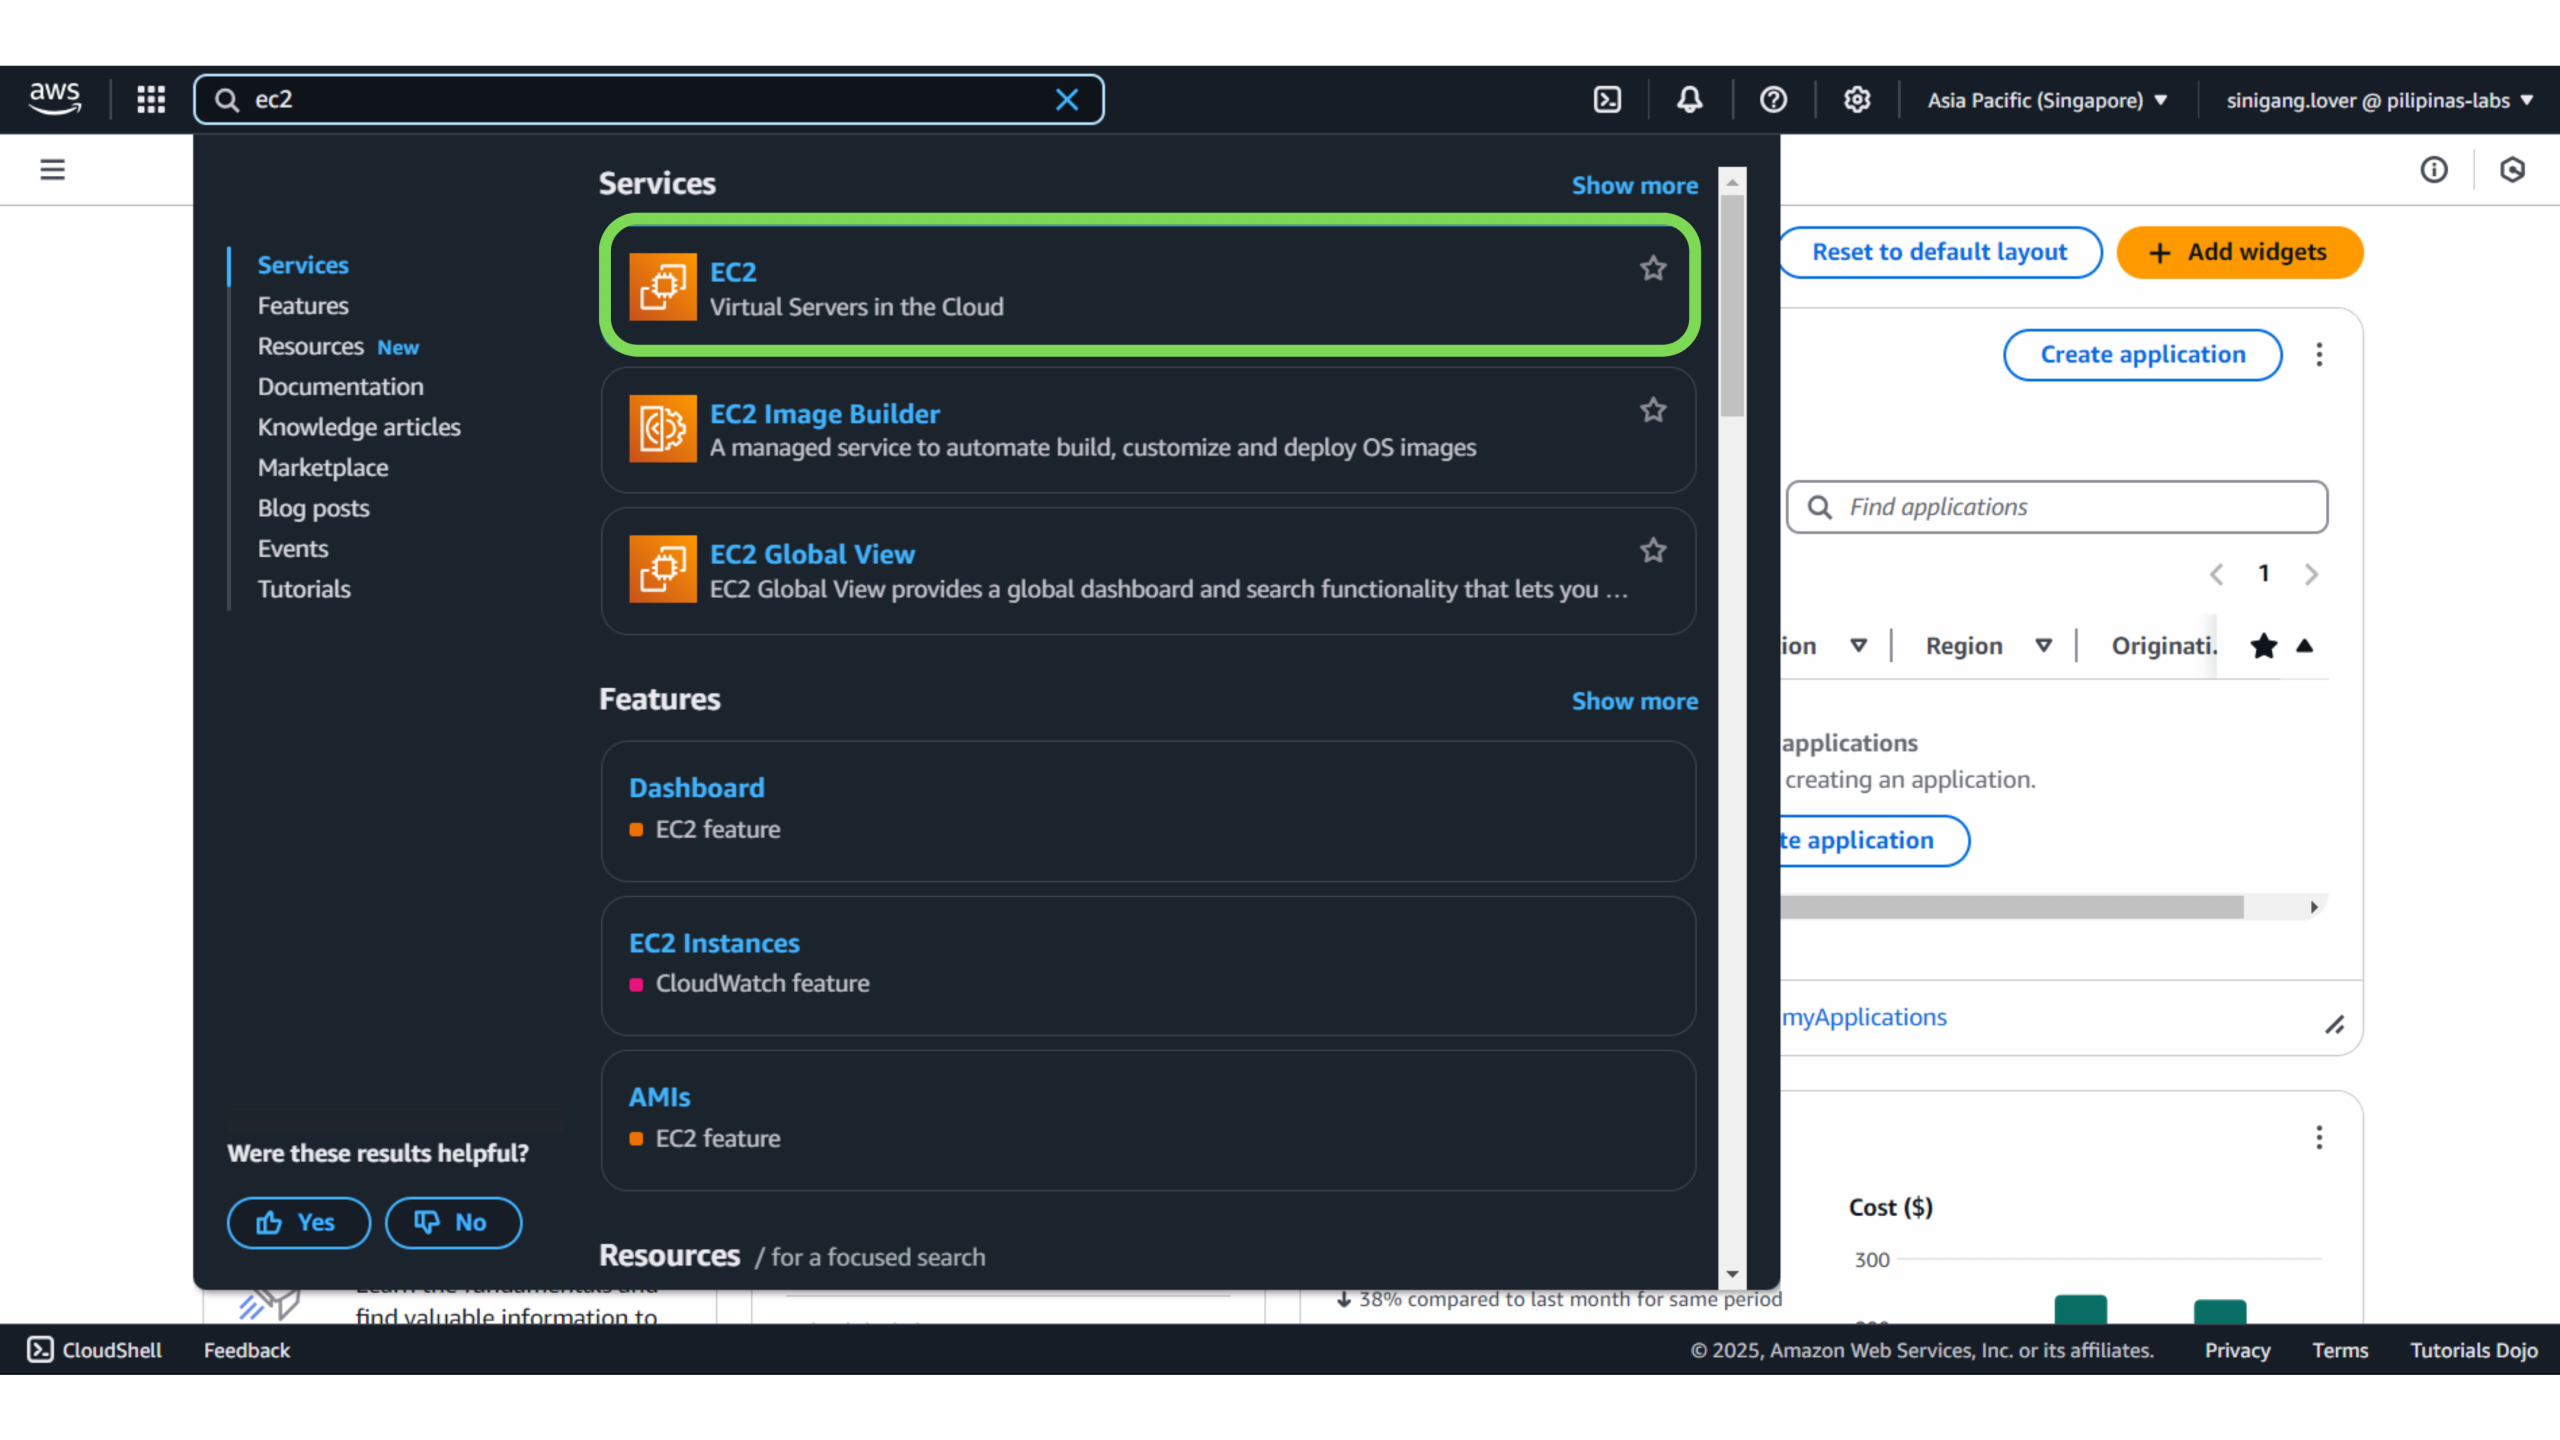
1. Log in to AWS Console – Navigate to the EC2 service on the AWS Management Console.
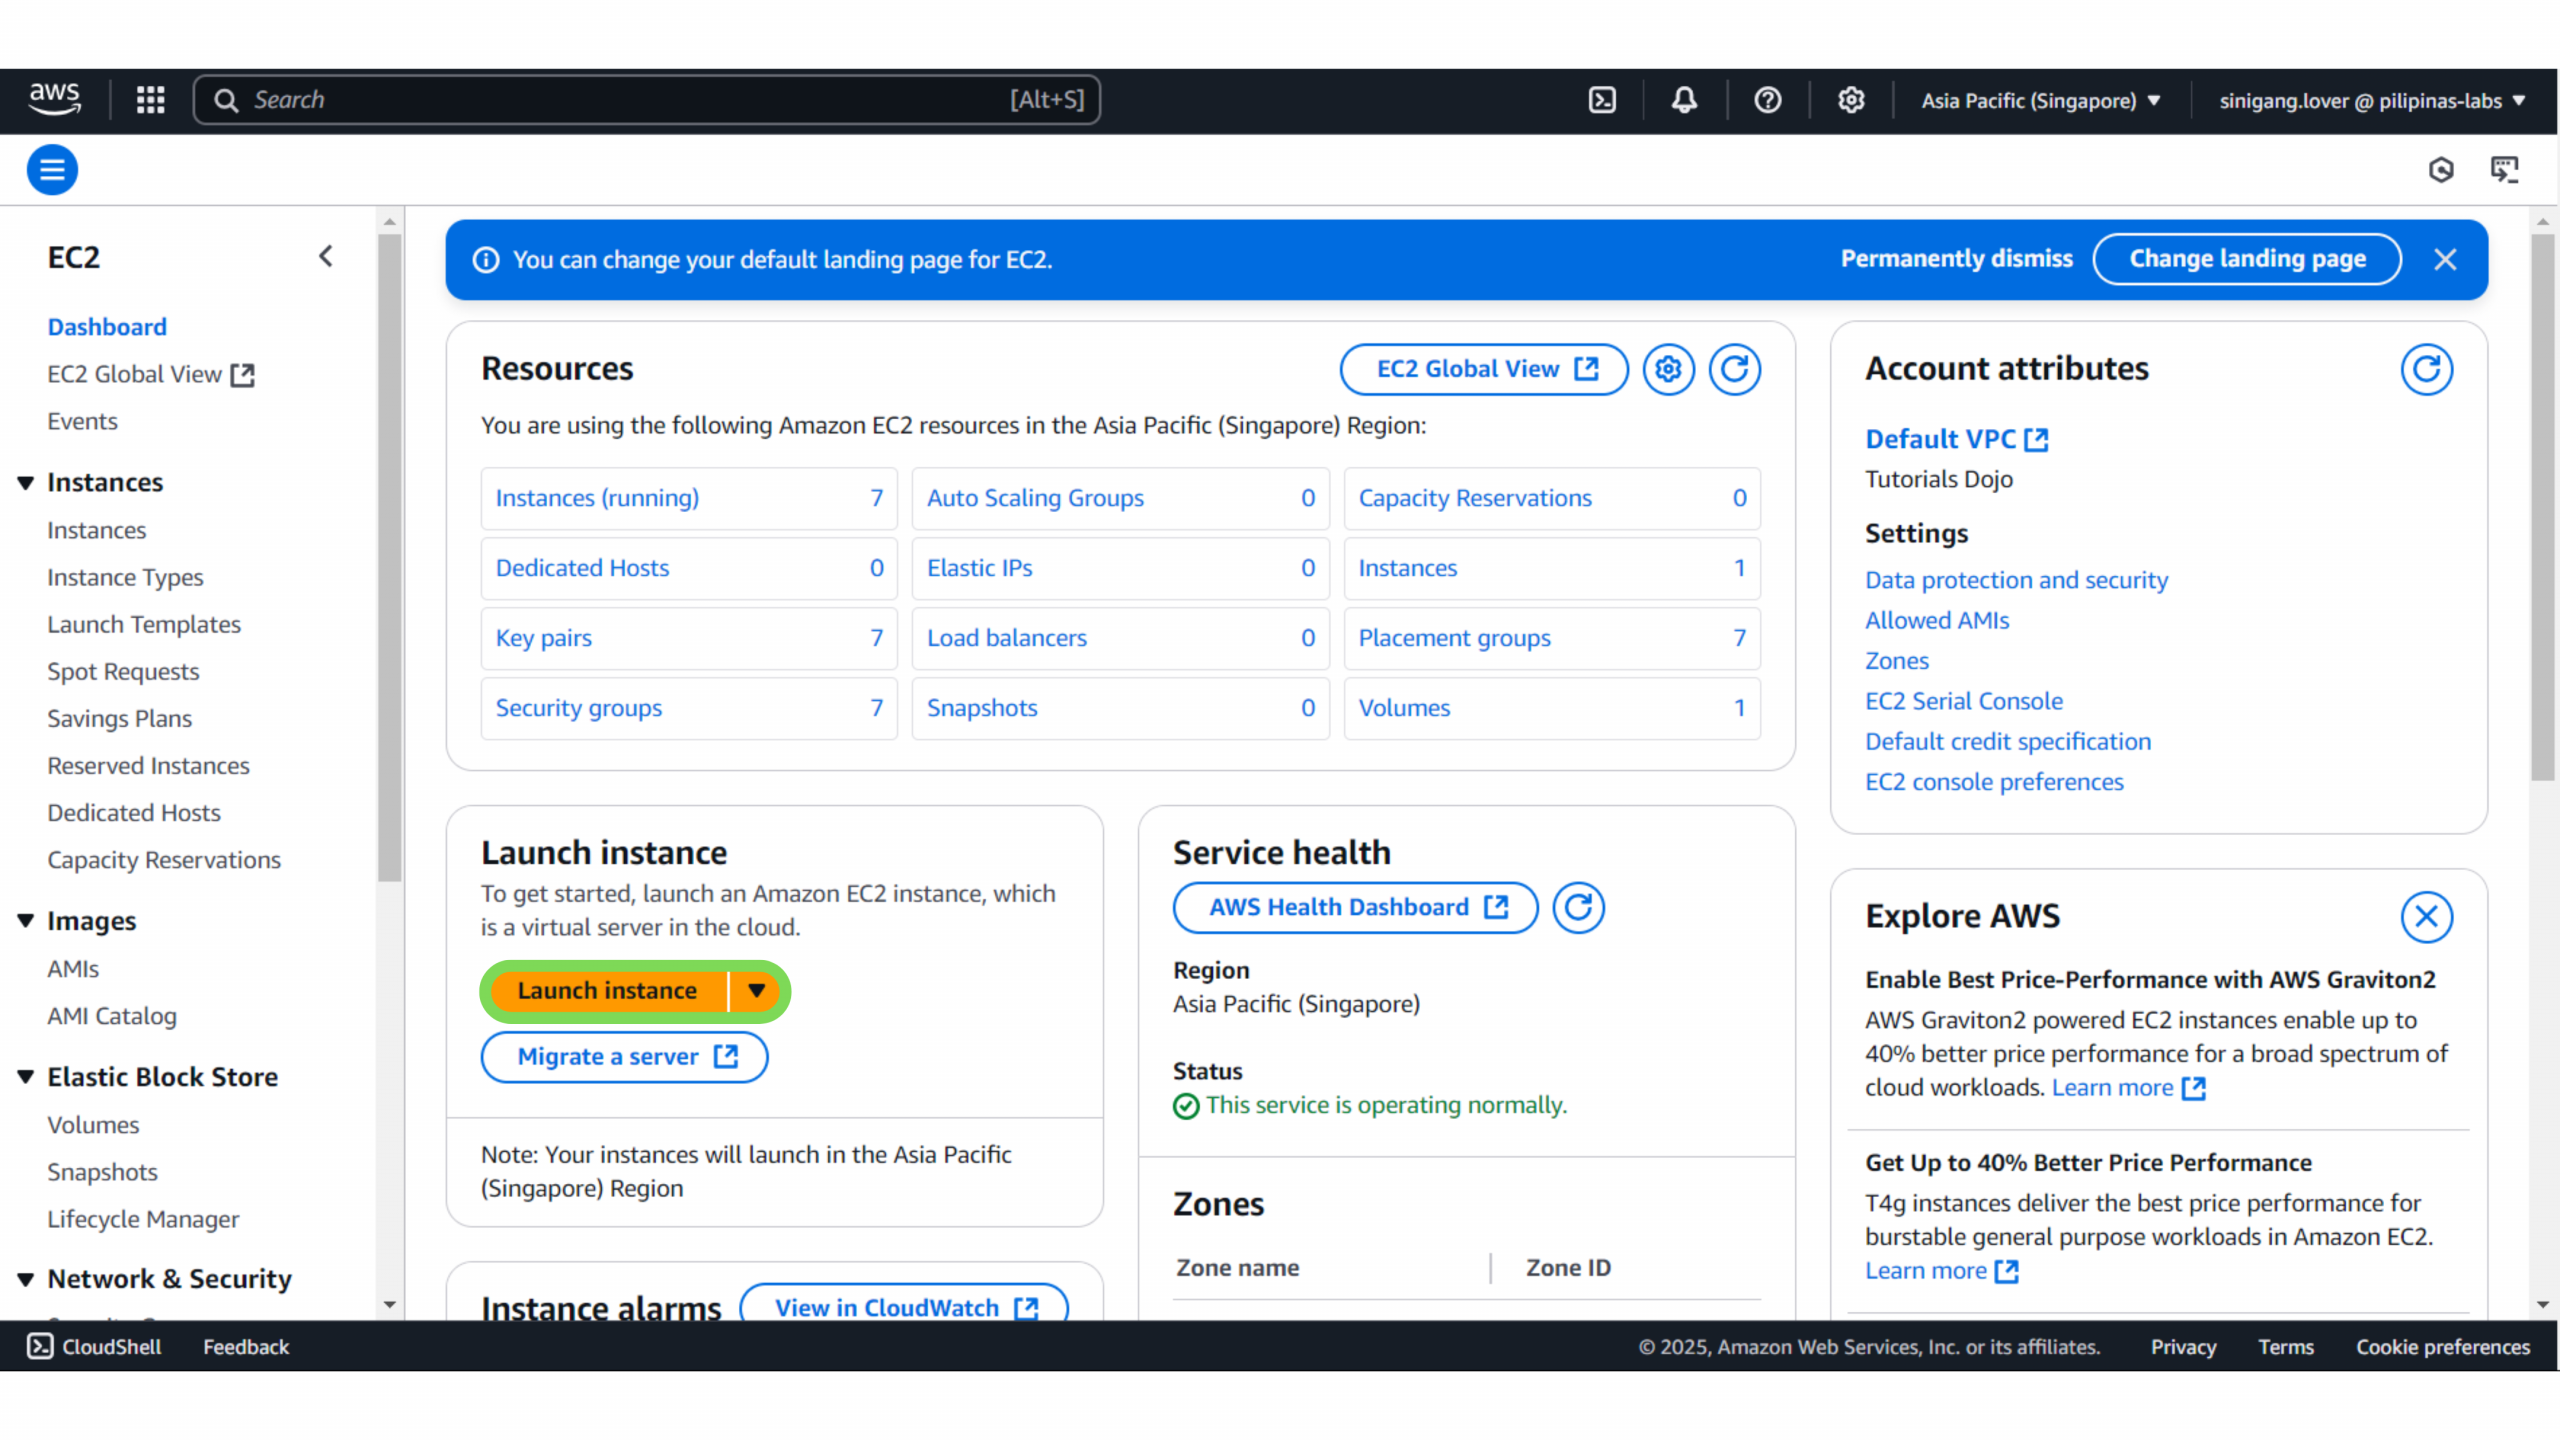
2. Launch a New Instance – Click on “Launch Instance.”
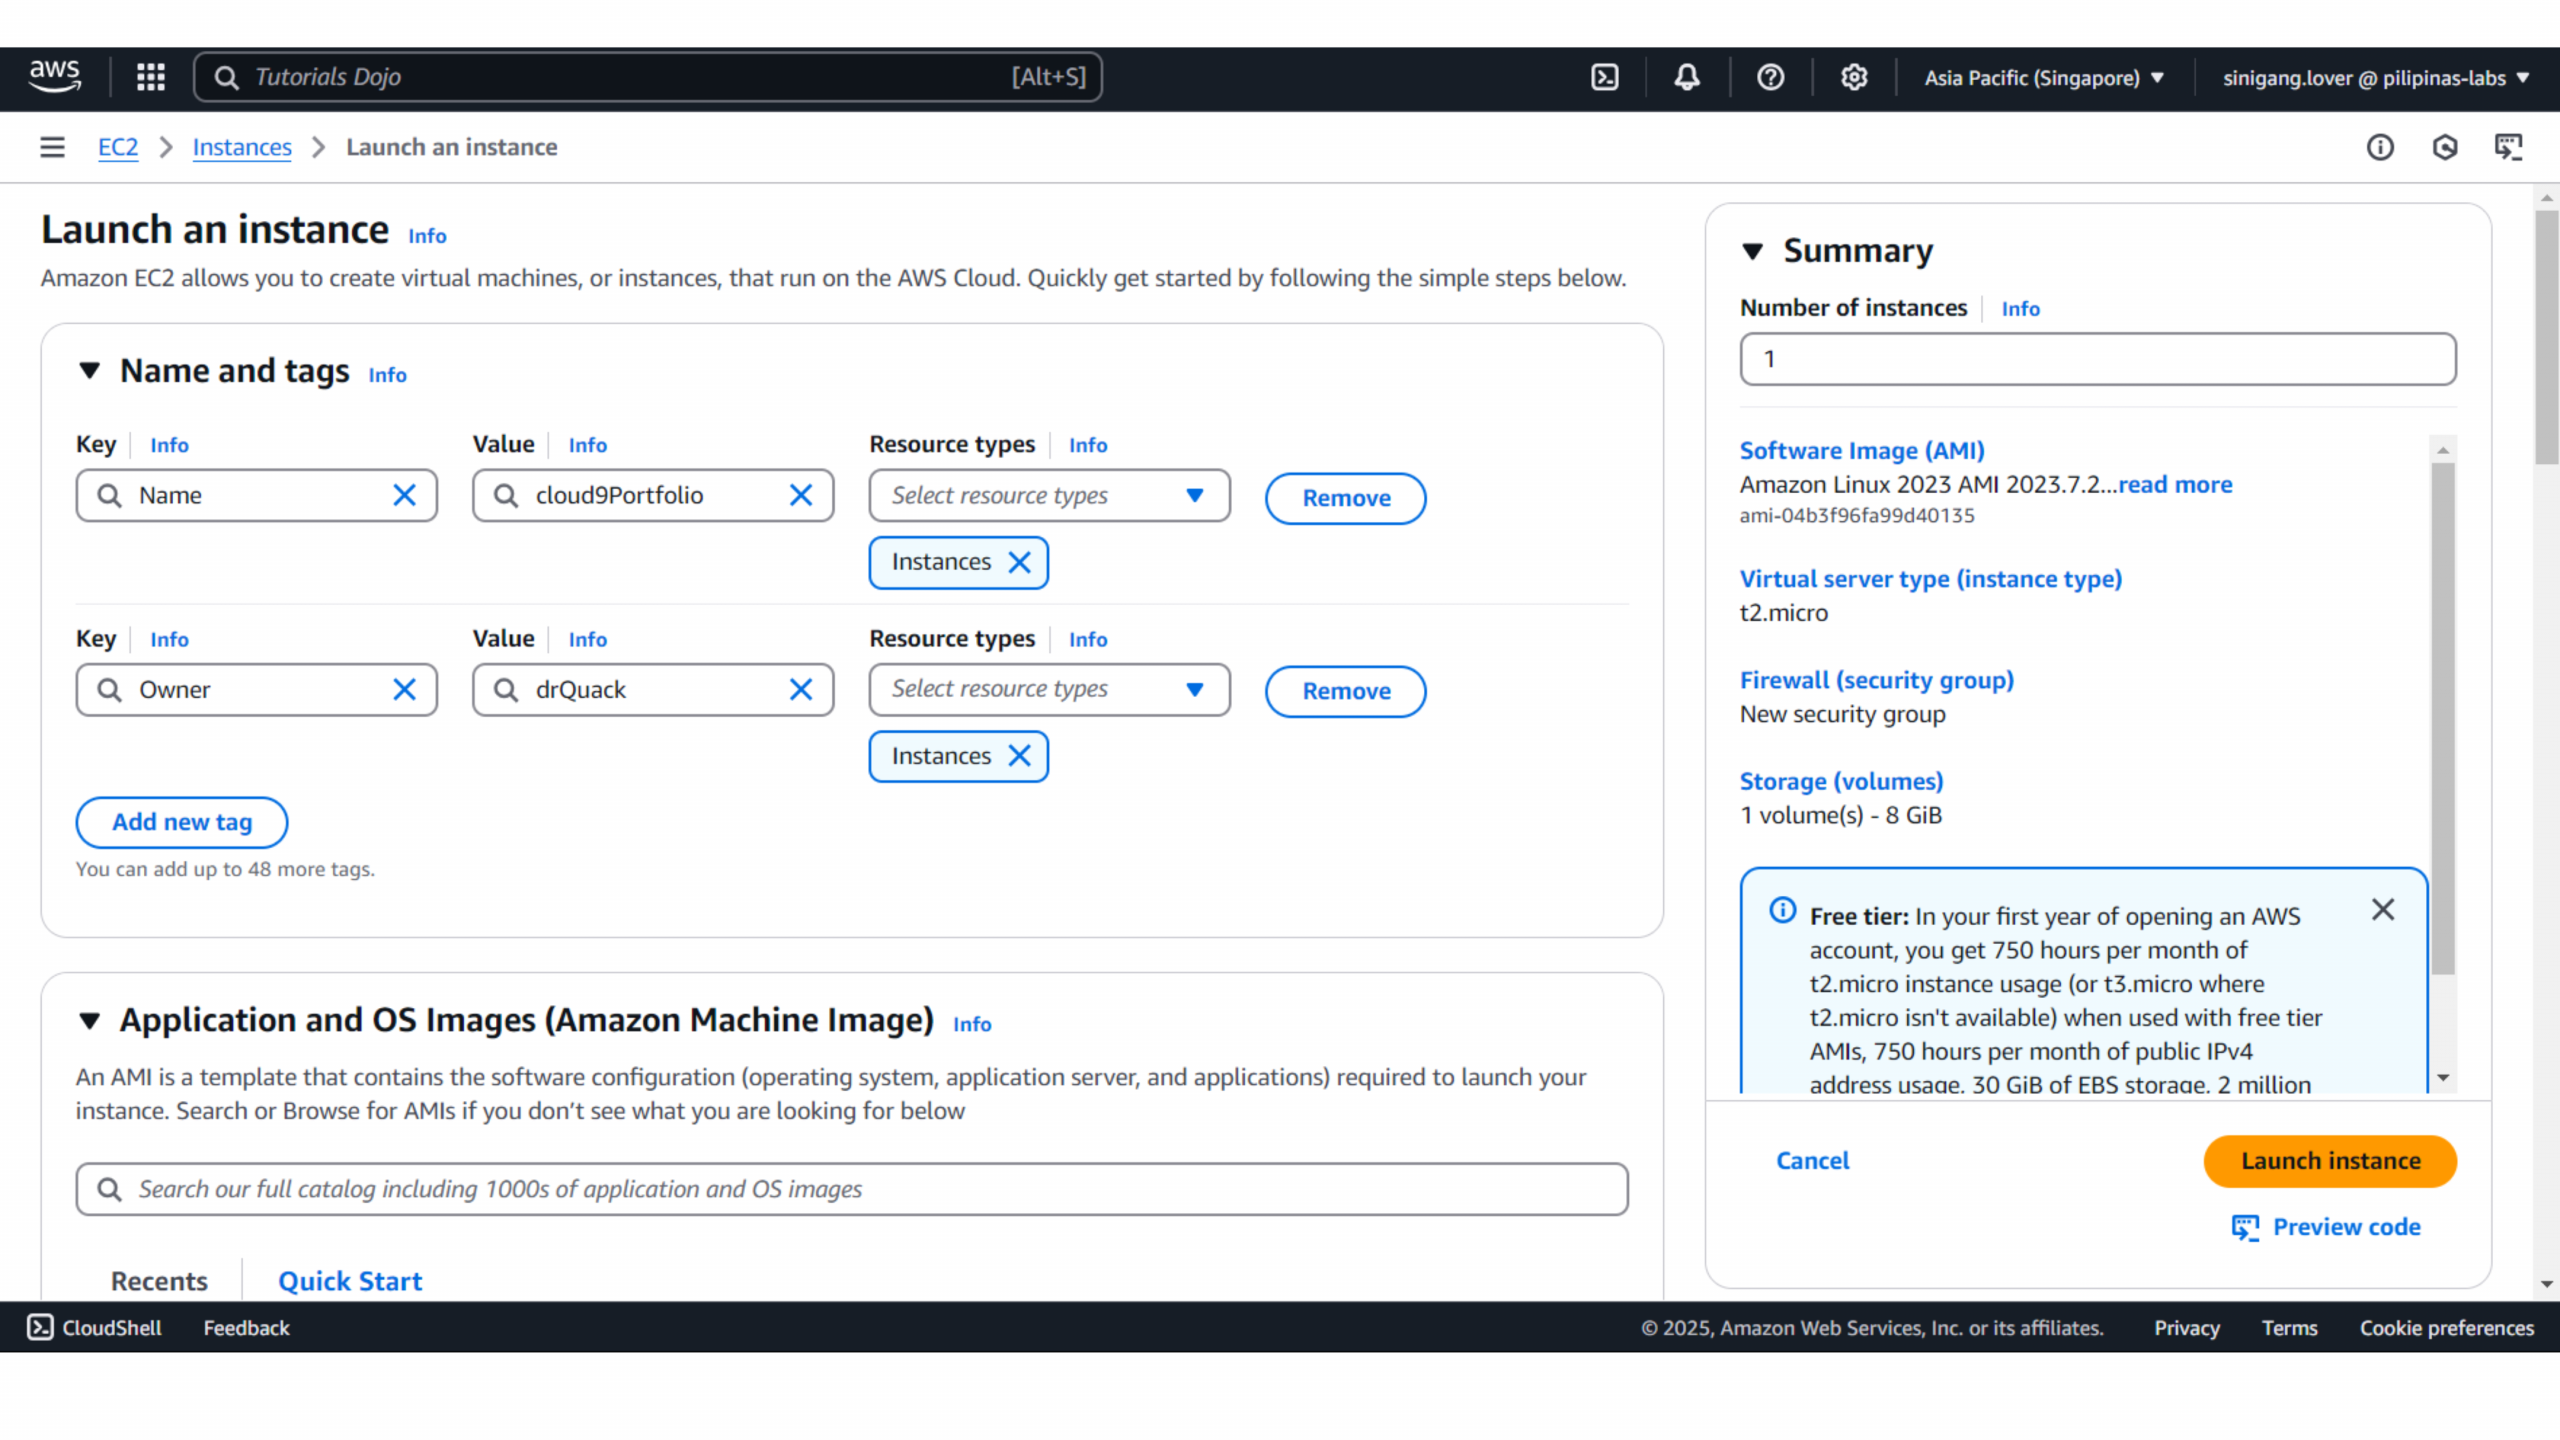
In the “Name and tags” section:
-
-
Enter a meaningful name for your instance (e.g.,
MyWebServer,Blog-EC2,Gaile-Portfolio-Site). -
(Optional but recommended) Add tags to help organize and manage your instance. Tags are key-value pairs, such as:
-
Project:Cloud9Blog -
Environment:Development -
Owner:Gaile
-
-
What’s the Purpose of the Name and Tags?
Name Field
-
Used to assign a human-readable label to your EC2 instance.
-
Makes it easier to identify in the AWS Console, especially when managing multiple instances.
-
Example:
-
Blog-EC2for a blog server -
Dev-Backend-1for a development backend server
-
This isn’t technically required but is very helpful for clarity!

Tags (Optional but Recommended)
-
Tags in EC2 are key-value pairs you can apply to any AWS resource.
-
They’re useful for organization, cost tracking, automation, and permissions.
Common Tags:
| Key | Value |
|---|---|
Project |
Cloud9Blog |
Owner |
Gaile |
Environment |
Development |
CostCenter |
WebTeam01 |
Why It Matters
-
Tags help you filter and search in the AWS Console.
-
You can use them for billing reports (e.g., see how much you spent on each project).
-
They also help with automation (e.g., scripts that shut down only dev machines at night).
Naming and tagging your instance is like putting a collar on your new pet—without it, it might just wander off and never be seen again, and good luck figuring out which one chewed up your budget later ._.
3. Choose an Amazon Machine Image (AMI)
What’s an Amazon Machine Image?
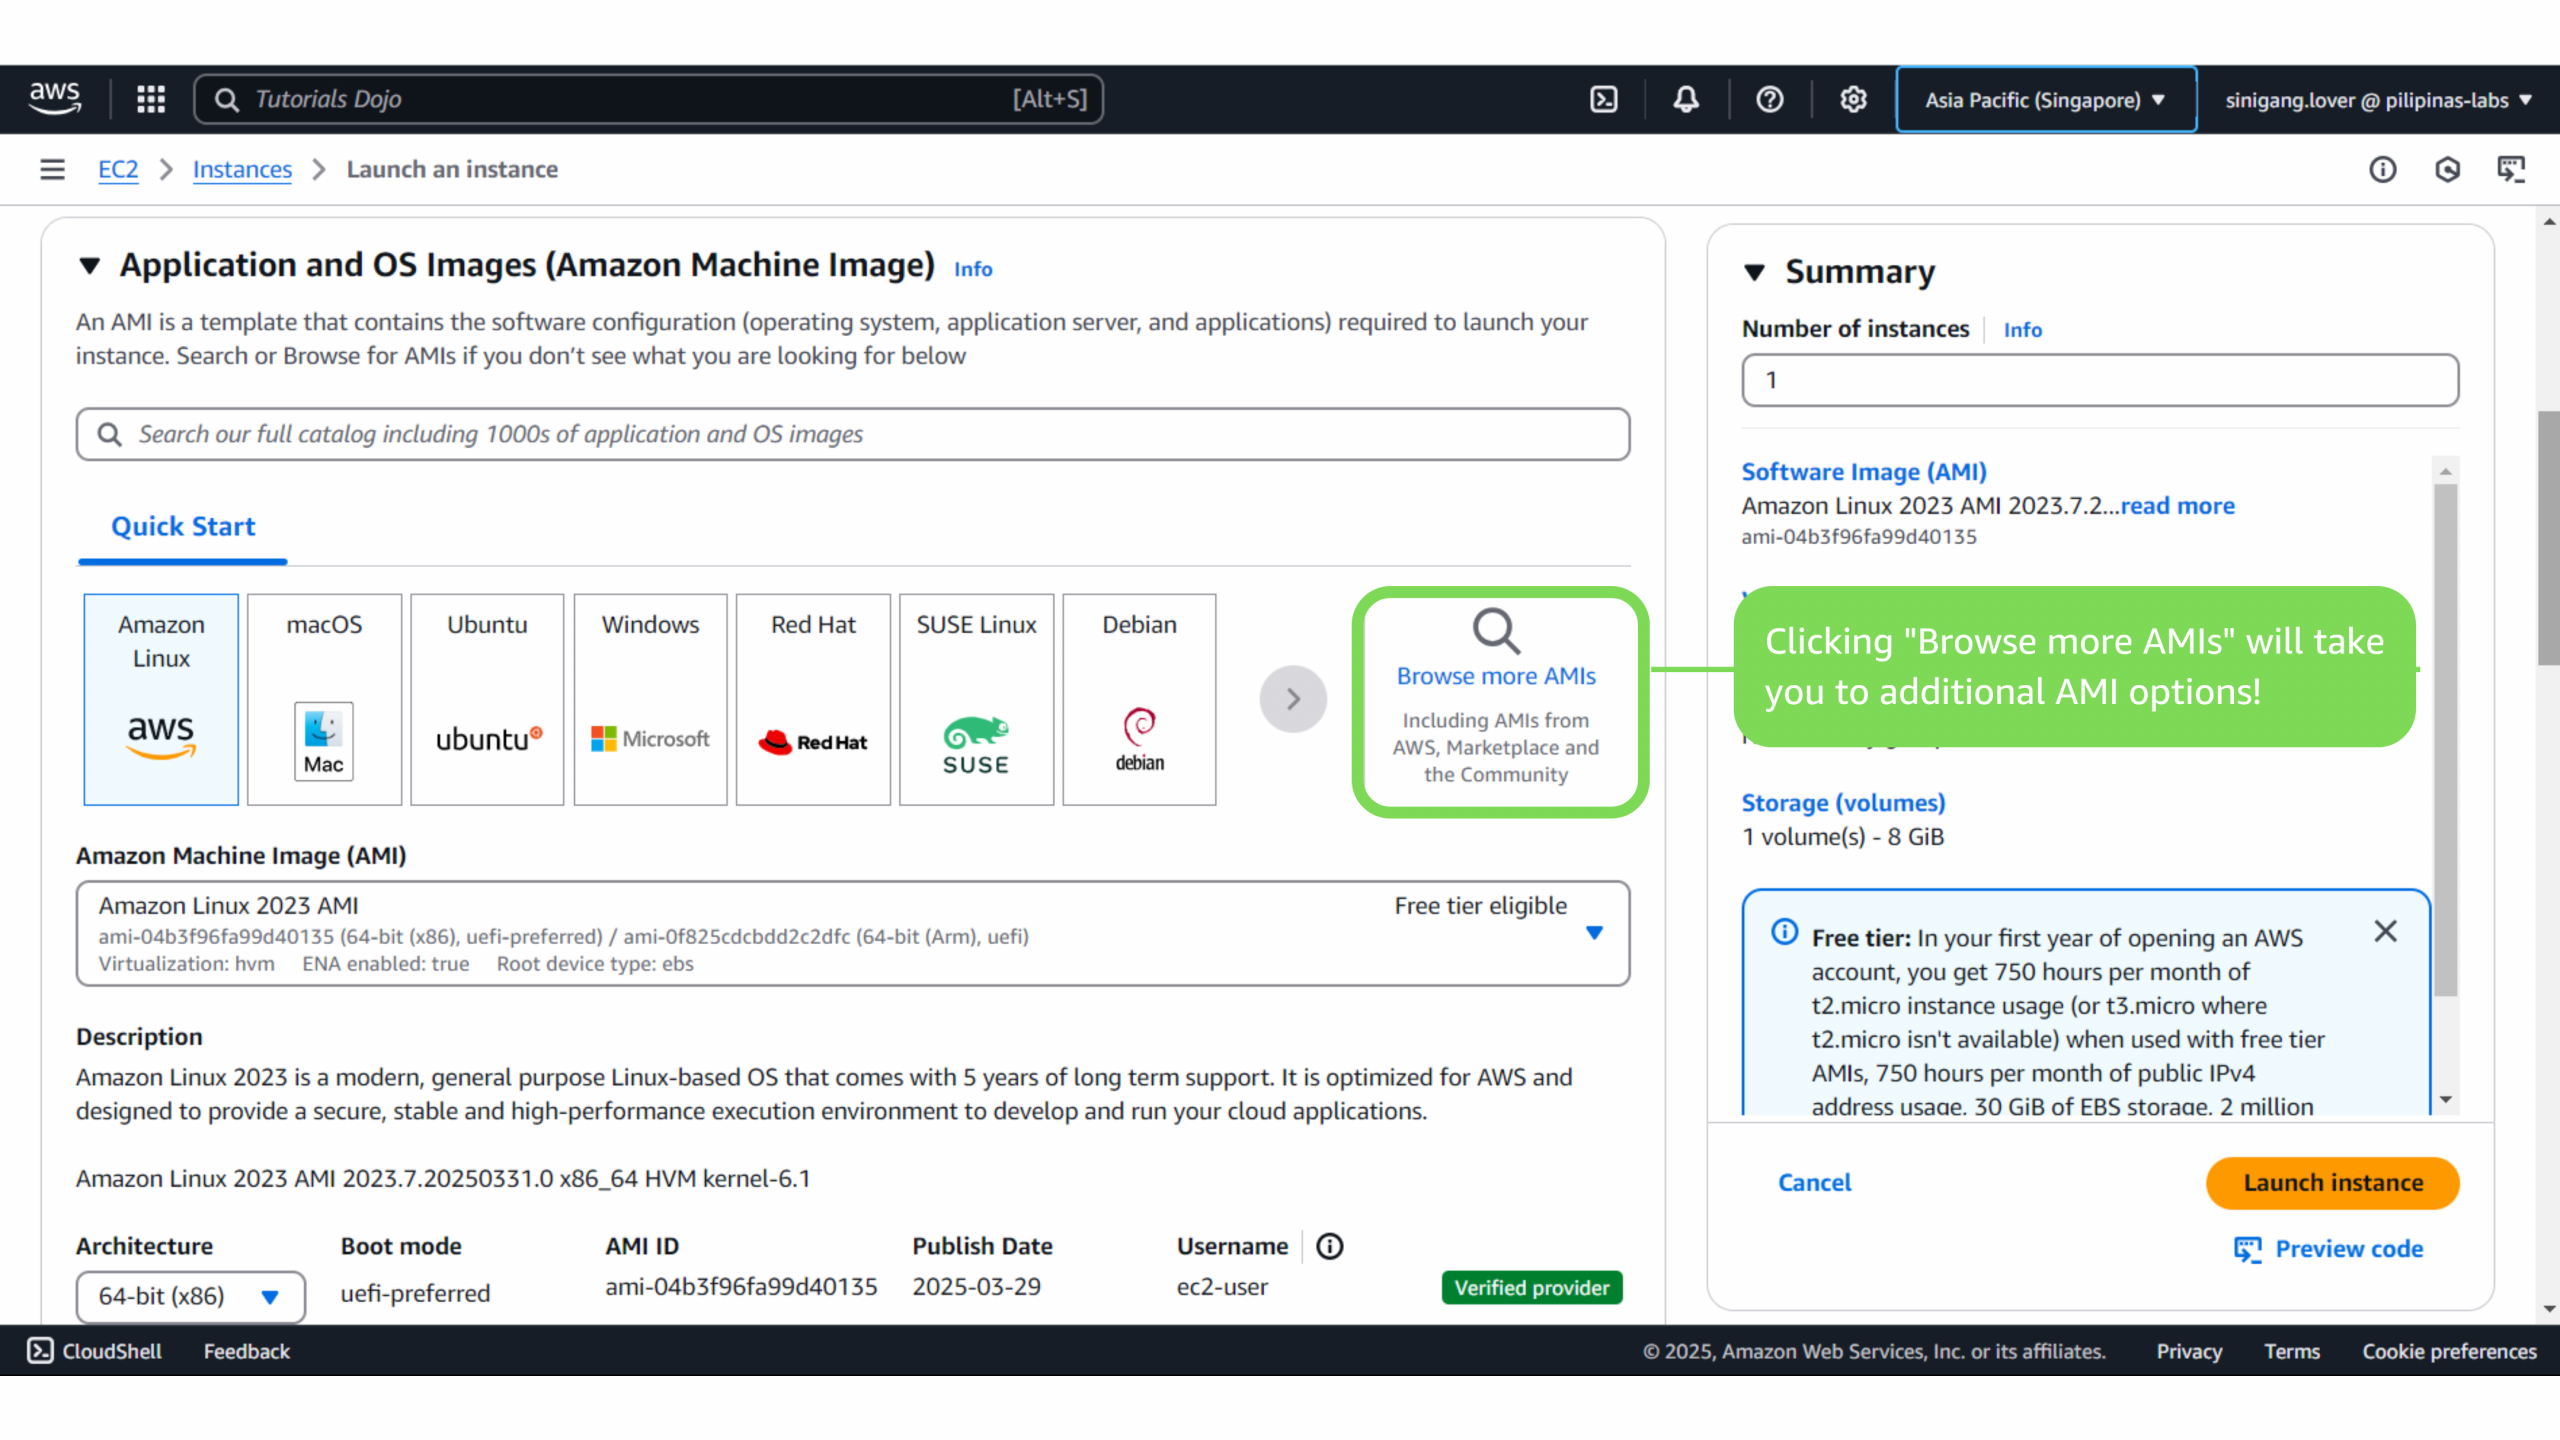
As you can see in the image above, it says “An AMI is a template that contains the software configuration (operating system, application server, and applications) required to launch your instance. ”
Think of it like a meal kit. Rather than going through the tiring process of buying assorted ingredients and trying out different ways of preparing them from scratch, the AMI gives you everything needed to “cook up” an EC2 instance with the right operating system, needed applications, and settings. It’s like getting a complete ready-to-go package, saving all the time and energy in setting up your virtual server.
Now that you’re familiar with AMI, let’s select a base operating system:
-
Amazon Linux 2 (recommended for AWS compatibility and optimization)
-
Ubuntu (popular for web development and open-source applications)
-
Windows Server (for applications requiring a Windows environment)
If you are going to select the Browse more AMIs option, you’ll be redirected to more options of AMIs. The “Free tier eligible” indicates that the Amazon Machine Image can run using the AWS free tier, which is great for testing or small projects. You may pick the one that perfectly fits your preferred operating system and architecture (64-bit or ARM).
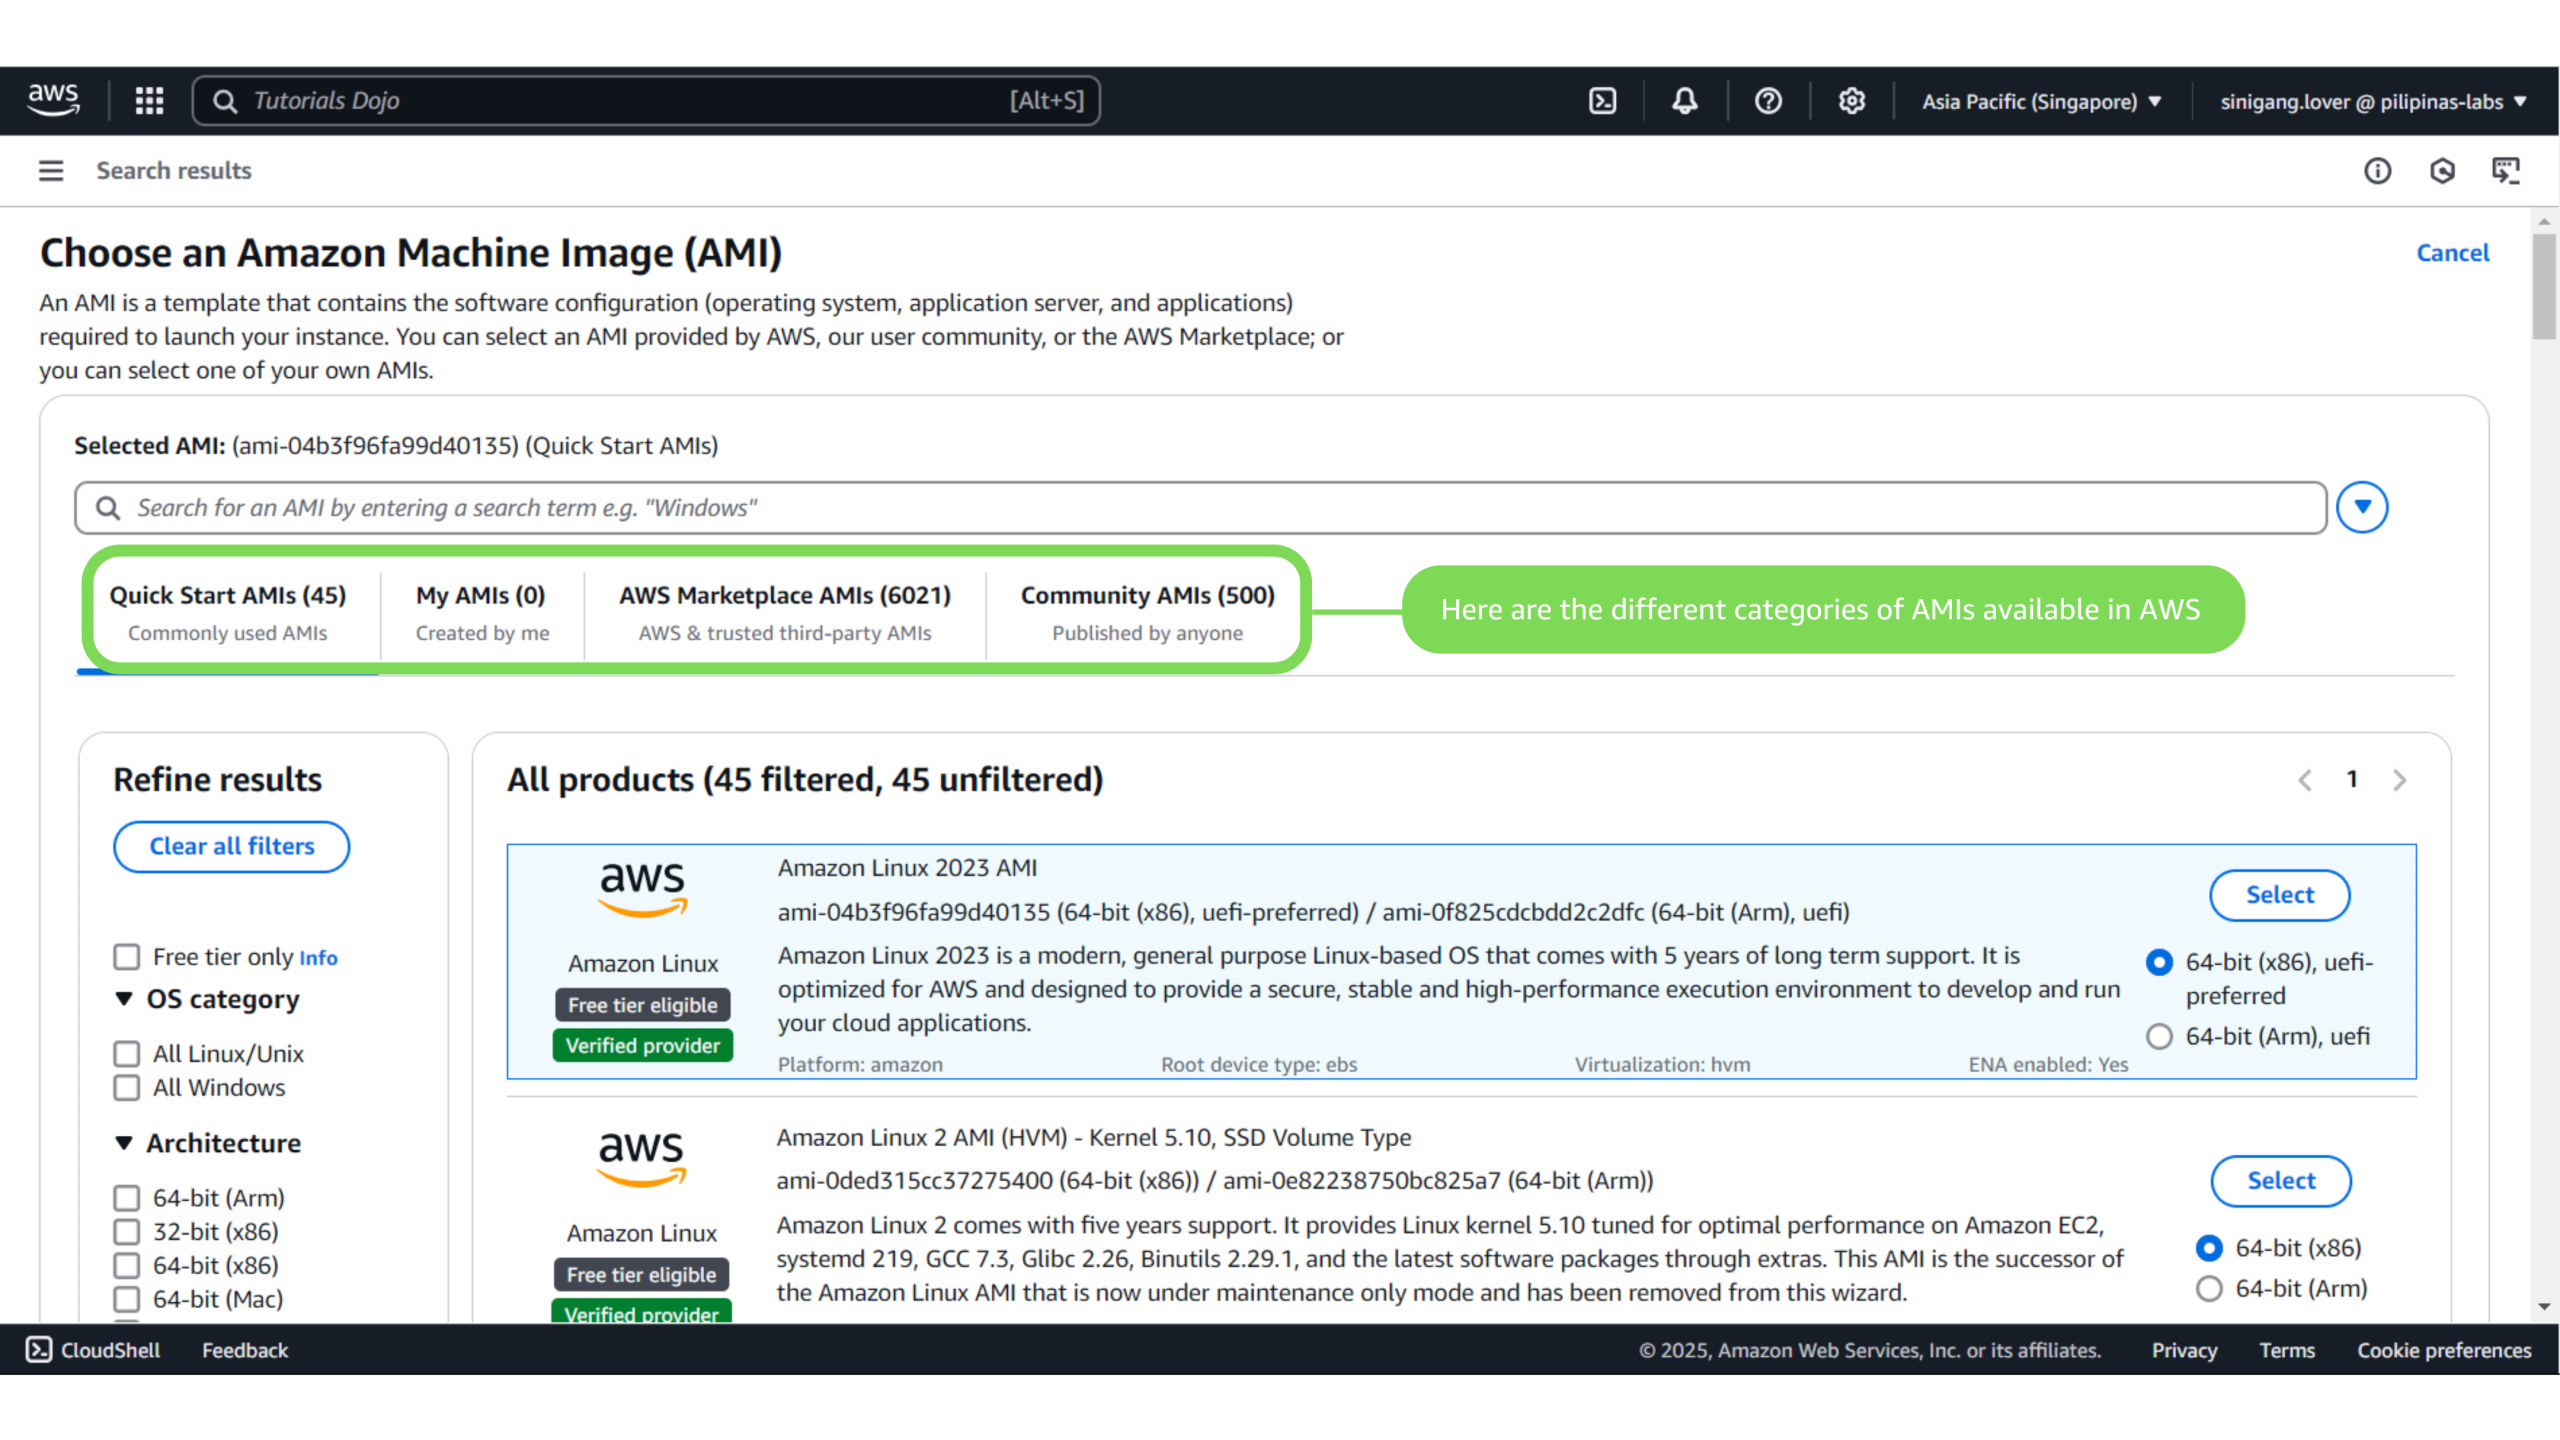
AMIs Categories
- Quick Start AMIs: Pre-configured, commonly used AMIs for popular apps or operating systems like Amazon Linux or Ubuntu—perfect for getting started quickly.
- My AMIs: Shows the AMIs you’ve created or customized. Use this to save your own setup as a template.
- AWS Marketplace AMIs: AMIs from third-party vendors offering specialized apps or environments like databases and web servers.
- Community AMIs: AMIs shared by other AWS users, which may vary in quality and support but can offer helpful setups.
Each tab helps you find the right EC2 template based on your needs, whether it’s a standard, custom, or third-party setup.
4. Pick an Instance Type – Start with a free-tier eligible t2.micro instance (1 vCPU, 1GB RAM).

When configuring your EC2 instance, you must select an instance type that determines your virtual machine’s hardware, including its CPU, memory, storage, etc.
For example, the t2.micro instance type offers:
-
1 vCPU and 1 GiB memory: Great for lightweight tasks like small web servers or development.
-
Free tier eligible: Use it for free for up to 750 hours per month for the first 12 months.
Pricing:
-
Linux AMIs: $0.0146 per hour
-
Windows AMIs: $0.0192 per hour
-
Other OS: Varies by choice.
If you can’t decide which type suits your needs, click “Compare instance types” for an elaborate comparison of CPU, memory, and cost details.
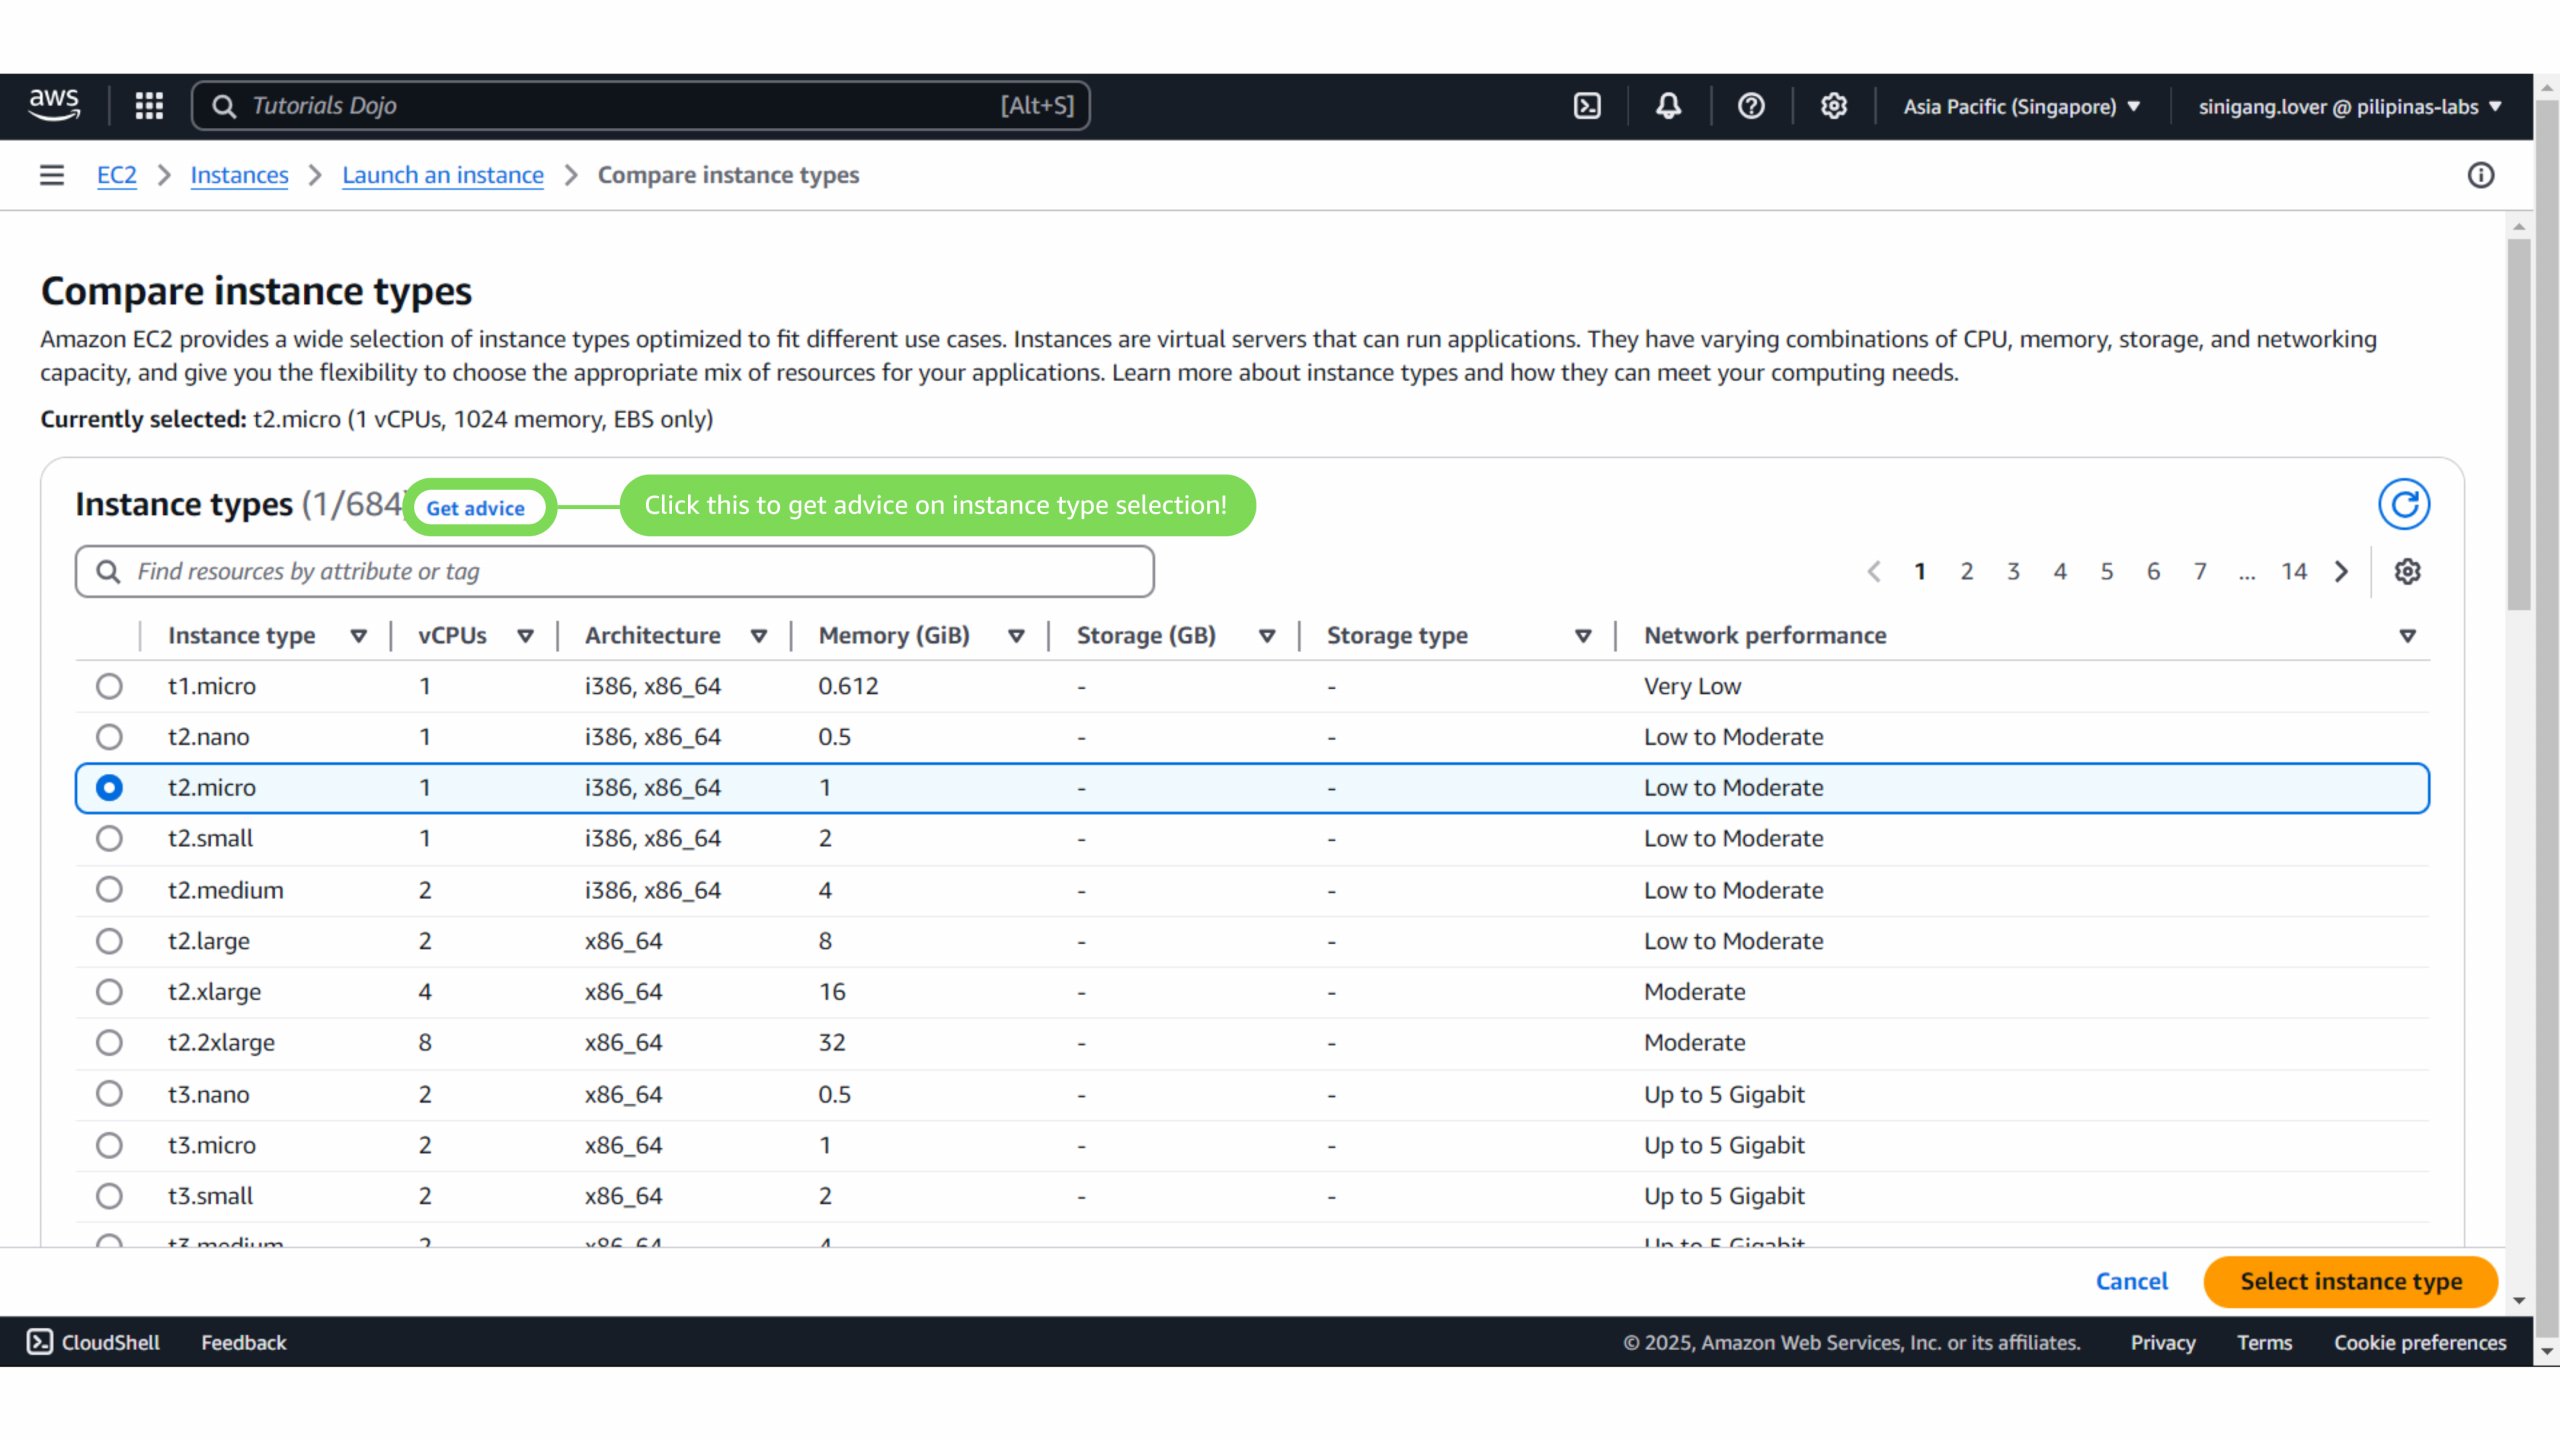
For now, let’s choose the t2.micro instance type as our default choice. It is a free-tier-eligible option good for small projects or testing environments.
Getting Advice on Amazon Instance Type Selection
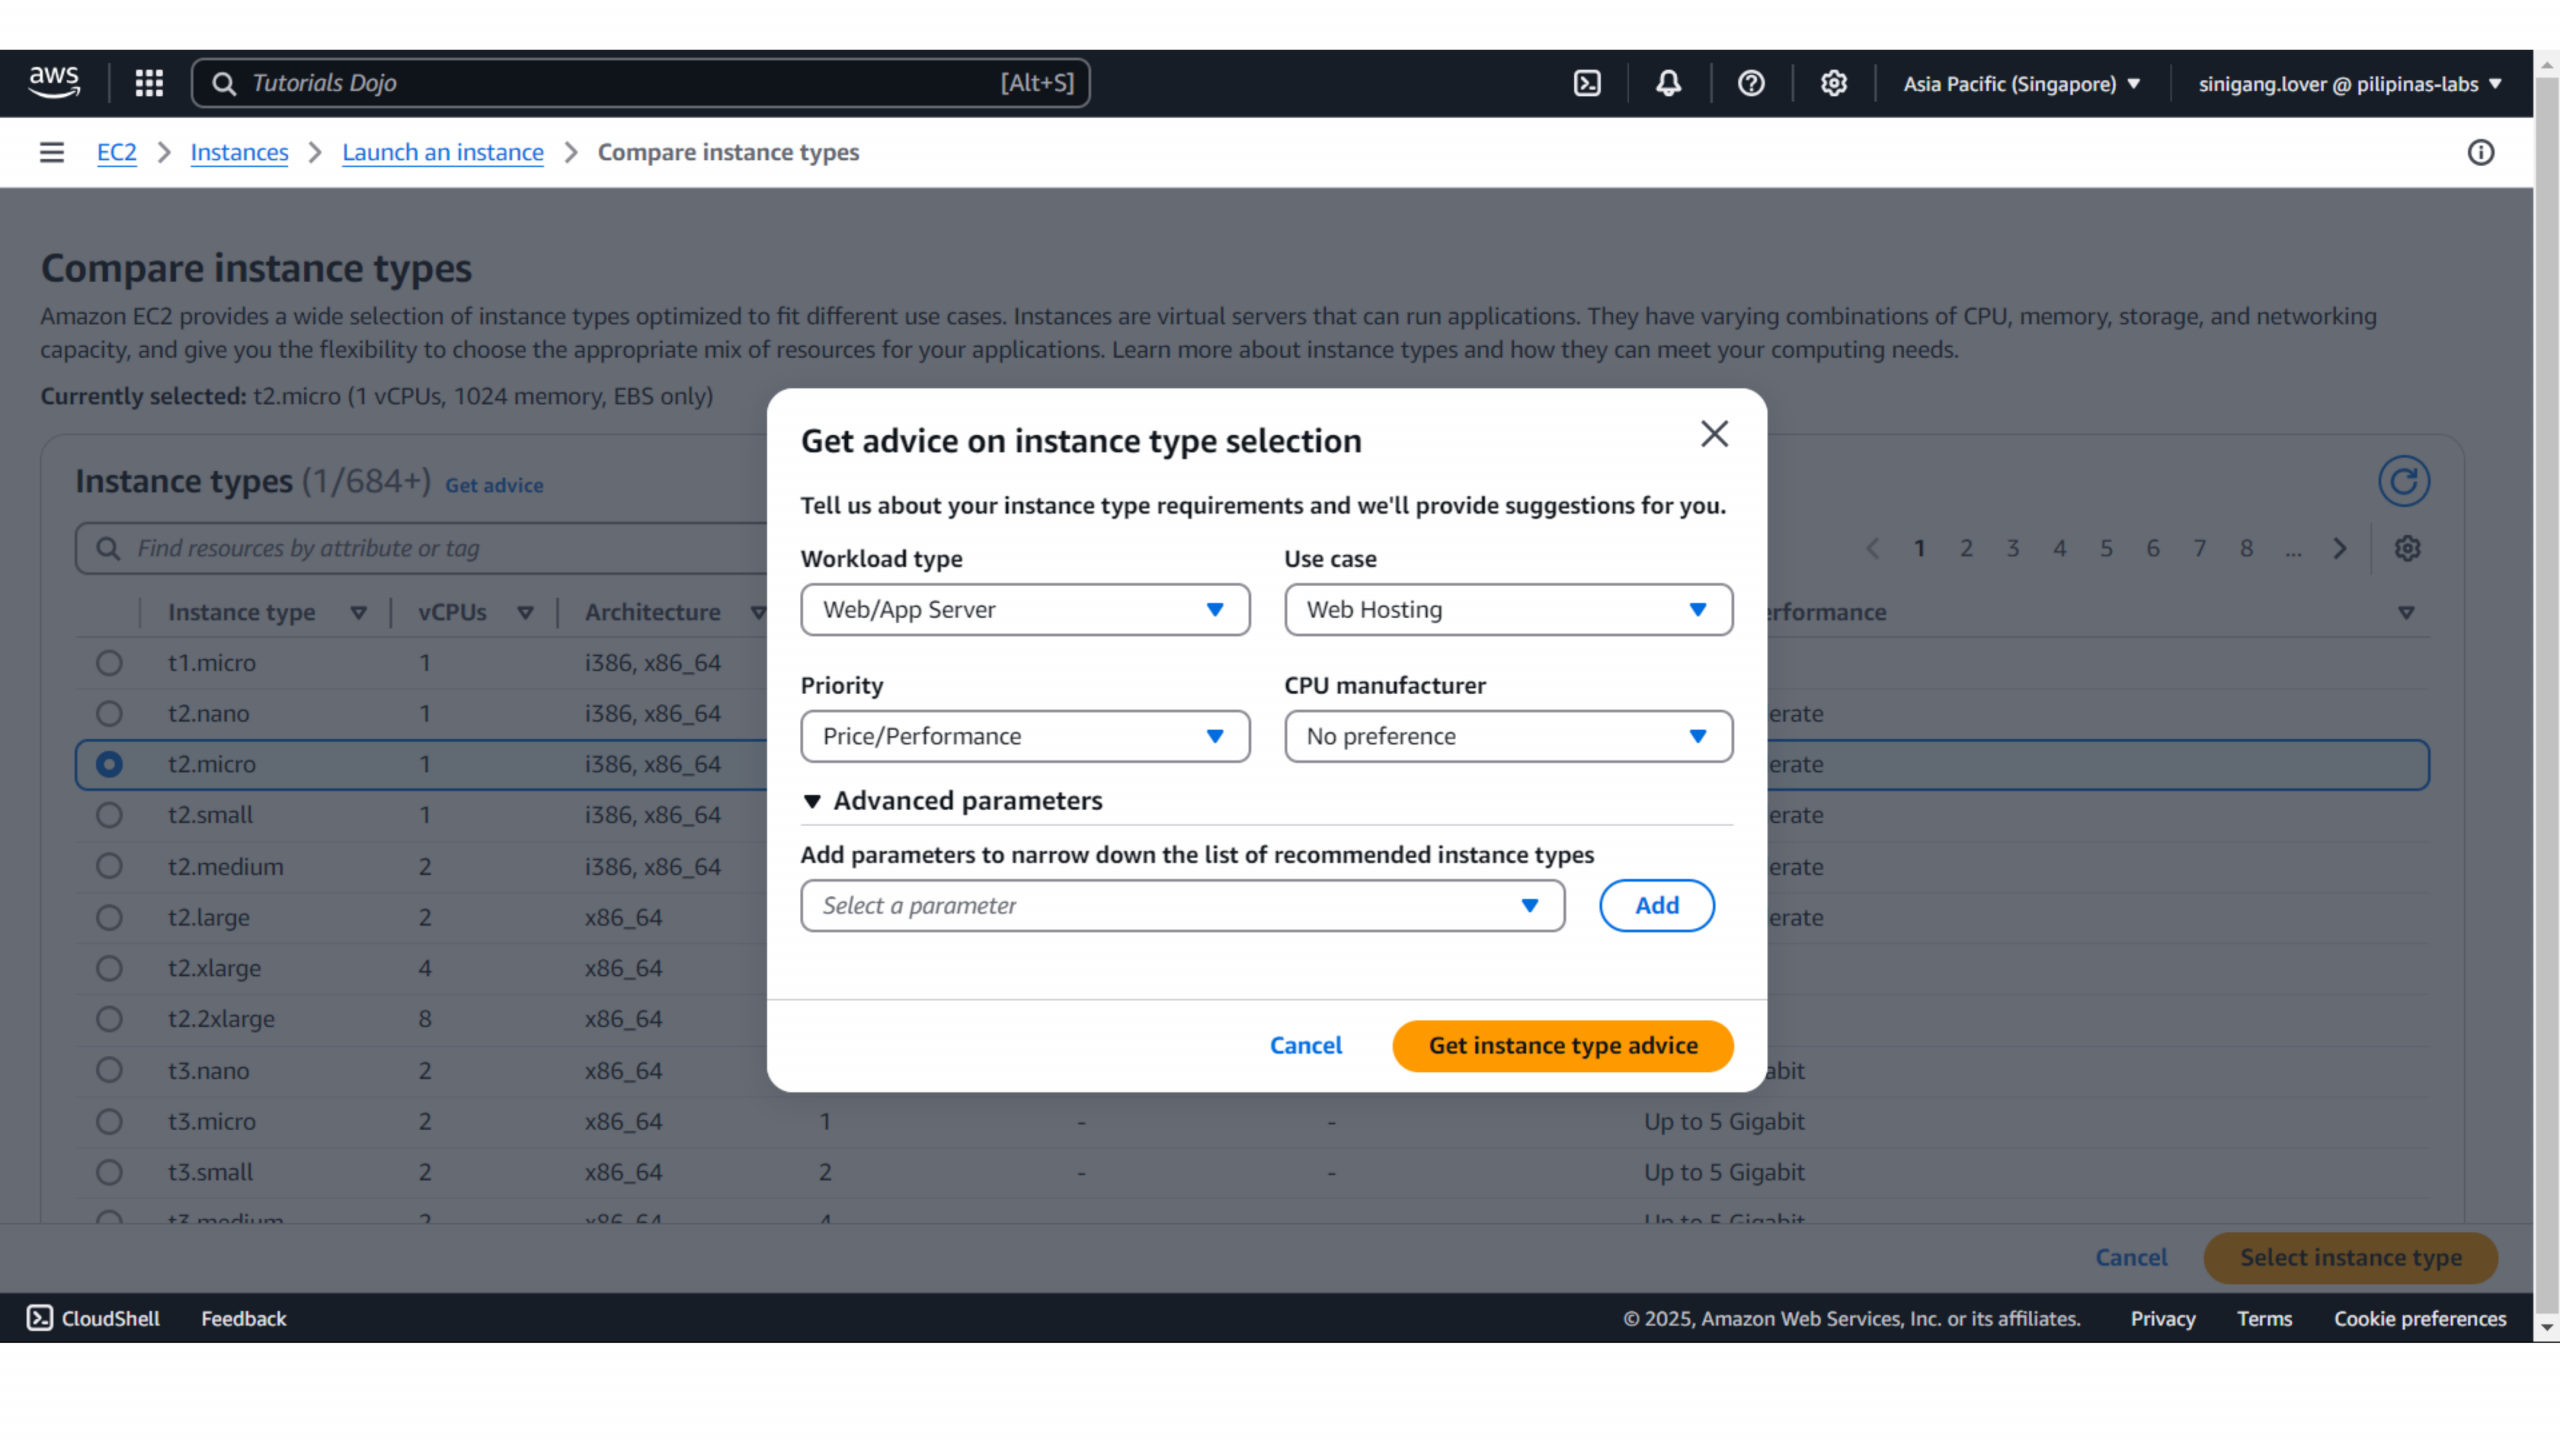
If you find it hard to choose the best instance type for your needs, AWS can provide customized recommendations. Click the “Get instance type advice” button, respond to a few questions, and AWS will provide an instance-type recommendation based on the following:
-
Workload type: Choose whether you’re setting up a Web/App Server, Database, or other options.
-
Use case: Select the specific purpose of your instance, like Web Hosting or Data Analysis.
-
Priority: Choose your priority between Price/Performance or other options like Performance alone.
-
CPU manufacturer: Specify if you have a preference for certain CPU types (e.g., Intel, AMD, or no preference).
If needed, you can also add advanced parameters to narrow down your options even further. Once you fill out these details, click “Get instance type advice” to receive the recommended instance types.
This feature takes the guesswork out of the equation, helping you find the right balance between cost and performance for your EC2 instance.
5. Create or Select a Key Pair – Download the key file (.pem) to access your instance later.
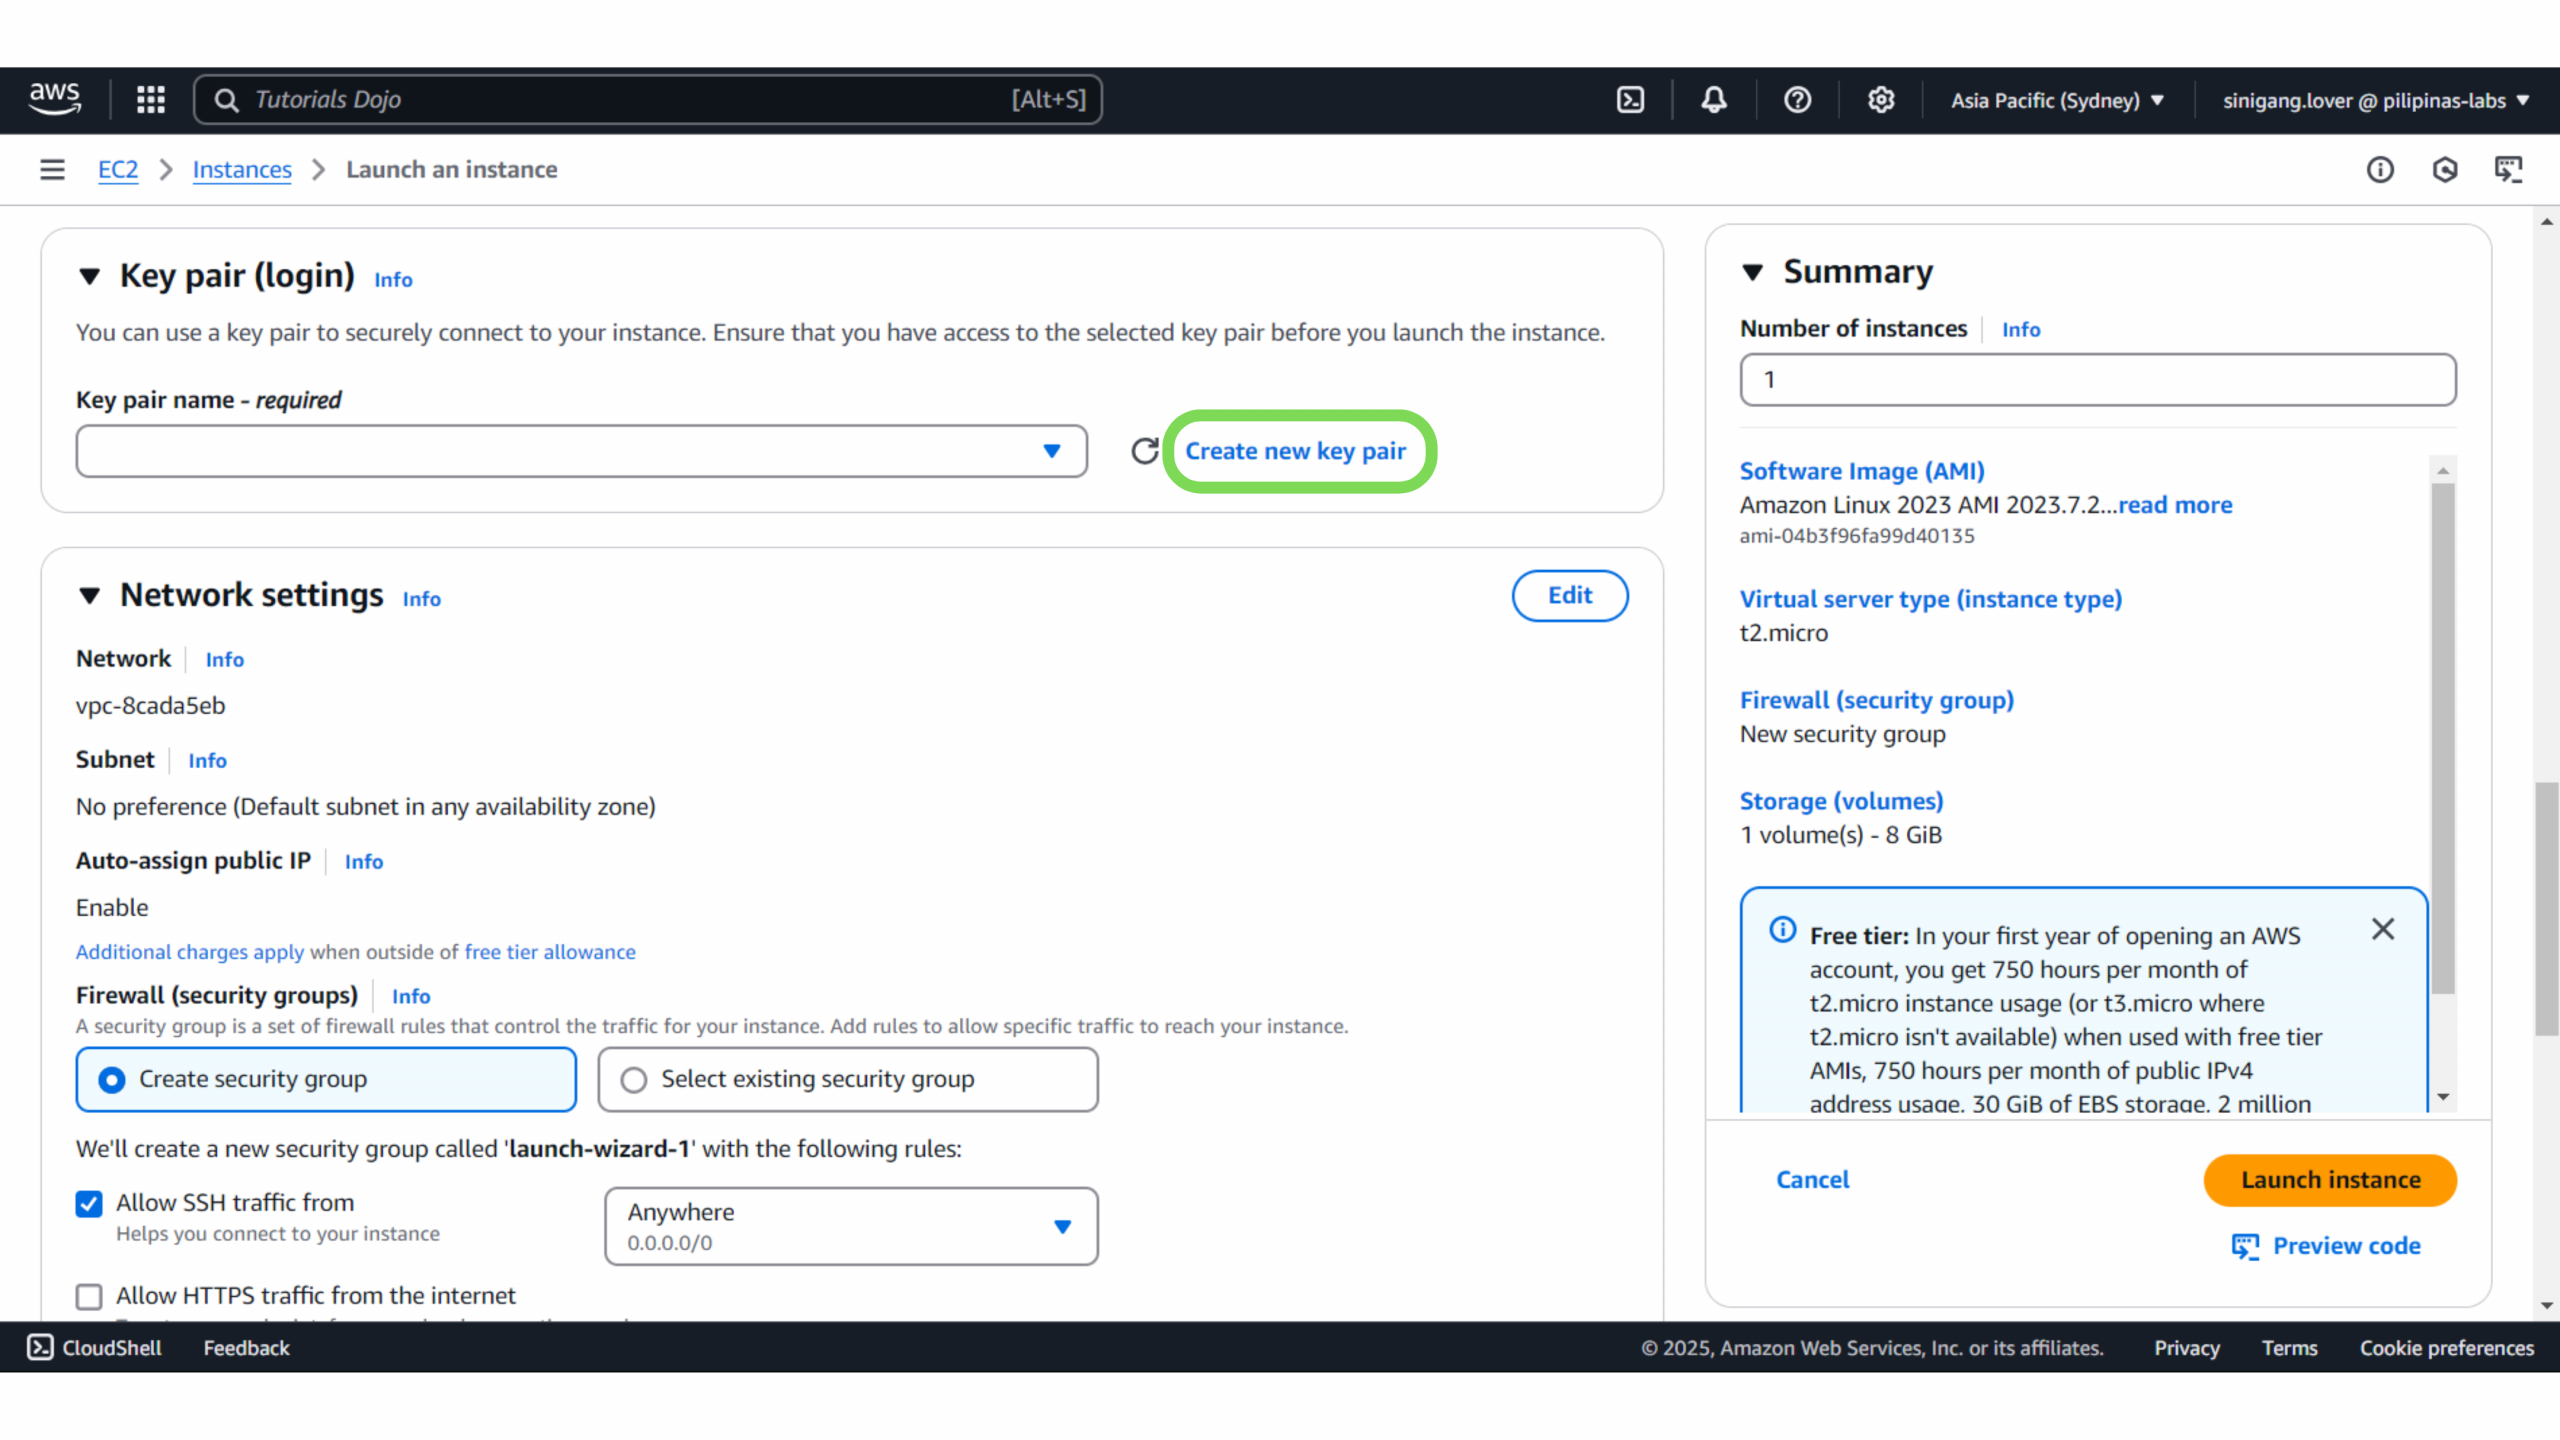
-
Key Pair Name: Enter a unique name for your key pair (up to 255 characters), avoiding leading or trailing spaces.
-
Key Pair Type: You can choose between two types of encryption for your key pair:
-
RSA: The most commonly used option for encrypted private and public key pairs.
-
ED25519: A newer, more secure option, but less widely supported.
-
-
Private Key File Format: You can choose the file format for your private key:
-
.pem: Used with OpenSSH, commonly used for Linux-based instances.
-
.ppk: Used with PuTTY, typically for Windows-based instances.
-
-
Reminder: Store your private key securely, as you’ll need it to connect to your instance.
-
Once set, click “Create Key Pair” to generate the key.
What’s a Key Pair for?
When you set up an EC2 instance, you can use a key pair to log in. Think of the key pair like a lock and key system:
-
Public Key (the lock): This is stored on your EC2 instance. It’s like a lock that only accepts the right key. You can’t open it with just anything.
-
Private Key (the key): This is kept safe on your computer. It’s the only key that can unlock the instance. You need to have this key to get in.
When you try to connect to your EC2 instance (like trying to open a door), the system checks to see if the private key you’re holding matches the public key (the lock) on the instance. If they match, you’re granted access.
Why is this better than using a password?
-
More Secured: A key pair is much harder to guess than a password, making your instance safer.
-
No Password to Remember: Instead of dealing with passwords, you just need to keep track of your private key. It’s simpler and safer.
-
Easy to Control: If you want to stop someone from accessing your EC2 instance, you can simply remove their private key. It’s like taking their key away, leaving them locked out.

In short, a key pair is like having a super-secure lock and key that only you can use, giving you a safe and easy way to access your EC2 instance.
Save this file for now, you’ll need it later!
Note: You can skip using a key pair, but it’s not recommended. Without it, anyone with your username could access your instance, especially if exposed to the internet. A key pair ensures only the holder of the private key can log in.
6. Configure Instance Details – Set the network, storage, and other settings as needed.
Configuring the Network Settings
-
Network: This is the virtual network (VPC) your EC2 instance will be part of. It connects your instance to the internet and other AWS resources. By default, AWS creates a VPC for you.
-
Subnet: This is a smaller section within your network (VPC). You don’t need to change this unless you have a specific reason for using a different subnet.
-
Auto-assign Public IP: When enabled, your EC2 instance gets a public IP address, allowing it to be accessed from the internet. This is usually enabled by default.
-
Firewall (Security Groups):
-
A Security Group is like a firewall that controls who can access your instance.
-
Create security group: This option allows you to create a new set of rules for how your instance is accessed.
-
Allow SSH traffic from Anywhere (0.0.0.0/0): This allows anyone on the internet to access your instance using SSH (for Linux instances). While this is convenient, it is not secure because it opens access to everyone.
-
There are options to make the SSH access more secure:
-
Custom: It enables you to set a range of IP addresses that can access your instance, which is useful if you want to restrict access to a particular set of IP addresses.
-
My IP: This automatically fills in your current IP address, so your EC2 instance can only be accessed via SSH from that device. This is a more secure option compared to allowing access from anywhere.
Both options are highly recommended for better security. Choosing My IP means that only your current network can connect to your EC2 instance.
-
-
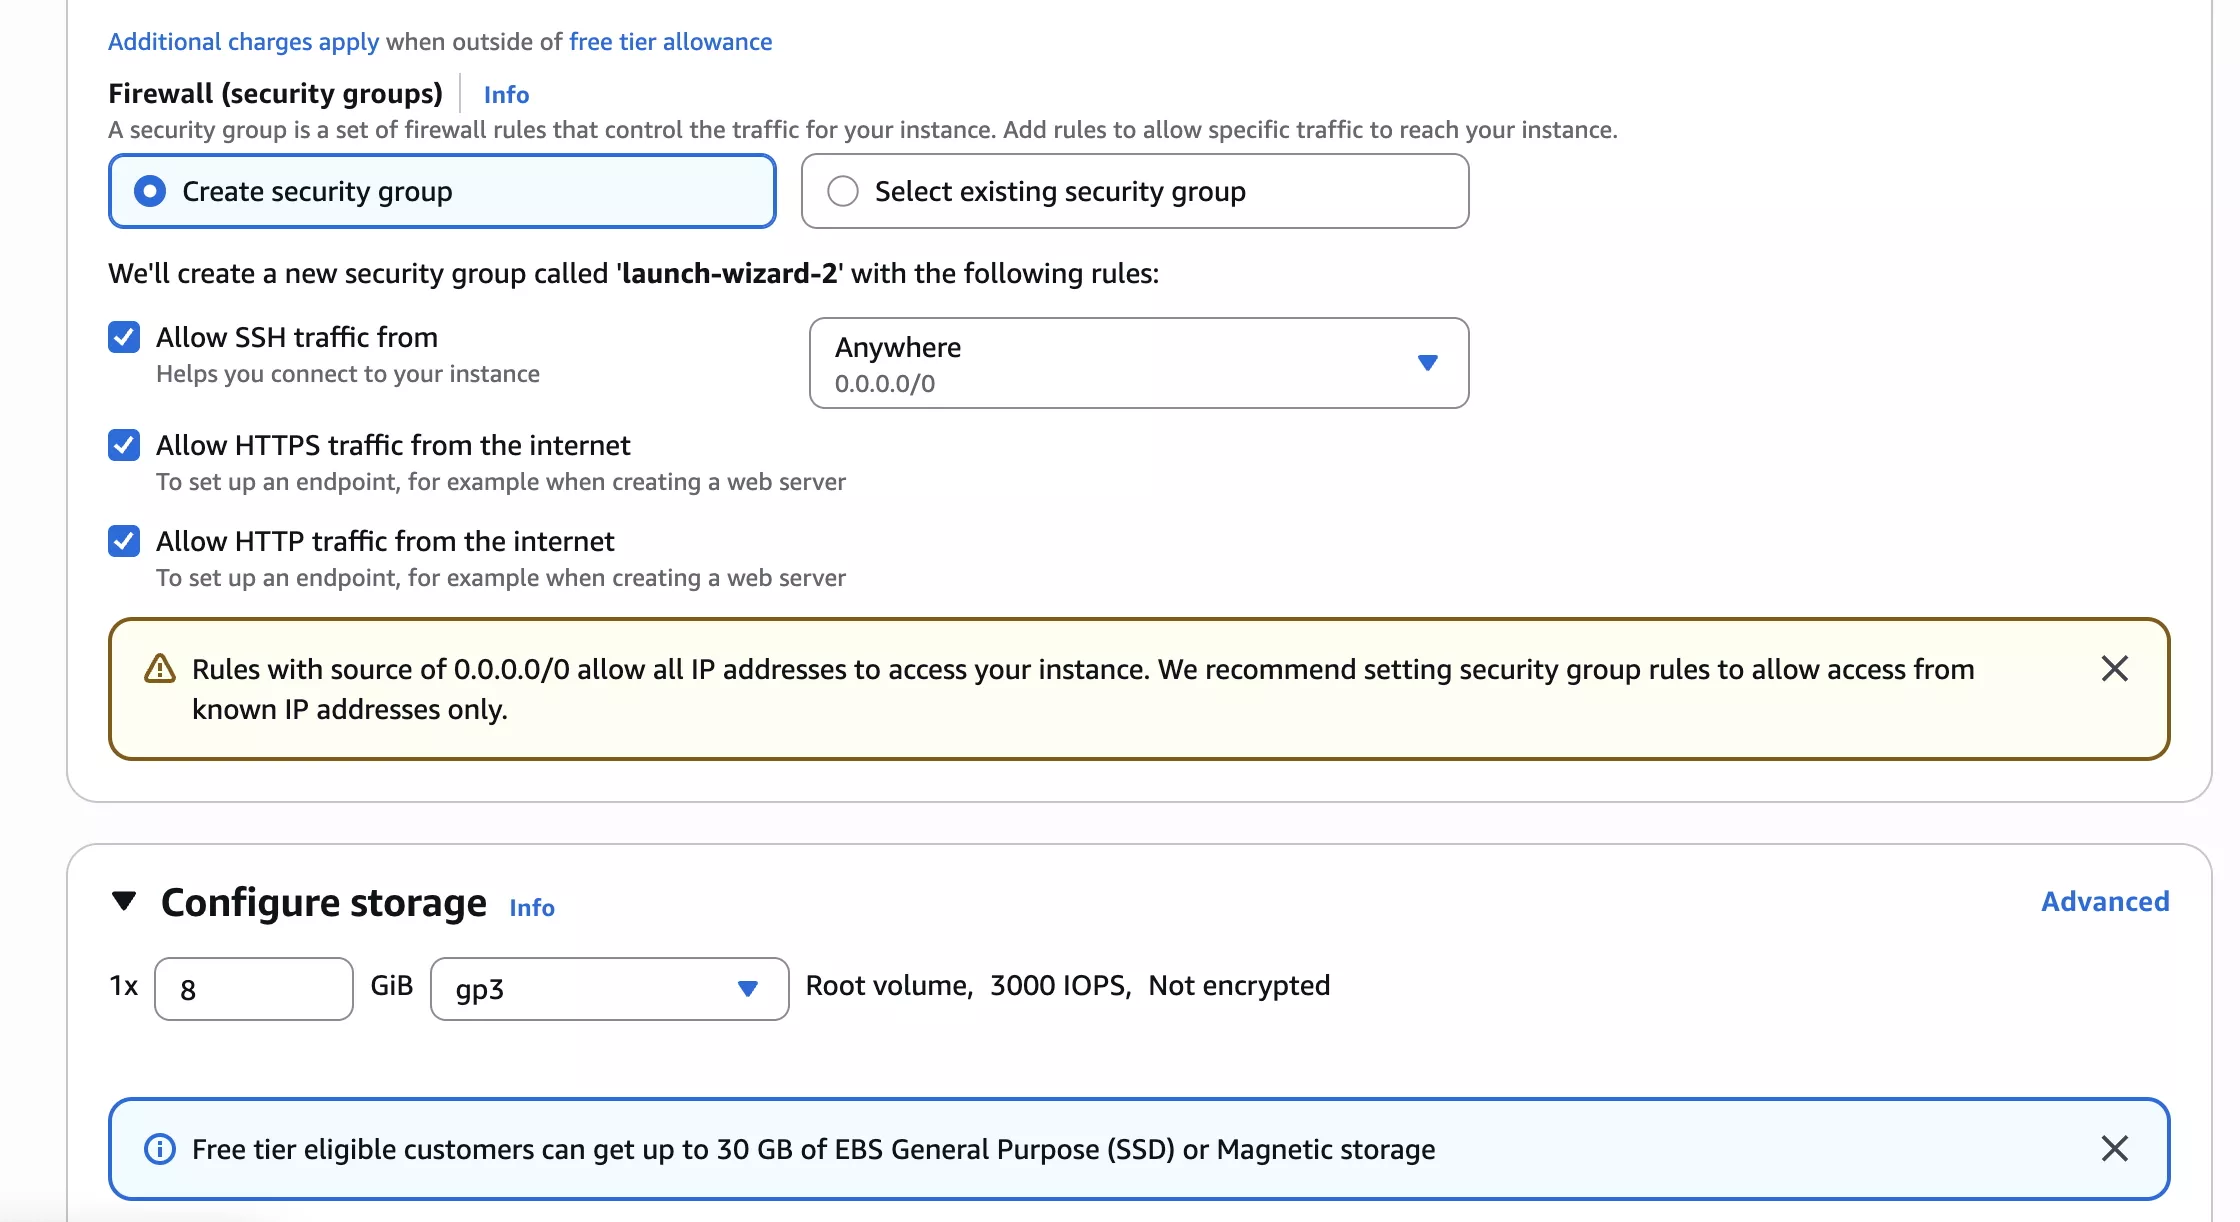
- Allow HTTP traffic: Enabling HTTP on port 80 allows web traffic to your instance.
-
Allow HTTPS traffic: Enabling HTTPS on port 443 allows secure web traffic to your instance, which is very important while hosting a website or web app so that user data is encrypted and secure.
-
Can you leave it as is?
You can leave it as is, though we do not encourage this for security reasons. Allowing SSH access from anywhere (0.0.0.0/0) poses a threat to the instance’s security as anyone can make an attempt to log in. It is better to restrict it to only trusted IP addresses.
In general:
-
If you’re just testing or using the instance temporarily, it might be okay to leave it as is.
-
For production environments, you should modify the security settings to only allow access from known IP addresses.
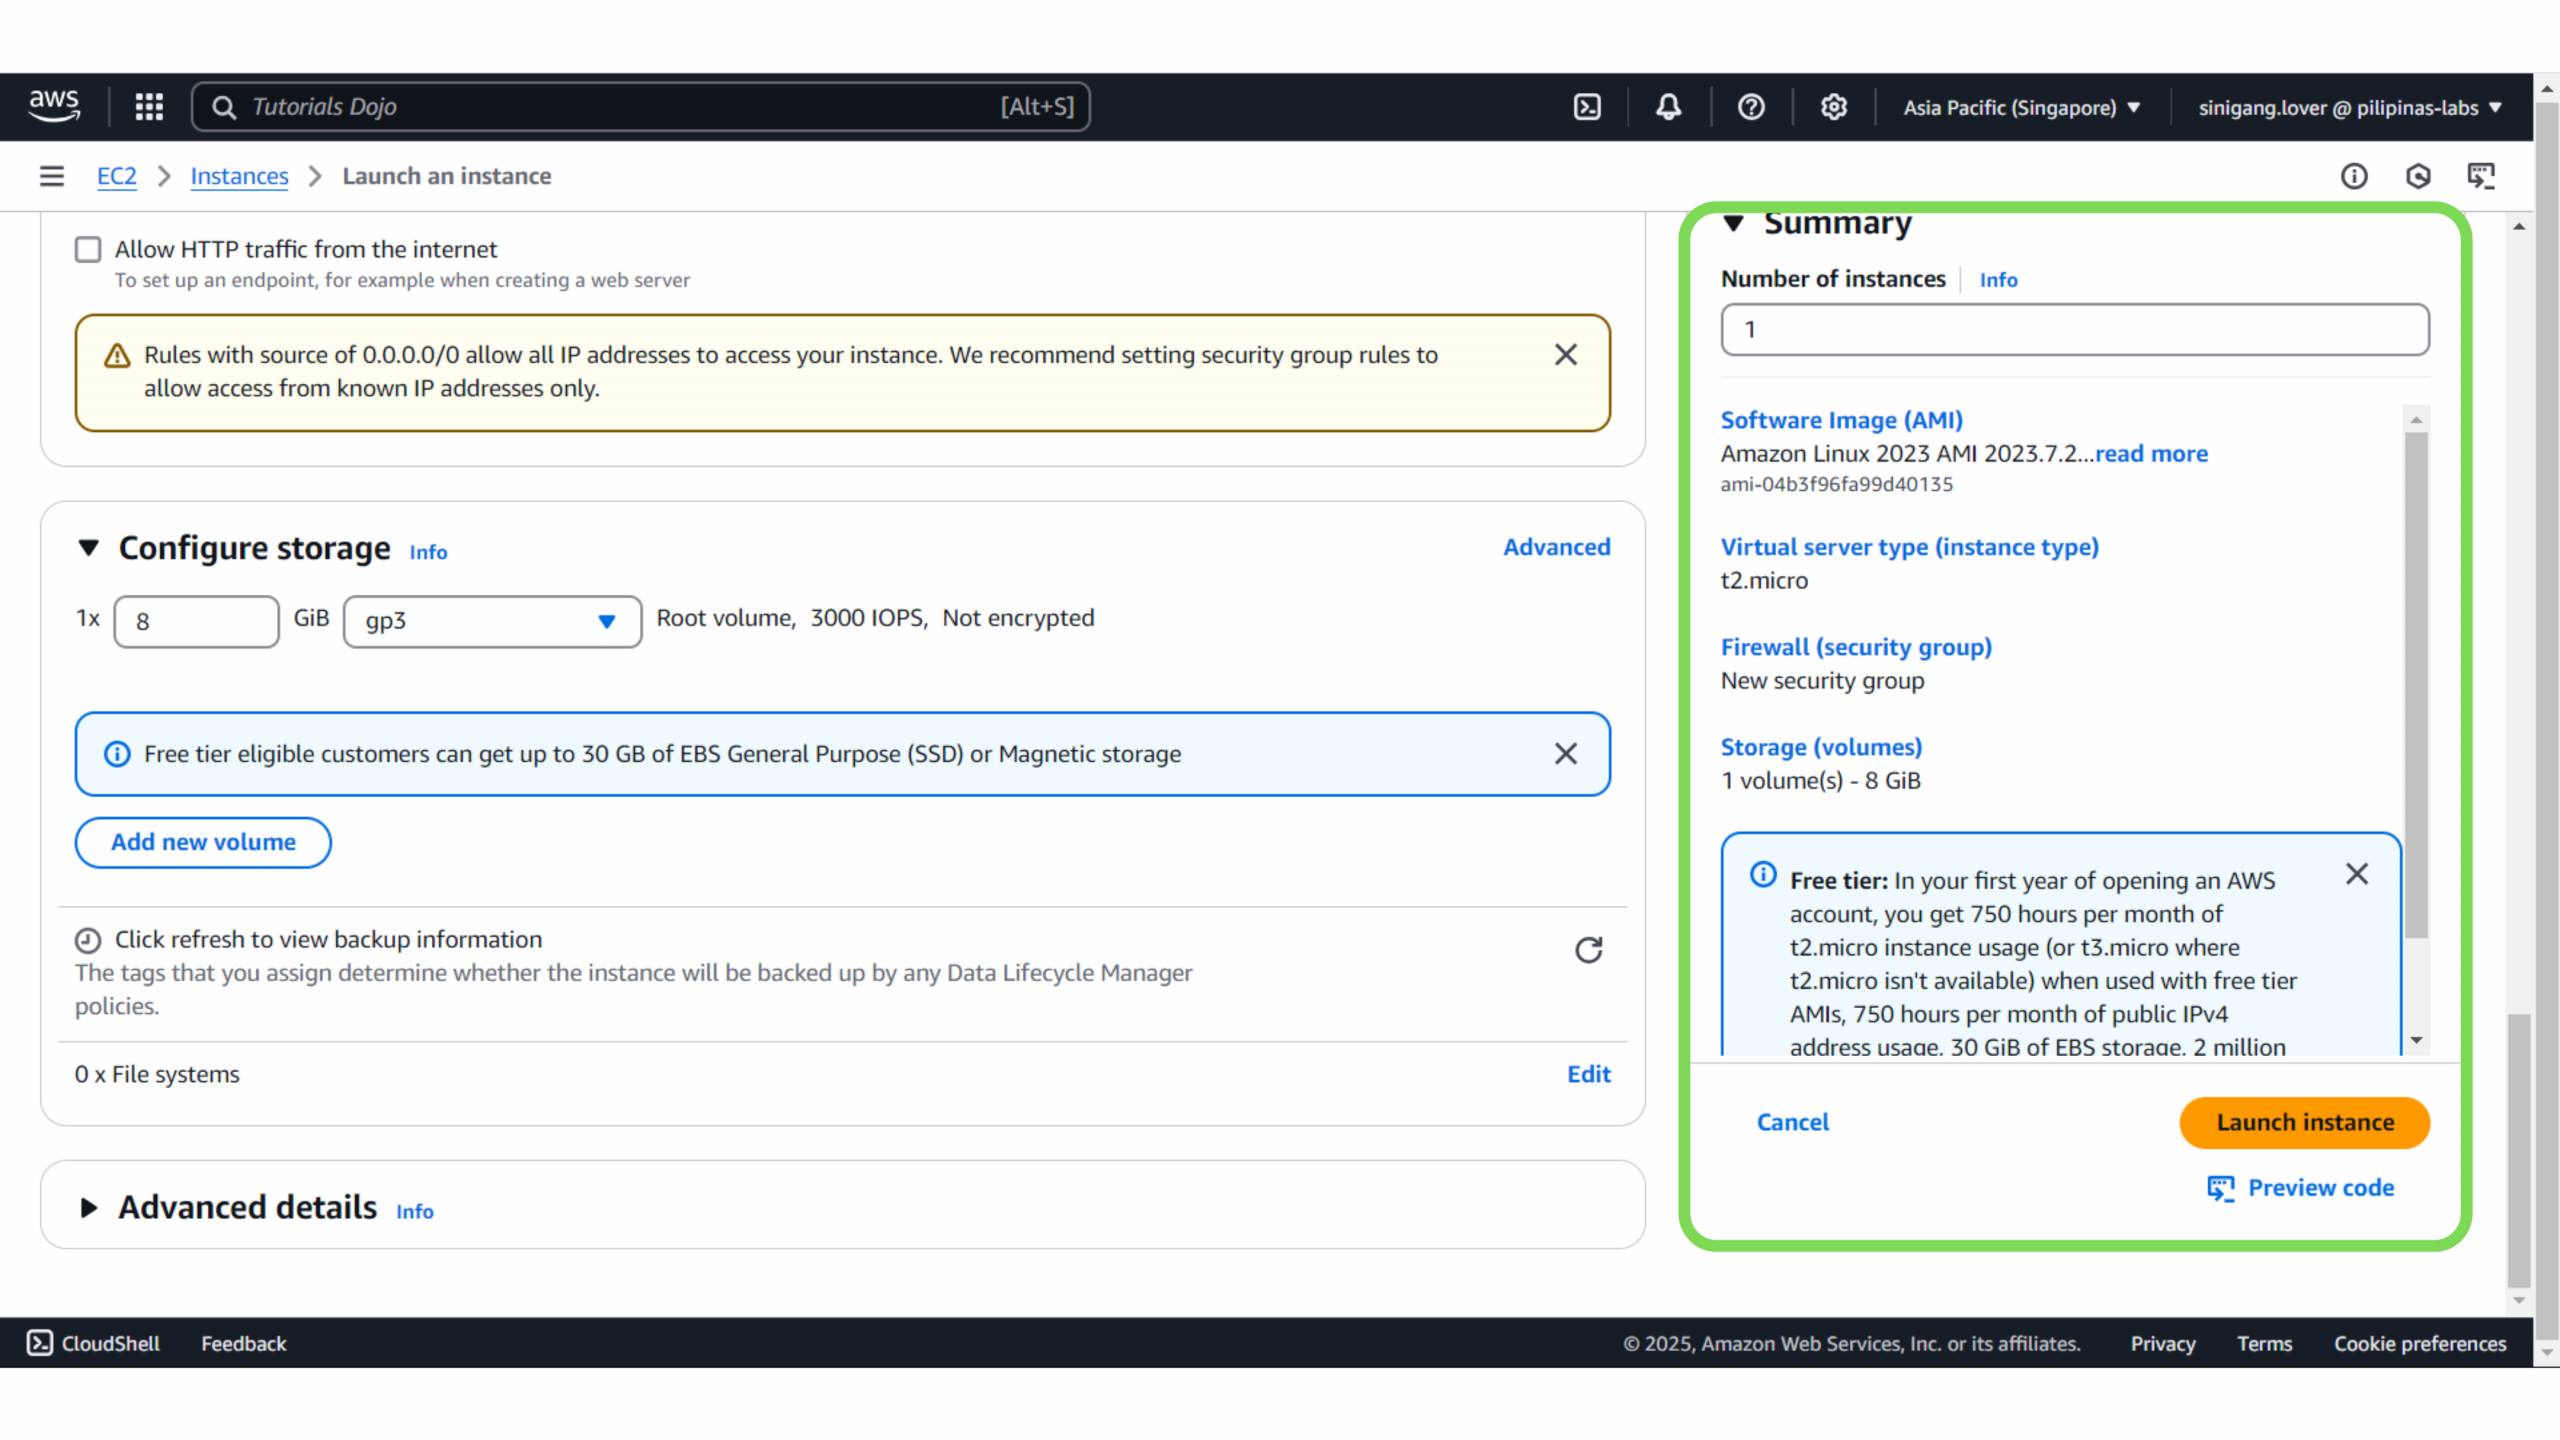
7. Add Storage – Adjust the storage size if required (8GB is default for free tier).
Note: While 8GB of storage is the default for the free tier, we highly recommend using at least 50GB to future-proof your website’s workloads!
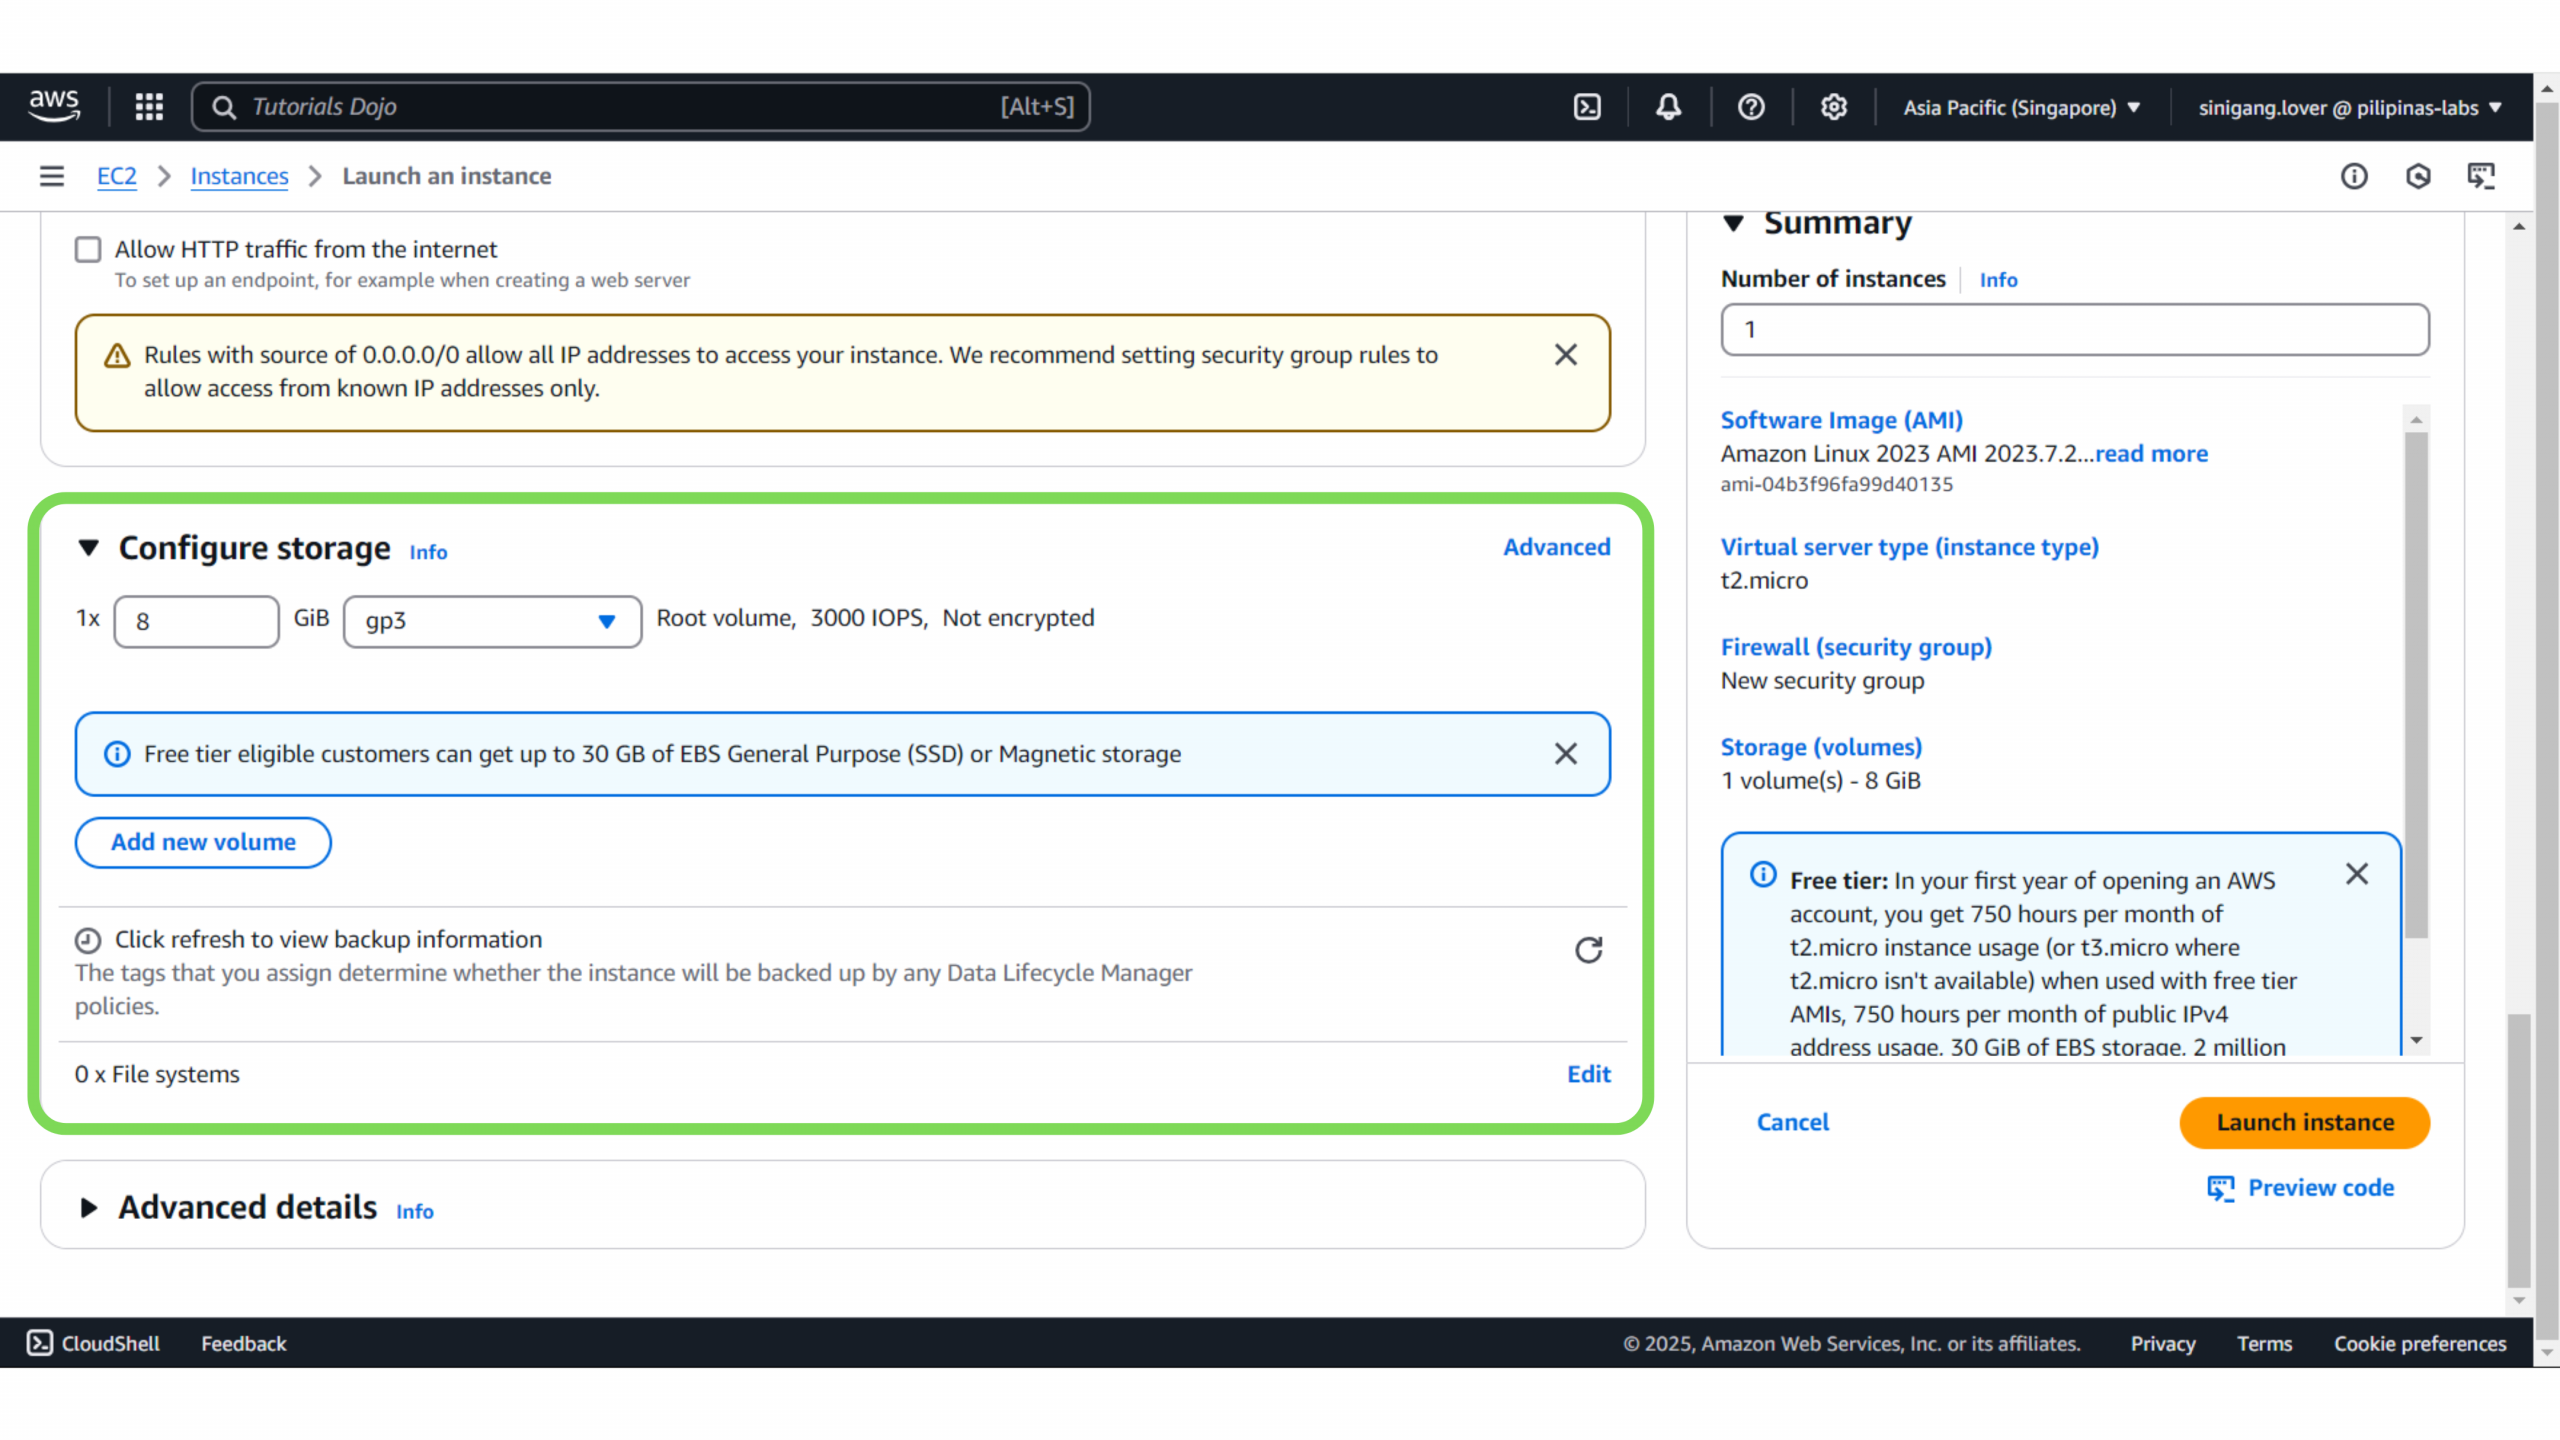
Amazon EC2 Storage Options Explained
When configuring storage for your EC2 instance, there are a few key settings to understand:
- Volume: This refers to storage provided to your EC2 instance. In most cases, it is 8 GiB or 8GB for user files, applications, and operating system data.
- Volume Type: By default, this is gp3, a General Purpose SSD that strikes a good balance between price and performance. For enhanced performance, Provisioned IOPS SSD (io1 or io2) can be selected for tasks that require rapid access of data, such as database use.
- Root Volume: The space where the operating system (OS) and system files are stored, and it is, therefore, the primary store for your instance.
- IOPS: Refers to how fast data can be read or written at. Defaults to 3000 IOPS, that means faster performance for tasks with frequent access to data.
- Encryption: The storage itself is not encrypted by default, but encryption may be selected for added security.
- Free Tier: If eligible, you get 30 GB free storage (General Purpose SSD or Magnetic) for beginners.
- Add New Volume: You can always add more storage later if you need extra space.
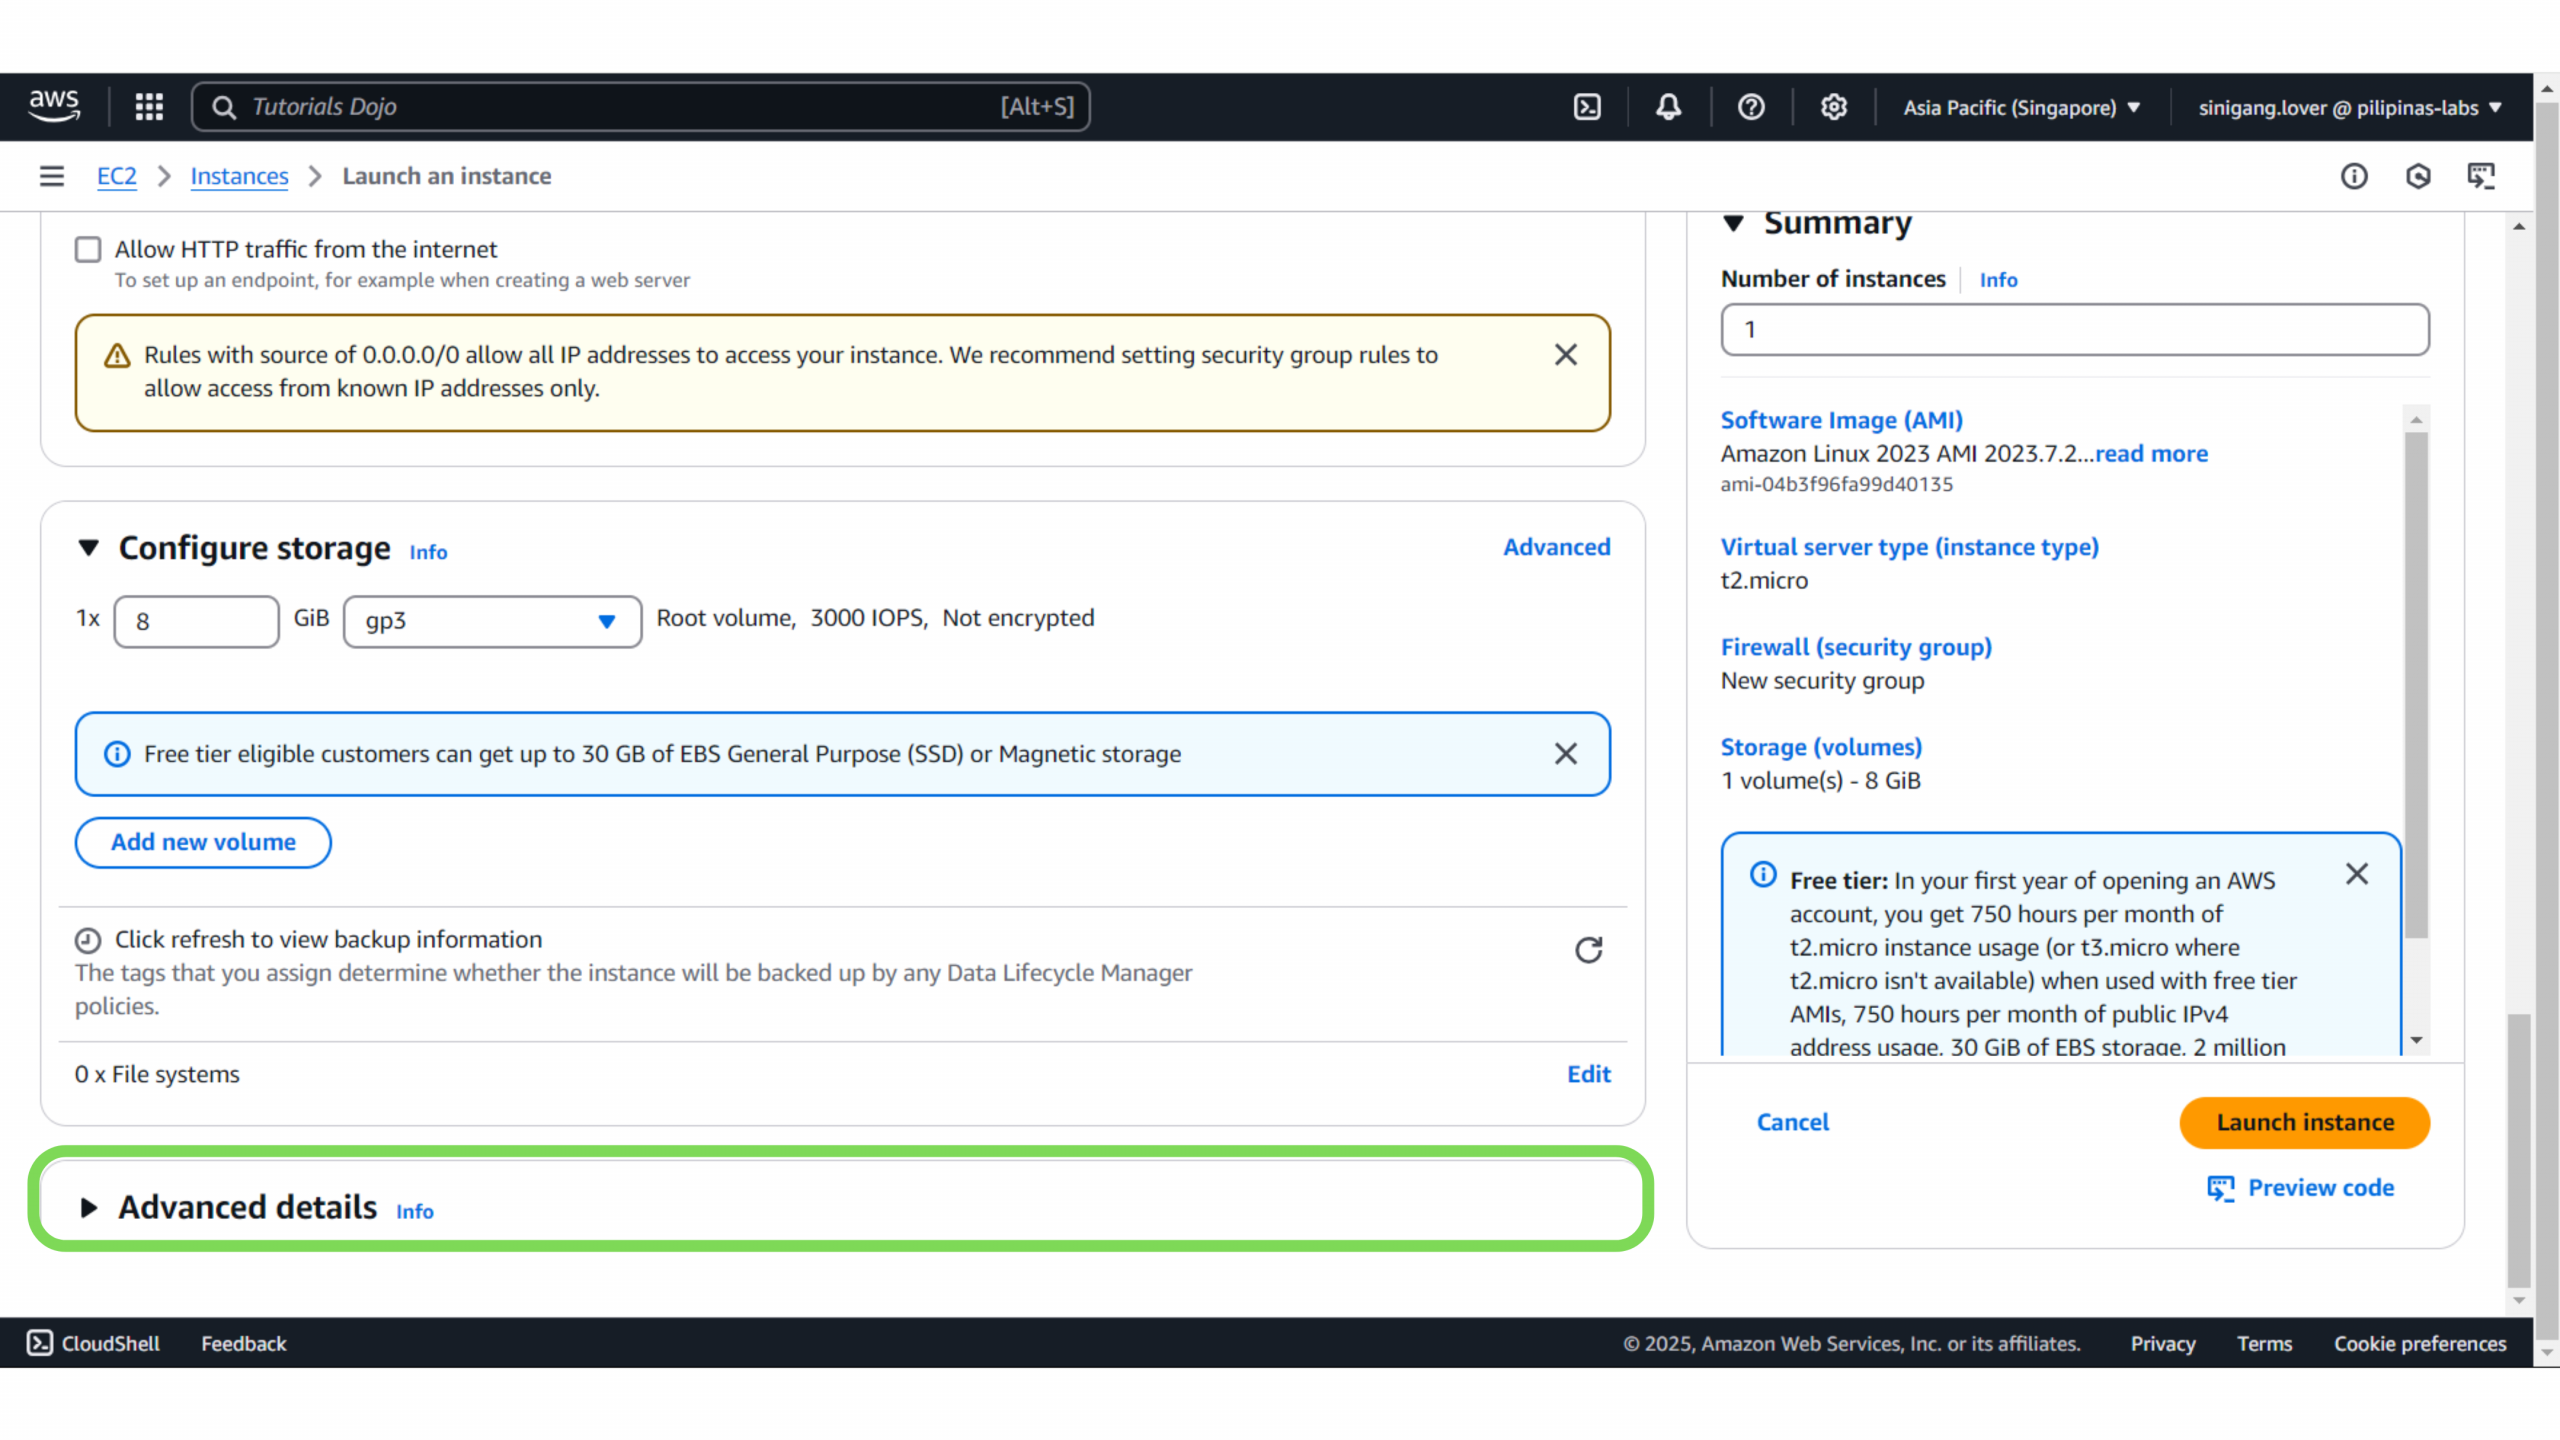
8. Advanced Details – The Advanced Details section includes options like domain joining, IAM profiles, and DNS settings. For now, let’s leave them as is. We’ll explore these in more detail soon!
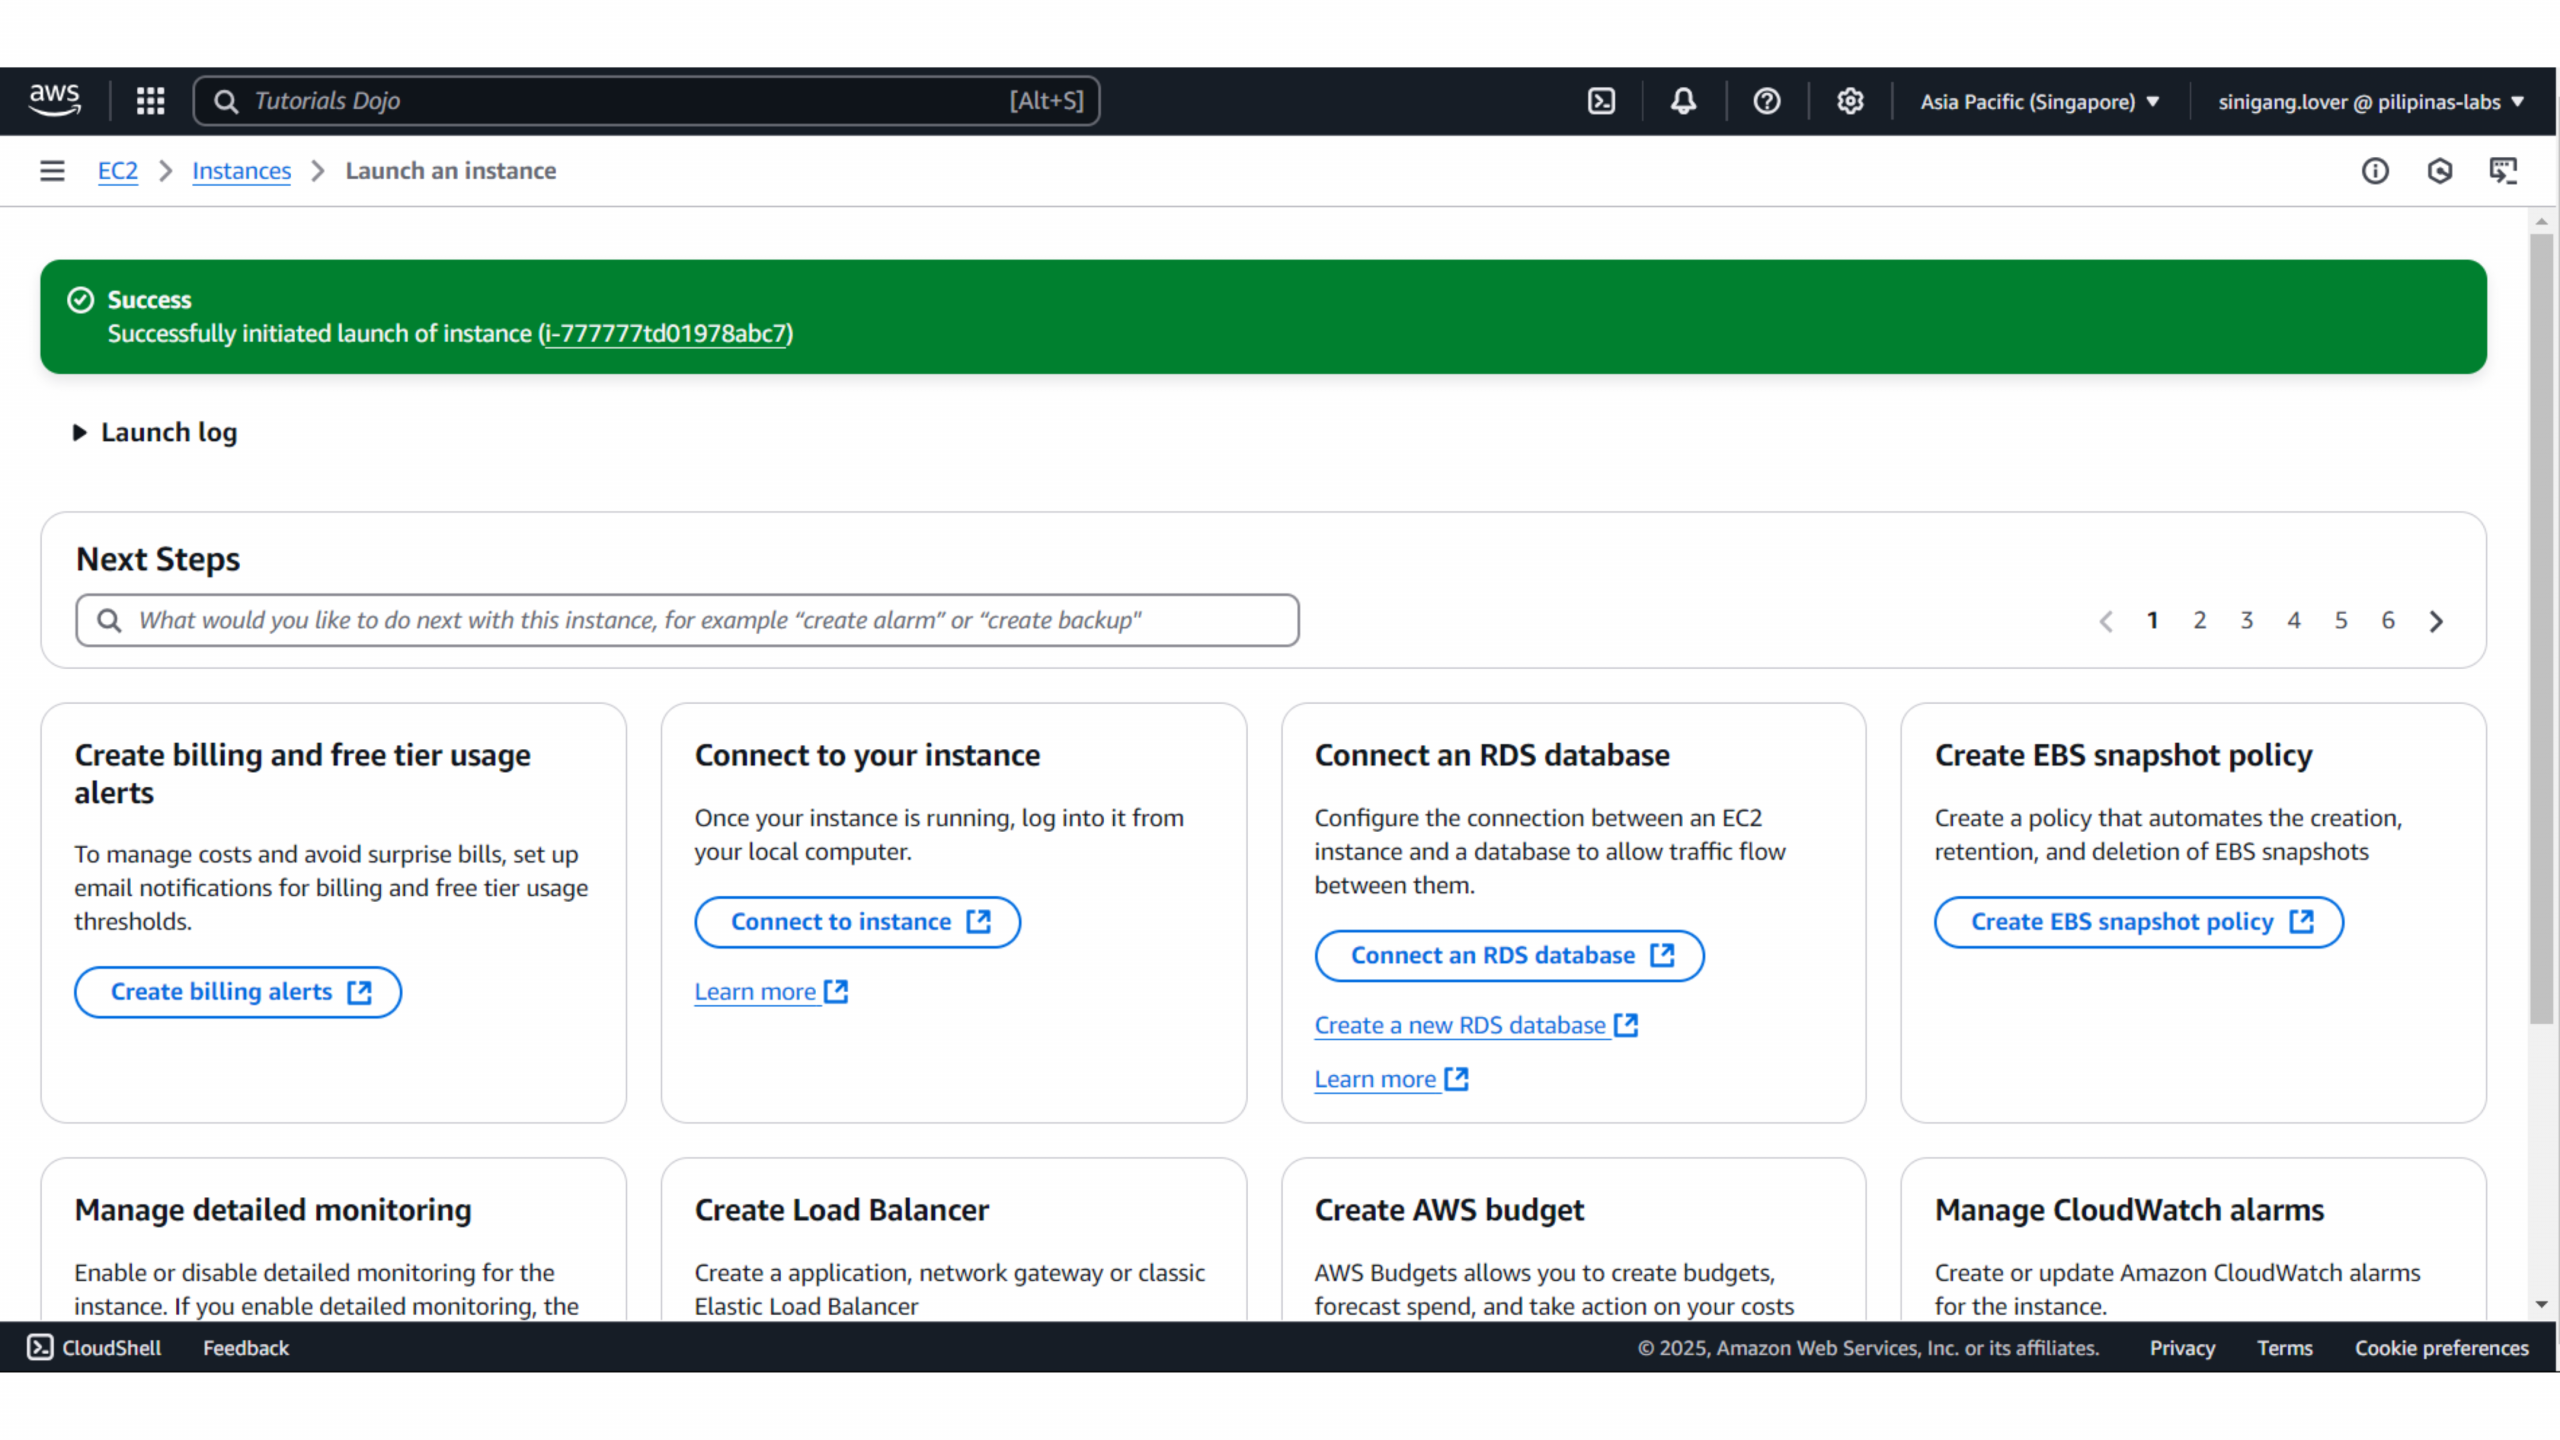
9. Review and Launch – Check your settings and click “Launch.”
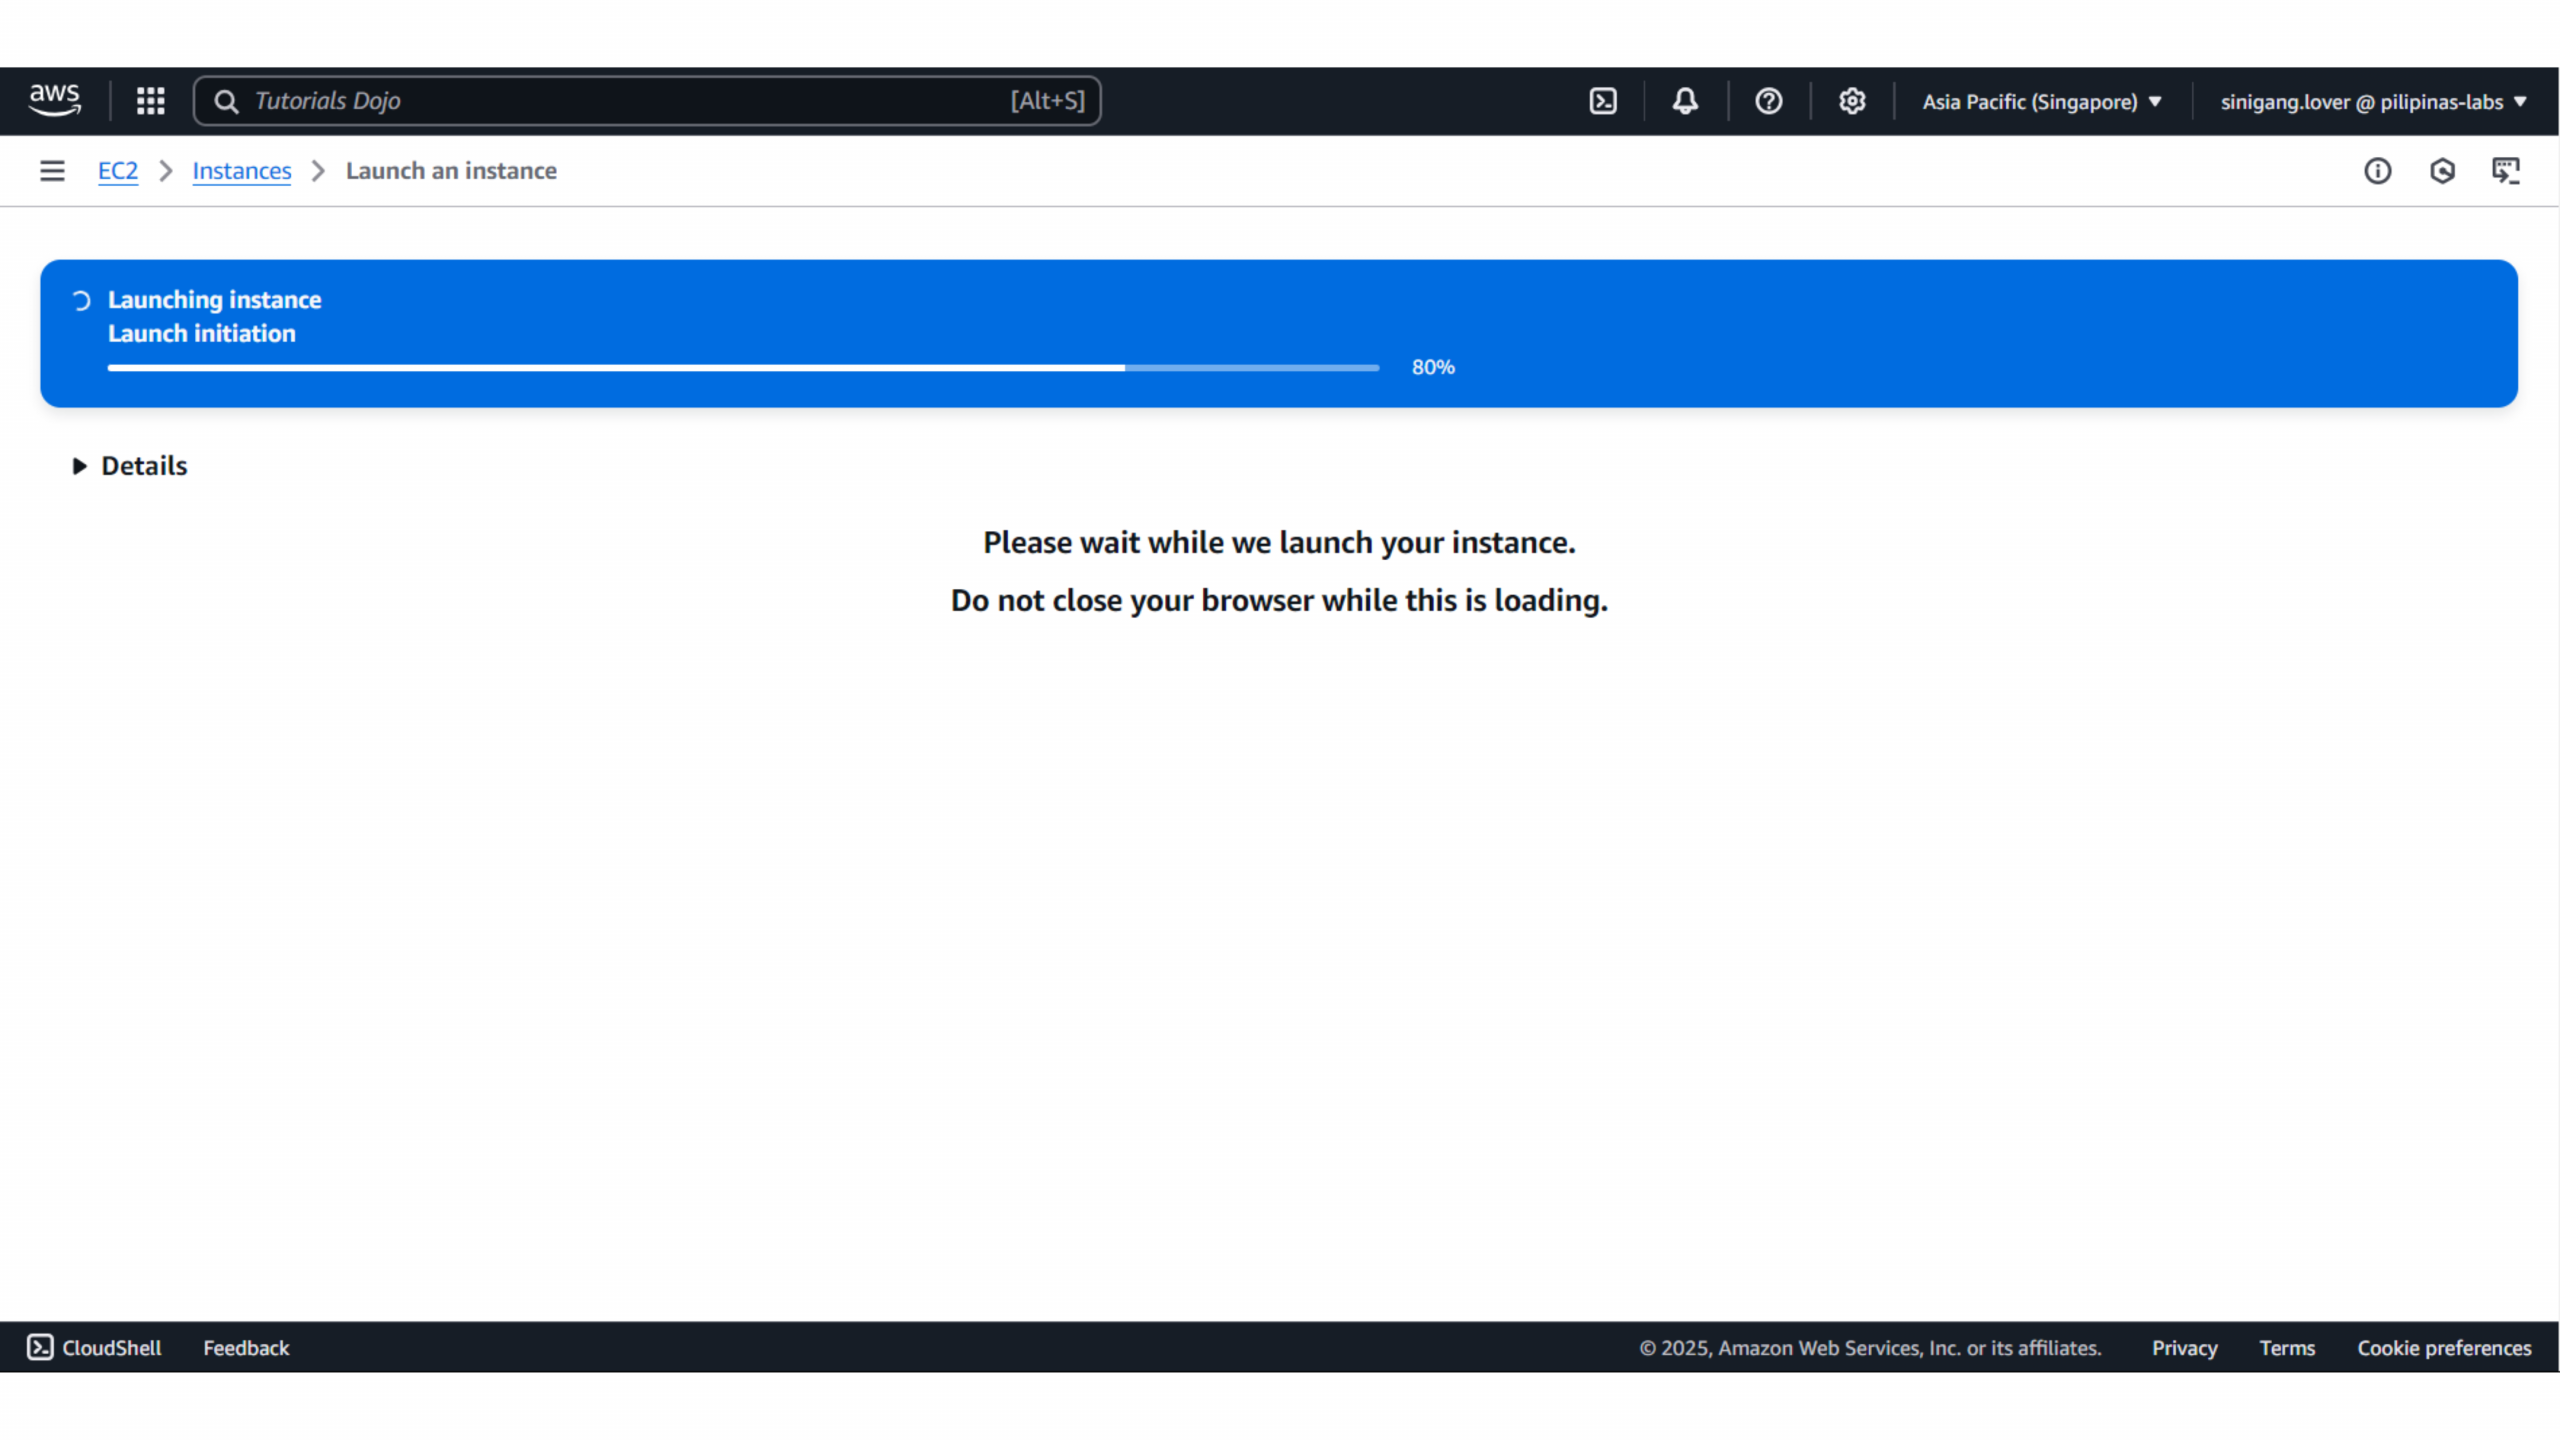
10. Wait for Deployment – Now, just sit back and relax—in a few minutes, your EC2 instance will be up and running! You’re almost there!
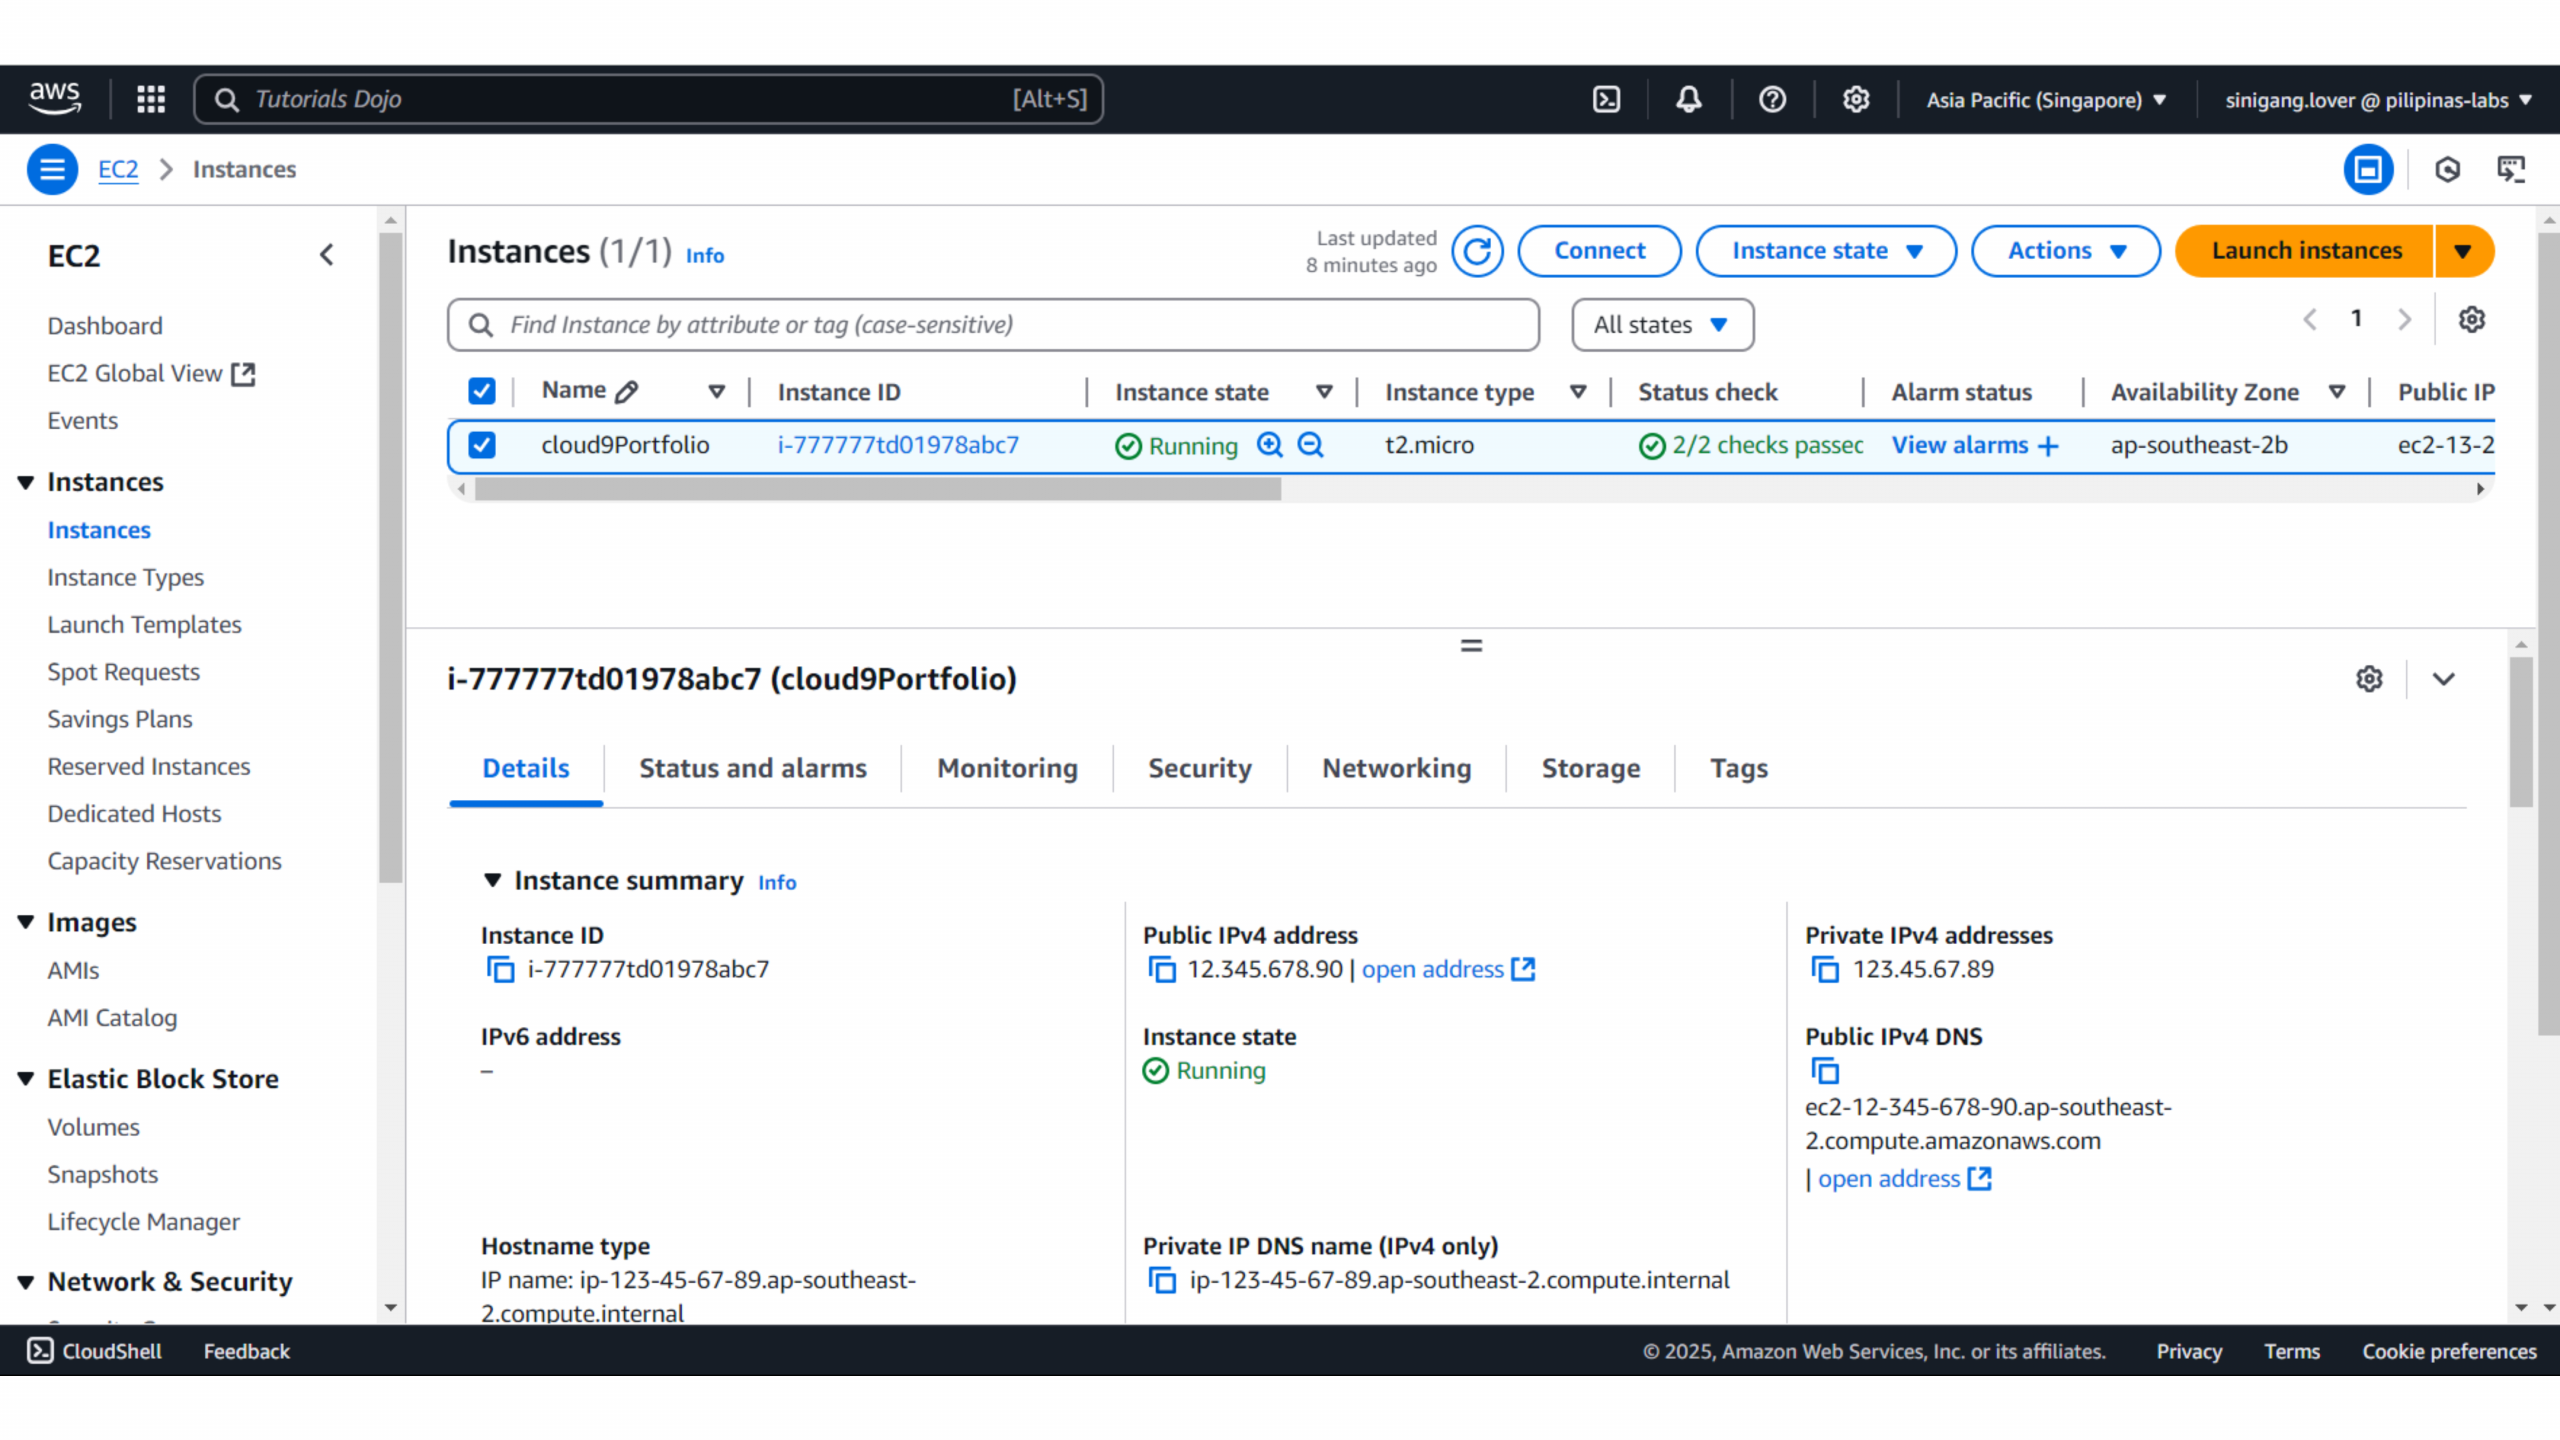
If you go back to your EC2 dashboard, you’ll find your launched instance along with key details like the instance ID, public IP, and security group settings—these will be helpful when connecting and configuring your instance.
Next Step: Accessing and Configuring Your Amazon EC2 Instance
Now that your EC2 instance is running, your next task is to connect to it. You will connect to your instance using SSH (for Linux instances) or RDP (for Windows instances).
In this step, you’ll need to use your private key to log in via SSH (or your Windows credentials for RDP). You’ll also configure any additional settings like firewall rules and network configurations to ensure your connection is smooth.
We’ll dive into the details of this process in our next article: Cloud-9.3: Accessing and Configuring Your EC2 Instance!
Frequently Asked Questions
- Can I use EC2 for free?
- Yes, AWS Free Tier offers 750 hours/month of t2.micro instance usage for 12 months.
- What happens if I lose my key pair?
- If you lose the key, you cannot SSH into your instance. You’ll need to create a new instance or use a recovery method.
- How do I keep my instance running 24/7?
- EC2 instances run continuously unless manually stopped. However, stopping your instance can help save costs if you’re not using it.
🤖 $3.49 eBooks Start Here – Get Up to 30% OFF All AI & Machine Learning Reviewers

Turn Your Team Into Cloud-Ready Professionals Today

Learn AWS with our PlayCloud Hands-On Labs

$2.99 AWS and Azure Exam Study Guide eBooks

New Claude Certified Architect Foundations CCA-F

Learn GCP By Doing! Try Our GCP PlayCloud

Learn Azure with our Azure PlayCloud

FREE AI and AWS Digital Courses

FREE AWS, Azure, GCP Practice Test Samplers


Subscribe to our YouTube Channel

Follow Us On Linkedin


