Last updated on October 30, 2025
Have you ever considered where all your company’s files and apps are being stored? Traditionally, they are stored inside physical servers or computers in data centers. In these setups, rooms are full of servers needing power, air conditioning, and regular maintenance. Although this works, the cost and time involved can become a hassle. Because of this, many businesses are migrating to AWS, where resources are easier to manage, more secure, and much more flexible.

Getting started with the cloud can feel unfamiliar, especially if you’re used to traditional systems. In this guide, we will therefore walk through simple hands-on activities in AWS so you can learn by doing. Together, we’ll explore three core services: Learn to create IAM users and groups, set up a Virtual Private Cloud (VPC), and learn how to store files using S3. Check the 7 Common Migration Strategies to learn more best practices!
By the end, you’ll understand the basics and feel more confident working in AWS!
Before we get started
Ensure you have an AWS account and are logged in as an IAM user with administrator access.
Let’s picture a scenario from a workshop I went to. You’re part of your university’s student organization, and every file, event detail, member list, and even a small online store for selling club merch is stored on an old computer in the faculty office. As a result, it runs slowly and breaks down often, and anyone with the password can access everything. During busy weeks, it also struggles to handle the traffic from students trying to sign up or buy things online. To make matters worse, the system is so outdated that students from other departments are already hacking it.
Now, imagine you propose moving everything to the AWS cloud. As a result, instead of relying on one fragile machine, you can:
-
Use IAM to secure access by giving students and faculty separate accounts with defined permissions.
-
Set up a VPC to create a safe, isolated environment where the org’s applications can run without outside interference.
-
Store files in S3 for essential things like event records, gradebooks, and merchandise images.
What is IAM in AWS?
IAM (Identity and Access Management) is AWS’s way of controlling who can access your resources and what actions they can take. Instead of everyone using the same admin login, you create groups and users with specific roles to keep things organized and secure. You might want to check out IAM documents for more information.
In our student org system scenario, IAM revolves around authentication and authorization.
-
Authentication is making sure someone is really who they say they are, like checking a student’s ID before letting them into an event.
-
Authorization is deciding what they can do once inside. A student might be able to join activities, but only officers can edit member records.
By setting up IAM, each student and faculty member gets their own account with the right level of access. This means no more passing around one password for the old computer. Instead, everyone signs in with their own credentials and only sees or does what they are allowed to.
Permissions make this possible. In AWS, the identity making the request is called a principal, such as a user or a role. For example, a student may only view the event calendar, while an officer can edit it.
Lab 1: AWS IAM Groups and Users
-
Creating AWS IAM Group
-
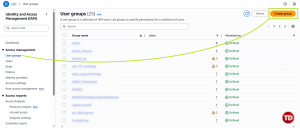
Go to the IAM console
-
Under Access management, go to User groups, then Create group

-
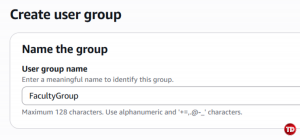
Name it FacultyGroup (or any name you prefer)

-
Skip adding users for now
-
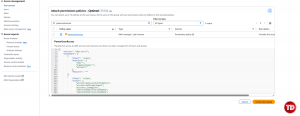
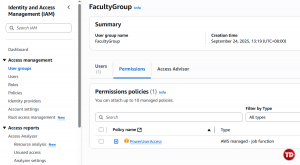
Under Attach permissions policies, search for “PowerUserAccess” and check the box, then click Create user group

-

Now we have a group with permissions already attached! Anyone added to this group will automatically inherit those permissions.
-
Creating AWS IAM User
-
On the left-hand side, go to Users, then Create user
-
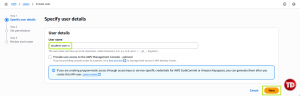
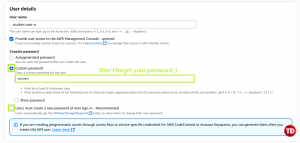
Name it student-user-a (or any name you prefer)

-
Click the checkbox below to provide user access and set a custom password. After that, uncheck the ‘User must create a new password’ option (since we’re just creating tests on users)

-
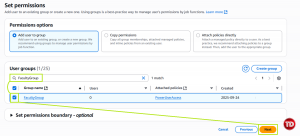
On Set permissions, add the created user to FacultyGroup.

-
Skip permission boundaries, then hit Next
-
Review everything and click Create user

-
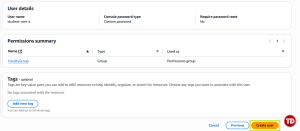
You’ve successfully made your first IAM user! Now repeat the process once more for student-user-b to practice creating multiple users. With IAM in place, our accounts are secure and everyone has the right level of access.
The next step is to make sure those users and applications run inside a safe environment. That’s where the Virtual Private Cloud (VPC) comes in. Let’s look at why VPC matters before we set one up.
What is VPC in AWS?
A VPC lets you create your own “mini internet” in the cloud! Inside it, you can also design secure areas for your resources. For example, a public subnet is like the front desk, where visitors or users connect to your system, while on the other hand, a private subnet is like the staff room, hidden away and accessible only to trusted members. For more details, you can check the VPC documentation to learn more.
-
Create a custom VPC named Faculty-vpc
-
Add one public subnet and one private subnet
In our scenario, the student org’s old server was sitting wide open in the faculty office, making it easy for curious students from other departments to sneak in. Because of that, we need a safe and isolated place for our applications to fix this issue. Instead of relying on the old server, a VPC is like building a private data center inside AWS. Only the people and services we approve can get in, and everything else stays out.
Lab 2: Setting Up Your Own Private Cloud in AWS
-
Creating an AWS VPC
-
-
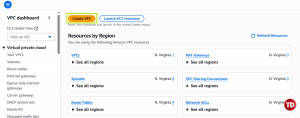
Go to the VPC Console
-
Click Create VPC

-
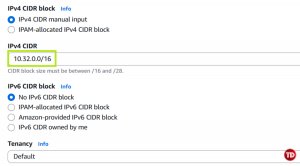
Choose VPC only. Then, name it Faculty-vpc

-
Set IPv4 CIDR block to 10.32.0.0/16

-
Leave the rest as default and click Create VPC!
-

-
Adding two subnets
-
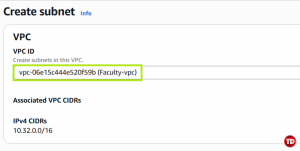
On the left, go to Subnets, then click Create subnet
-
Select the VPC we created earlier, named Faculty-vpc

-
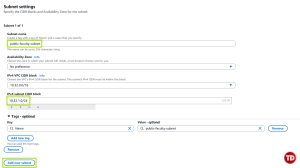
Name your subnet public-faculty-subnet with a CIDR block 10.32.1.0/24. Then, click Add new subnet

-
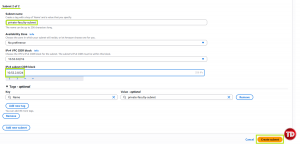
Name the second one private-faculty-subnet with CIDR block 10.32.2.0/24. After that, click Create subnet

-
You created two subnets in your Faculty-vpc: “public“ and “private.“ At this point, the names are just for clarity. What makes a subnet truly public is when you connect it to the internet through an Internet Gateway, and what makes a subnet private is when you restrict it. Hence, resources only communicate inside the VPC.
Why Two Subnets?
This setup is necessary because it lets you separate what the world can see from what stays protected. For example:
-
The public subnet could host a small website or a student sign-up page.
-
The private subnet could hold sensitive data like gradebooks or internal applications that should never be exposed directly to the internet.
Splitting resources this way reduces risk and makes your network more secure.
Lab 2.1: Make public subnet PUBLIC
Now that you have a public and a private subnet, the next step is to make the “public” subnet work as intended. In other words, think of it like setting up the front gate of your campus network. Doing this allows internet traffic in and out of that area by creating an IGW (Internet Gateway), adding a Route Table, and linking it to the public-faculty-subnet. At the same time, the private-faculty-subnet stays locked away inside, safe from outside access. As a result, this setup keeps sensitive resources hidden and lets your apps or websites in the public subnet talk to the internet.
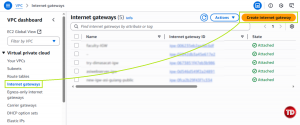
- Create Internet Gateway (IGW) and Route Table
-
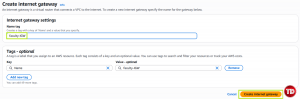
Create an Internet Gateway (IGW).

-
Then, name it faculty-igw

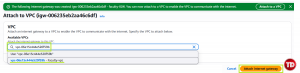
-
After creating, click the button above to attach it to a VPC. Then attach the name of your VPC
-
This is like opening the front door. Without an IGW, nothing in your VPC can talk to the outside internet.

-
-
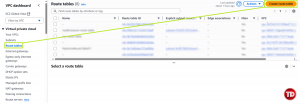
Create a Route Table.
-
A route table is like a set of traffic rules. It decides where requests from your subnet should go.

-
-
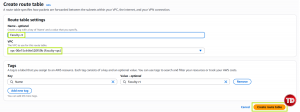
Name your Route Table to Faculty-rt and select your VPC

-
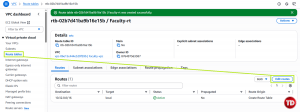
Add a Route Table entry for Internet Traffic. Open Faculty-rt and click Edit Routes

-
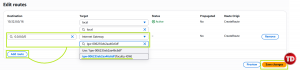
Click Add route
-
After clicking, make sure the destination is set to 0.0.0.0/0 (this means “all internet traffic”). Then for target, add your IGW faculty-IGW. Hit Save changes once finished.

-
-
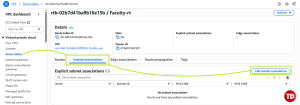
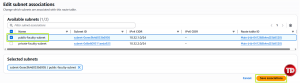
Associate the Route Table with the Public Subnet. Click Edit subnet associations from the route table you created.

-
Then, choose your subnet.

-
Reminder: Do not modify the Private Subnet. The private subnet stays internal, so resources there are protected from direct internet access.
-
Great job! You’ve made your public-faculty-subnet public by attaching an Internet Gateway and updating the route table with 0.0.0.0/0. From here, resources placed in that subnet can communicate with the internet, while at the same time, your private-faculty-subnet stays isolated and protected.
Next, let’s move on to S3, where we’ll store the files and data our student org depends on.
Lab 3: Creating an AWS S3 Bucket
S3 (Simple Storage Service) is like a secure, online filing cabinet for your data. Not only is it safe, but it is also fast and reliable, and it grows with you, whether you are storing just a few photos for the org’s online store or thousands of files over time. On top of that, you can reach your files from anywhere without worrying about crashes or running out of space. To explore further, you can check the S3 documentation.
In our scenario, the student org needs a safe place to keep important files, from gradebook spreadsheets to images of club merchandise like shirts and pens. Rather than storing these on a fragile old computer, we will use S3.
- Create an S3 Bucket
-
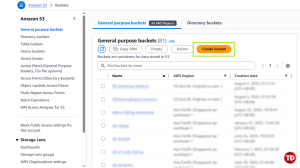
Go to the S3 Console
-
Click Create bucket.

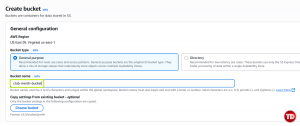
-
Name your to something like club-merch-bucket.
-
Leave Block Public Access enabled for now.

-
-
Click Create bucket.
-
-
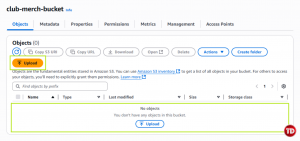
Upload
-
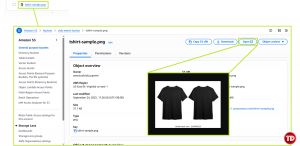
Click and open the bucket you created, and afterward either Upload or Drag your images.

-
Click Upload
-
You’ll now see the images listed in your bucket

-
You now have a fully working S3 bucket where you can upload, view, and delete images. Before we wrap up, let’s also remove S3 access from student-user-a so we can demonstrate how permissions work in practice.
-
Removing User’s Access
-
We want student-user-a to act as a normal student without access to the club-merch-bucket. To show how this works, let’s demonstrate how to remove S3 permissions based on our actions. Currently, student-user-a belongs to FacultyGroup, which contains a PowerUserAccess policy; as a result, everyone inside that group gets the same permissions. If you want to check, go to IAM > Policies, then search for “PowerUserAccess.”

-
Now, let’s take a closer look at the JSON.
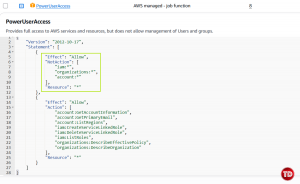

The highlighted part of the JSON tells that:
-
Effect: “Allow” means all services and their resources are allowed
-
NotAction (iam:*, organizations:*, account:*) means all actions listed here are not allowed
-
Since s3:* is not in that NotAction list, all S3 actions are implicitly allowed.
-
Resource: “*” applies to all resources across the account, including every S3 bucket and object.
By understanding what JSON and its allowed permissions are, our goal is to remove student-user-a from the group FacultyGroup to remove their access to the S3 bucket.
-
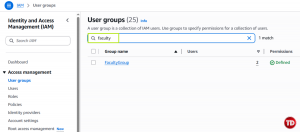
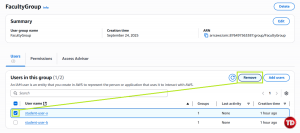
Go to IAM > User Groups, then search for FacultyGroup

-
After clicking FacultyGroup, check the box for student-user-a, then click Remove

-
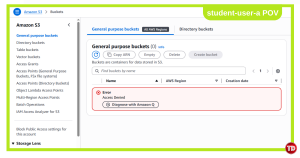
A delete confirmation will appear. Confirm the action, and then log in as student-user-a to test if S3 access is denied. Should look something like this:

Awesome! By now, you’ve accomplished a lot:
-
Created IAM users with secure, role-based access
-
Built a VPC to protect and isolate your applications
-
Uploaded files into reliable cloud storage with S3
With these labs, you’ve taken your first real steps into AWS. What began as a simple student org story has now become a foundation for bigger things. From here, you can start imagining launching full web apps, adding databases, or even scaling services for thousands of users, all powered by the cloud through AWS.
Conclusion
You’ve just taken your first steps into AWS Cloud Infrastructure by learning to manage users with IAM, build a secure network with VPC, and store files with S3. These are the building blocks that almost every cloud project starts with. As you continue practicing, stay curious, and you’ll take on bigger projects in the cloud.
References:
🌸 25% OFF All Reviewers on our International Women’s Month Sale! Save 10% OFF All Subscriptions Plans & 5% OFF Store Credits/Gift Cards!

Learn AWS with our PlayCloud Hands-On Labs

$2.99 AWS and Azure Exam Study Guide eBooks

New AWS Generative AI Developer Professional Course AIP-C01

Learn GCP By Doing! Try Our GCP PlayCloud

Learn Azure with our Azure PlayCloud

FREE AI and AWS Digital Courses

FREE AWS, Azure, GCP Practice Test Samplers


Subscribe to our YouTube Channel

Follow Us On Linkedin


