Last updated on June 29, 2025
If you have ever tried to create a website and wanted it to be accessible through a custom web address, then you have already touched the basics of DNS, or Domain Name System. DNS is what connects your domain name to the actual server where your website lives. It plays a critical role in making sure your site is reachable, fast, and secure for users around the world.
Many website owners start by registering their domain with a provider like GoDaddy. This works well for buying and setting up a domain quickly. However, as your project or business grows, you might find yourself needing more advanced features or tighter integration with cloud services like AWS.
That is where Amazon Route 53 comes in. It is a DNS management service that gives you more control over how your domain is handled. It also makes it easier to connect your domain with other AWS tools and services. The best part is that you can still keep your domain registered with GoDaddy while letting Amazon Route 53 handle the DNS. This means better flexibility without needing to transfer your domain completely.
In this article, we will guide you through the process of updating your domain’s DNS settings on GoDaddy so that Amazon Route 53 takes over the management. This setup gives you more power over your website infrastructure while keeping your domain registration exactly where it is.
Why Transfer DNS Management to Amazon Route 53?
Transferring your DNS management to Amazon Route 53 gives you more control, flexibility, and integration with AWS services like EC2, S3, and CloudFront. It allows you to centralize your infrastructure management, making it easier to connect your domain with cloud resources. Route 53 also offers advanced routing options such as latency-based, geolocation, and failover routing, which help improve performance and reliability for users around the world.
In addition, Amazon Route 53 works seamlessly with Infrastructure as Code tools like Terraform and AWS CloudFormation, allowing you to automate DNS configurations as part of your deployment workflow. You also get access to monitoring and health checks through Amazon CloudWatch, giving you better insight into the status of your domain. The best part is you can keep your domain registered with GoDaddy while using Amazon Route 53 for DNS, giving you the convenience of both platforms in one setup.
Transferring DNS Control from GoDaddy to Amazon Route 53
Follow these steps to shift your DNS management from GoDaddy to Amazon Route 53. This process allows you to maintain domain registration with GoDaddy while gaining full control of DNS configurations through AWS.
Step 1: Create a Hosted Zone in Amazon Route 53
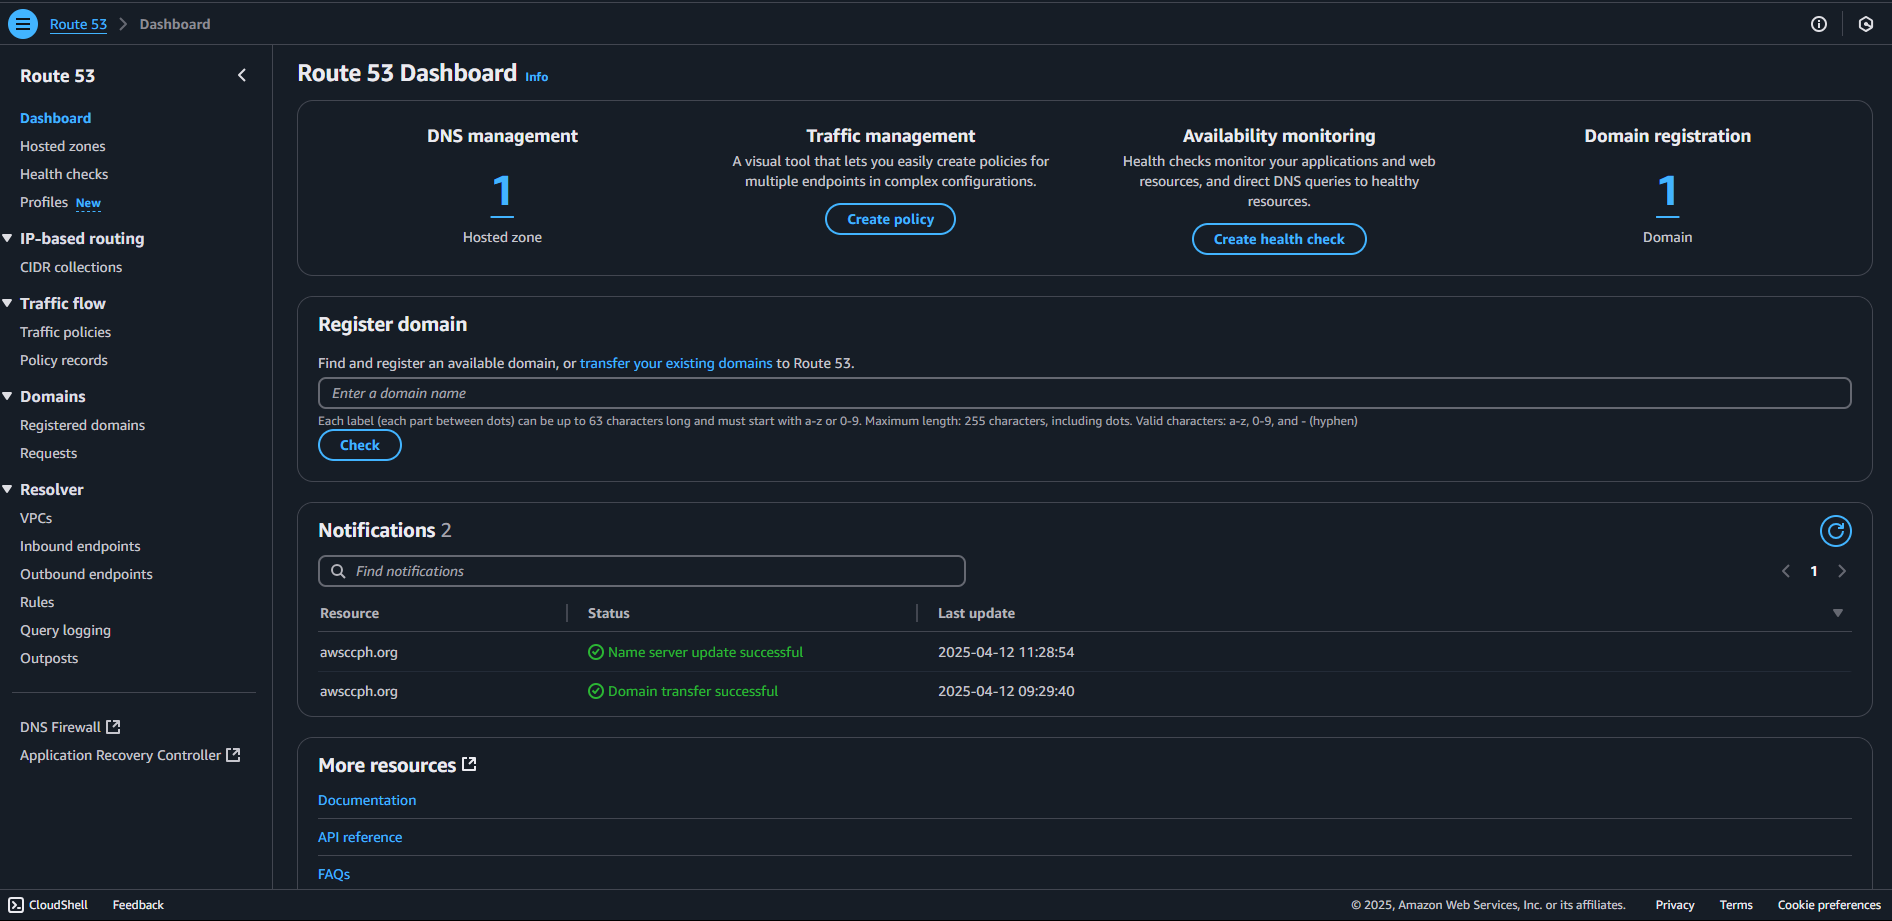
- Sign in to the AWS Management Console and navigate to Route 53.
 Click “Create hosted zone”.
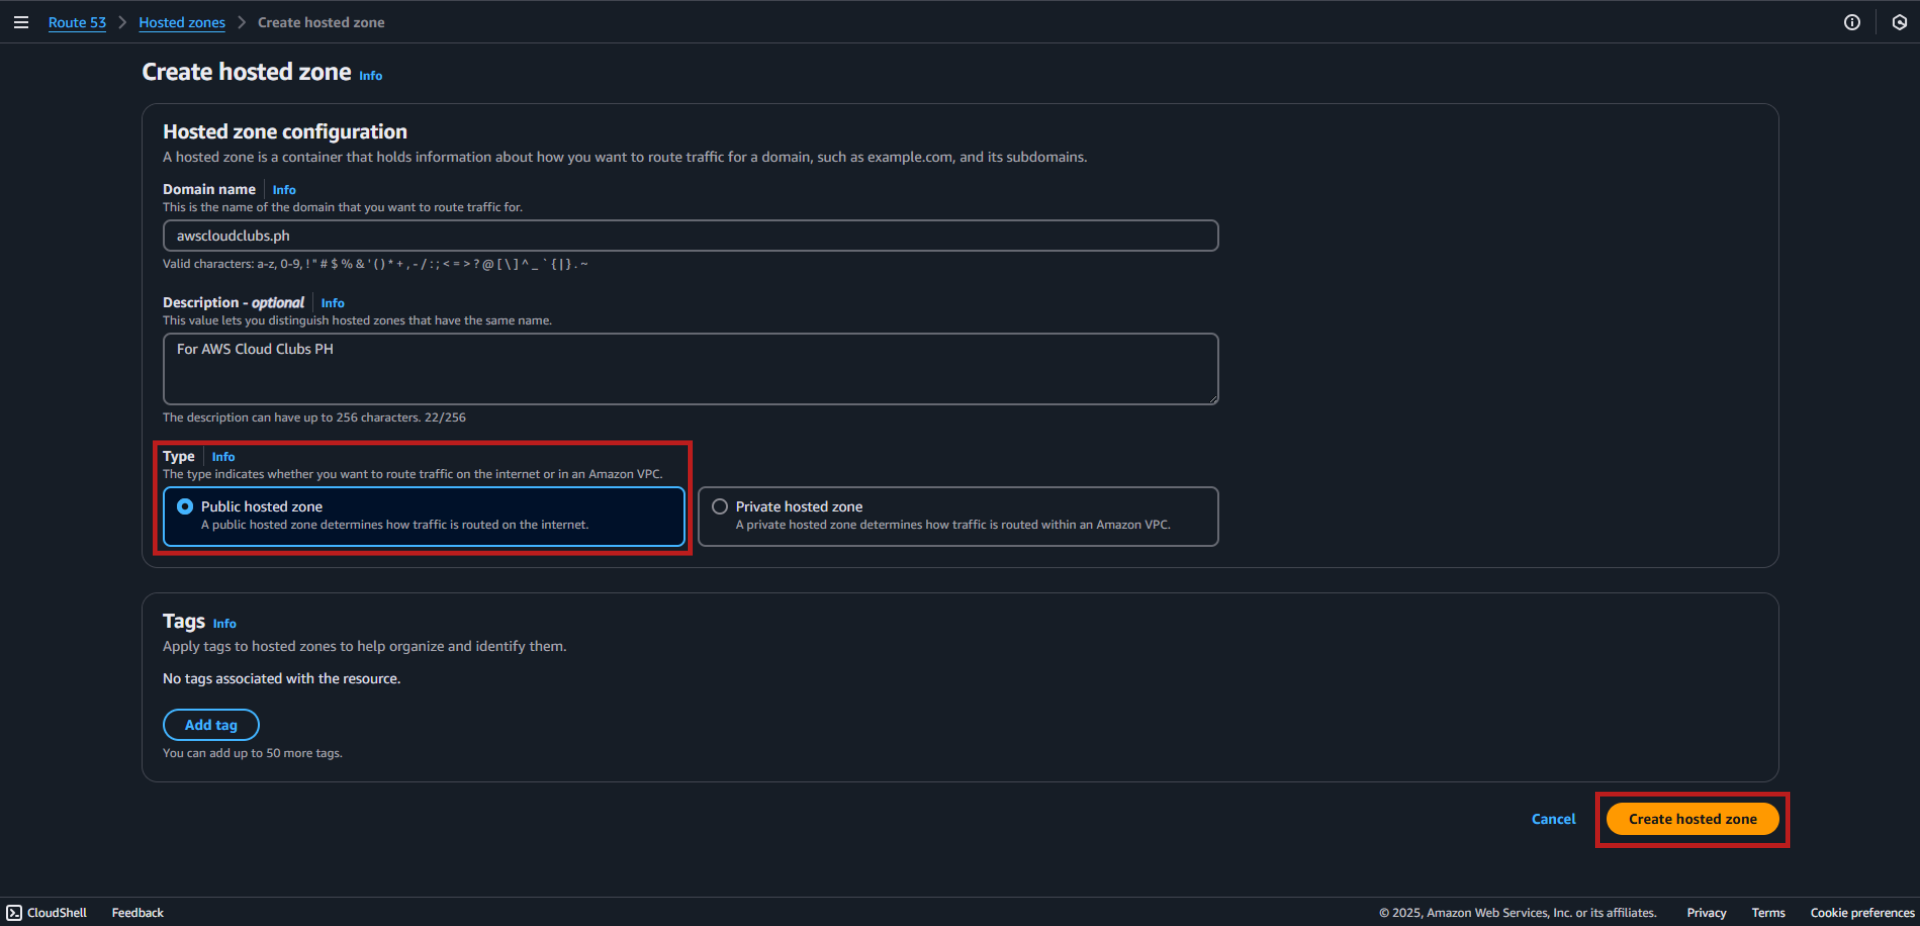
- Enter your domain name (the same domain registered in GoDaddy) and leave the type as Public Hosted Zone. Then click “Create hosted zone”.

- Once created, AWS will automatically generate a set of four NS (Name Server) records and a default SOA (Start of Authority) record.

 Click “Create hosted zone”.
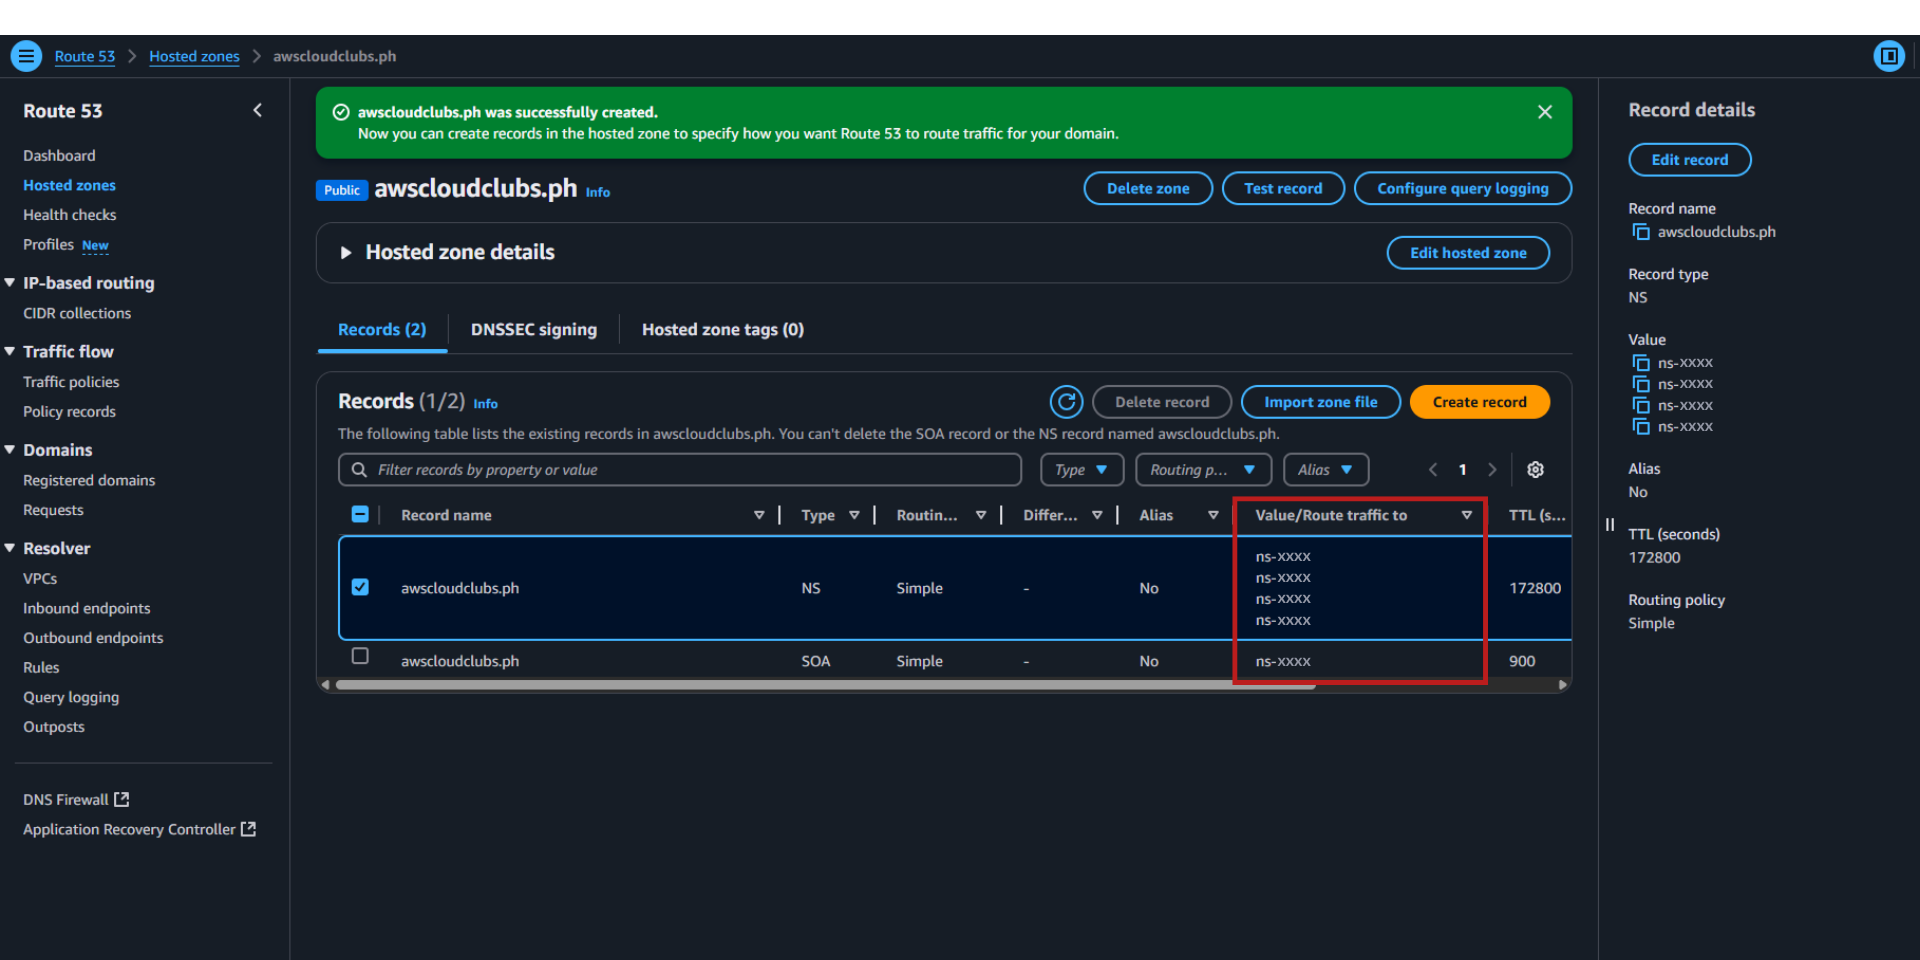
These NS records are what you’ll use to point your domain’s DNS to Route 53.

Step 2: Copy the AWS Name Servers
Copy the four Name Server (NS) values that AWS generated. You will need to enter these in your GoDaddy DNS settings.
Step 3: Update Name Servers in GoDaddy
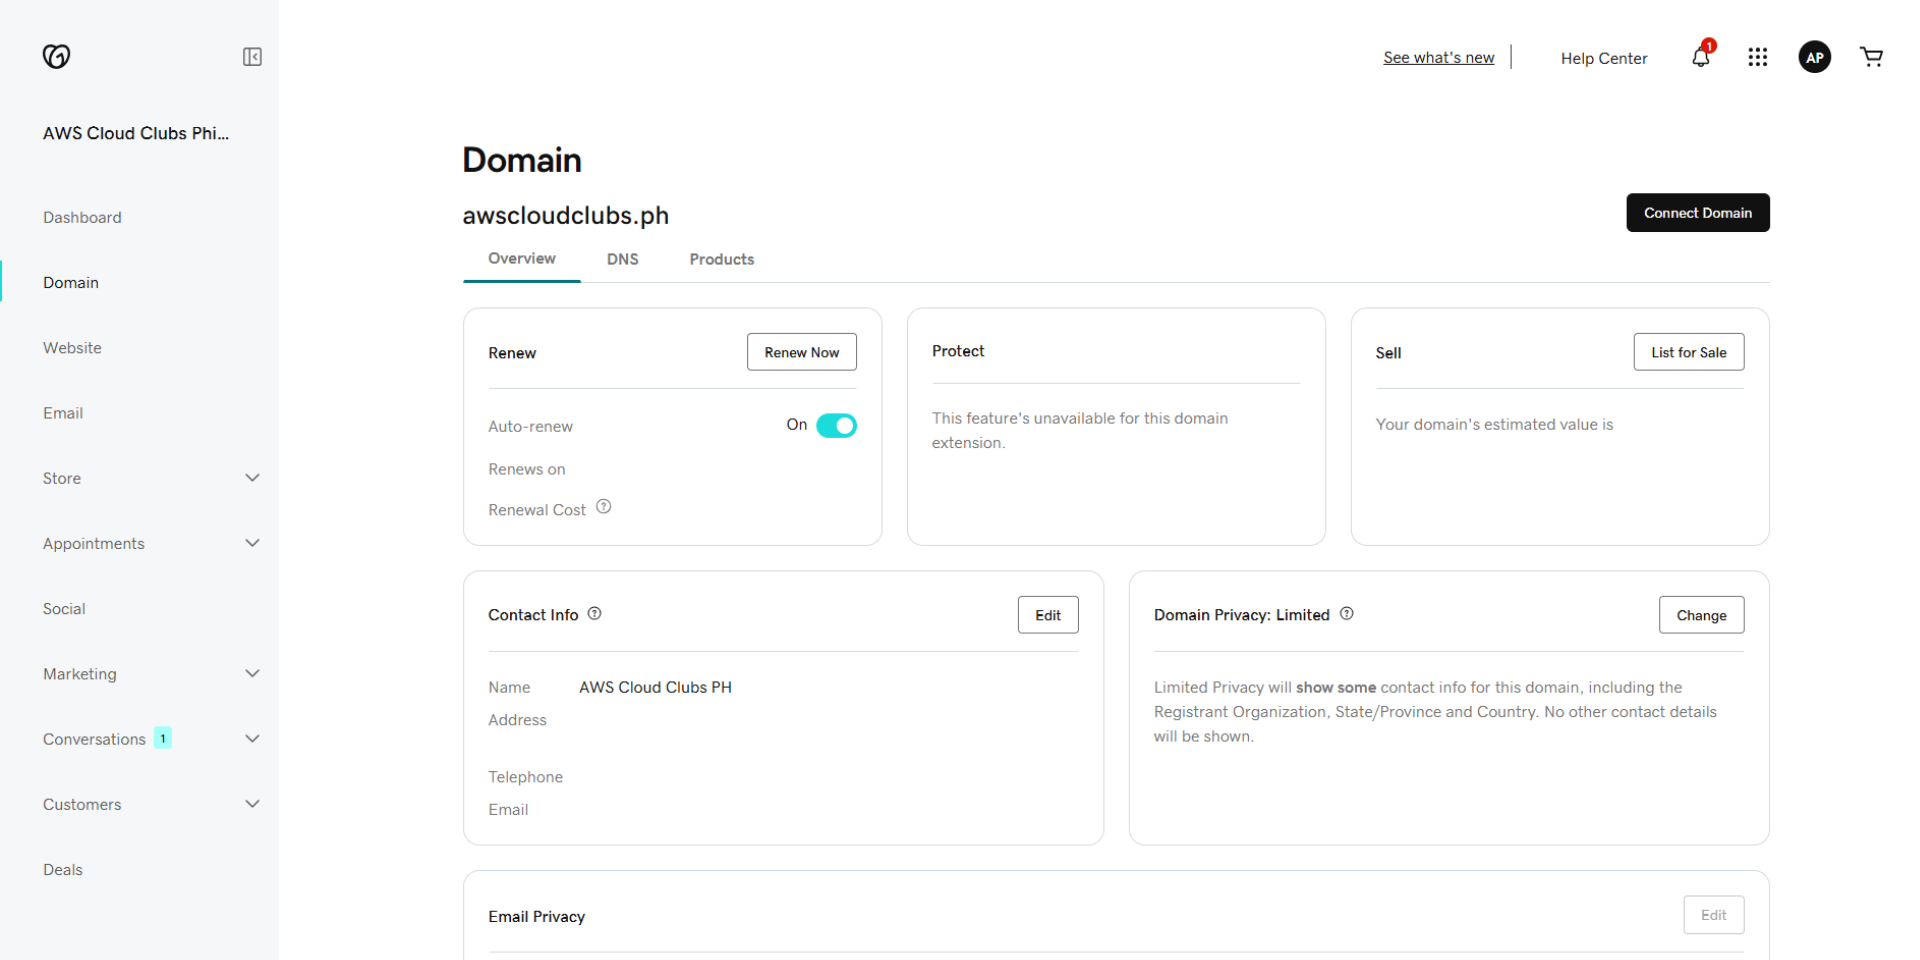
- Log in to your GoDaddy account.
- Go to the Domains section and select the domain you want to update.
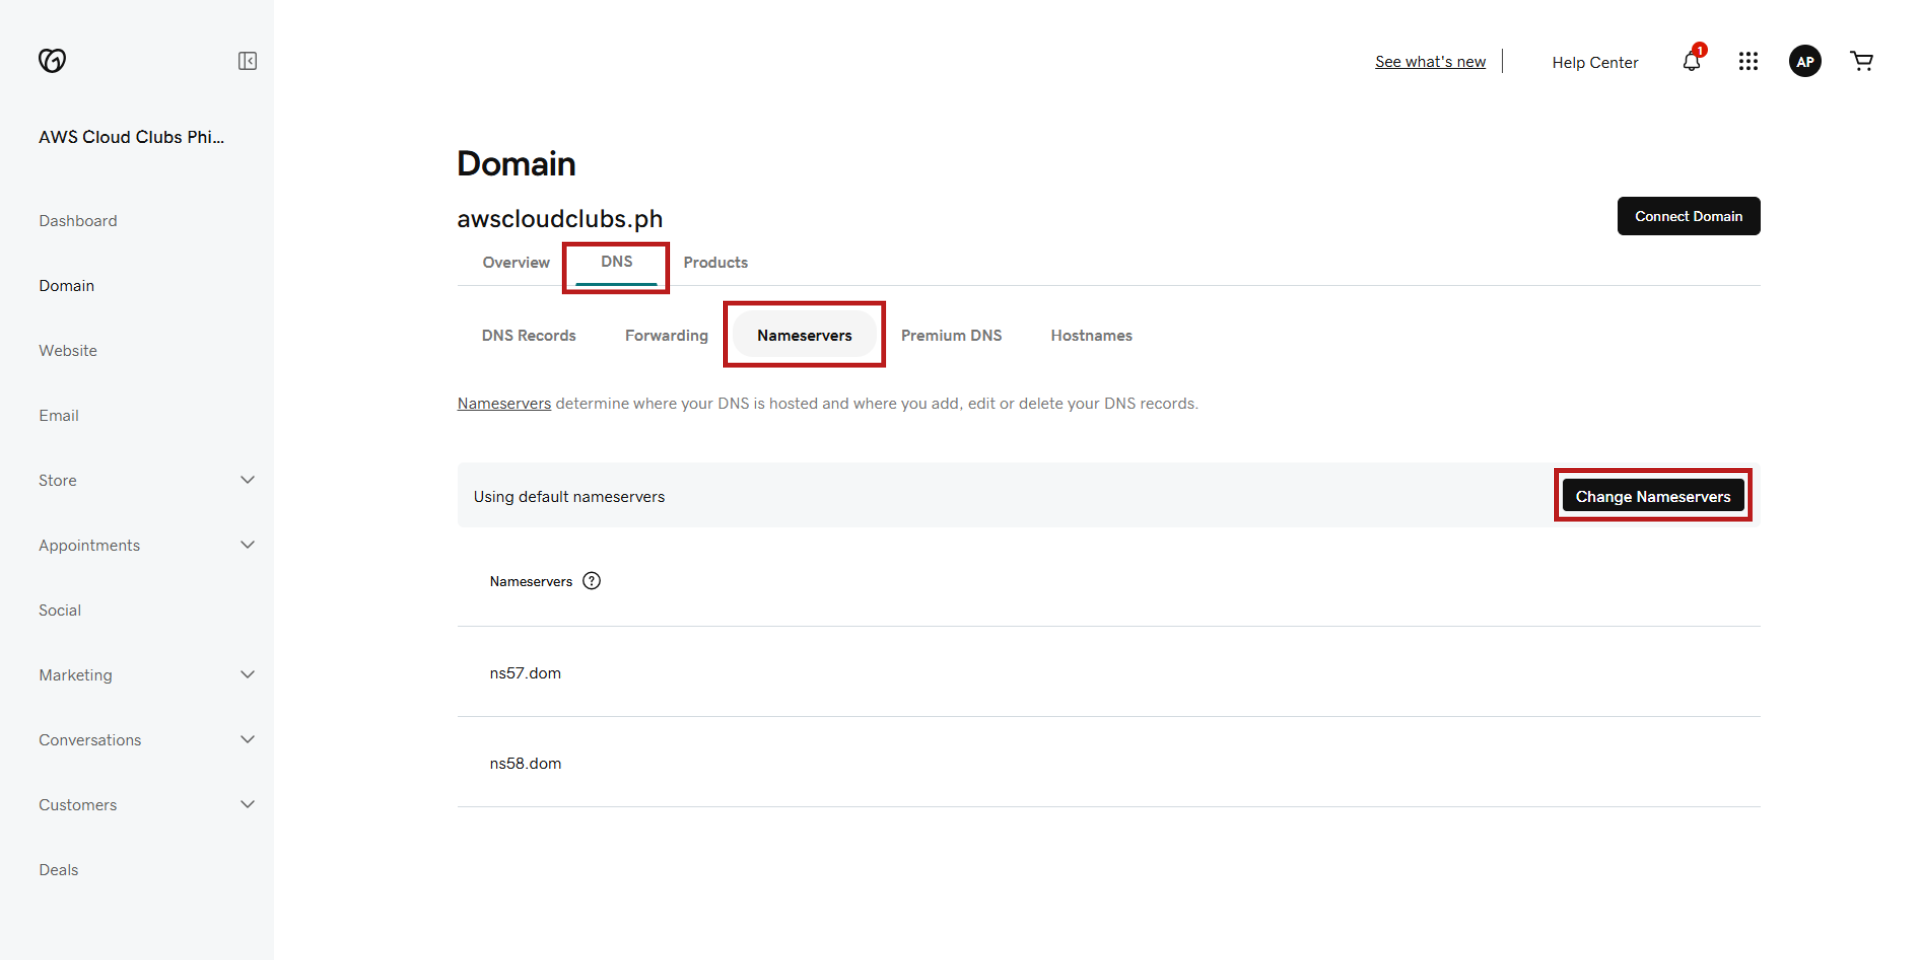
- Click DNS to access the DNS Management page.
- Click the Nameservers section and click “Change Nameservers”.
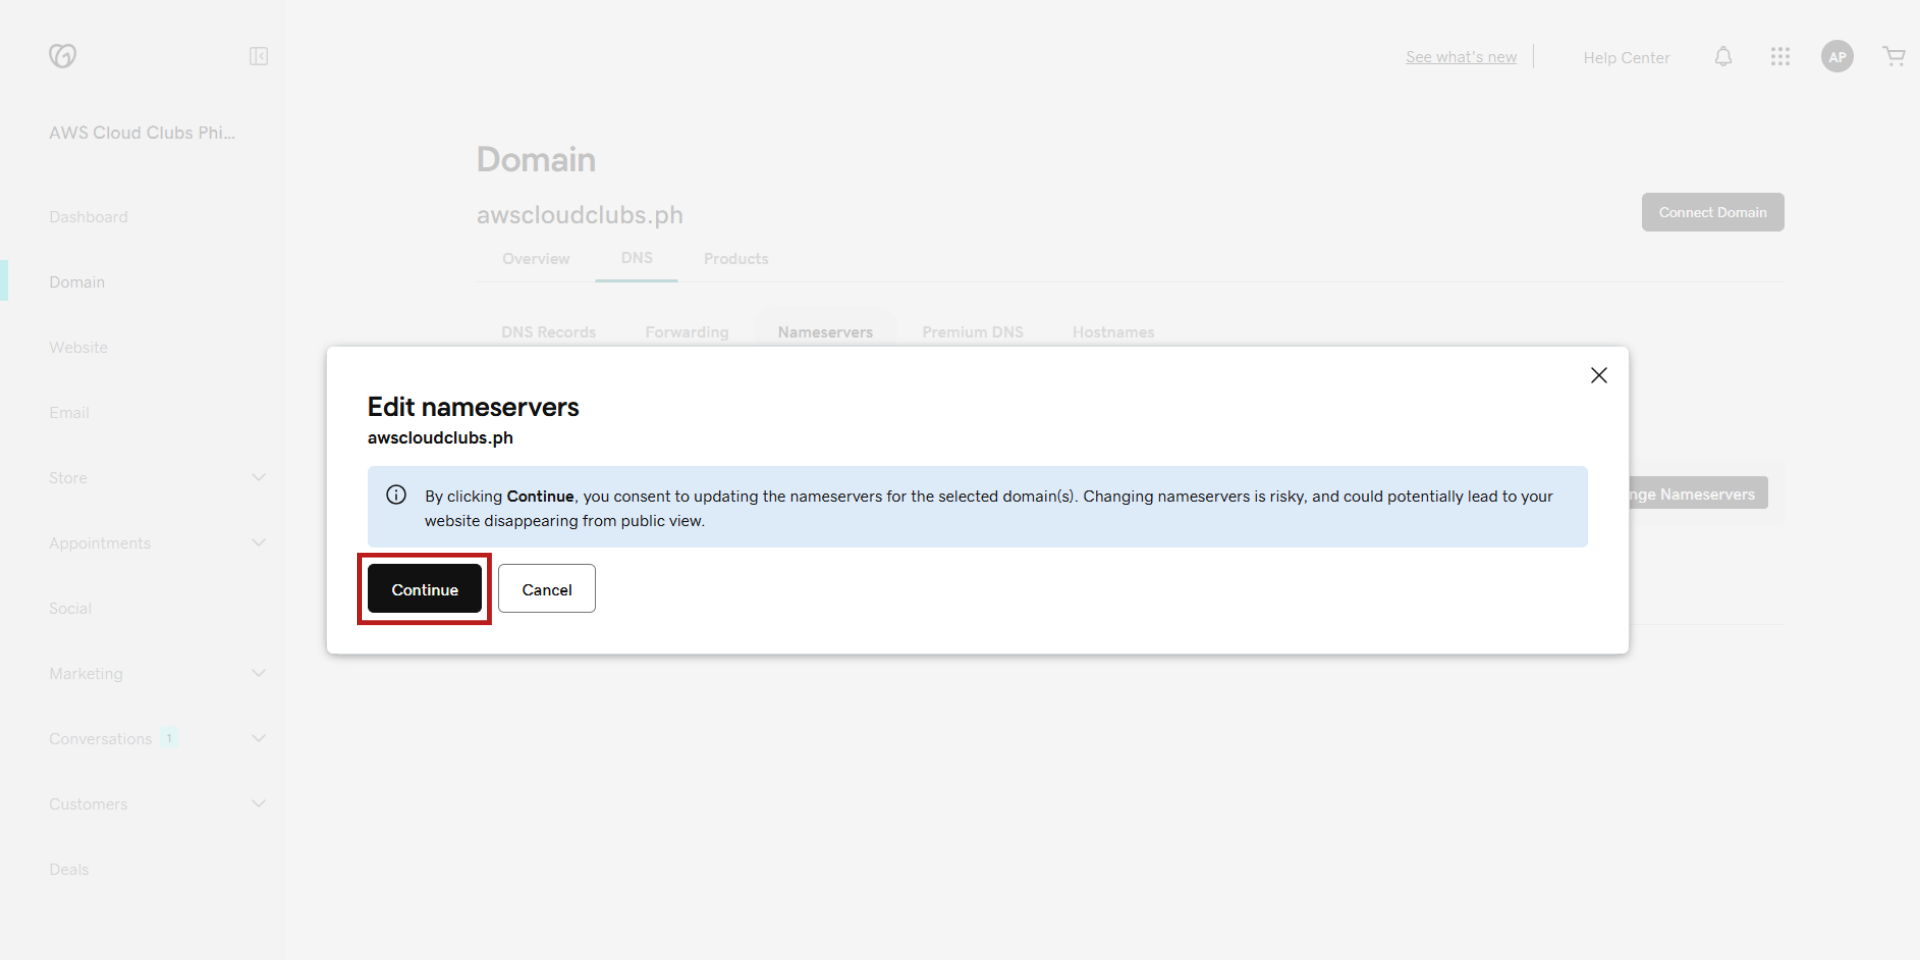
- Select “I’ll use my own nameservers” or “Custom”, depending on the UI.
- Paste the four name servers you copied from Route 53.
- Save your changes then click “Continue”.

Your nameservers should be updated now: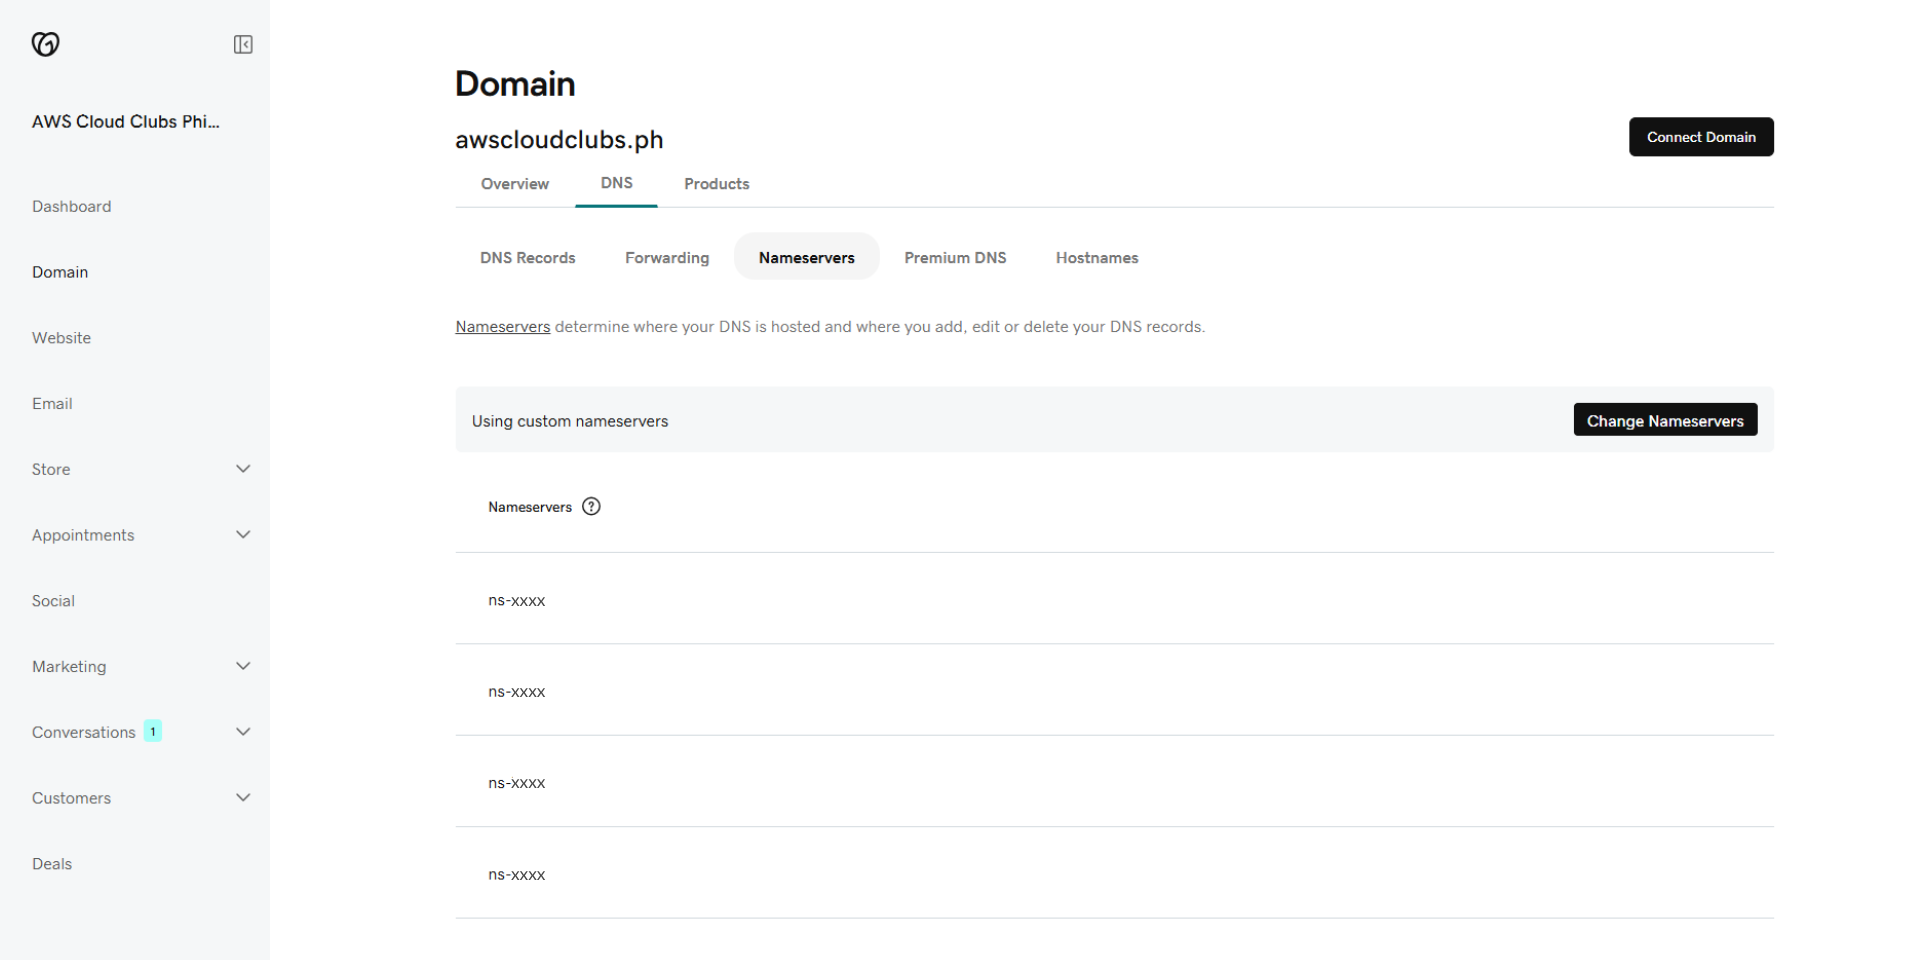
DNS propagation can take time, typically up to 48 hours, though it often completes much sooner.
Step 4: Verify DNS Transfer
To confirm that the DNS change has taken effect, use tools like:
- dig yourdomain.com ns
- nslookup yourdomain.com
- whatsmydns.net to check global propagation
Once your domain is pointing to AWS name servers, you can fully manage DNS records through Amazon Route 53.
Step 5: Request a Public SSL/TLS Certificate Using AWS Certificate Manager (ACM)
Once your DNS is managed in Route 53, you can easily request an SSL/TLS certificate for your domain using AWS Certificate Manager (ACM). This certificate is essential for enabling HTTPS on services like CloudFront or Elastic Load Balancing.
- Go to the AWS Management Console, then navigate to Certificate Manager (ACM).
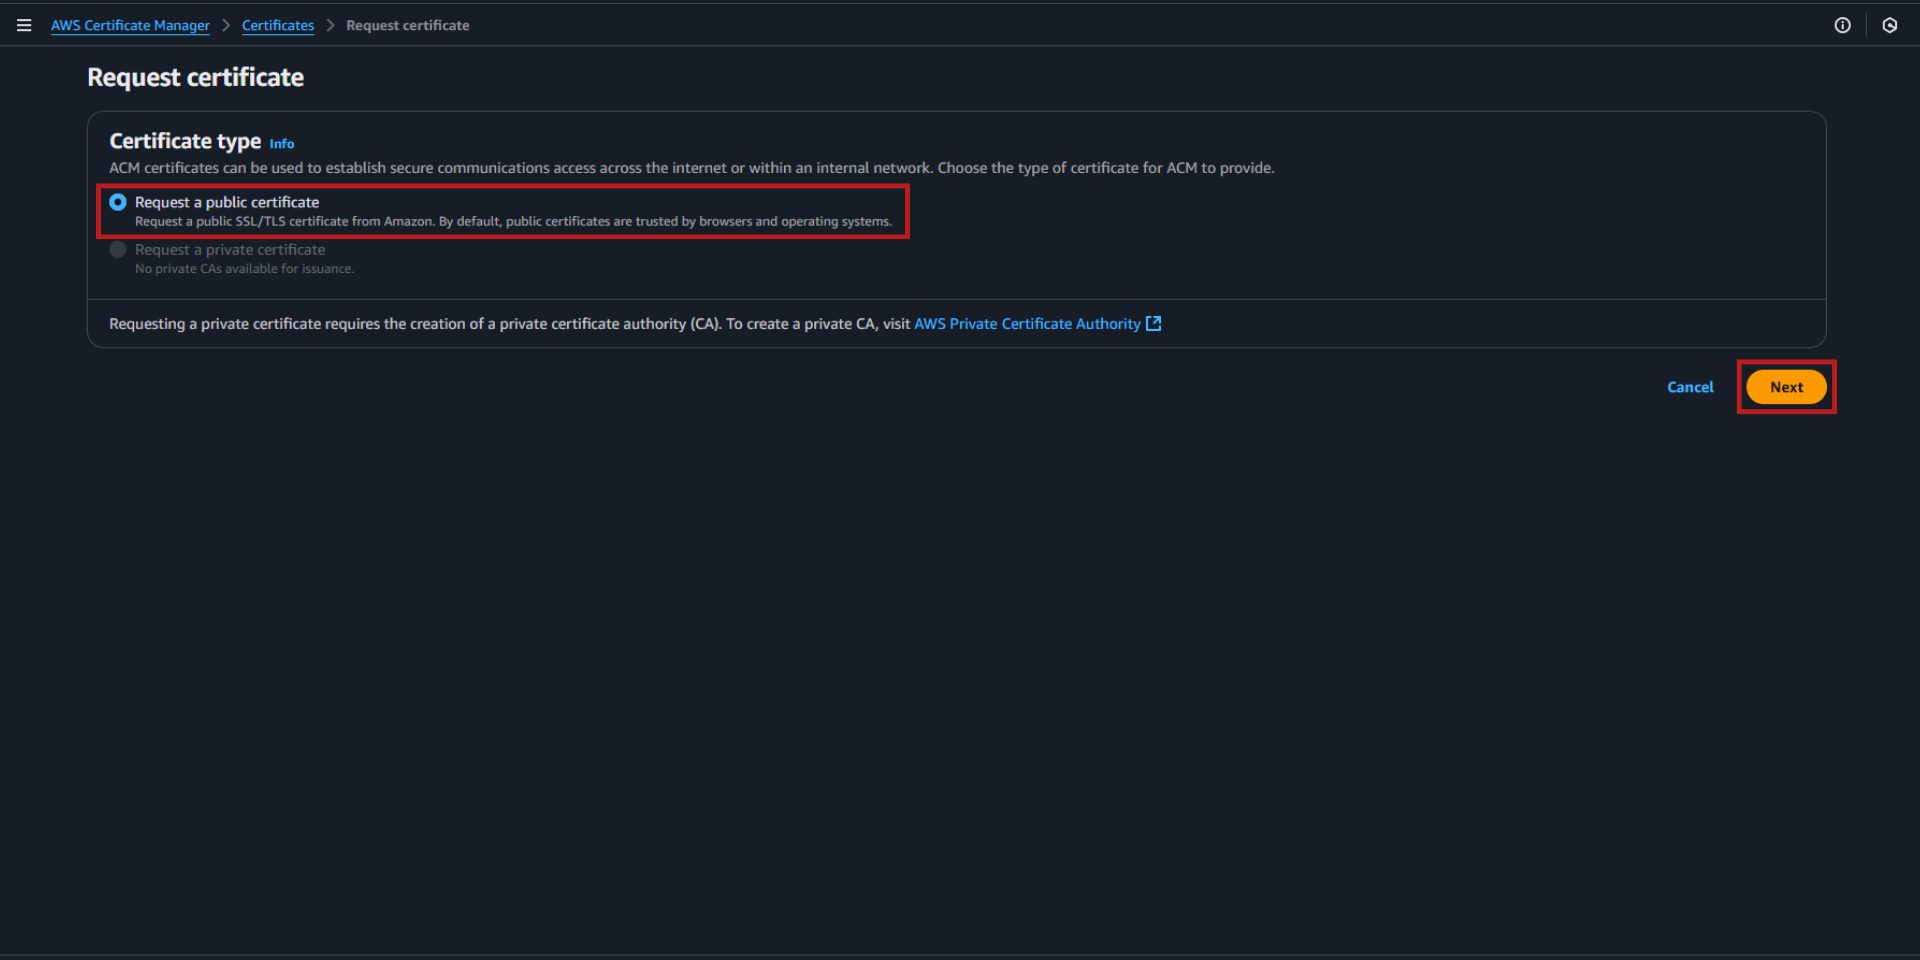
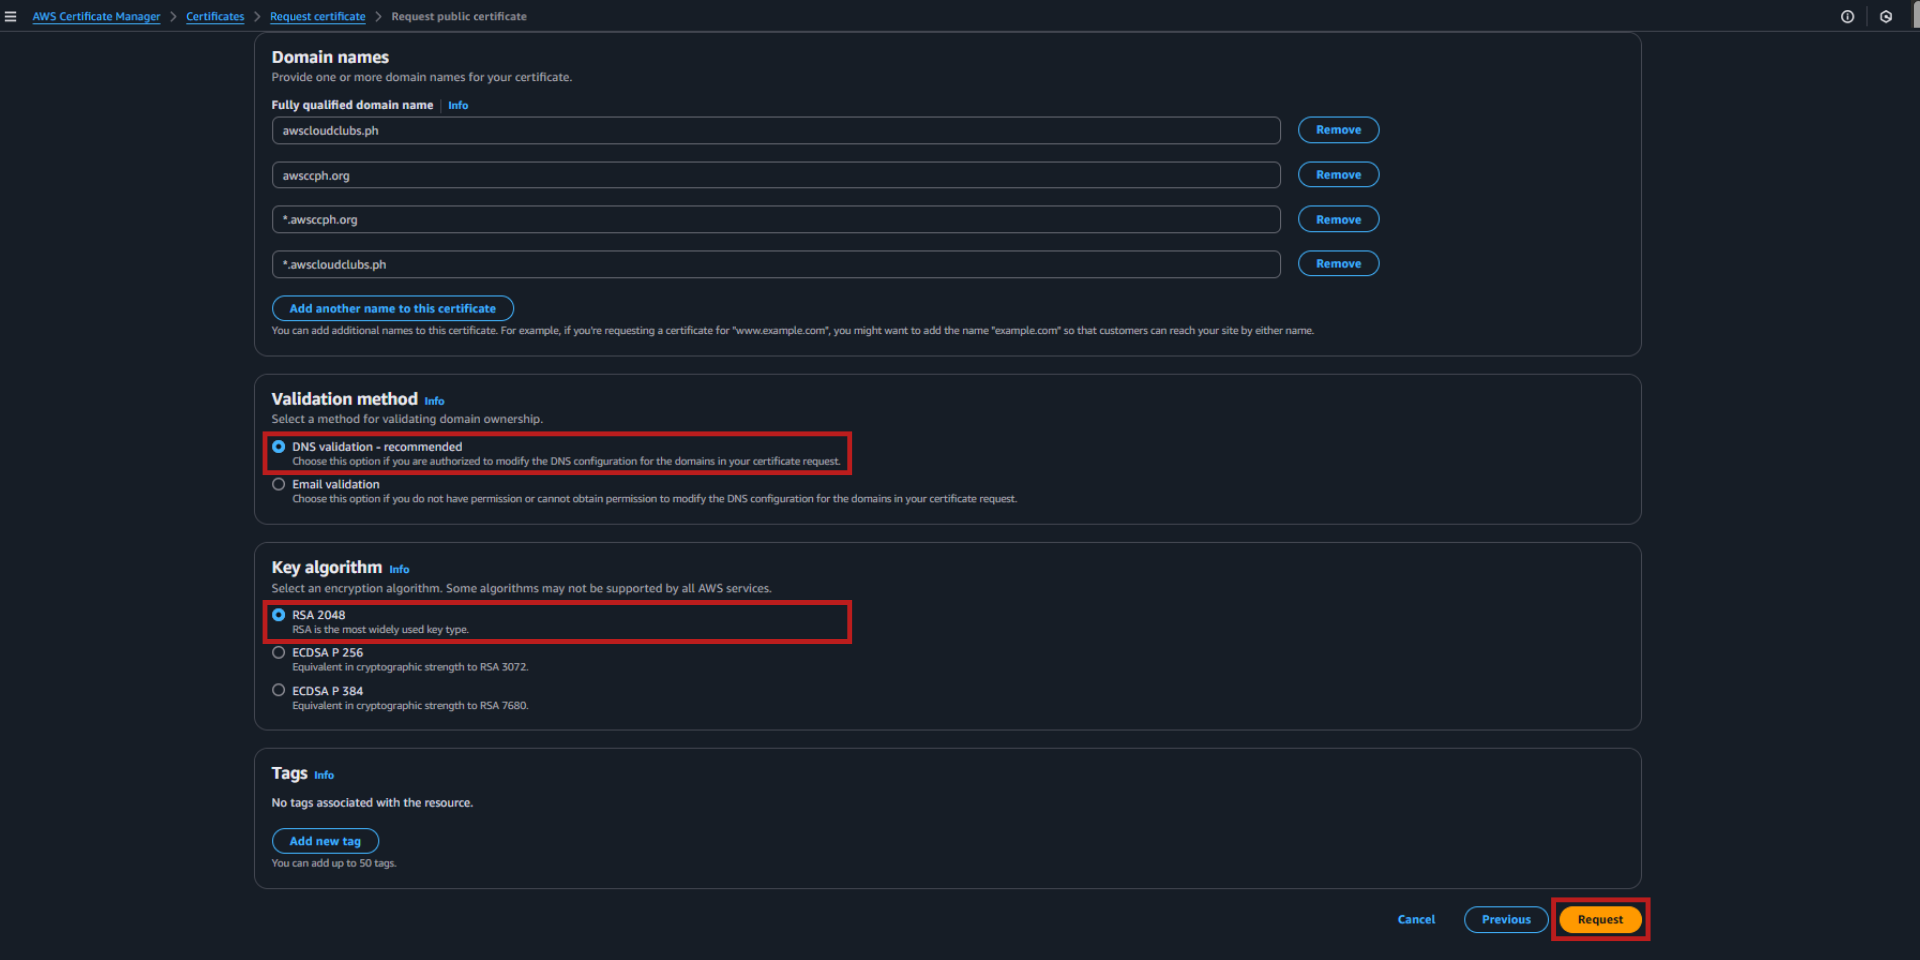
- Click “Request a certificate” and choose “Request a public certificate”, then click Next.
- Enter your domain name (e.g., awsccph.org). You can also add wildcard entries (like *.awsccph.org) if needed
- Choose DNS validation as the validation method and RSA 2048 as the key algorithm, then click Request.
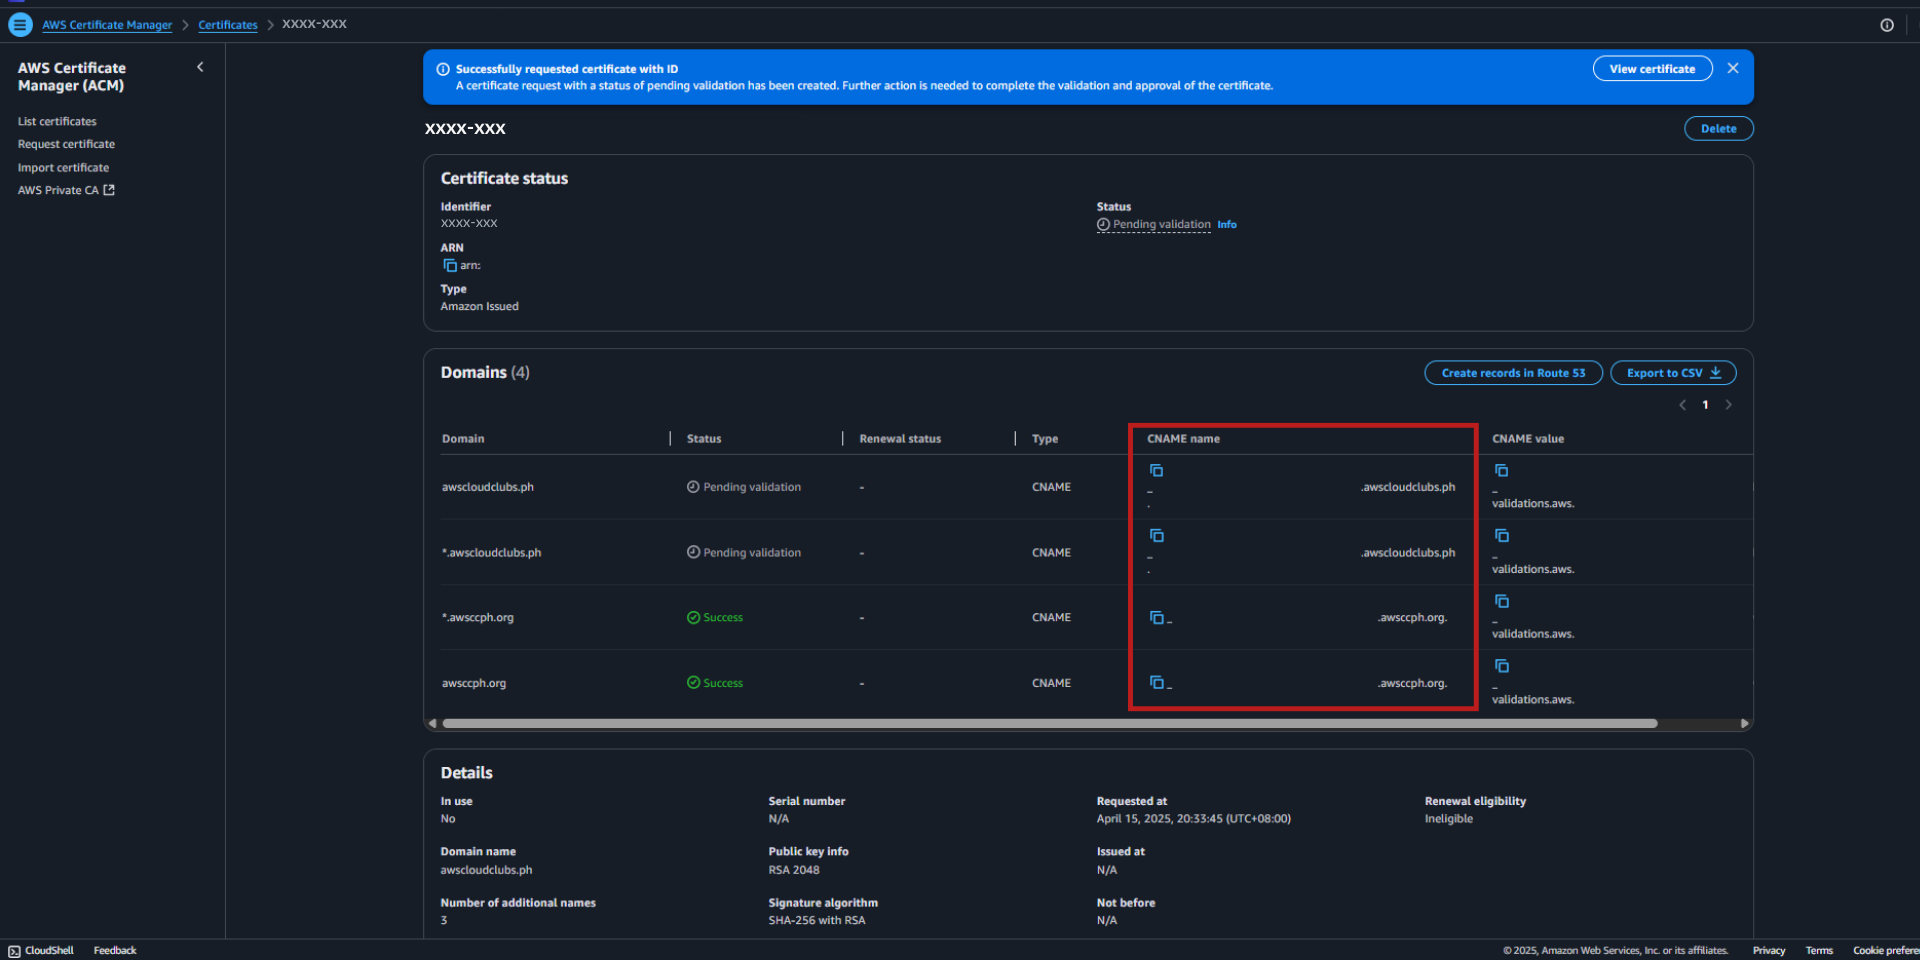
- On the validation page, ACM will provide a CNAME record to add to your Route 53 hosted zone.
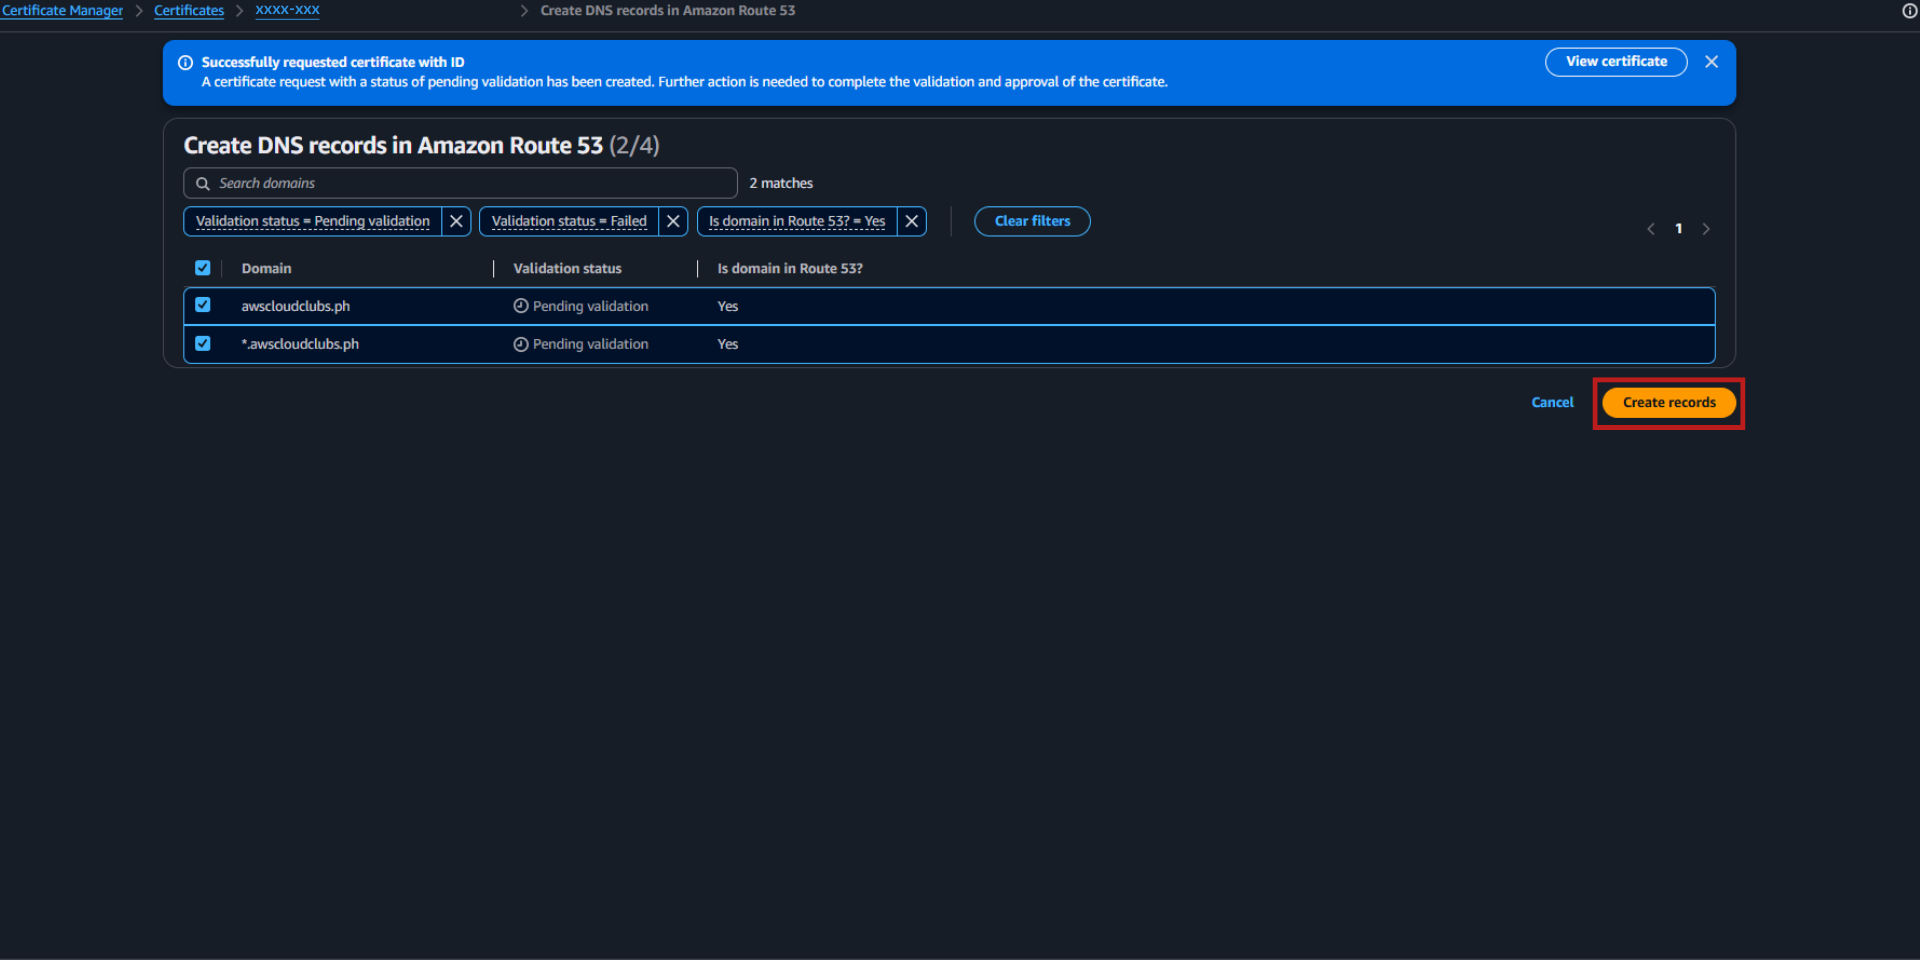
- Click “Create record in Route 53” if ACM detects your hosted zone, or manually copy the CNAME record into Route 53. Then click “Create records”.
- Once the record is added, ACM will automatically validate the certificate (usually within a few minutes).
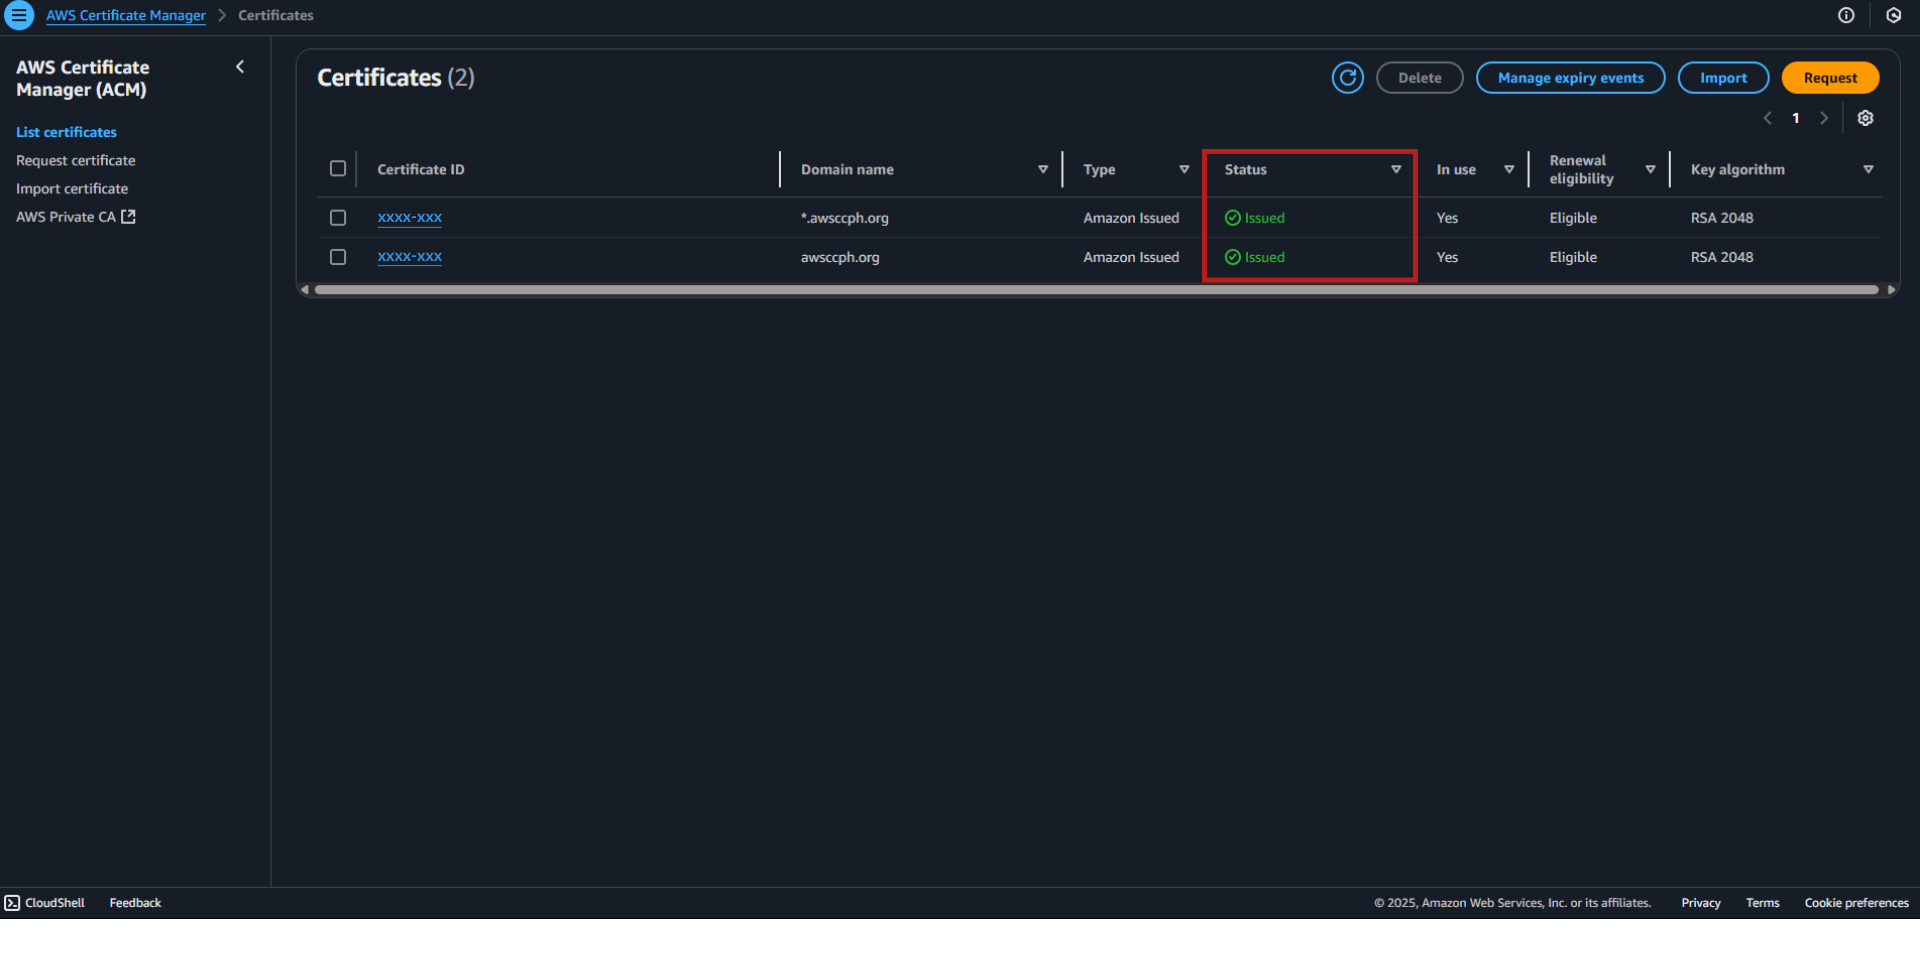
- After validation, your certificate status will change to “Issued”, and you can start using it with AWS services that support HTTPS.
Note: DNS validation is preferred because it’s automatic and doesn’t require email interaction. Once validated, the certificate will renew automatically as long as the CNAME record remains in Route 53.
This is what your ACM dashboard should look like after your DNS has been successfully verified: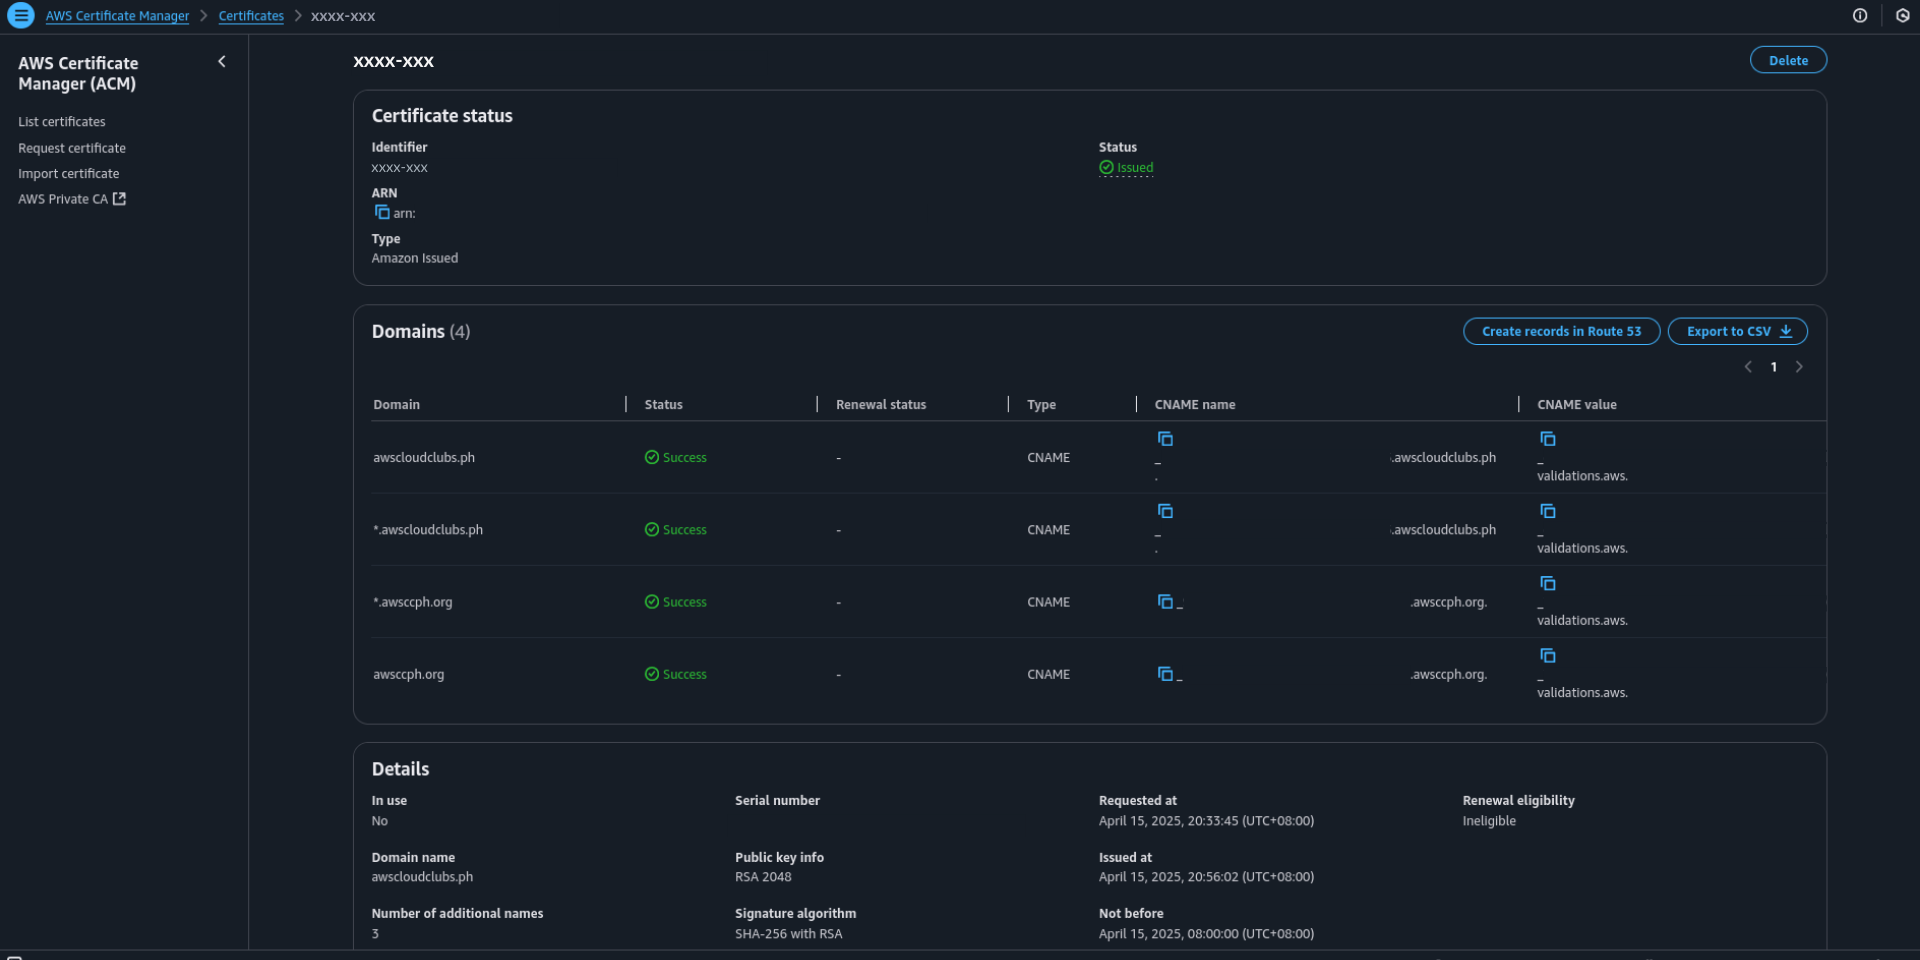
Managing DNS Records in Amazon Route 53
Within your hosted zone in Route 53, you can now add or modify DNS records such as:
- A Records – Point your domain to an IP address (e.g., an EC2 instance)
- CNAME Records – Set up subdomains or verify third-party services
- MX Records – Configure mail servers for your domain
- TXT Records – Use for domain verification or SPF settings for email

Simply click “Create record” in your hosted zone and choose the type of DNS record you need.
Bonus Tip: Automate DNS with Infrastructure as Code
After moving your DNS to AWS, you can automate DNS management using Terraform, AWS CloudFormation, or similar tools. This is especially useful when managing staging and production environments or working with teams.
Troubleshooting and Final Tips
- DNS changes may take time to propagate across the internet. Be patient and check using verification tools.
- Do not delete your hosted zone immediately after setup. It must remain active for DNS to function.
- Double-check that all critical DNS records (A, MX, CNAME, TXT, etc.) from GoDaddy are recreated in Route 53 before switching.
Take Full Control of Your Domain’s Potential
By transferring your DNS management from GoDaddy to Amazon Route 53, you unlock the full power of cloud-native tools without giving up the convenience of your existing domain registrar. Your domain stays with GoDaddy, but DNS becomes faster, smarter, and deeply integrated with the rest of your AWS infrastructure.
Whether you’re a developer, a startup founder, or anyone managing cloud-based applications, this setup gives you greater control, scalability, and flexibility. From advanced routing to automation and monitoring, Amazon Route 53 turns DNS from a basic setup task into a strategic part of your cloud architecture.
With just a few steps, you’ve set the stage for a more secure, efficient, and future-ready domain setup. Now you’re now ready to build with confidence!

Turn Your Team Into Cloud-Ready Professionals Today

Learn AWS with our PlayCloud Hands-On Labs

$2.99 AWS and Azure Exam Study Guide eBooks

New Claude Certified Architect Foundations CCA-F

Learn GCP By Doing! Try Our GCP PlayCloud

Learn Azure with our Azure PlayCloud

FREE AI and AWS Digital Courses

FREE AWS, Azure, GCP Practice Test Samplers


Subscribe to our YouTube Channel

Follow Us On Linkedin


