Last updated on December 9, 2025
When setting up HTTPS for your website using Certbot and NGINX, it is not uncommon to run into an issue where the SSL/TLS certificate appears to be successfully generated, but your browser still does not show the certificate information, or worse, it results in a timeout or connection error when trying to access the site via HTTPS. This can be frustrating, especially after spending time configuring everything correctly and thinking the process is complete. You might be wondering why the certificate is not being served, even though Certbot reports that it’s installed successfully.
This blog article will explore this issue in detail, breaking down the potential causes, offering troubleshooting steps, and ultimately providing a clear solution. If you’ve ever encountered the dreaded “This site can’t be reached” error or found yourself staring at a blank page when trying to access your site over HTTPS, you’re not alone. The good news is that these issues are often easily solvable once the root cause is identified.

We’ll walk through common mistakes and overlooked configurations, as well as explore how external factors, such as EC2 security groups and network settings, can impact the ability to serve your SSL/TLS certificate correctly. Whether you’re a beginner or have experience with server configurations, you’ll find actionable steps that can help you resolve these HTTPS issues efficiently. Let’s dive into the possible causes and how you can fix them to ensure your website is secure and accessible to all visitors.
Understanding the Components
Before diving into the troubleshooting process, it’s important to understand the key components involved in this setup.
Certbot
Certbot is a popular tool from the Electronic Frontier Foundation (EFF) that automates the process of obtaining and renewing SSL/TLS certificates from the Let’s Encrypt certificate authority. These certificates allow you to serve your website securely over HTTPS, ensuring the integrity and privacy of user data transmitted between the browser and your server.
NGINX
NGINX is a highly popular web server that acts as a reverse proxy, load balancer, and HTTP server. When combined with SSL/TLS certificates, it helps encrypt the traffic between the server and the browser, ensuring secure communication. NGINX is often used for its efficiency in serving static content and handling a large volume of simultaneous connections.
EC2 Instance Security Group
Amazon EC2 (Elastic Compute Cloud) allows you to create and manage virtual servers in the cloud. Each EC2 instance is associated with a security group, which acts as a virtual firewall controlling inbound and outbound traffic. By default, EC2 instances may not allow traffic on certain ports (such as 443 for HTTPS), which can prevent your server from being accessible over HTTPS.
💡 Quick Context: Port 443 is the standard port for HTTPS traffic, just as port 80 is for HTTP. Browsers automatically use these ports when you type https:// or http:// in the address bar.
Investigating the Problem: Following the Trail of a Missing HTTPS Request
With the fundamentals covered, let’s diagnose why HTTPS isn’t working. We’ll follow a systematic approach to identify where the connection is failing.
1. Test NGINX Configuration
Your NGINX configuration files are like a set of instructions. If they’re not perfectly clear, the server might get confused and fail to serve your site correctly. Even if Certbot automatically configured your files, it’s always smart to double-check for any syntax errors, typos, or stray conditional statements that could be causing a problem.
A great way to do a quick check is to have NGINX test its own configuration for you. This can immediately tell you if there are any syntax errors. Run the following command:
sudo nginx -t
If the test is successful, you’ll see a message like “syntax is okay” and “test is successful.” This gives us a solid clue that the issue isn’t a simple configuration mistake. If the problem persists after this check, we can move on to our next line of investigation, knowing that the issue is likely external to NGINX itself.
✅ Success Indicator: Look for the message
nginx: configuration file
/etc/nginx/nginx.conf test is successful
2. Monitor NGINX Logs

To check the access and error logs for an NGINX web server, you can use the tail -f command. This command displays the last few lines of a file and “follows” it, showing new lines as they are added. This is useful for real-time monitoring.
The command tail -f /var/log/nginx/access.log will show you live requests as they are being made to the web server, which is helpful for troubleshooting. Similarly, tail -f /var/log/nginx/error.log will show you any errors that NGINX encounters in real time. Suppose these logs remain empty while you are attempting to access the site. In that case, it suggests that the problem is not with NGINX itself, but rather with a network-level issue such as a firewall, DNS problem, or incorrect network settings preventing the traffic from ever reaching the server.
💡 Pro Tip: Use Ctrl+C to stop monitoring. Alternatively, use sudo tail -n 50 /var/log/nginx/error.log to see the last 50 lines without following.
Now, try accessing your site via HTTPS in your browser. Watch the logs carefully.
⚠️ Critical Clue: If these logs remain completely empty while you’re attempting to access the site, it suggests that the problem is not with NGINX itself, but rather with a network-level issue preventing the traffic from ever reaching the server. This is our smoking gun.
3. Verifying the SSL/TLS Certificate
To verify the status of your SSL/TLS certificates managed by Certbot, use the command sudo certbot certificates. This command provides a list of all certificates, including their domain names, expiration dates, and the path to the certificate files.
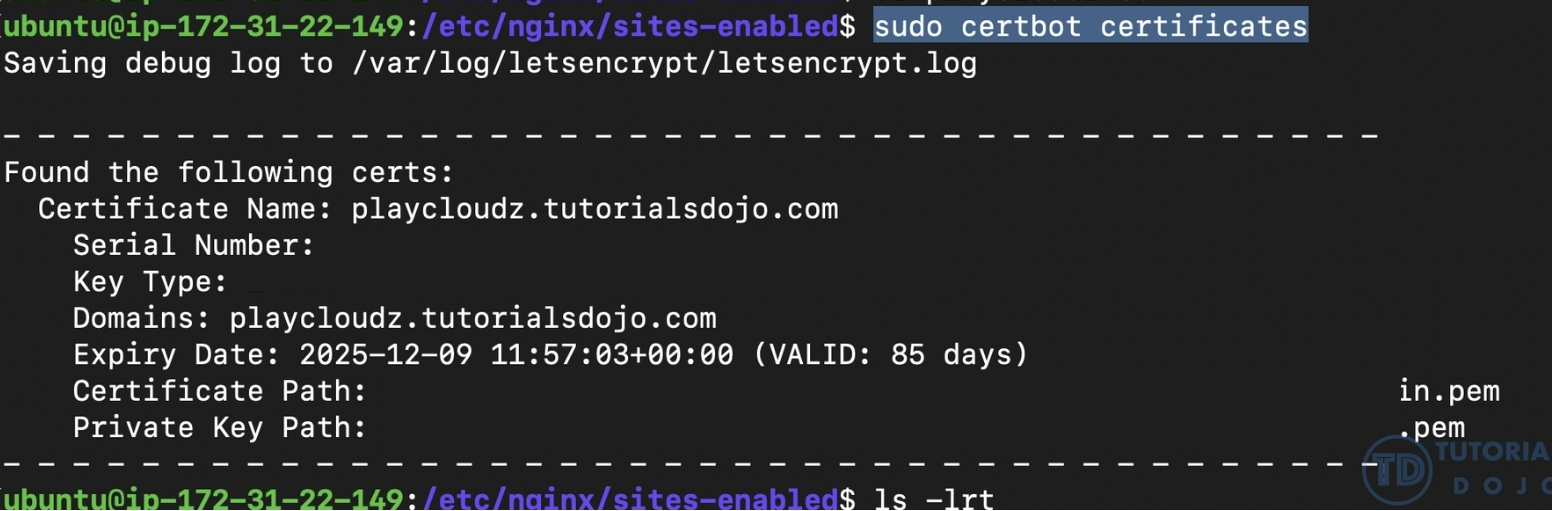
If the output confirms that a certificate is valid and correctly installed for your domain, but you’re still unable to connect via HTTPS, it suggests that the issue is not with the certificate itself. Instead, the problem is likely related to network accessibility. This could be due to:
-
Firewall rules on the server that are blocking port 443 (HTTPS).
-
Cloud provider security group settings that are not configured to allow inbound HTTPS traffic.
-
Other network-level restrictions preventing requests from reaching the web server.
Root Cause Identified: EC2 Security Group Configuration
Our investigation reveals that the issue is not with the NGINX web server, the SSL certificate, or the Certbot configuration. All server-side components are functioning correctly. The root cause is a network-level restriction within the EC2 instance’s Security Group.
The Problem: The Security Group doesn’t have an inbound rule to allow traffic on port 443 (HTTPS). This effectively acts as a firewall, blocking all external HTTPS requests before they can reach the server.
The Evidence:
- NGINX configuration is valid
- SSL certificate is properly installed
- NGINX access and error logs remain empty (no requests reach the server)
- Browser shows timeout and connection errors
- Traffic is being blocked at the network layer
This is like having a perfectly functioning store with all the inventory ready, but the front door is locked from the outside. Customers (HTTPS requests) can’t get in, no matter how well-prepared you are inside.
How to Fix the Issue: Enabling HTTPS in Your EC2 Security Group
Here’s a step-by-step guide to quickly resolve this issue by configuring your EC2 instance’s Security Group to allow HTTPS traffic. This process is like telling the virtual firewall to open its doors to secure web requests.
Step 1: Navigate to Security Groups
First, log in to your AWS Management Console and go to the EC2 Dashboard.
- In the left-hand menu, under Network & Security, click on Security Groups.
- Then, find and select the specific security group that is attached to your EC2 instance.
💡 Pro Tip: You can find which security group is attached to your instance by going to Instances, selecting your instance, and looking at the Security tab.
Step 2: Add Inbound HTTPS Rules
- With the security group selected, click on the Inbound rules tab.
- Click Edit inbound rules and then Add rule.
- Add the following two rules to allow HTTPS traffic:
- Rule 1: For IPv4 Traffic
- Type: Select HTTPS from the dropdown menu. This will automatically set the port range to 443.
- Source: Choose Anywhere-IPv4 from the dropdown. This is represented by
0.0.0.0/0and allows any IPv4 address on the Internet to connect.
- Rule 2: For IPv6 Traffic
- Type: Select HTTPS.
- Source: Choose Anywhere-IPv6. This is represented by
::/0and allows any IPv6 address to connect.
- Rule 1: For IPv4 Traffic
Adding both rules ensures that your site is accessible via HTTPS to users on either type of network.
⚠️ Security Consideration: Using 0.0.0.0/0 and ::/0 allows traffic from anywhere on the internet. This is standard for public websites. However, if you’re running an internal application and know your user base (e.g., corporate network), consider restricting access to specific IP ranges for enhanced security.
Step 3: Save and Verify
- Once you have added both rules, click Save rules to apply your changes. The updates are typically effective immediately. Now, go back to your website and refresh the page. The browser should now display a lock icon, confirming that your site is secure and accessible over HTTPS. Your SSL certificate is finally being served correctly because the gate is open.
Troubleshooting Checklist

Use this checklist to ensure everything is properly configured:
□ Domain DNS A record points to correct EC2 public IP
□ NGINX installed and running (check: sudo systemctl status nginx)
□ SSL certificate obtained via Certbot (check: sudo certbot certificates)
□ NGINX configuration valid (check: sudo nginx -t)
□ Port 443 open in EC2 Security Group for IPv4 (0.0.0.0/0)
□ Port 443 open in EC2 Security Group for IPv6 (::/0)
□ Server-level firewall allows port 443 (check: sudo ufw status)
□ Browser showing HTTPS connection with padlock icon
□ No certificate warnings in browser
□ NGINX logs showing HTTPS traffic
Final Thoughts: A Simple but Powerful Lesson
It’s easy to get lost in the complexities of server configuration, but this specific issue highlights a crucial principle of web hosting: a successfully running web server is only half the battle. Your EC2 instance’s Security Group acts as the gatekeeper, and if its rules aren’t set up correctly, all the work you did with Certbot and NGINX is for nothing. The server is ready to handle secure connections, but the requests never even get to the front door.
This experience serves as a powerful reminder to always check the layers of your network stack, from the public-facing firewall down to your local server configurations. When troubleshooting connectivity problems, don’t assume the issue is with the application itself. Instead, start by confirming that traffic is even reaching the server in the first place. This simple, often-overlooked step can save you hours of frustration.
The Key Takeaway: When debugging web connectivity issues, always work from the outside in:
- Can external traffic reach your server? (Security Groups/Firewalls)
- Is the server listening on the correct port? (Application configuration)
- Is the application configured correctly? (NGINX, certificates)
Ultimately, by enabling the necessary HTTPS ports in your Security Group, you’re not just fixing a bug; you’re completing the entire chain of secure communication. Your website can now confidently serve its SSL certificate, providing a secure and reliable experience for all your visitors.
🔥 $0.99 eBooks Start Here – Up to 80% OFF All Products Mid-Year Sale!

Turn Your Team Into Cloud-Ready Professionals Today

Learn AWS with our PlayCloud Hands-On Labs

$2.99 AWS and Azure Exam Study Guide eBooks

New Claude Certified Architect Foundations CCA-F

Learn GCP By Doing! Try Our GCP PlayCloud

Learn Azure with our Azure PlayCloud

FREE AI and AWS Digital Courses

FREE AWS, Azure, GCP Practice Test Samplers


Subscribe to our YouTube Channel

Follow Us On Linkedin


