Last updated on January 8, 2026
Organizations today are entrusted with enormous amounts of sensitive information. Customer support logs, healthcare records, financial transactions, and even training datasets often contain Personally Identifiable Information (PII) such as names, phone numbers, email addresses, or credit card numbers. Protecting this information is not just a matter of compliance with regulations like GDPR, HIPAA, or PCI DSS. It is also central to maintaining customer trust and reducing the risk of data breaches.
Amazon Comprehend, a managed natural language processing (NLP) service, provides a powerful way to automate the detection and redaction of PII. Instead of relying on manual review or custom scripts, teams can use Comprehend’s analysis jobs to scan large volumes of text, identify sensitive entities, and produce sanitized versions of documents ready for safe sharing or downstream processing.
We often encounter the phrase “detect and redact PII using Amazon Comprehend” when preparing for AWS certification exams. It’s a common exam topic, but have you ever wondered how this actually works in practice? Beyond the multiple‑choice questions, there is a real, hands‑on workflow that allows you to implement PII detection and redaction in your own AWS environment. In this article, we will walk through the process step by step, showing how you can set up Amazon Comprehend to automatically identify and sanitize sensitive information in text files stored in Amazon S3.
Why PII Detection and Redaction Matters
The importance of PII detection and redaction cannot be overstated. Regulatory frameworks around the world impose strict requirements on how organizations handle personal data. Failure to comply can result in heavy fines and reputational damage. Beyond compliance, there is the practical risk of accidental exposure, sharing raw customer logs with a vendor, for example, could inadvertently leak sensitive details.
Automating redaction ensures consistency and scalability. Instead of relying on human reviewers who may miss details or apply inconsistent standards, Comprehend applies machine learning models trained to recognize a wide range of PII types. This reduces risk, saves time, and allows organizations to confidently share or analyze text data without compromising privacy.
Where This Can Be Applied
The applications of automated PII detection and redaction are broad. In customer support, chat transcripts or call notes can be sanitized before being shared with third-party analytics providers. In healthcare, patient identifiers can be removed from medical notes so they can be used for research without violating privacy laws. Financial institutions can redact sensitive details from transaction records before sending them to auditors. Even machine learning teams benefit: training datasets can be cleansed of PII to avoid bias and ensure ethical use of data.
In short, any scenario where text data is stored, processed, or shared can benefit from automated PII redaction. It is a foundational capability for modern data governance.
Implementation Steps Using the AWS Console
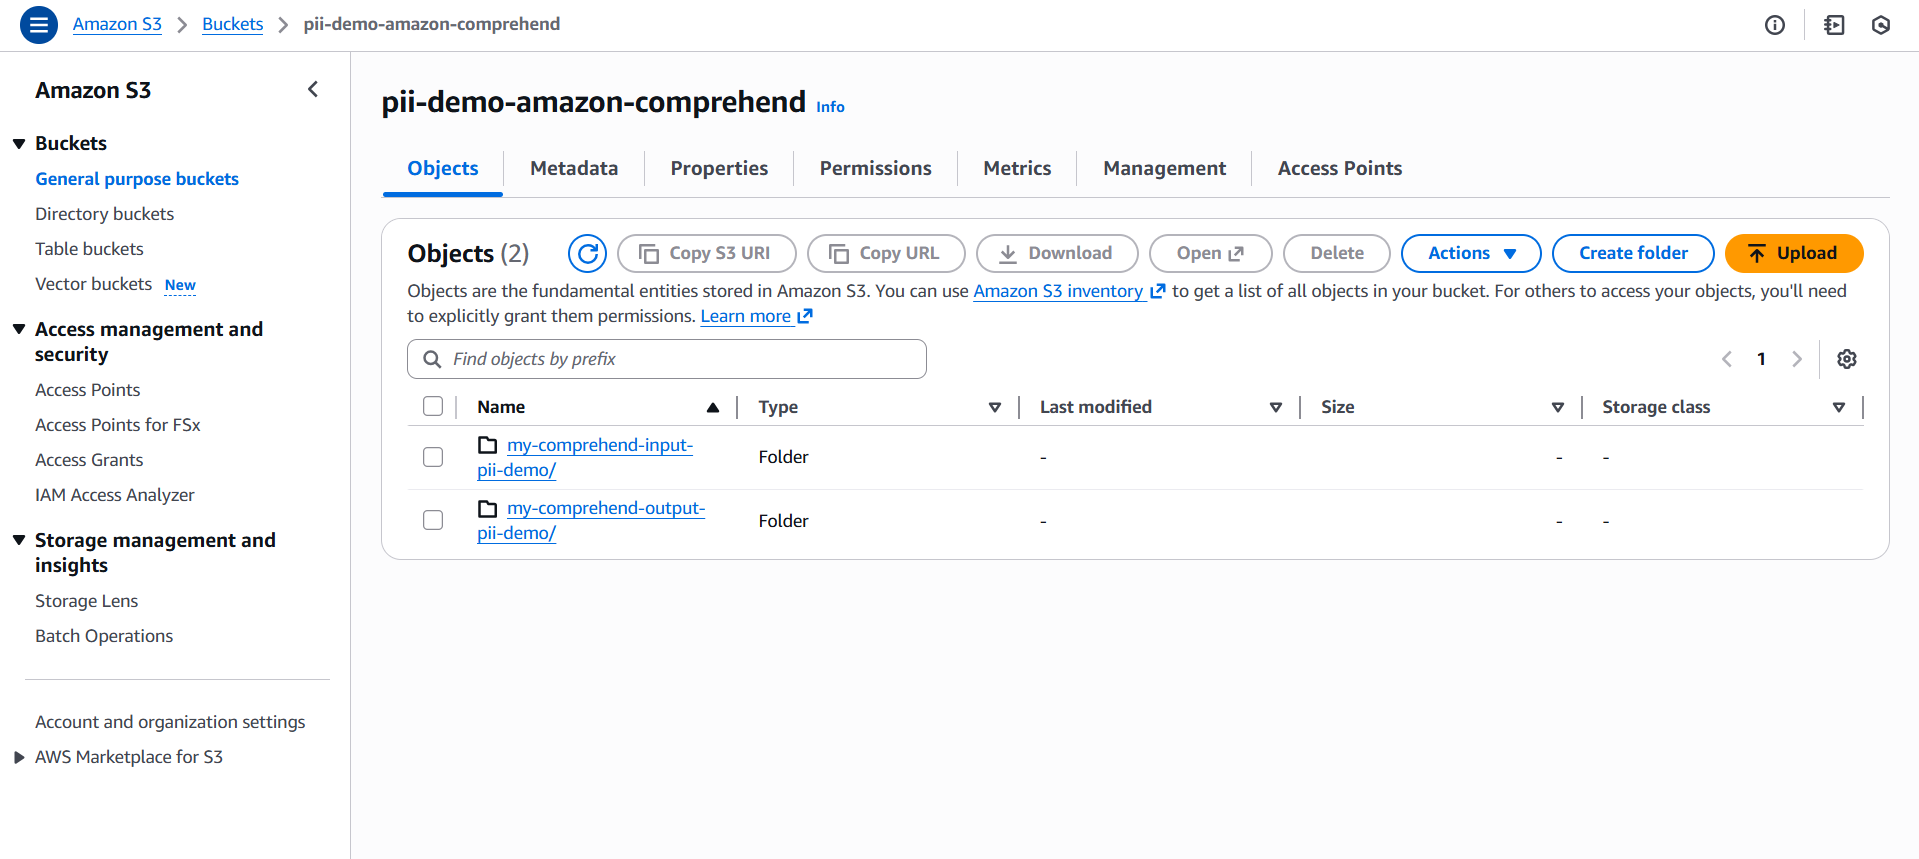
Creating an Amazon S3 Bucket
The workflow begins by creating an Amazon S3 bucket that will hold the text you want to analyze. In the AWS Console, you can create a new bucket by choosing a globally unique name and selecting the Region where you plan to run your Comprehend Analysis job. This Region selection matters because Comprehend can only read from and write to buckets located in the same Region as the analysis job.

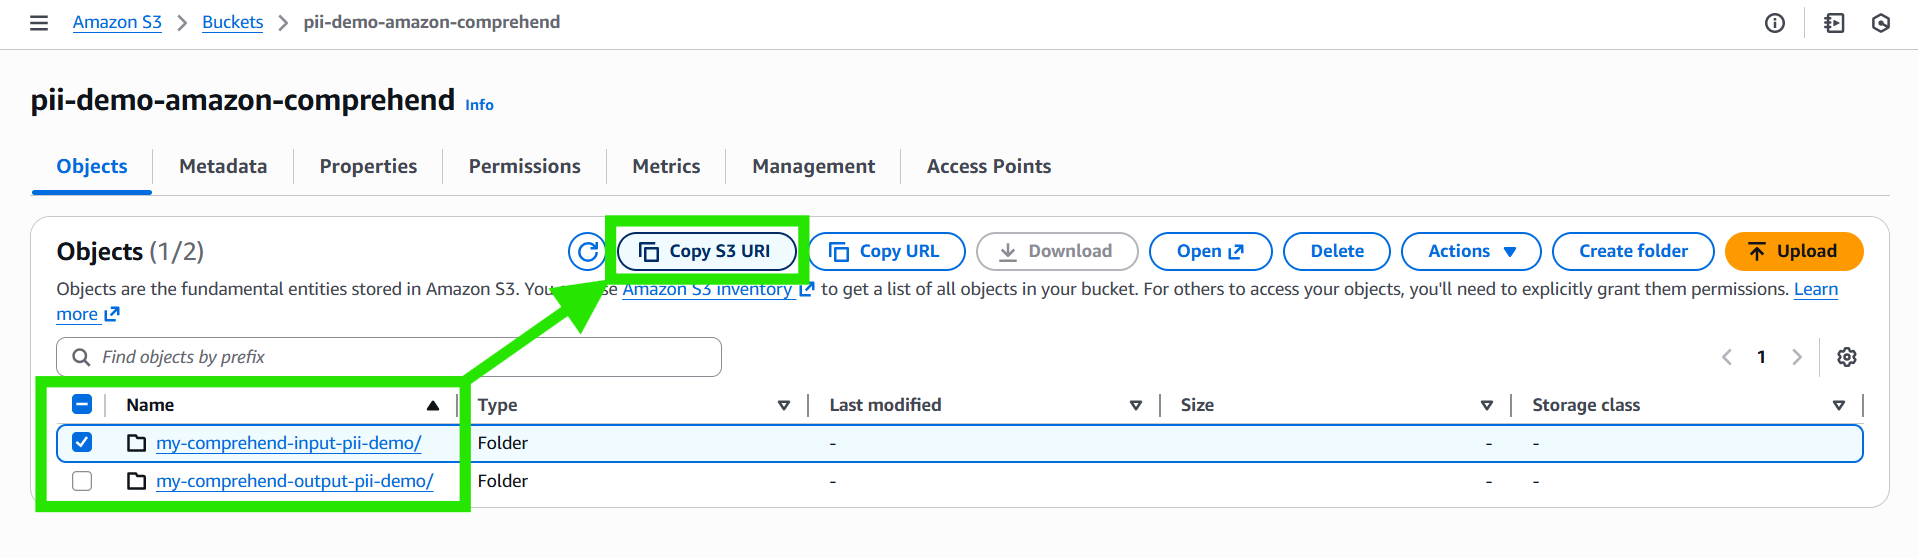
After the bucket is created, create two folders (prefixes) inside it to organize your workflow:
my-comprehend-input-pii-demo/– for storing the input text files that Comprehend will analyze.my-comprehend-output-pii-demo/– for storing the output results generated by Comprehend.
These folders help keep your input and output data clearly separated and easy to manage.
Preparing Input Data
Once the bucket and folders are set up, the next step is to prepare the text you want Amazon Comprehend to process. Your input files should be UTF‑8 encoded .txt files containing raw text. These can include anything from customer support messages to log entries or synthetic test strings.
- Each file may contain a single block of text.
- Alternatively, you can store multiple text entries by placing each one on a separate line.
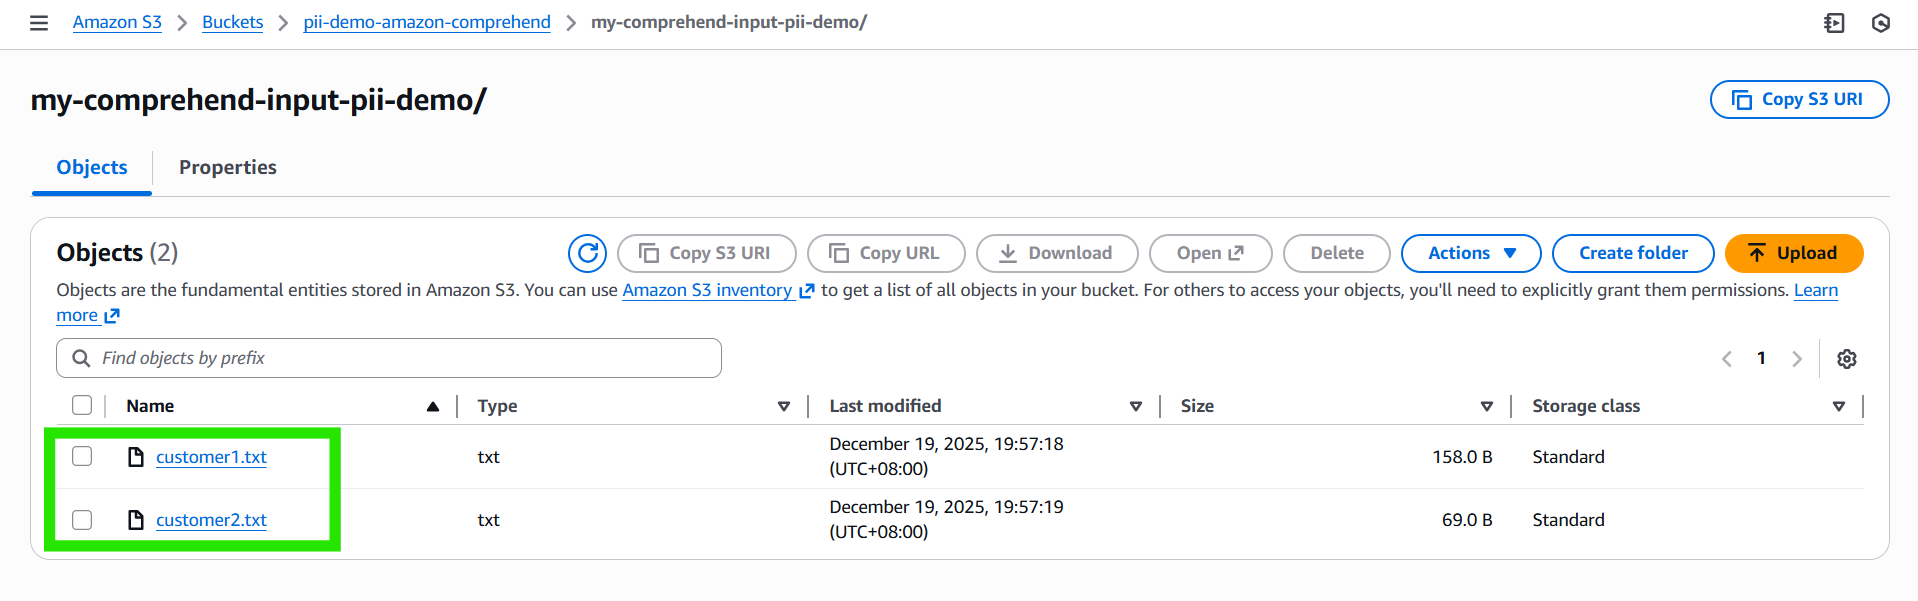
After preparing your files, upload them to the my-comprehend-input-pii-demo/ folder within your S3 bucket. This folder becomes the input location that Comprehend will scan when the analysis job runs. The results will be written to the my-comprehend-output-pii-demo/ folder.
Example Input Files:
customer1.txt –
Hi team, this is José Protacio Rizal Mercado y Alonso Realonda. My phone is +63 912 345 6789 and email is jose.rizal@example.com.

Please call me tomorrow.
customer2.txt –
Customer: Juan Dela Cruz
SSN: 123-45-6789
Card: 4111 1111 1111 1111
Setting Up Output Storage
With your input text in place, you then need to configure the location where Amazon Comprehend will write the results. In this workflow, you’ve already created a dedicated folder inside your S3 bucket named my-comprehend-output-pii-demo/. This folder serves as the output destination for the analysis job.
It’s important that the output location resides in the same AWS Region as both the input folder (my-comprehend-input-pii-demo/) and the Comprehend job itself. When the analysis completes, Comprehend will automatically generate the processed output, such as redacted text files or detection metadata reports, and store them in the my-comprehend-output-pii-demo/ folder.
This separation of input and output ensures a clean workflow:
- Input folder – raw text files to be analyzed.
- Output folder – results produced by Comprehend.
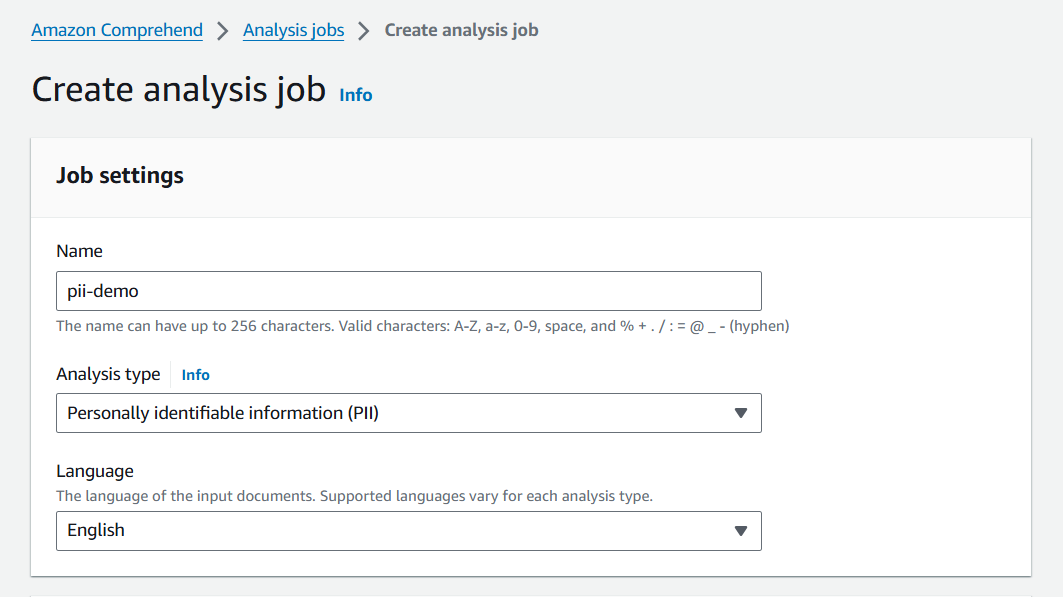
Configuring the Job in the Console
Step 1: Navigate to the Amazon Comprehend console and choose Analysis jobs.
Step 2: Click Create job and provide a descriptive name.
Step 3: Select Personally identifiable information (PII) as the analysis type.
Step 4: Select the language of the input documents.
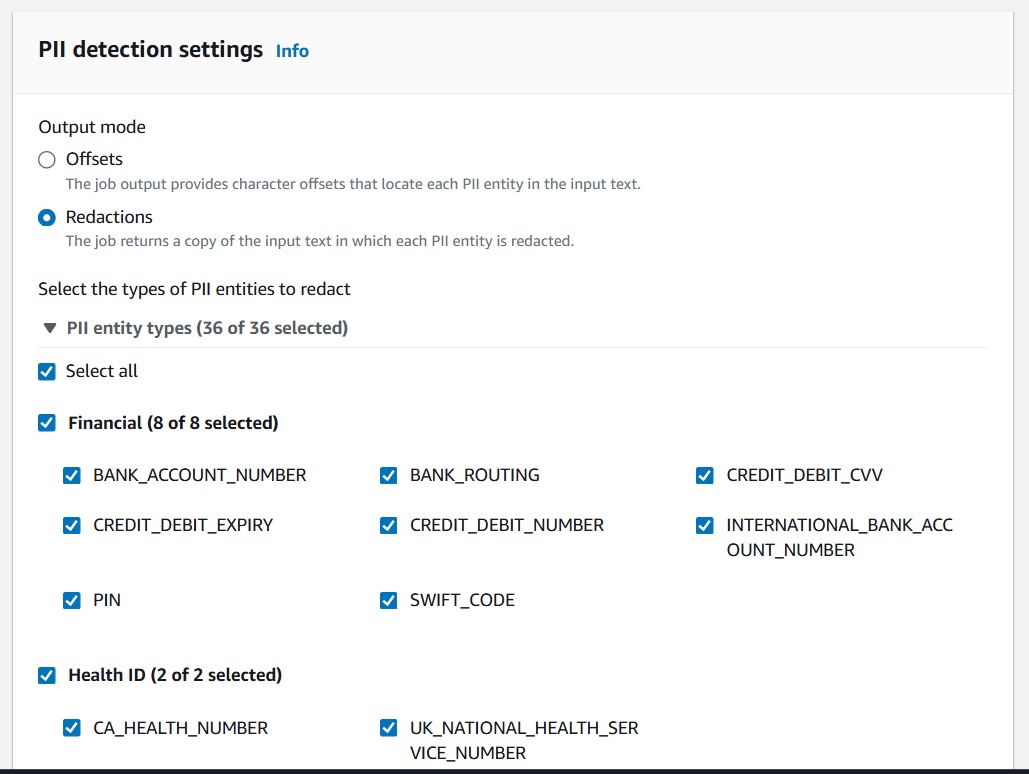
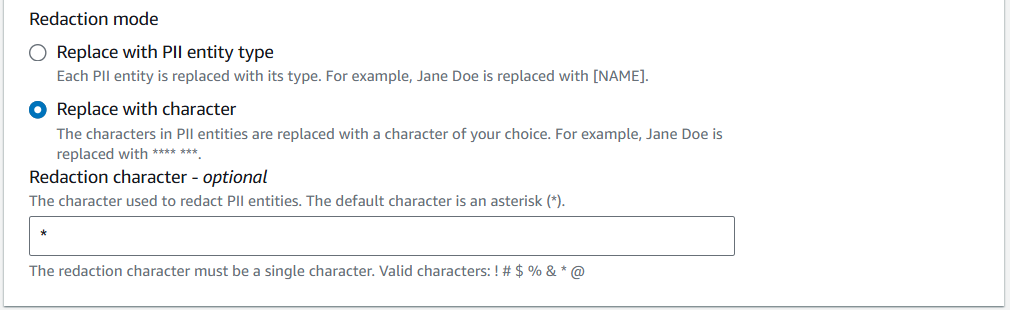
Step 5: Under PII detection settings, choose Redactions.
- Select the types of PII entities to redact: Tick “Select All” to cover all 36 supported entity types (names, phone numbers, emails, SSNs, credit card numbers, etc.).

- Redaction mode: Choose Replace with character, and use the asterisk (
*) as the default masking character.
Step 6: Specify the input S3 location
- Copy the S3 URI for the
my-comprehend-input-pii-demo/folder.
- Choose the input format. For this demo, we will choose One document per file:
- One document per file – Each file in the folder contains a single document. For example:
customer1.txt– one customer’s messagecustomer2.txt– another customer’s message
Comprehend treats each file as a separate document.
- One document per line – A single file contains multiple documents, with each line representing one document. For example:
Document 1: Hi team, this is José Protacio Rizal Mercado y Alonso Realonda.
Document 2: My phone is +63 912 345 6789 and email is jose.rizal@example.com.
Document 3: Please call me tomorrow.- Comprehend treats each line as a separate document.
- One document per file – Each file in the folder contains a single document. For example:
- Key difference:
- One document per file – multiple files, each with one document.
- One document per line – one file, multiple documents separated by line breaks.
Step 7: Specify the output S3 location
- Copy the S3 URI for the
my-comprehend-output-pii-demo/folder. - This is where Comprehend will store the redacted text and detection metadata after the job completes
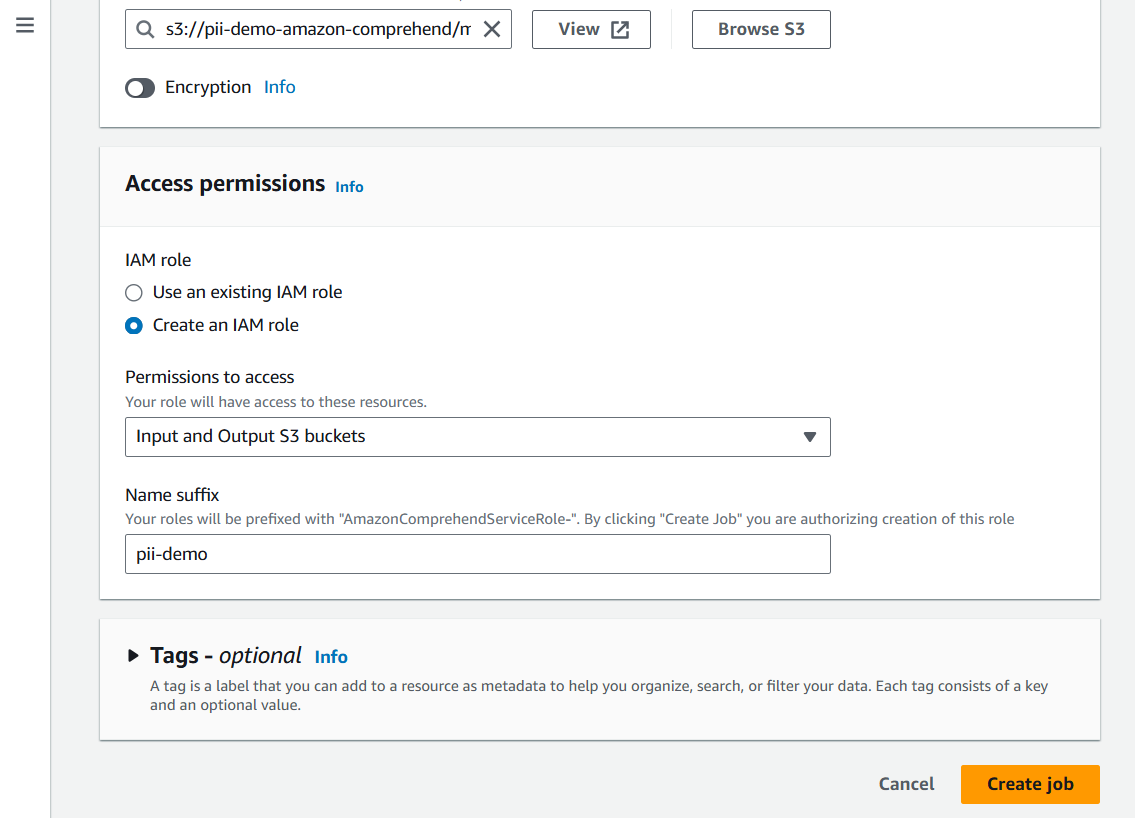
Step 8: Configure IAM Role
- Under Access permissions, choose how Comprehend will access your S3 buckets:
- Use an existing IAM role
- Create a new IAM role
- In this demo, we will create a new IAM role.
- Comprehend will automatically generate a role with the prefix “AmazonComprehendServiceRole-“

- Comprehend will automatically generate a role with the prefix “AmazonComprehendServiceRole-“
Step 9: Click Create job.

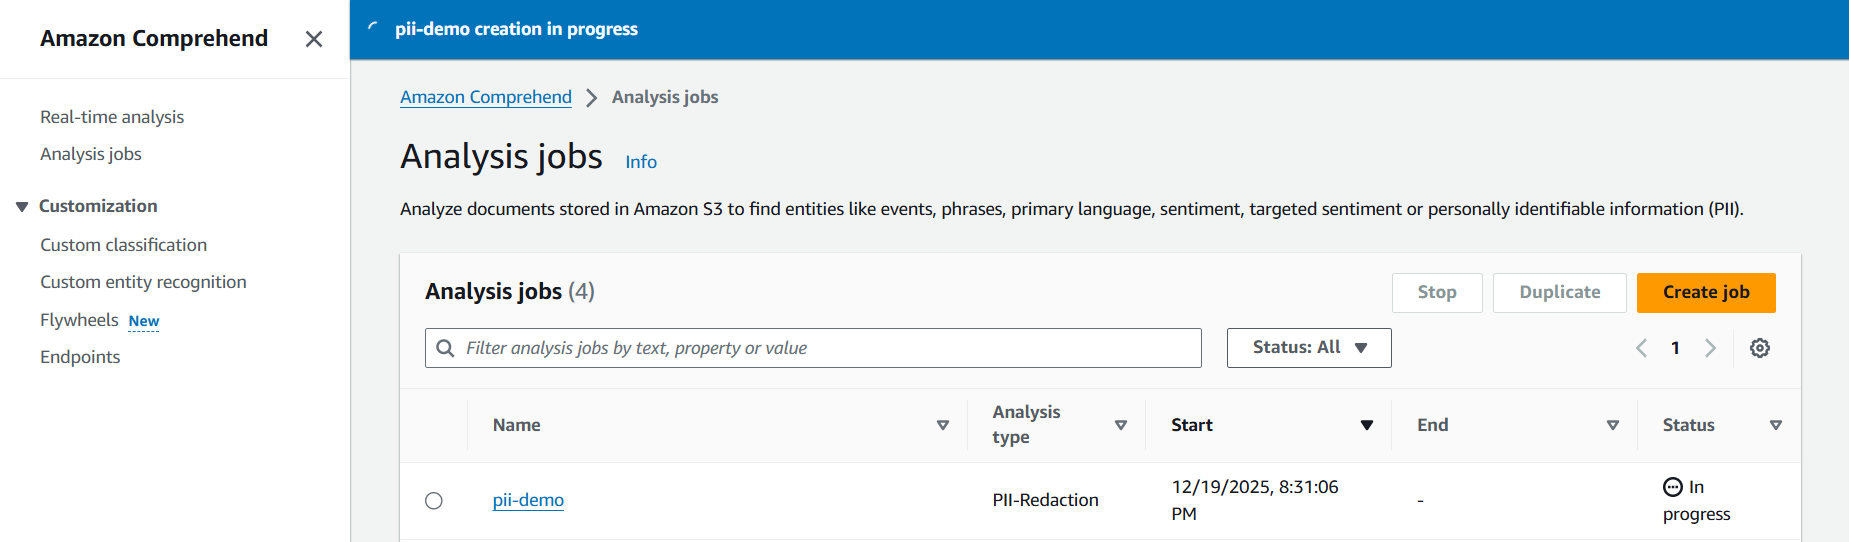
Running and Monitoring the Job
Once configured, start the job. The console will show its status as In progress.
When it completes, the results will be written to your output bucket. If the job fails, common causes include incorrect IAM permissions or mismatched Regions between the job and the buckets.
Retrieving Results
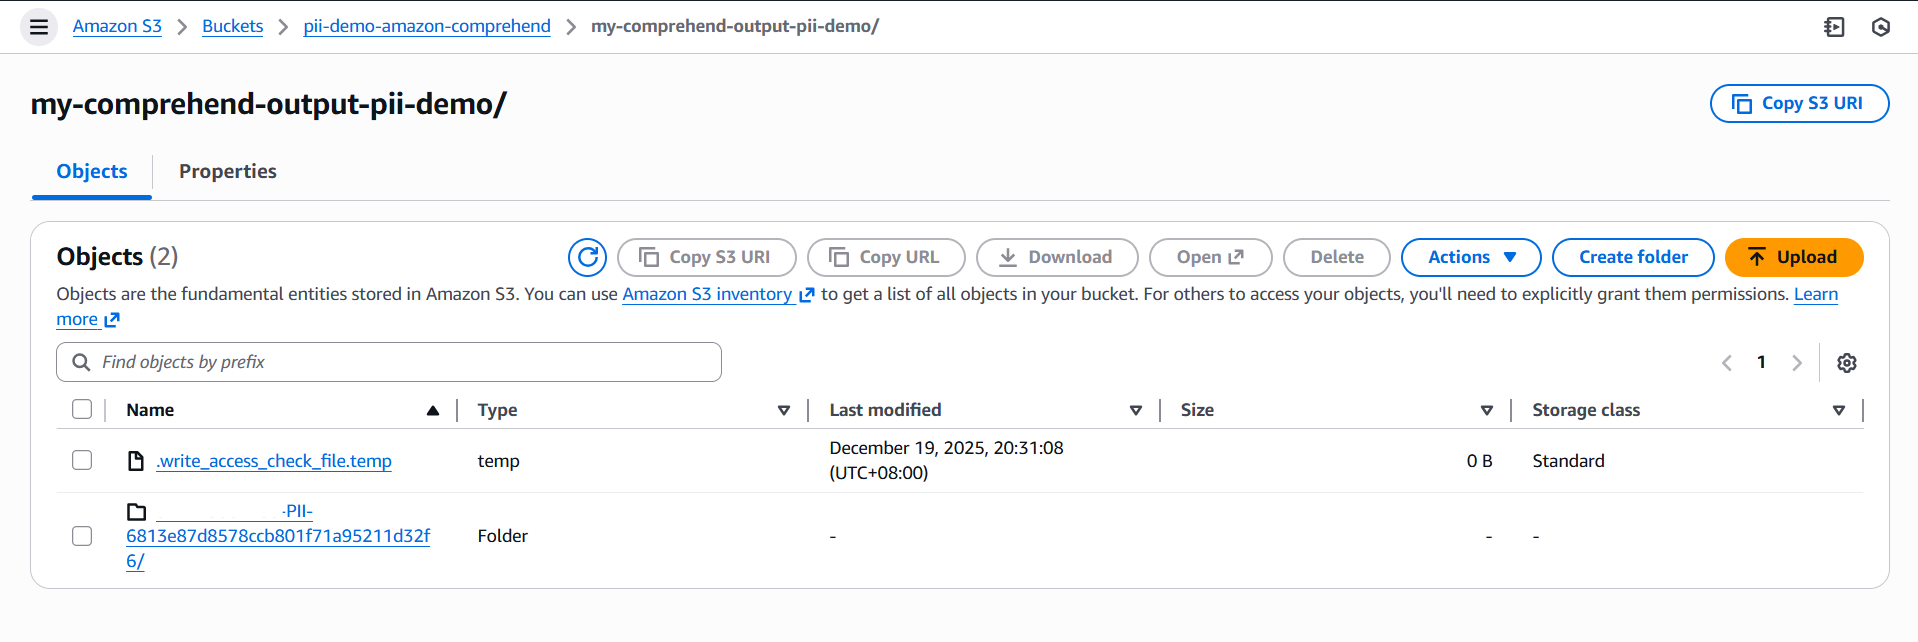
These files typically use the .out extension and contain either the redacted text or the detection metadata, depending on the job mode you selected. You may also notice a temporary file such as .write_access_check_file.temp, which Comprehend uses internally to verify that it has permission to write to your bucket.
 For example, if you uploaded
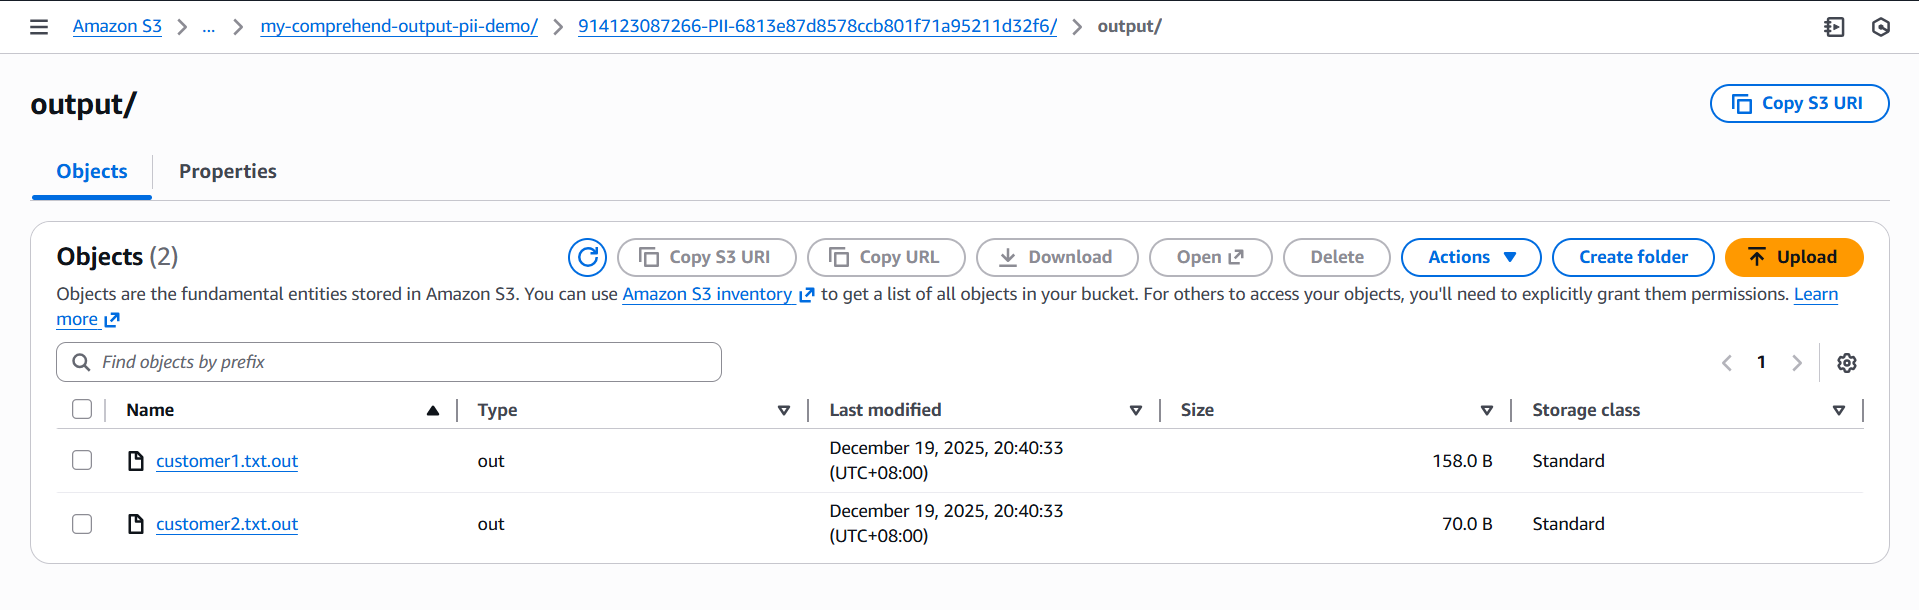
 customer1.txt and customer2.txt as input, your output folder will contain files like customer1.txt.out and customer2.txt.out.
- Comprehend organizes results into a job‑specific folder (e.g.,
<account_id>-PII-6813e87d8578ccb801f71a95211d32f6/). - Inside this folder, you’ll find the
.outfiles corresponding to each input document.
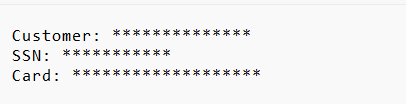
Opening these files reveals the sanitized version of your original text, with sensitive information masked according to the redaction settings you selected. For example, a document that originally contained:
Hi team, this is José Protacio Rizal Mercado y Alonso Realonda. My phone is +63 912 345 6789 and email is jose.rizal@example.com.

Please call me tomorrow.
and
Customer: Juan Dela Cruz
SSN: 123-45-6789
Card: 4111 1111 1111 1111
will now appear in the output as a redacted version where names, phone numbers, email addresses, Social Security numbers, and credit card numbers are replaced with masking characters.

This structure makes it easy to map each output file back to its corresponding input document and review the redacted content directly from S3 without needing to extract archives or process bundled files.
This sanitized version can now be safely shared or analyzed without exposing sensitive details.
That’s it! I sincerely hope this walkthrough helps you feel confident setting up and running your own Amazon Comprehend PII detection jobs, from configuring input and output folders to reviewing the sanitized results.
📚 $0.99 eBooks Start Here – Up to 80% OFF All Products Mid-Year Sale Extension!

Turn Your Team Into Cloud-Ready Professionals Today

Learn AWS with our PlayCloud Hands-On Labs

$2.99 AWS and Azure Exam Study Guide eBooks

New Claude Certified Architect Foundations CCA-F

Learn GCP By Doing! Try Our GCP PlayCloud

Learn Azure with our Azure PlayCloud

FREE AI and AWS Digital Courses

FREE AWS, Azure, GCP Practice Test Samplers


Subscribe to our YouTube Channel

Follow Us On Linkedin


