
Have you ever wanted to build a completely custom AI Architecture Generator, but got stuck trying to force a language model to output perfectly valid diagram syntax?
Downloading a standard flowchart library is rarely plug-and-play. You wire up the code, run it, and immediately hit walls, from struggling to prevent the AI from hallucinating markdown wrappers to fighting stubborn canvas elements where text overlaps and ruins your sequence diagrams.
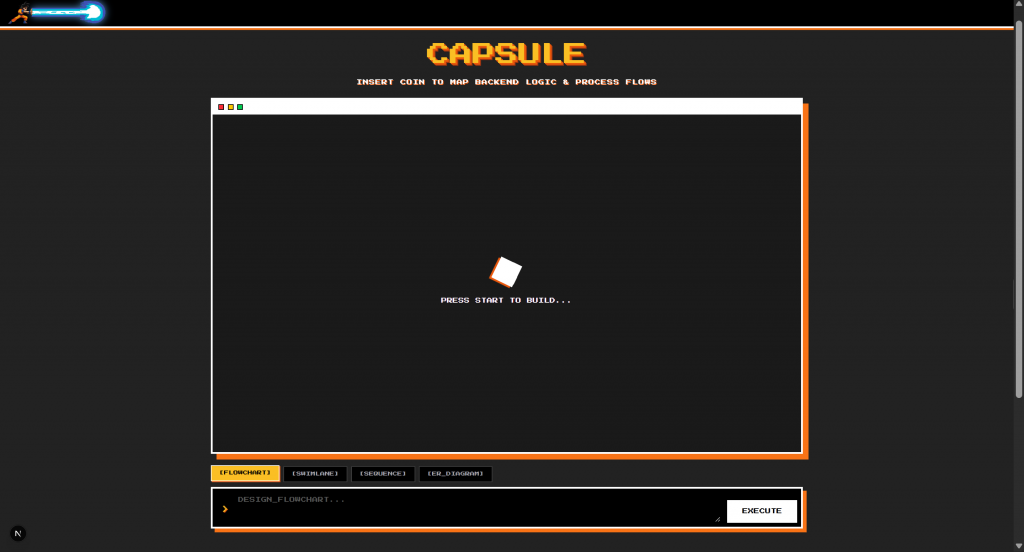
In this beginner-friendly tutorial, we will walk through how to build “Capsule,” a production-ready, gamified AI Architecture Generator. Users simply type a prompt, and the application streams back a fully rendered, interactive diagram. We will break down exactly how to bootstrap a clean environment, route AI system prompts, render programmatic SVGs using Mermaid.js, and implement a custom dynamic scroll-progress bar styled as an expanding 8-bit energy beam.
Prerequisites
Before we start, you don’t need to be a senior developer, but you should have the following ready:
-
Node.js: Think of this as the engine that runs JavaScript outside of your web browser. You need it installed on your local machine to run your React frontend.
-
An API Token: An API key is like a secure password that lets your app talk to an AI. Grab a free API key from the Groq Developer Console to power our lightning-fast AI inference.
-
A Code Editor: Download VS Code or a similar IDE to edit your project’s files.
Phase 1 of AI Architecture Generator: Bootstrapping the Next.js Environment
When starting a modern web application, manually configuring React, bundling files, and setting up styling libraries can take hours. Relying on outdated starter templates often leads to frustrating package conflicts later.
The Beginner Fix: We will use a command-line tool to “scaffold” a pristine Next.js environment instantly. Think of scaffolding like pouring the foundation of a house—Next.js builds the walls and plumbing so you can focus on the fun parts. We will also install the exact AI packages needed.
Open PowerShell or your computer’s terminal and run these commands to initialize your workspace:

# 1. Scaffold a new Next.js application (Press 'Enter' to accept default options like Tailwind CSS and App Router) npx create-next-app@latest ai-flowchart

# 2. Move inside your newly created project folder cd ai-flowchart

# 3. Install our required tools: # - 'ai' and '@ai-sdk/groq': Lets us talk to the AI and stream responses line-by-line. # - 'mermaid': A tool that turns special text into beautiful visual diagrams. npm install ai @ai-sdk/groq mermaid

# 4. Start the local server to verify the baseline app works npm run dev
Open your web browser and go to http://localhost:3000. If you see a generic Next.js welcome page, your environment is perfectly set up!
Phase 2 of AI Architecture Generator: Secure Application Secrets
Before adding AI capabilities, you must secure your application. When you sign up for Groq, they give you an API key. If you accidentally paste this key directly into your code and upload it to GitHub, hackers can steal it and run up your usage limits.
The Beginner Fix: We store secrets in a special hidden file called .env.local. Next.js is smart enough to load these variables securely into your backend servers without ever exposing them to the user’s web browser.
In your code editor, create a new file at the very root (the main folder) of your project named .env.local and assign your API key:
GROQ_API_KEY=[YOUR_GROQ_API_KEY_HERE]
Phase 3 of AI Architecture Generator: Integrate Lightning-Fast AI Routing
For our AI architecture generator to work, we need a backend server route. Furthermore, a one-size-fits-all prompt will inevitably fail. Mermaid.js has drastically different rules depending on whether you are drawing a sequence diagram or a cross-departmental swimlane.
The Beginner Fix: We will create a dynamic API route. An API route is a URL that your frontend can send data to. We will send it the user’s text and a diagramType parameter. Our backend will use a switch statement to give the AI strict, hidden rules (a “System Prompt”) on exactly how to format that specific type of chart before it starts generating.
Create a new folder path app/api/chat/ and inside it, create a file named route.ts. Add this code:
import { groq } from '@ai-sdk/groq';
import { streamText } from 'ai';

export async function POST(req: Request) {
  try {
    // 1. Read the data sent from the user's web browser
    const body = await req.json();
    const { prompt, diagramType = 'FLOWCHART' } = body;

    // 2. Give the AI specific rules based on the type of diagram they selected
    let syntaxRules = '';
    switch (diagramType) {
      case 'SWIMLANE':
        syntaxRules = `
          - Use 'flowchart TD' or 'graph TD'.
          - CRITICAL: Structure the diagram into clear departmental rows or swimlanes using 'subgraph' blocks (e.g., Customer, Sales, Stocks, Finance).
          - Map out operational logic step-by-step passing across these distinct lanes with clear conditional decision diamonds (e.g., Yes/No routes).
        `;
        break;
      case 'SEQUENCE':
        syntaxRules = `
          - Use 'sequenceDiagram'.
          - CRITICAL SPACING RULE: Keep all message text short and concise to prevent text overlapping on arrows.
          - Space out interactions cleanly with distinct participant lifelines.
        `;
        break;
      case 'ER_DIAGRAM':
        syntaxRules = `
          - Use 'erDiagram'.
          - Map database entities, attributes, and precise relational cardinalities.
        `;
        break;
      default:
        syntaxRules = `
          - Use 'flowchart TD' or 'graph TD'.
          - Use standard shapes: Pill shapes for Start/End A([Start]), Rectangles for Process B[Action], Diamonds for Decisions C{Check?}.
          - Label decision paths explicitly (e.g., -->|Yes|).
        `;
        break;
    }

    // 3. The System Prompt acts as the ultimate rulebook for the AI.
    const systemPrompt = `
      You are an expert strict systems architect.
      Convert the user's request into a valid Mermaid.js diagram.

      DIAGRAM TYPE REQUESTED: ${diagramType}

      CRITICAL RULES:
      ${syntaxRules}
      - ONLY output the raw Mermaid code block.
      - Do not include markdown formatting, backticks, or conversational text.
    `;

    // 4. Send the request to Groq's high-speed AI model
    const result = await streamText({
      model: groq('openai/gpt-oss-20b'),
      system: systemPrompt,
      prompt: prompt,
    });

    // 5. Stream the text back to the user instantly, word-by-word
    return result.toTextStreamResponse();

  } catch (error: any) {
    return new Response(error.message || "Unknown AI Provider Error", { status: 500 });
  }
}
Phase 4 of AI Architecture Generator: Reactive Mermaid Canvas & Overlap Prevention
Standard diagramming libraries often look heavily corporate. Worse, when generating sequence diagrams, long labels frequently overlap with interaction arrows, ruining the visual output. Finally, AI models are often “too polite” and include extra conversational text like “Here is your diagram!” which instantly crashes the Mermaid renderer.
The Beginner Fix: First, we initialize Mermaid globally with a custom 8-bit theme (orange and yellow) and explicitly define actorMargin spacing to prevent text crowding. Second, we use a Regular Expression (Regex)—a tool that hunts for specific text patterns—to slice away any conversational fluff, keeping only the raw code.
Create a new folder named components at the root of your project, create MermaidDiagram.tsx inside it, and add this rendering logic:
"use client"; // Tells Next.js this component runs in the browser, not the server
import React, { useEffect, useState } from 'react';
import mermaid from 'mermaid';

// 1. Customize Mermaid's colors and spacing rules
mermaid.initialize({
  startOnLoad: false,
  theme: 'base',
  themeVariables: {
    darkMode: true,
    background: 'transparent',
    primaryColor: '#000000',
    primaryTextColor: '#fbbf24',
    primaryBorderColor: '#ea580c',
    lineColor: '#FFFFFF',
    fontFamily: '"Press Start 2P", monospace',
  },
  flowchart: { curve: 'step', padding: 20 },
  sequence: {
    actorMargin: 60,
    messageMargin: 35,
    boxMargin: 10,
    boxTextMargin: 5,
    noteMargin: 10,
    messageAlign: 'center',
  },
  suppressErrorRendering: true, // Prevents crashes if the AI is still typing
});

export default function MermaidDiagram({ chartCode }: { chartCode: string }) {
  const [svgContent, setSvgContent] = useState<string>('');
  const [zoom, setZoom] = useState(1);
  const [editableCode, setEditableCode] = useState('');
  const [showEditor, setShowEditor] = useState(false);

  // 2. The Regex Filter: Safely extracts the diagram syntax, ignoring AI markdown
  useEffect(() => {
    if (!chartCode) return;

    let cleanCode = chartCode;
    const match = cleanCode.match(/(?:graph|flowchart|sequenceDiagram|erDiagram)[\s\S]*/i);
    if (match) {
      cleanCode = match[0].replace(/```.*/g, '').trim();
    }

    setEditableCode(cleanCode);
  }, [chartCode]);

  // 3. Render the code into a visual SVG graphic
  useEffect(() => {
    if (!editableCode) return;
    const uniqueId = `mermaid-svg-${Math.random().toString(36).substring(2, 9)}`;
    mermaid.render(uniqueId, editableCode)
      .then((result) => setSvgContent(result.svg))
      .catch(() => { });
  }, [editableCode]);

  const handleDownload = () => {
    const blob = new Blob([svgContent], { type: 'image/svg+xml' });
    const url = URL.createObjectURL(blob);
    const a = document.createElement('a');
    a.href = url;
    a.download = 'capsule-architecture.svg';
    a.click();
    URL.revokeObjectURL(url);
  };

  // If there is no code yet, show a retro loading screen
  if (!chartCode) {
    return (

<div className="w-full h-full flex flex-col items-center justify-center text-white font-pixel text-xs leading-loose bg-[url('[https://www.transparenttextures.com/patterns/cubes.png](https://www.transparenttextures.com/patterns/cubes.png)')]">

<div className="w-12 h-12 mb-6 bg-white shadow-[4px_4px_0px_#ea580c] animate-spin" style={{ animationDuration: '3s' }}></div>

        PRESS START TO BUILD...
      </div>

    );
  }

  // 4. The actual visual layout of the diagram canvas
  return (

<div className="relative w-full h-full flex bg-[#1a1a1a] overflow-hidden border-t-4 border-white font-pixel">

      {/* 8-Bit Live IDE Editor (Hidden by default) */}
      {showEditor && (

<div className="w-1/3 h-full border-r-4 border-white bg-black p-4 flex flex-col z-20">

<div className="text-[8px] text-[#fbbf24] mb-4">{">>"} CODE_TERMINAL</div>

          <textarea
            value={editableCode}
            onChange={(e) => setEditableCode(e.target.value)}
            className="flex-1 w-full bg-transparent text-[#22c55e] text-[8px] leading-relaxed resize-none focus:outline-none custom-scrollbar"
            spellCheck="false"
          />
        </div>

      )}


<div className="flex-1 relative flex flex-col">
        {/* Gamified Toolbar for Zooming and Exporting */}

<div className="absolute top-2 right-2 z-20 flex items-center gap-2 bg-black border-2 border-white p-1.5 shadow-[2px_2px_0px_#f97316]">
          <button onClick={() => setZoom(z => Math.max(z - 0.2, 0.4))} className="text-white hover:text-[#fbbf24] text-[8px]">[-] ZOOM</button>

<div className="text-[8px] text-white w-8 text-center">{Math.round(zoom * 100)}%</div>

          <button onClick={() => setZoom(z => Math.min(z + 0.2, 3))} className="text-white hover:text-[#fbbf24] text-[8px]">[+] ZOOM</button>


<div className="w-[2px] h-3 bg-white mx-1"></div>


          <button onClick={() => setShowEditor(!showEditor)} className="text-[8px] text-black bg-[#fbbf24] px-2 py-1.5 hover:bg-white transition-all shadow-[1px_1px_0px_#ea580c]">
            {showEditor ? 'CLOSE' : 'EDIT'}
          </button>
          <button onClick={handleDownload} className="text-[8px] text-black bg-[#fbbf24] px-2 py-1.5 hover:bg-white transition-all shadow-[1px_1px_0px_#ea580c]">
            EXPORT
          </button>
        </div>


        {/* Render Canvas */}

<div className="flex-1 overflow-auto flex items-start justify-center pt-20 px-8 pb-16 custom-scrollbar bg-[url('[https://www.transparenttextures.com/patterns/cubes.png](https://www.transparenttextures.com/patterns/cubes.png)')]">

<div
            className="transition-transform duration-75 origin-top"
            style={{ transform: `scale(${zoom})` }}
            dangerouslySetInnerHTML={{ __html: svgContent }}
          />
        </div>

      </div>

    </div>

  );
}
Phase 5 of AI Architecture Generator: State Management & Gamified 3D Typography
To bring the main interface of our AI architecture generator to life, we need to manage several pieces of “State”. In React, State is how an app remembers things—like what the user just typed, or if the AI is currently loading. We also want to apply a global 8-bit aesthetic, but standard web fonts cannot easily simulate the blocky 3D depth of classic arcade cabinets.
The Beginner Fix: We will use useState hooks to manage our data at the top of the file. Then, we will inject a global <style> block to import Google’s Press Start 2P font, stacking triple-layered CSS text-shadow configurations to achieve authentic 8-bit depth.
Open your existing app/page.tsx file (delete everything inside it) and add this foundational logic:
"use client";
import { useState, FormEvent, useEffect } from 'react';
import MermaidDiagram from '../components/MermaidDiagram';
const DIAGRAM_MODES = ['FLOWCHART', 'SWIMLANE', 'SEQUENCE', 'ER_DIAGRAM'];
export default function Home() {
// 1. React State Management (The app's memory)
const [input, setInput] = useState('');
const [chartCode, setChartCode] = useState('');
const [isLoading, setIsLoading] = useState(false);
const [errorMessage, setErrorMessage] = useState('');
const [scrollProgress, setScrollProgress] = useState(0);
const [diagramType, setDiagramType] = useState('FLOWCHART');
// 2. The function that runs when the user clicks 'EXECUTE'
const onSubmit = async (e: FormEvent) =&amp;amp;amp;amp;amp;gt; {
e.preventDefault();
if (!input.trim() || isLoading) return;
setIsLoading(true);
setChartCode('');
setErrorMessage('');
try {
// Sends data to the /api/chat route we created earlier
const res = await fetch('/api/chat', {
method: 'POST',
headers: { 'Content-Type': 'application/json' },
body: JSON.stringify({ prompt: input, diagramType }),
});
if (!res.ok) throw new Error(await res.text());
const reader = res.body?.getReader();
if (!reader) throw new Error("Stream failed");
const decoder = new TextDecoder();
// Reads the AI's response chunk-by-chunk for that live typing effect
while (true) {
const { done, value } = await reader.read();
if (done) break;
setChartCode((prev) =&amp;amp;amp;amp;amp;gt; prev + decoder.decode(value, { stream: true }));
}
} catch (error: any) {
setErrorMessage(error.message);
} finally {
setIsLoading(false);
setInput('');
}
};
return (
&amp;amp;amp;amp;amp;lt;main className="flex flex-col min-h-[140vh] bg-[#222222] text-white selection:bg-[#f97316]/50"&amp;amp;amp;amp;amp;gt;
{/* 3. 3D Pixel Font Styles injected globally using CSS Text Shadows */}
&amp;amp;amp;amp;amp;lt;style dangerouslySetInnerHTML={{__html: `
@import url('[https://fonts.googleapis.com/css2?family=Press+Start+2P&amp;amp;amp;amp;amp;amp;display=swap](https://fonts.googleapis.com/css2?family=Press+Start+2P&amp;amp;amp;amp;amp;amp;display=swap)');
.font-pixel { font-family: 'Press Start 2P', monospace; }
.text-3d-pixel {
color: #fbbf24;
text-shadow: 2px 2px 0px #ea580c, 4px 4px 0px #ea580c, 6px 6px 0px #9a3412;
}
`}} /&amp;amp;amp;amp;amp;gt;
{/* We will add the visual UI in the next phases... */}
&amp;amp;amp;amp;amp;lt;/main&amp;amp;amp;amp;amp;gt;
);
}
Phase 6 of AI Architecture Generator: Dynamic Image-Based Scroll Engine
To elevate the user experience, we want a scroll progress bar styled as an energy beam pinned to the top of the screen. However, using a standard HTML <img /> tag will stretch the pixels horizontally as the bar grows, instantly destroying the pixel art ratio.
The Beginner Fix: We will use useEffect (a React tool that runs code behind the scenes) to measure how far down the page the user has scrolled. For the UI, we use a container div powered by CSS background-repeat: repeat-x. This ensures the energy stream tiles cleanly side-by-side instead of stretching. The head of the projectile is then locked to the far edge using negative absolute positioning.
Directly above your onSubmit function, add the scroll listener, and directly below your <style> block, add the fixed taskbar:
// 1. Add this Scroll Logic inside your Home component (above onSubmit):
useEffect(() =&amp;amp;amp;amp;gt; {
const handleScroll = () =&amp;amp;amp;amp;gt; {
// Calculates how far you've scrolled vs how tall the page is
const scrollY = window.scrollY;
const docHeight = document.documentElement.scrollHeight - window.innerHeight;
if (docHeight &amp;amp;amp;amp;gt; 0) {
setScrollProgress(Math.min(scrollY / docHeight, 1));
}
};
// Listeners tell the browser to watch for scrolling
window.addEventListener('scroll', handleScroll);
return () =&amp;amp;amp;amp;gt; window.removeEventListener('scroll', handleScroll);
}, []);
{/* 2. Add this Taskbar directly inside &amp;amp;amp;amp;lt;main&amp;amp;amp;amp;gt;, below the
&amp;amp;amp;amp;lt;style&amp;amp;amp;amp;gt; block: */}
&amp;amp;amp;amp;lt;div className="fixed top-0 left-0 w-full h-16 bg-black border-b-4 border-white z-50 flex items-center px-4 overflow-hidden shadow-[0_4px_0_#f97316]"&amp;amp;amp;amp;gt;
{/* Origin Character Image */}
&amp;amp;amp;amp;lt;img src="/Goku pixelated.png" alt="Goku" className="h-14 w-14 object-contain z-20" onError={(e) =&amp;amp;amp;amp;gt; e.currentTarget.style.display = 'none'} /&amp;amp;amp;amp;gt;
&amp;amp;amp;amp;lt;div className="flex-1 h-full relative flex items-center ml-[-5px] z-10"&amp;amp;amp;amp;gt;
&amp;amp;amp;amp;lt;div
className="h-[20px] relative transition-all duration-100 ease-linear drop-shadow-[0_0_8px_rgba(107,183,255,0.8)]"
style={{
width: `${scrollProgress * 95}%`, // The bar grows based on scroll %
backgroundImage: 'url("/Kame Stream.png")',
backgroundRepeat: 'repeat-x', // Tiles the image cleanly
backgroundSize: 'auto 100%',
backgroundPosition: 'left center'
}}
&amp;amp;amp;amp;gt;
{/* Projectile head locked to the tip using absolute positioning */}
&amp;amp;amp;amp;lt;img
src="/Kame Hame Ha.png" alt="Kamehameha"
className="absolute -right-[24px] top-1/2 -translate-y-[50%] h-[48px] w-auto object-contain z-30"
onError={(e) =&amp;amp;amp;amp;gt; e.currentTarget.style.display = 'none'}
/&amp;amp;amp;amp;gt;
&amp;amp;amp;amp;lt;/div&amp;amp;amp;amp;gt;
&amp;amp;amp;amp;lt;/div&amp;amp;amp;amp;gt;
&amp;amp;amp;amp;lt;/div&amp;amp;amp;amp;gt;
Phase 7 of AI Architecture Generator: Adaptive Canvas & Multi-Line Command Interface
Writing complex architectural workflows into a rigid, single-line text input field leads to typos and frustration because users cannot read their entire prompt at once.
The Beginner Fix: Tailwind CSS allows us to build layouts using utility classes. We will provide a massive viewport (h-[750px]) for the diagram rendering, allowing large architectures to breathe. We will replace the standard text <input> with an auto-expanding <textarea> paired with mode selection tabs so users can comfortably write and review multi-line logic workflows.
Paste this final UI block below your Taskbar to complete the page.tsx layout:
{/* Main Content Wrapper (Tailwind flexbox keeps everything centered and spaced out) */}
&amp;amp;amp;lt;div className="flex-1 w-full max-w-7xl mx-auto flex flex-col gap-6 p-4 pt-24 pb-20"&amp;amp;amp;gt;
&amp;amp;amp;lt;header className="text-center font-pixel space-y-3 mt-4"&amp;amp;amp;gt;
&amp;amp;amp;lt;h1 className="text-3xl md:text-5xl text-3d-pixel leading-relaxed"&amp;amp;amp;gt;
CAPSULE
&amp;amp;amp;lt;/h1&amp;amp;amp;gt;
INSERT COIN TO MAP BACKEND LOGIC &amp;amp;amp;amp; PROCESS FLOWS
&amp;amp;amp;lt;/header&amp;amp;amp;gt;
{/* Render Canvas Frame - styled like a retro OS window */}
&amp;amp;amp;lt;div className="w-full h-[750px] bg-[#1a1a1a] border-4 border-white shadow-[12px_12px_0px_#f97316] flex flex-col relative"&amp;amp;amp;gt;
&amp;amp;amp;lt;div className="w-full h-8 bg-white flex items-center px-3 gap-2"&amp;amp;amp;gt;
&amp;amp;amp;lt;div className="w-3 h-3 bg-red-500 border-2 border-black"&amp;amp;amp;gt;&amp;amp;amp;lt;/div&amp;amp;amp;gt;
&amp;amp;amp;lt;div className="w-3 h-3 bg-yellow-400 border-2 border-black"&amp;amp;amp;gt;&amp;amp;amp;lt;/div&amp;amp;amp;gt;
&amp;amp;amp;lt;div className="w-3 h-3 bg-green-500 border-2 border-black"&amp;amp;amp;gt;&amp;amp;amp;lt;/div&amp;amp;amp;gt;
&amp;amp;amp;lt;/div&amp;amp;amp;gt;
&amp;amp;amp;lt;div className="flex-1 relative overflow-hidden"&amp;amp;amp;gt;
{errorMessage ? (
&amp;amp;amp;lt;div className="w-full h-full flex flex-col items-center justify-center font-pixel text-red-500 p-8 text-center text-xs leading-loose bg-black"&amp;amp;amp;gt;
&amp;amp;amp;lt;div className="text-4xl mb-4"&amp;amp;amp;gt;💀&amp;amp;amp;lt;/div&amp;amp;amp;gt;
SYSTEM ERROR:
{errorMessage}
&amp;amp;amp;lt;/div&amp;amp;amp;gt;
) : (
// This is where our custom component from Phase 4 lives!
&amp;amp;amp;lt;MermaidDiagram chartCode="{chartCode}"/&amp;amp;amp;gt;
)}
&amp;amp;amp;lt;/div&amp;amp;amp;gt;
&amp;amp;amp;lt;/div&amp;amp;amp;gt;
{/* Command Interface &amp;amp;amp;amp; Mode Tabs */}
&amp;amp;amp;lt;div className="w-full flex flex-col gap-2"&amp;amp;amp;gt;
{/* Diagram Mode Selection Tabs (.map generates a button for every mode) */}
&amp;amp;amp;lt;div className="flex gap-2 overflow-x-auto custom-scrollbar pb-1"&amp;amp;amp;gt;
{DIAGRAM_MODES.map((mode) =&amp;amp;amp;gt; (
&amp;amp;amp;lt;button
key={mode}
type="button"
onClick={() =&amp;amp;amp;gt; setDiagramType(mode)}
className={`px-4 py-2 font-pixel text-[8px] md:text-[10px] transition-all border-2 ${
diagramType === mode
? 'bg-[#fbbf24] text-black border-white shadow-[2px_2px_0px_#ea580c] translate-y-0'
: 'bg-black text-[#a1a1aa] border-neutral-700 hover:border-white hover:text-white translate-y-[2px]'
}`}
&amp;amp;amp;gt;
[{mode}]
&amp;amp;amp;lt;/button&amp;amp;amp;gt;
))}
&amp;amp;amp;lt;/div&amp;amp;amp;gt;
{/* Form area with Multi-line Textarea */}
&amp;amp;amp;lt;form onSubmit={onSubmit} className="w-full relative"&amp;amp;amp;gt;
&amp;amp;amp;lt;div className="flex bg-black border-4 border-white p-2 shadow-[8px_8px_0px_#f97316] items-center"&amp;amp;amp;gt;
&amp;amp;amp;lt;div className="flex items-start pt-2 px-3 text-[#fbbf24] font-pixel text-sm drop-shadow-[2px_2px_0px_#ea580c]"&amp;amp;amp;gt;
{'&amp;amp;amp;gt;'}
&amp;amp;amp;lt;/div&amp;amp;amp;gt;
&amp;amp;amp;lt;textarea
value={input}
onChange={(e) =&amp;amp;amp;gt; setInput(e.target.value)}
placeholder={`DESIGN_${diagramType}...`}
rows={3}
className="flex-1 p-2 bg-transparent text-white font-pixel text-xs placeholder-neutral-600 focus:outline-none uppercase resize-y custom-scrollbar"
disabled={isLoading}
/&amp;amp;amp;gt;
&amp;amp;amp;lt;button
type="submit"
disabled={isLoading}
className="self-end px-8 py-4 bg-white text-black font-pixel text-xs hover:bg-[#fbbf24] transition-colors disabled:opacity-50 disabled:cursor-not-allowed border-l-4 border-black ml-2"
&amp;amp;amp;gt;
{isLoading ? 'WAIT...' : 'EXECUTE'}
&amp;amp;amp;lt;/button&amp;amp;amp;gt;
&amp;amp;amp;lt;/div&amp;amp;amp;gt;
&amp;amp;amp;lt;/form&amp;amp;amp;gt;
&amp;amp;amp;lt;/div&amp;amp;amp;gt;
&amp;amp;amp;lt;/div&amp;amp;amp;gt;
Wrap Up
We finally made it! Let’s be real for a second: building modern apps is incredibly fun, but orchestrating the backend architecture, the frontend design system, and the AI integrations to all work together perfectly is a serious accomplishment.
It’s easy to feel overwhelmed when building full-stack software, but every developer relies on breaking massive projects into focused, manageable phases.
We didn’t just “install a template” today. We successfully bootstrapped a clean Next.js environment, secured our API secrets locally, built a dynamic LLM routing engine that understands the nuances between Swimlanes and ER diagrams, integrated a reactive programmatic SVG canvas, bulletproofed our data stream with Regex extractors, and built a breathtaking, custom pixel-art scroll UI using advanced CSS background repetition.
Now, you have a beautiful, fully functioning AI architecture generator running perfectly on your machine, proving that professional tooling doesn’t have to be boring.

Resources
🔥 $1.99 eBooks and $4.99 Video Claude Reviewers

Turn Your Team Into Cloud-Ready Professionals Today

Learn AWS with our PlayCloud Hands-On Labs

$2.99 AWS and Azure Exam Study Guide eBooks

Learn GCP By Doing! Try Our GCP PlayCloud

Learn Azure with our Azure PlayCloud

FREE AI and AWS Digital Courses

FREE AWS, Azure, GCP Practice Test Samplers


Subscribe to our YouTube Channel

Follow Us On Linkedin


Written by: Joshua Emmanuel Santiago