Last updated on February 4, 2026
As organizations increasingly rely on cloud-based infrastructure, managing resources across multiple AWS services can become complex and time-consuming. Traditionally, developers and DevOps engineers rely on Infrastructure as Code (IaC) tools such as AWS CloudFormation, Terraform, or CDK to create, modify, and maintain cloud environments.
However, with the rise of Large Language Models (LLMs) and the Model Context Protocol (MCP), a new approach to cloud management is emerging one where infrastructure can be managed through natural language conversations rather than static code.
The AWS Cloud Control MCP Server bridges this gap. It allows LLMs and AI assistants to interact directly with AWS Cloud Control API, enabling resource creation, updates, and monitoring using conversational instructions all while maintaining strong governance, security, and IaC best practices.
What is the AWS Cloud Control API MCP Server?
The AWS Cloud Control API MCP Server is a specialized MCP implementation built by AWS Labs that connects LLMs to the AWS Cloud Control API. Through this integration, AI agents can manage over 1,100 AWS and partner resources spanning EC2, S3, RDS, Lambda, IAM, and more, securely and transparently.
Instead of manually writing CloudFormation templates or CLI commands, users can simply instruct an LLM:
“Create an S3 bucket with versioning and encryption enabled in ap-southeast-1.”
Behind the scenes, the MCP Server handles the entire workflow: generating declarative resource definitions, validating them through security scans, applying AWS best practices, and then deploying them via the Cloud Control API.
Key Features
- Declarative Resource Management – The MCP Server adopts a declarative model, users describe the desired state, and the server ensures AWS reflects that state. It supports:
- Creation, reading, updating, and deletion of AWS resources
- Schema retrieval for any supported resource type
- Template generation through AWS’s IaC Generator API
This enables full lifecycle management of AWS infrastructure directly through conversational interaction.
- Natural Language Interface – With MCP integration, LLMs translate natural language into structured API requests. This means complex IaC tasks like setting up a VPC, configuring an RDS instance, or scaling an ECS cluster can be initiated through plain English, democratizing access to cloud automation.
- Built-In Security and Transparency – Before any resource operation occurs, the MCP Server provides a transparent “explain” step showing exactly what will be created, modified, or deleted. It also integrates optional Checkov security scanning, ensuring all configurations align with compliance and security best practices.
- Controlled Workflow and Token Validation – Every operation is validated through a token-based system that enforces sequential security checks.

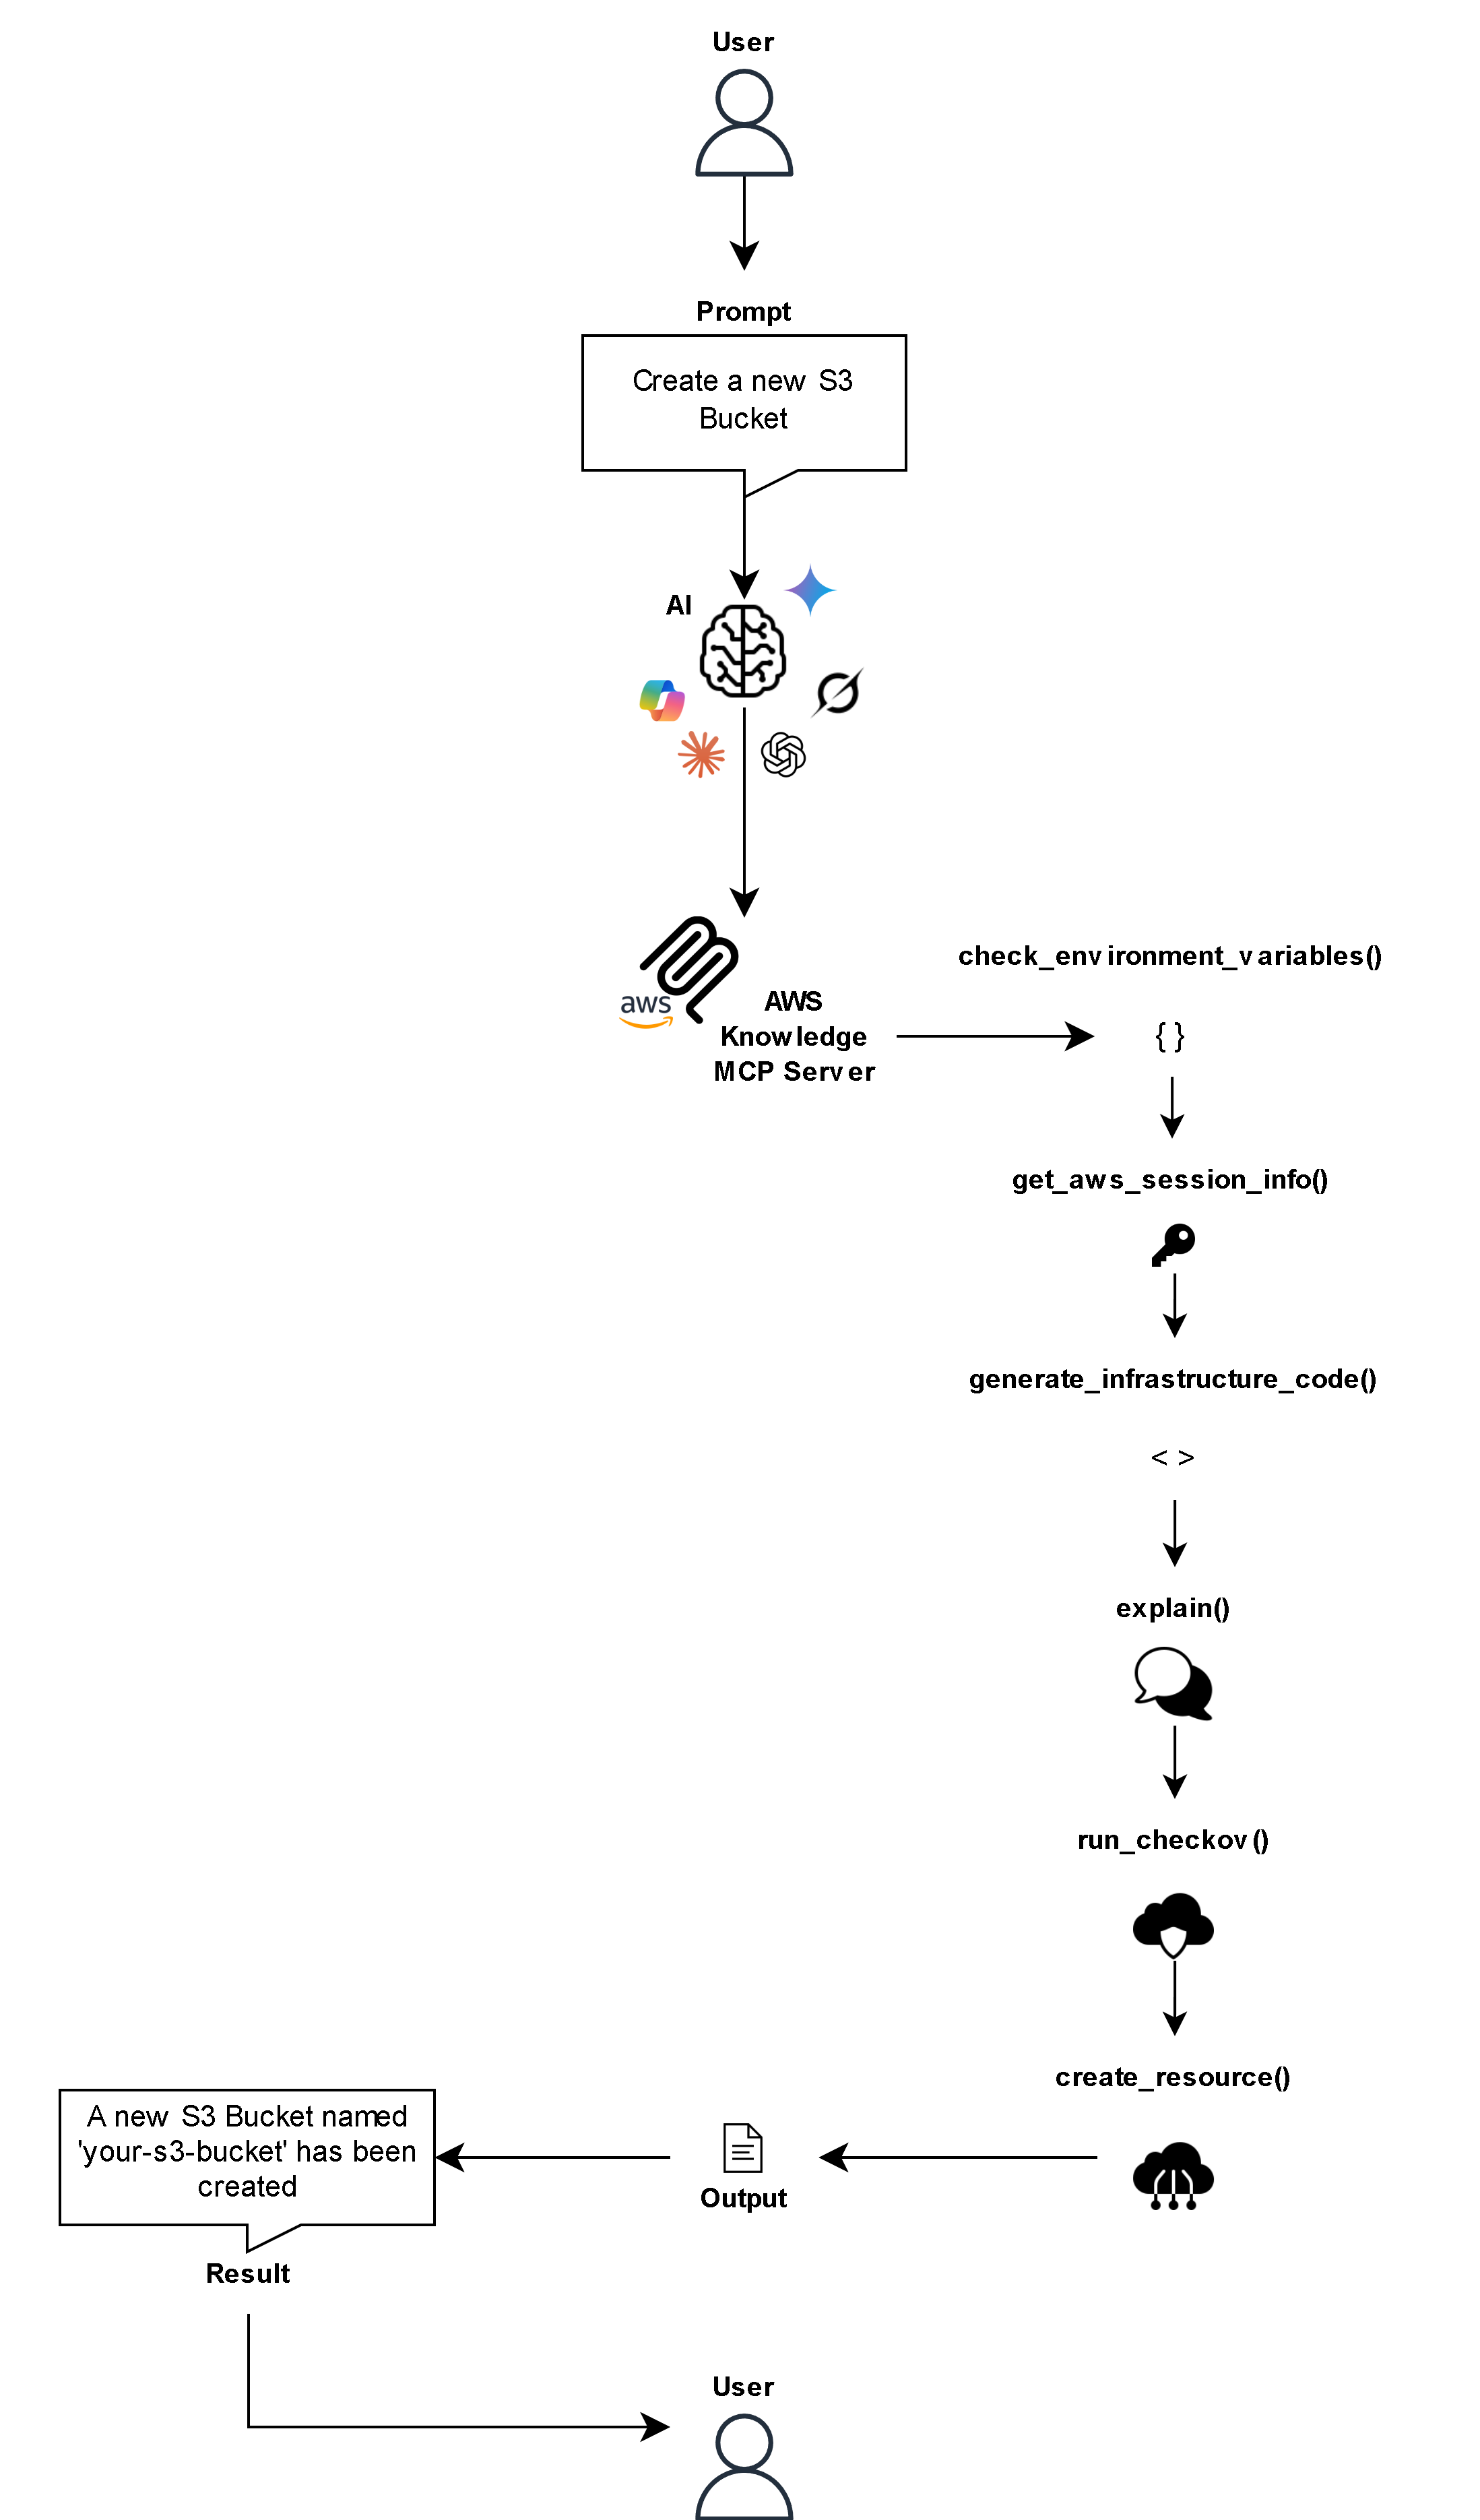
For example:

-
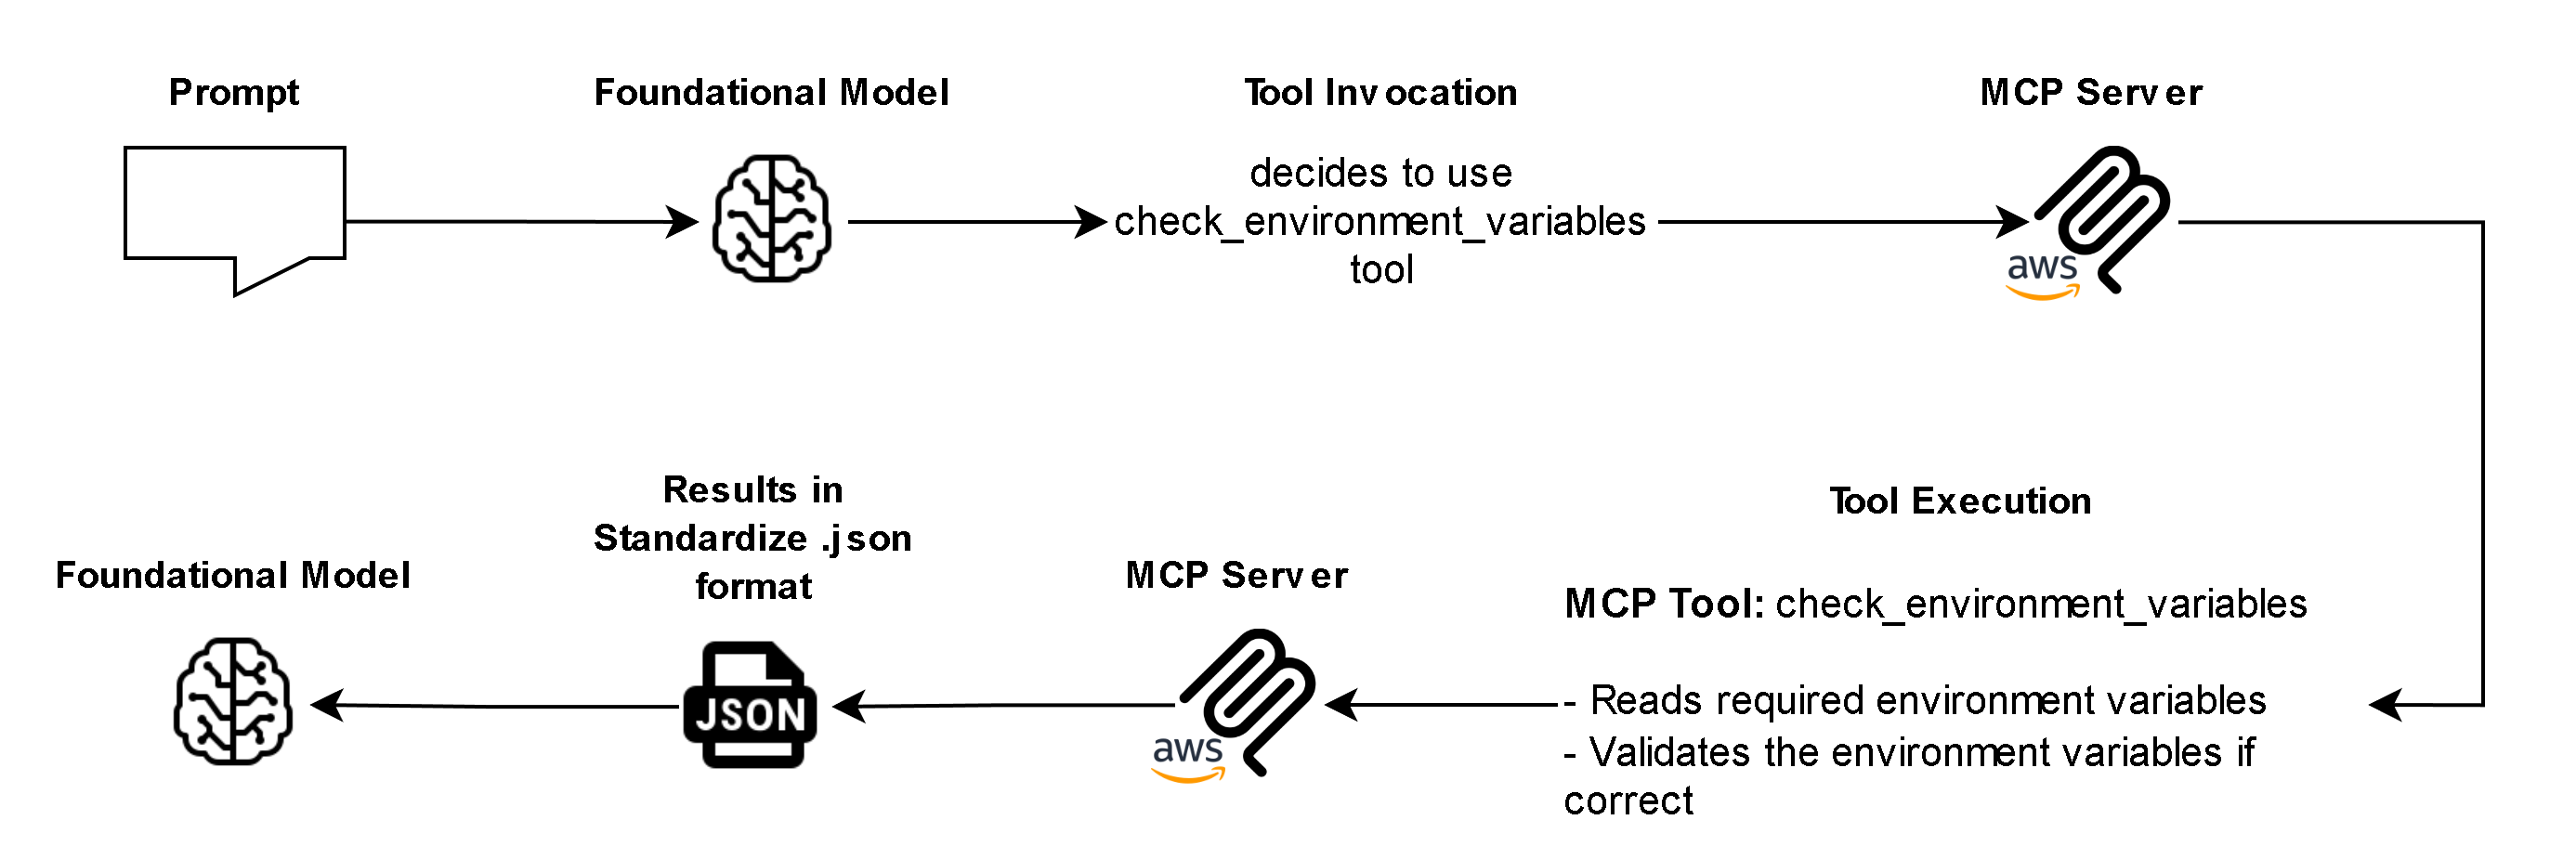
- Verify credentials (check_environment_variables)
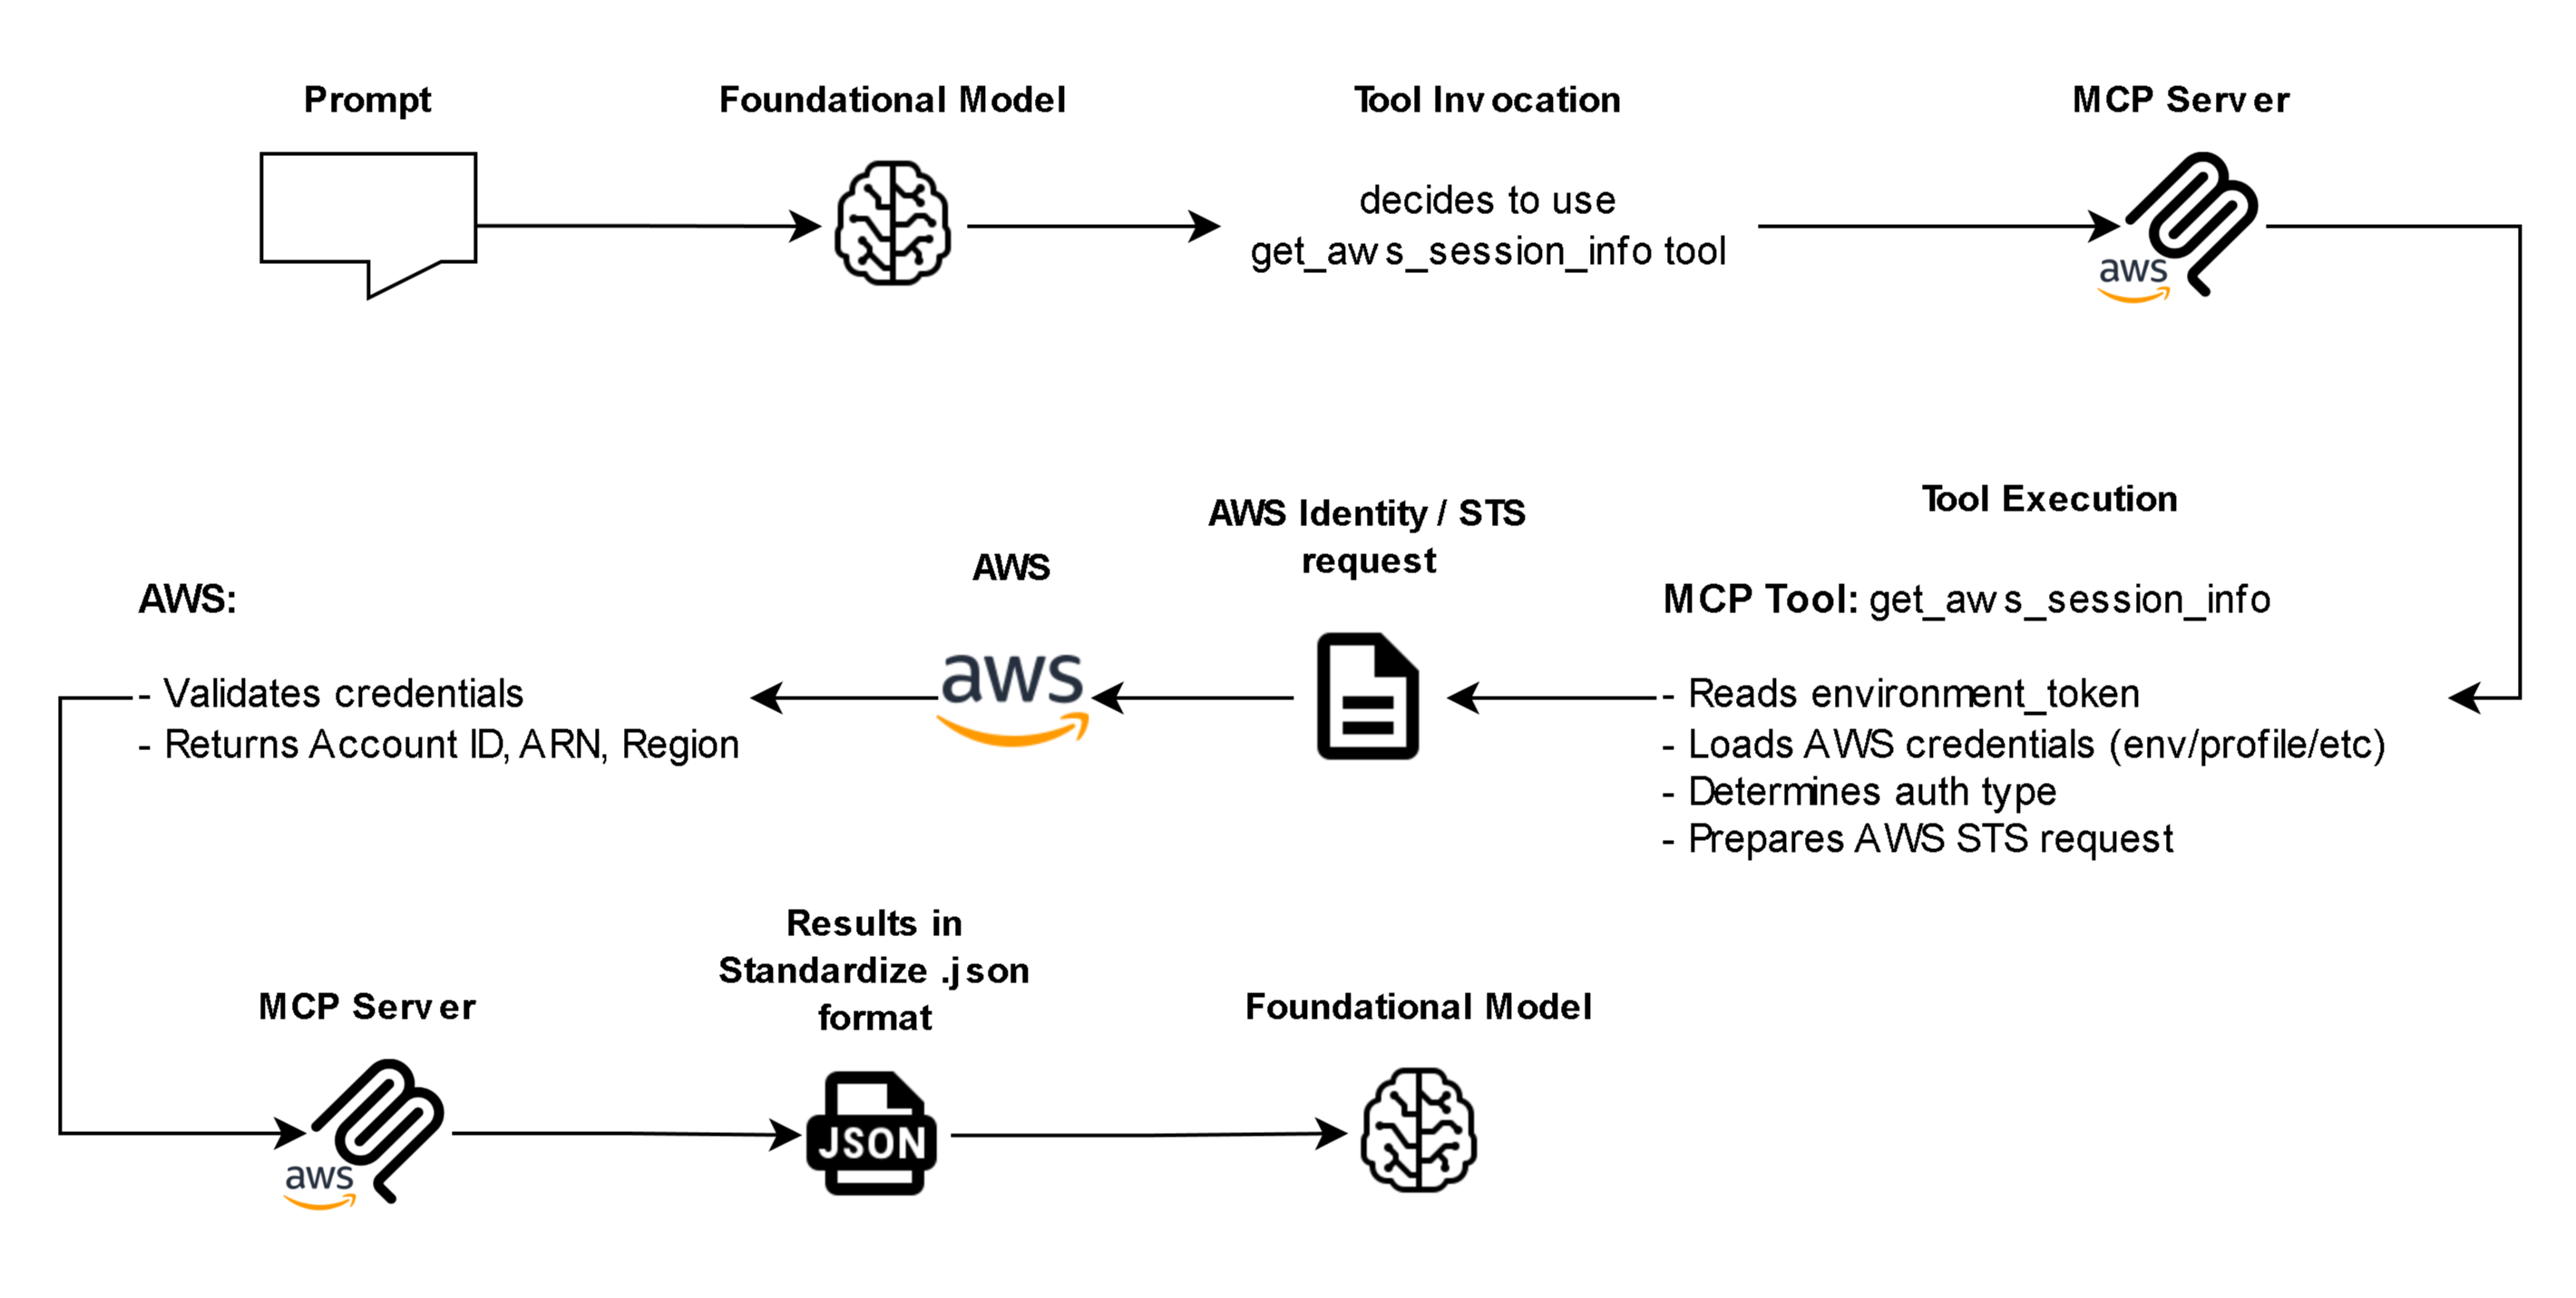
- Retrieve AWS account and region (get_aws_session_info)
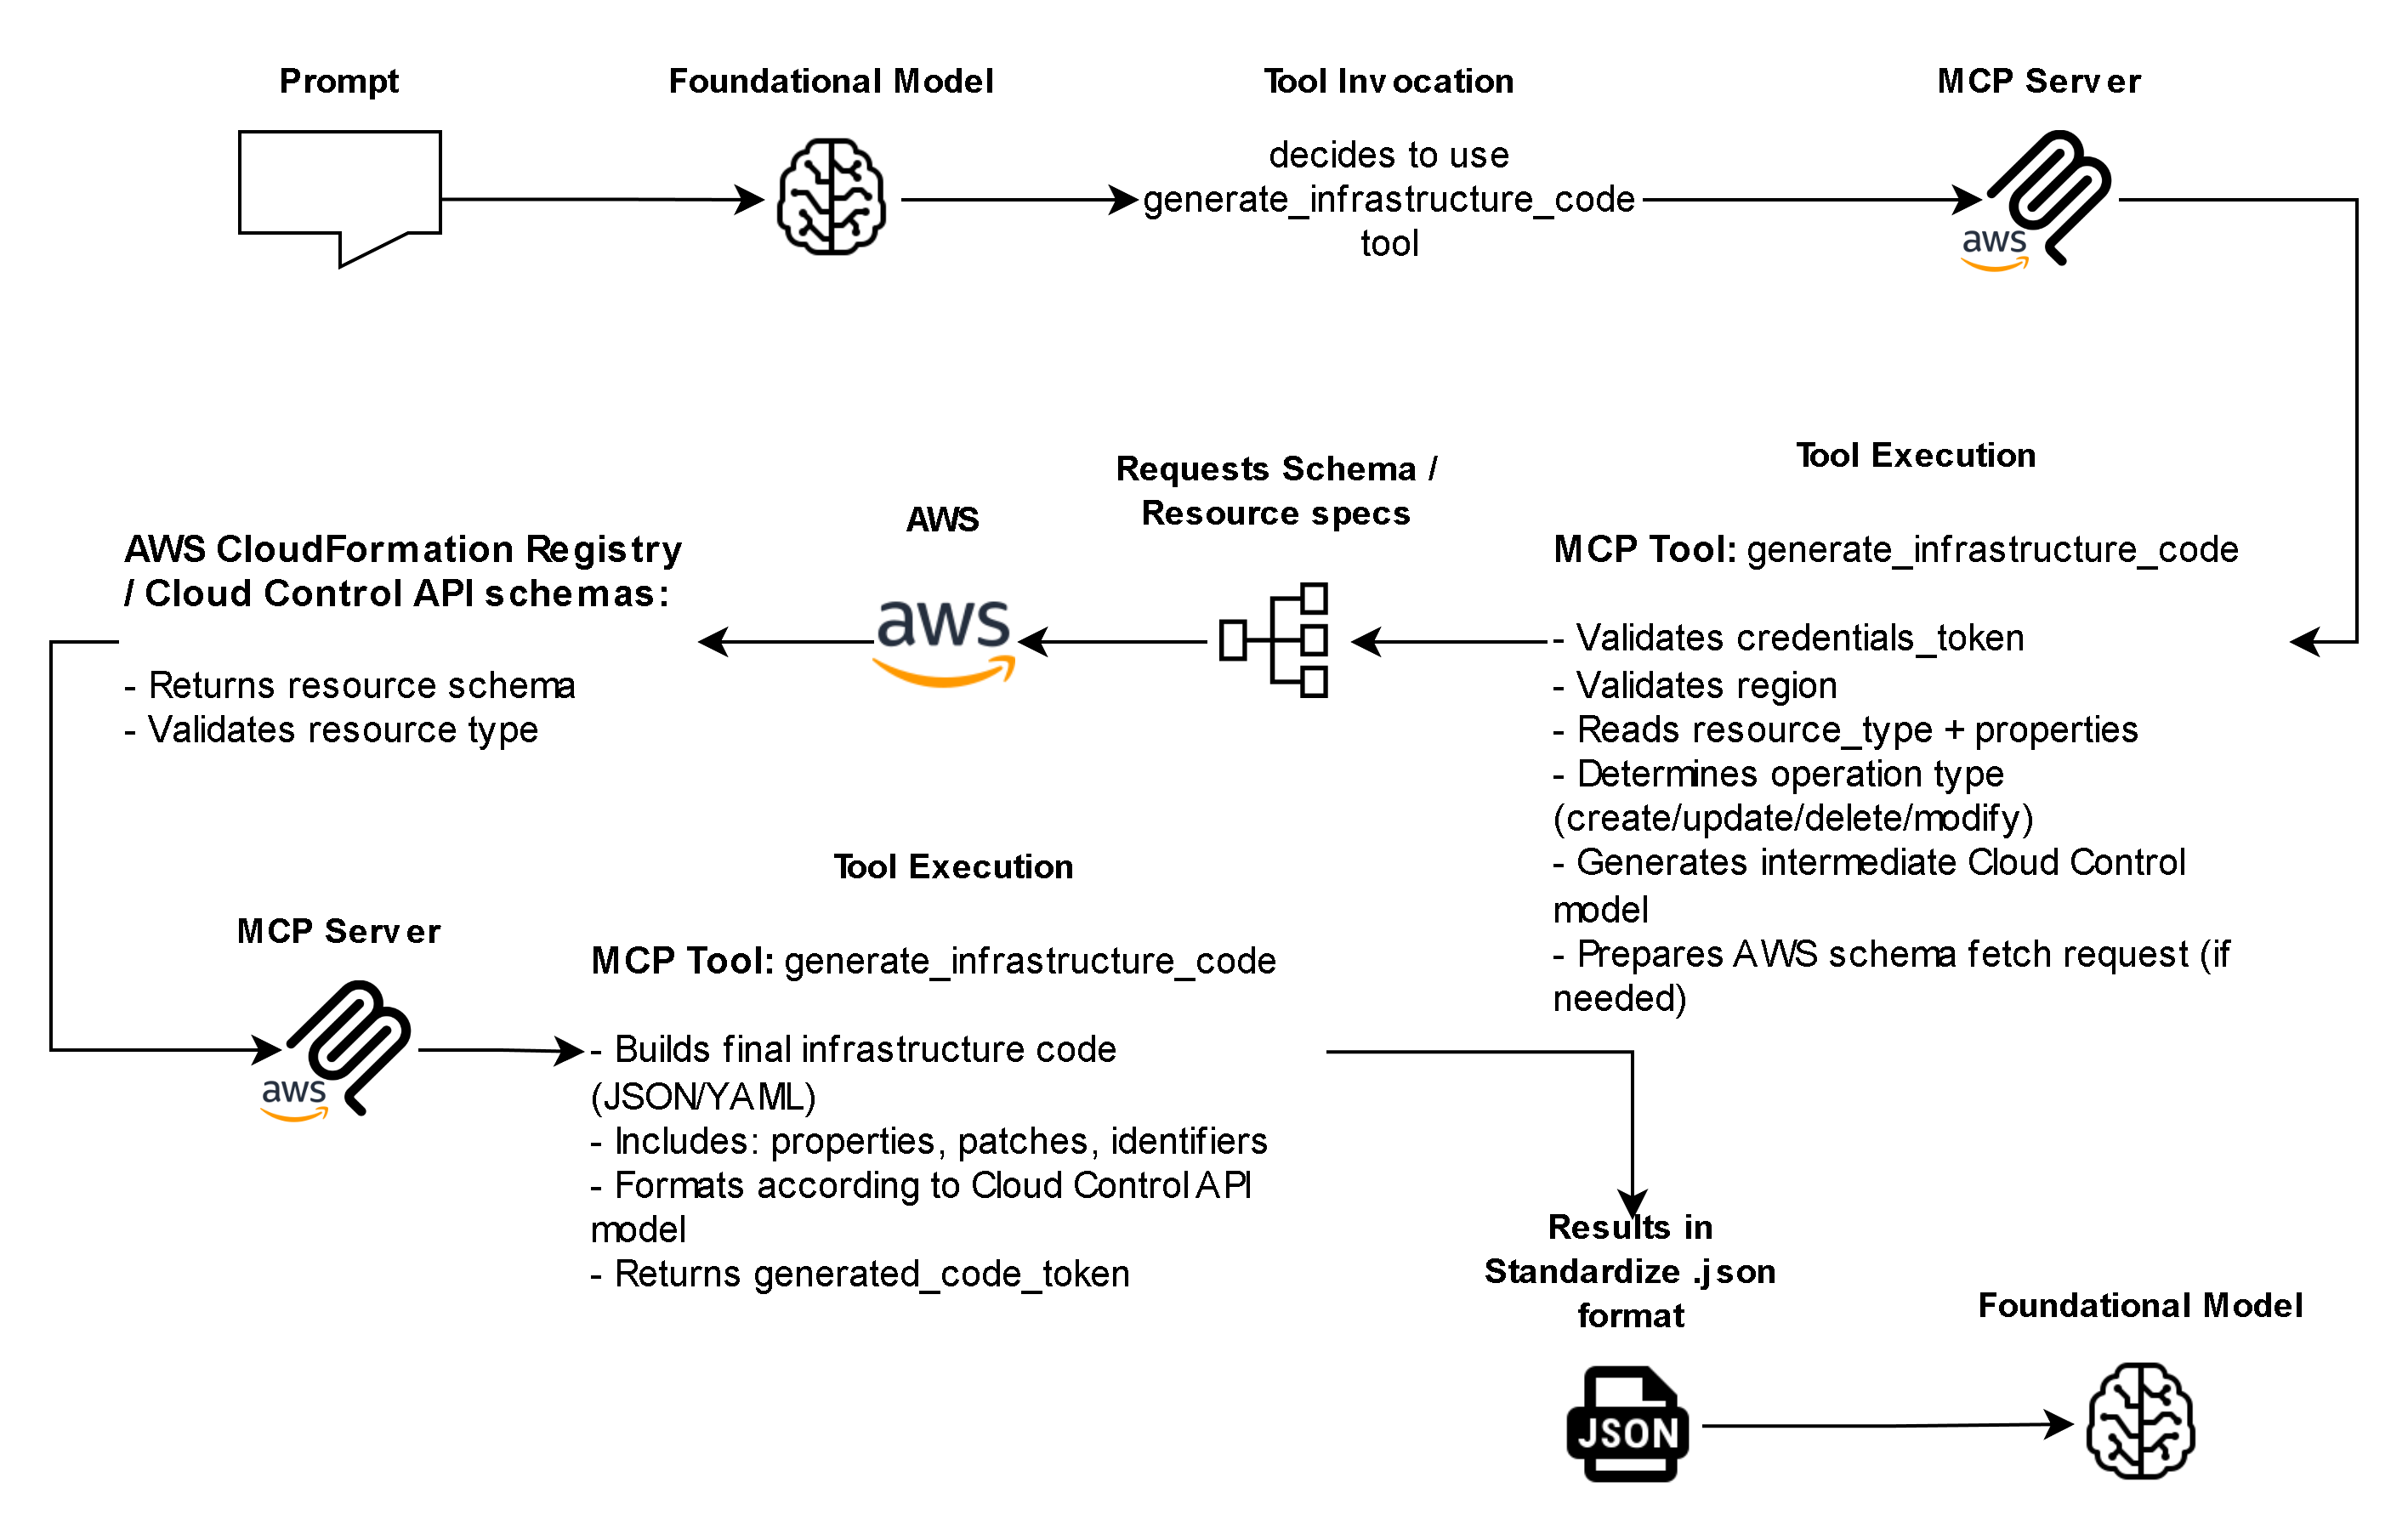
- Generate IaC template (generate_infrastructure_code)
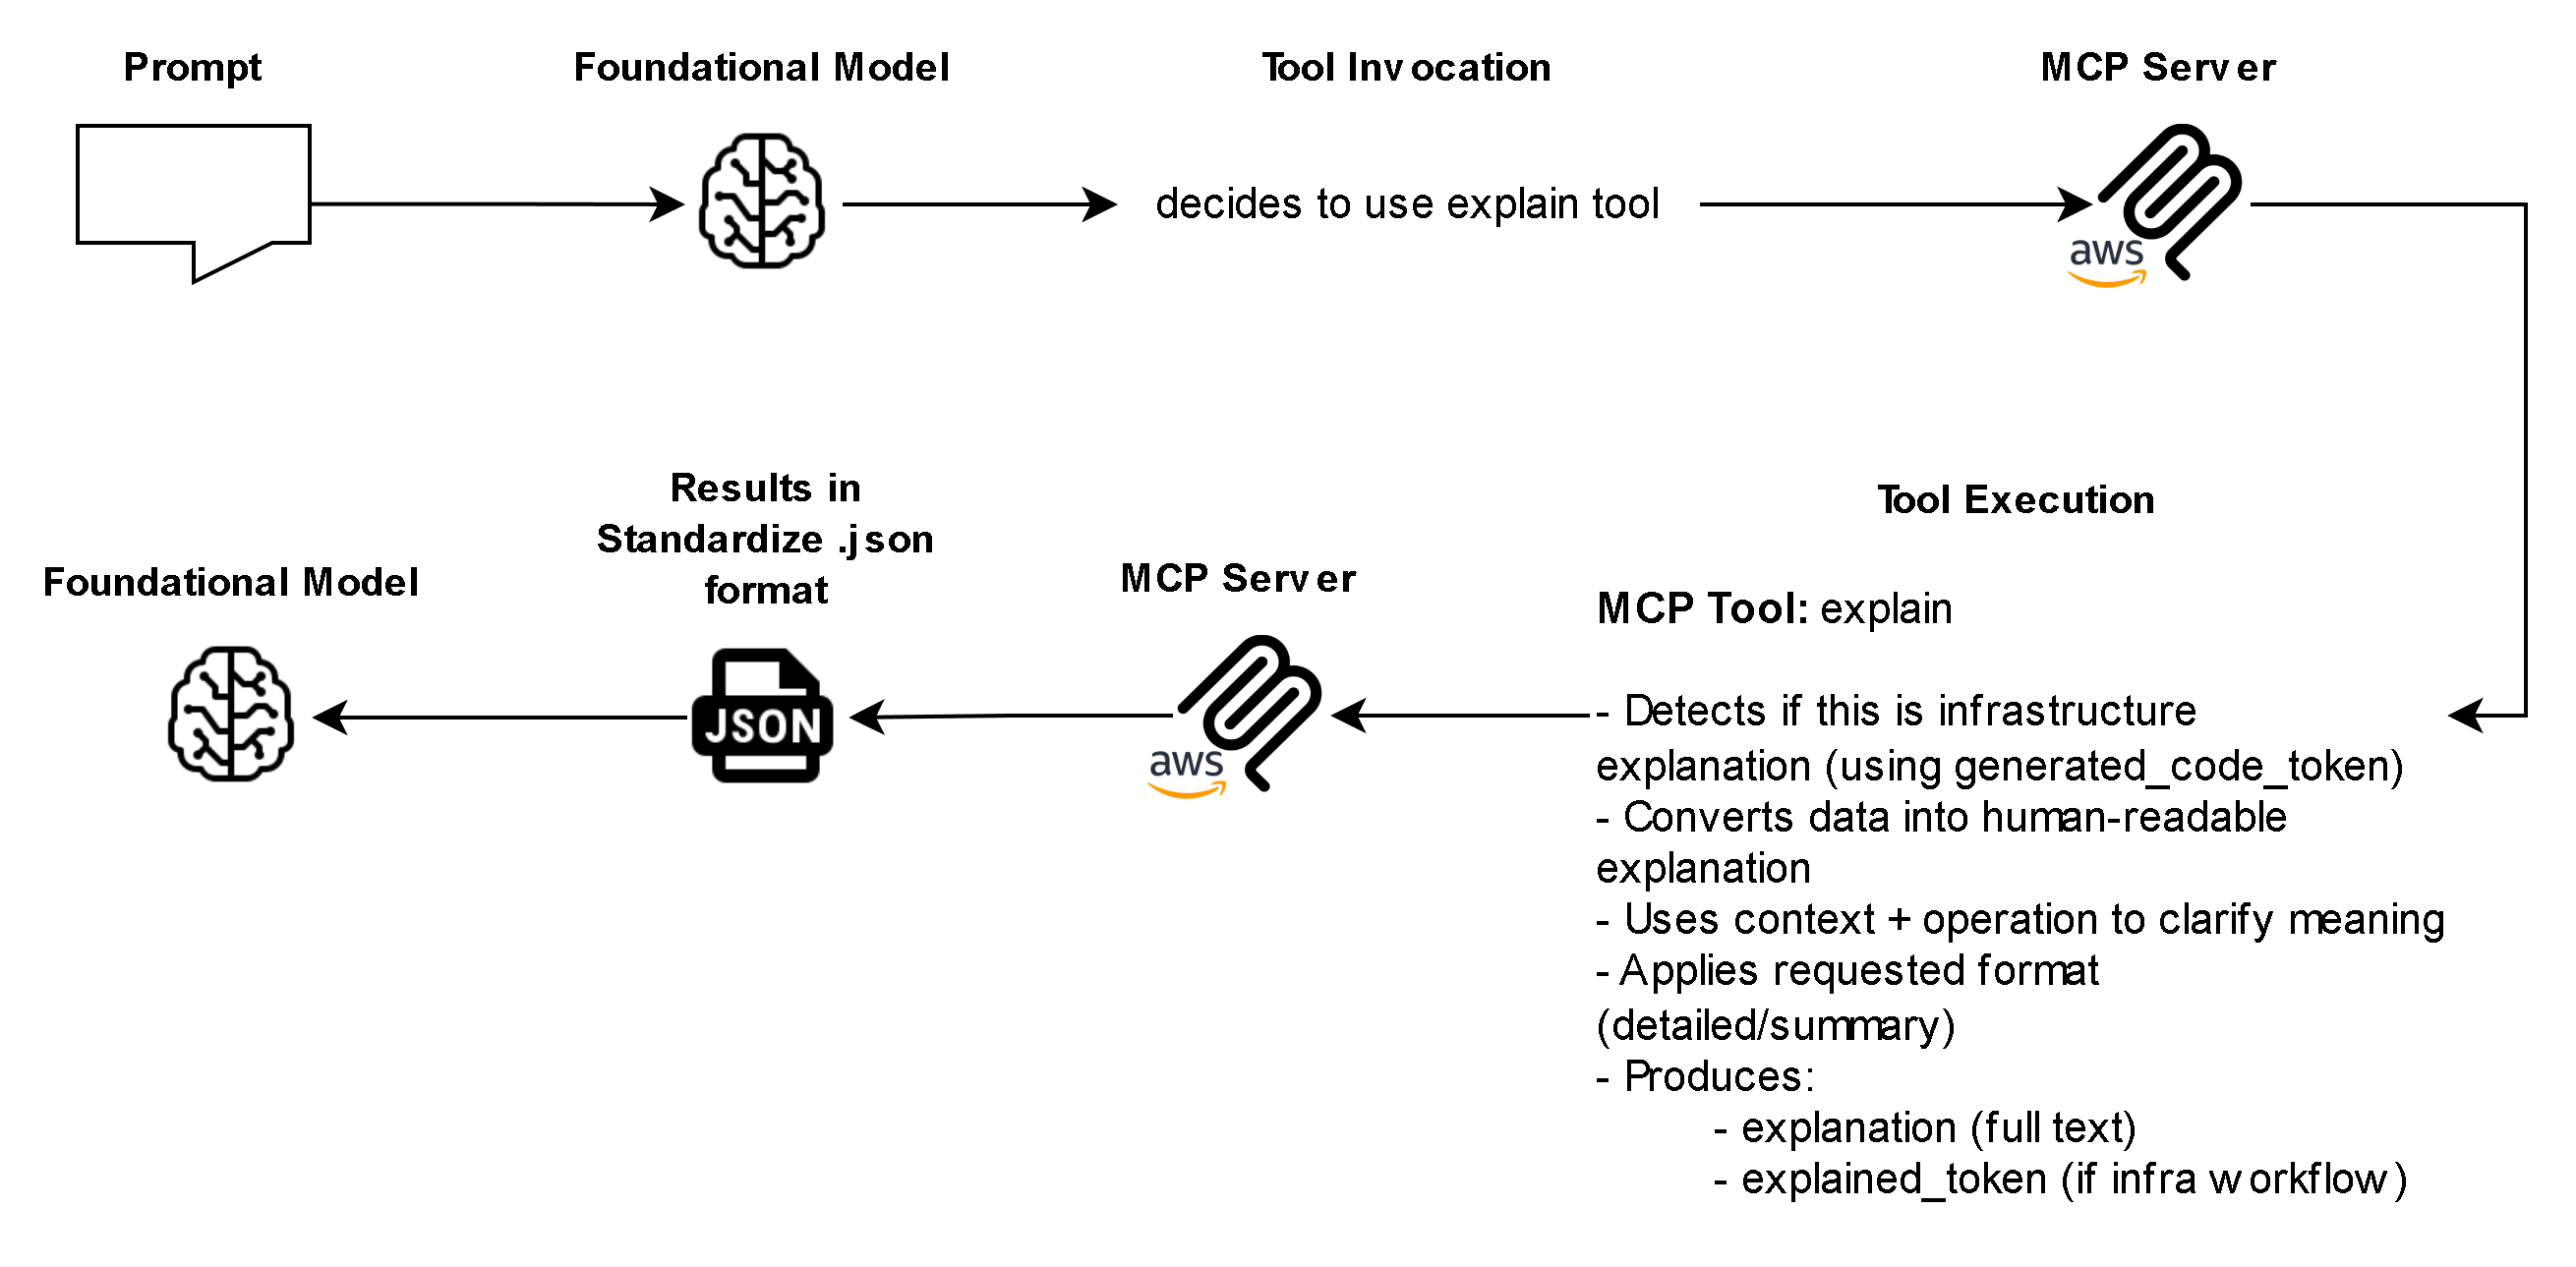
- Explain configuration (explain)
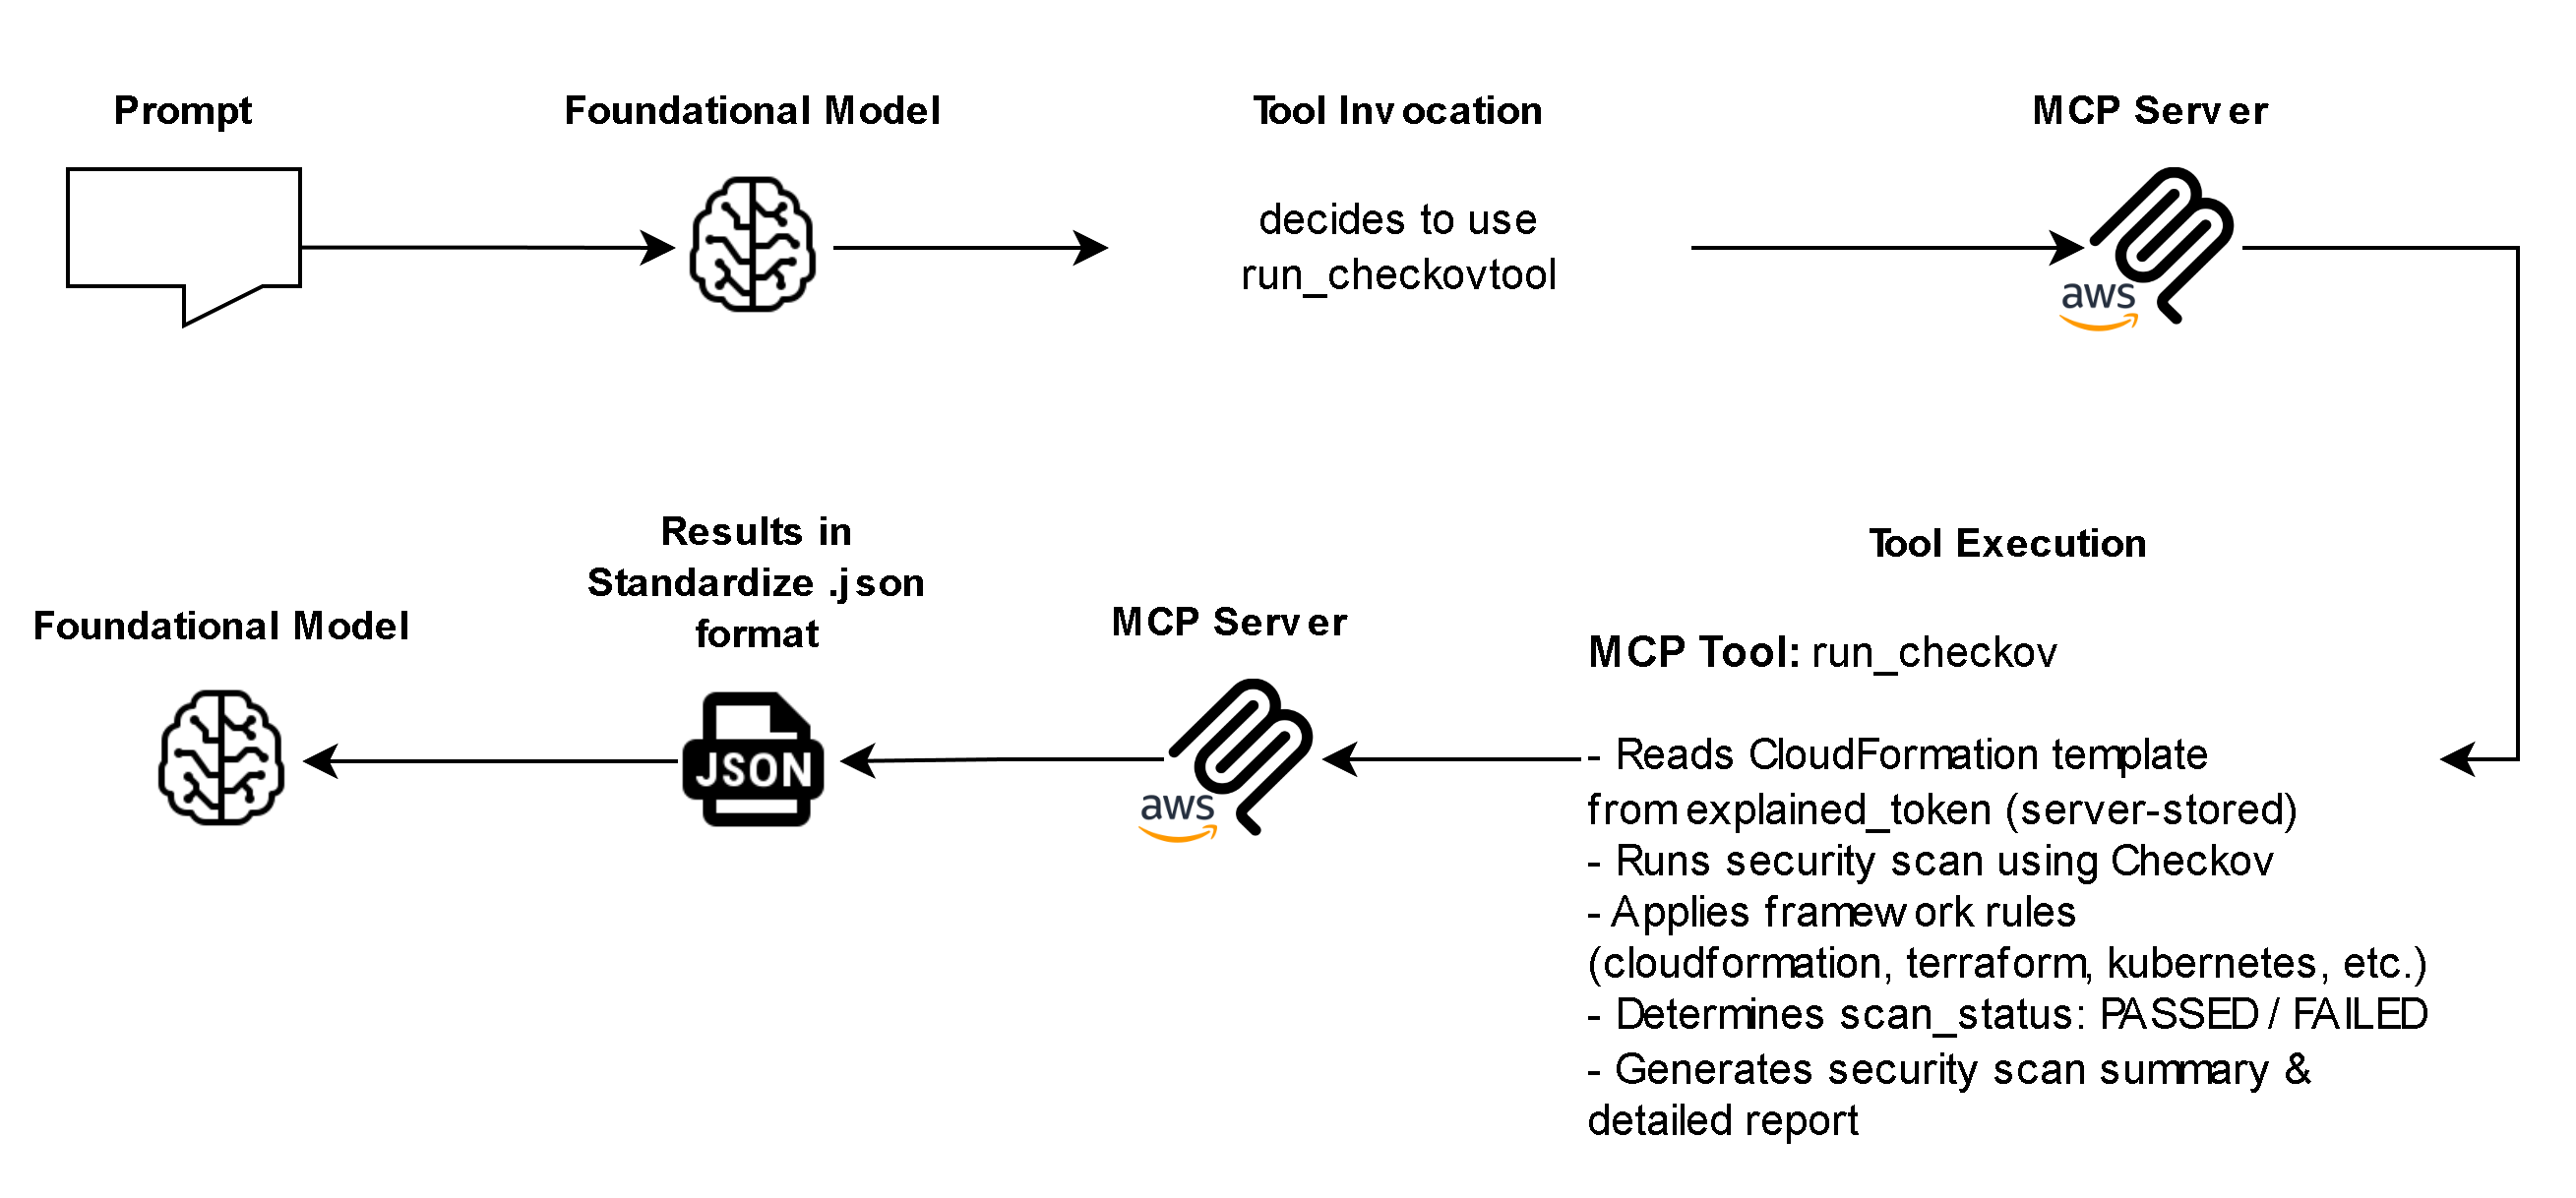
- Run security validation (run_checkov)
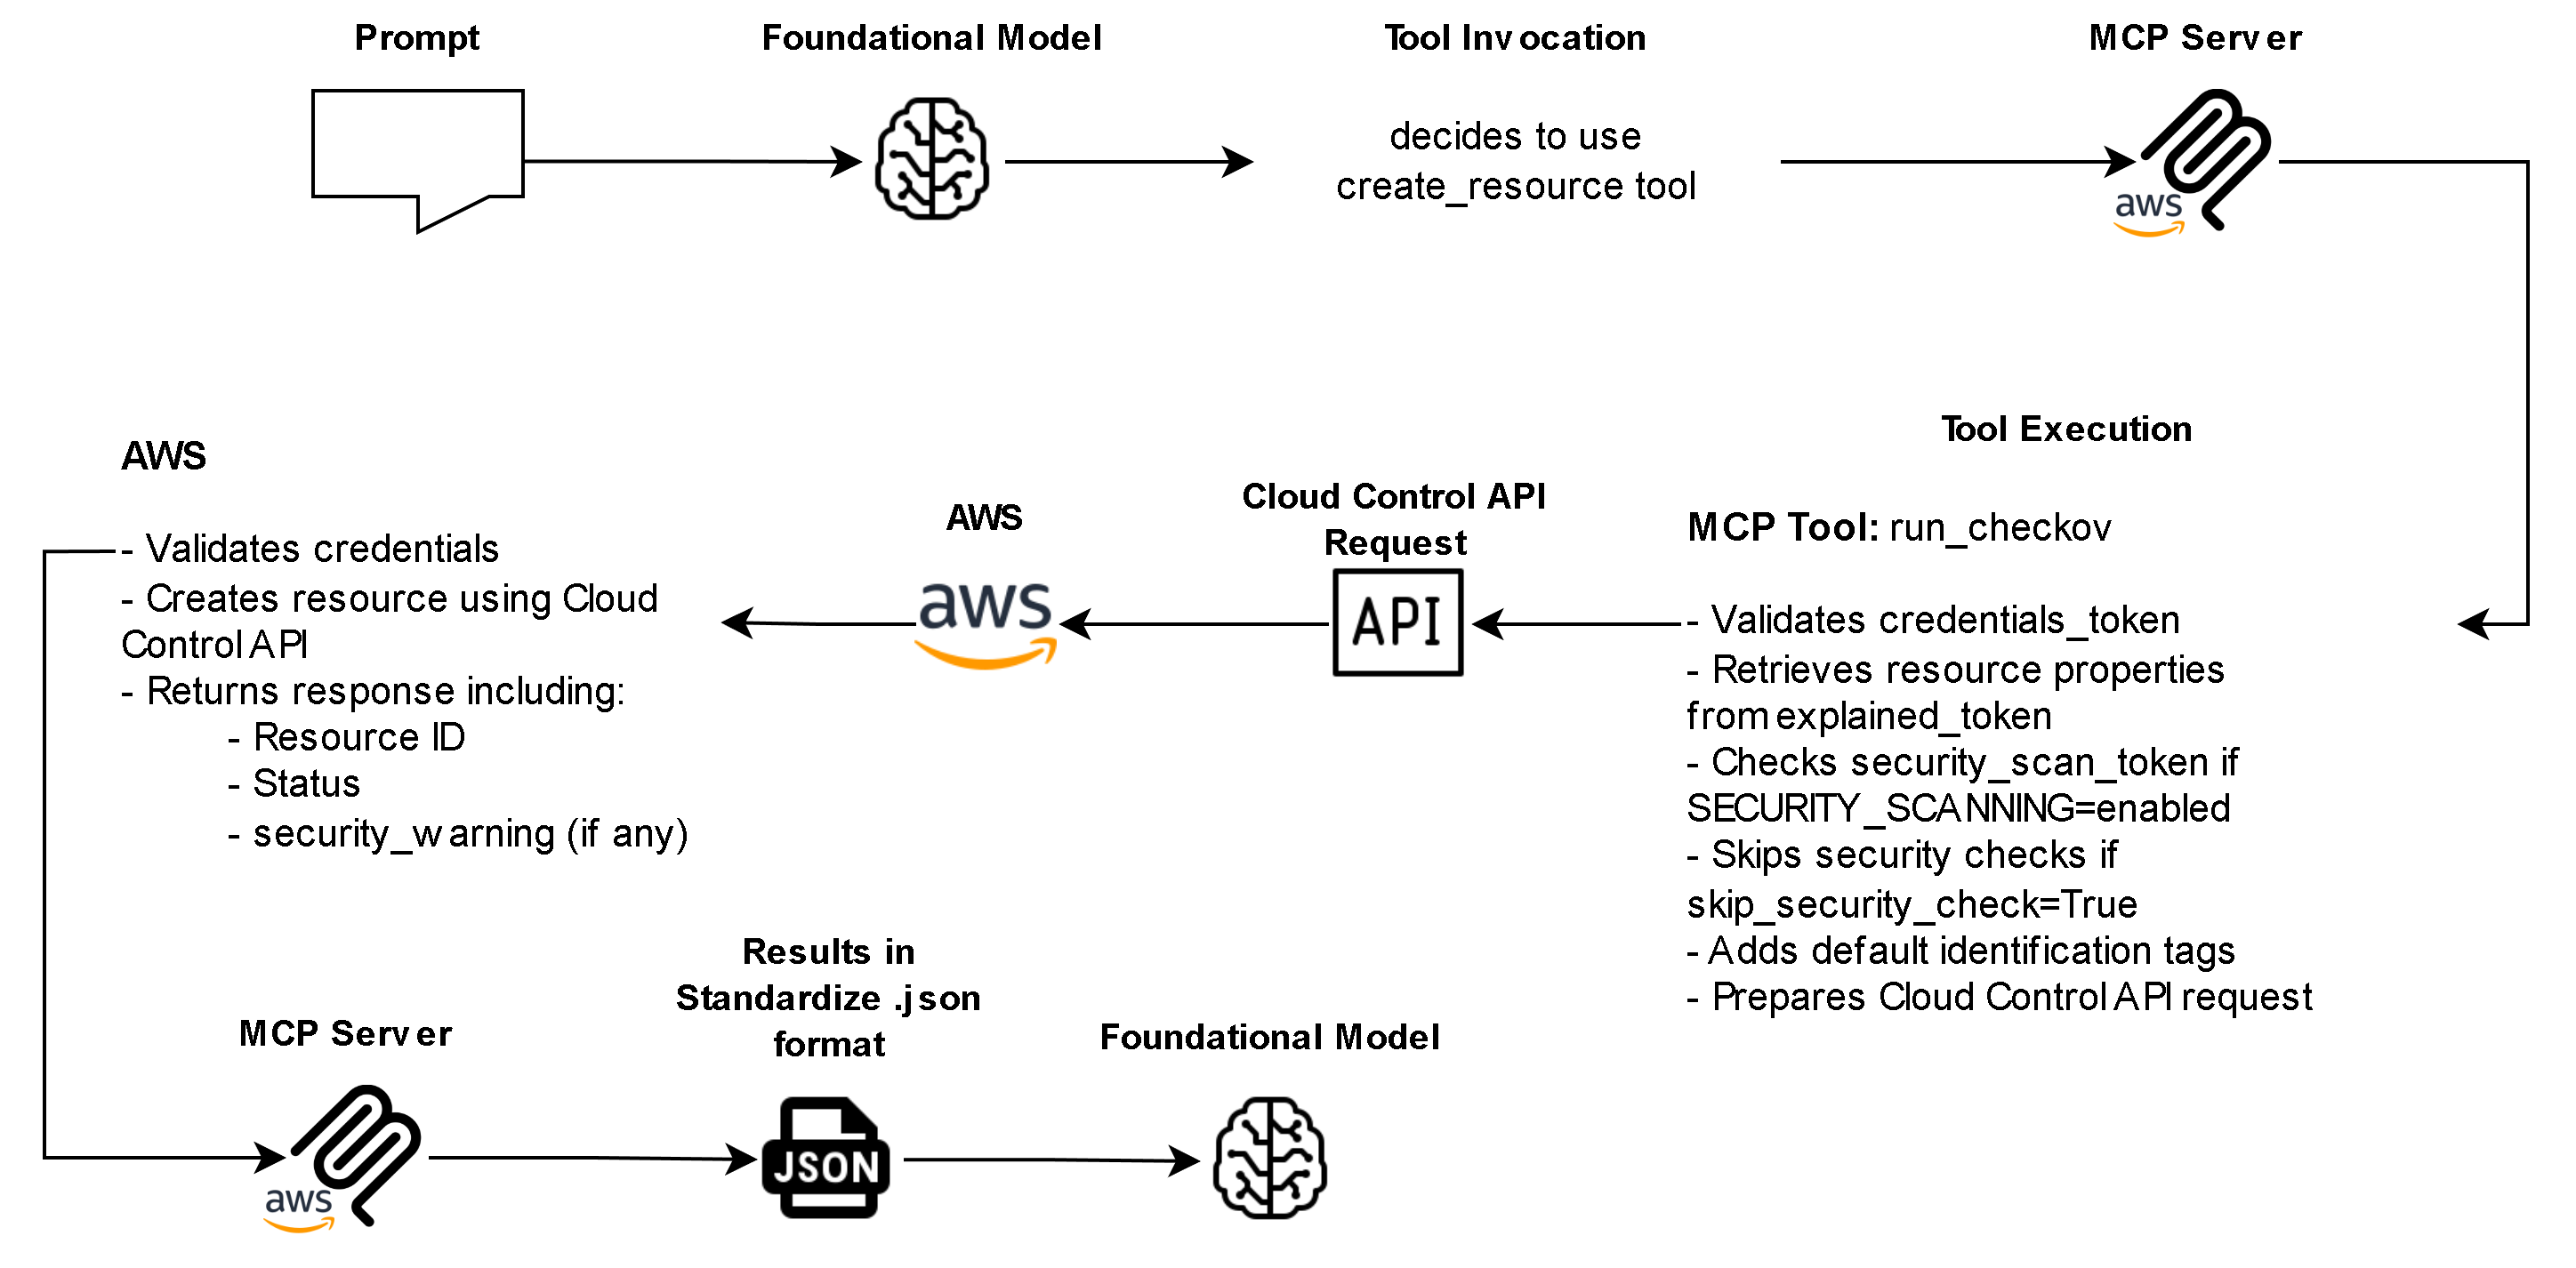
- Execute resource change (create_resource or update_resource)
- Verify credentials (check_environment_variables)
This guarantees that no operation bypasses security or credential validation, protecting both the user and their AWS environment.
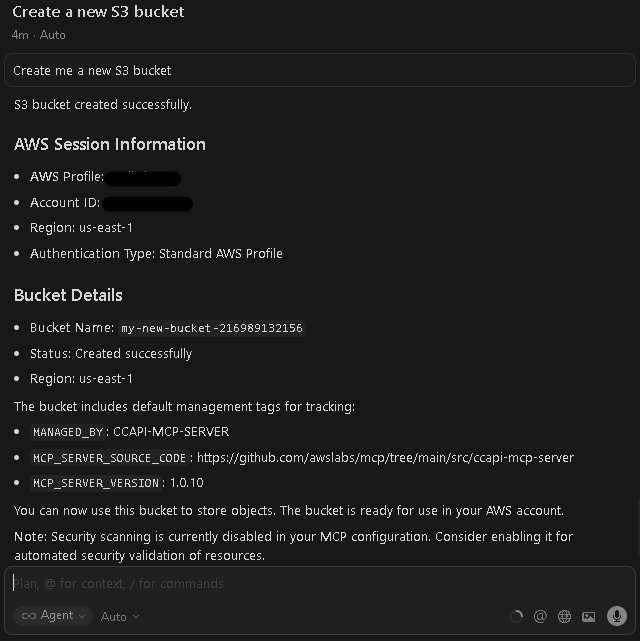
- Credential Awareness and Safe Defaults – Before making any changes, the server clearly displays the AWS account ID, region, and authentication method being used. It automatically adds standard tracking tags to all created resources. This supports governance, auditing, and troubleshooting.
- Secure Deletion and Policy Enforcement – Deletion operations require explicit double confirmation to prevent accidental data loss.
The server also blocks unsafe configurations, such as:
-
- Publicly accessible resources
- Overly permissive IAM policies (“Effect”: “Allow” with “Resource”: “*”)
- Disabling encryption on sensitive data
Security and Compliance Architecture
Security is central to the MCP server design:
- Token-Based Workflow Enforcement: Prevents skipping or faking validation steps.
- Read-Only Mode: Protects environments by disabling all write operations (–readonly flag).
- Audit Trail: Each operation includes token-based traceability for accountability.
- Credential Safety: Sensitive AWS keys are never exposed; they’re masked and managed through AWS SDK credential chains.
These protections make it safe for enterprises to use LLM-based infrastructure management in regulated or multi-account environments.
How to Integrate AWS Cloud Control API MCP Server to Foundational Models
Pre-requisites:
- uv from Astral installed
- Latest Python installed
- AWS CLI V2 installed
- AWS Credentials with permission to modify AWS Cloud Resources
- Configured local AWS profile
- Access to Foundational Models (e.g. Cursor, Roo, Amazon Q CLI, etc.)
Installing and Setup of Pre-requisites
uv from Astral:
- Run Windows Powershell as administrator and install uv via command: powershell -ExecutionPolicy ByPass -c “irm https://astral.sh/uv/install.ps1 | iex”

Python:
- Download and install Python from the official website: https://www.python.org/downloads/
AWS CLI V2:
- Download and install AWS CLI V2 MSI from the official link: https://awscli.amazonaws.com/AWSCLIV2.msi
AWS Credentials:
- Login to your AWS Account.
- Navigate to IAM and ensure you have the permissions to modify AWS Resources.
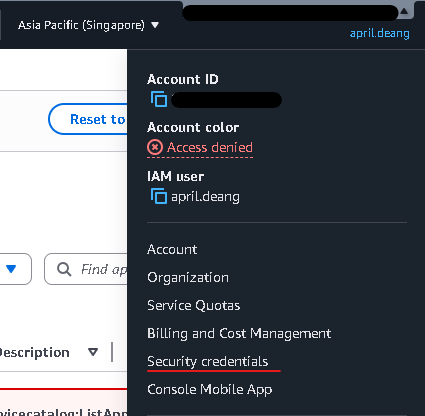
- In the upper right corner of AWS Console, click your username -> Security credentials -> Access keys -> Create access keys. Save the access keys somewhere safe.
Setup and configuration of AWS profile in local machine
- To setup AWS Profile in your local machine, open cmd and run command: aws configure –profile any-name-you-want
- Input your AWS Access Key ID, AWS Secret Access Key, Default region name, and Default output format.
- To verify if it was successfully created, run command: aws configure list-profiles
It should appear in the list


Setup and configuration for AWS Cloud Control API MCP Server
Cursor:
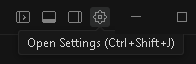
- Open Cursor. Go to settings by clicking the (⚙️) gear icon
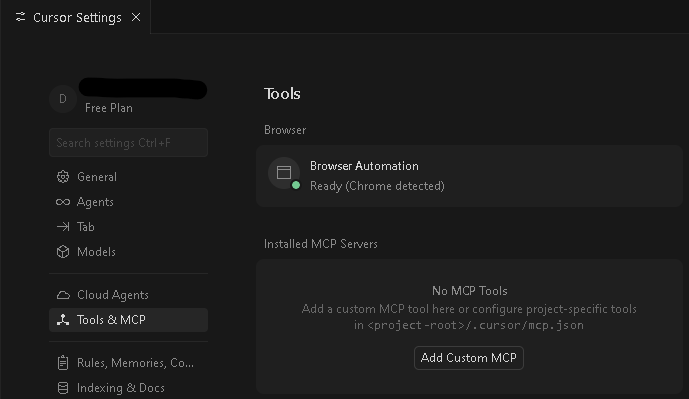
- Navigate to ‘Tools & MCP’, and click Add Custom MCP
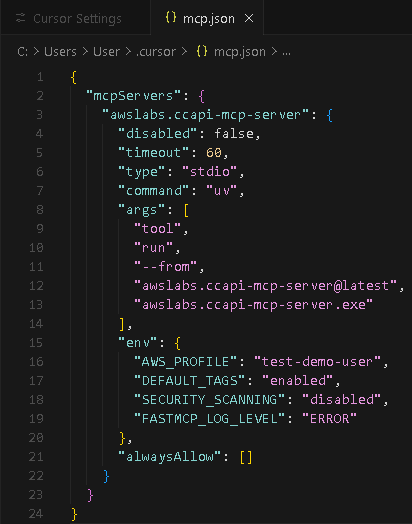
- Copy and paste this code into the mcp.json file, and save it:
{
“mcpServers”: {
“awslabs.ccapi-mcp-server”: {
“disabled”: false,
“timeout”: 60,
“type”: “stdio”,
“command”: “uv”,
“args”: [
“tool”,
“run”,
“–from”,
“awslabs.ccapi-mcp-server@latest”,
“awslabs.ccapi-mcp-server.exe”
],
“env”: {
“AWS_PROFILE”: “test-demo-user”,
“DEFAULT_TAGS”: “enabled”,
“SECURITY_SCANNING”: “disabled”,
“FASTMCP_LOG_LEVEL”: “ERROR”
},
“alwaysAllow”: [] }
}
}
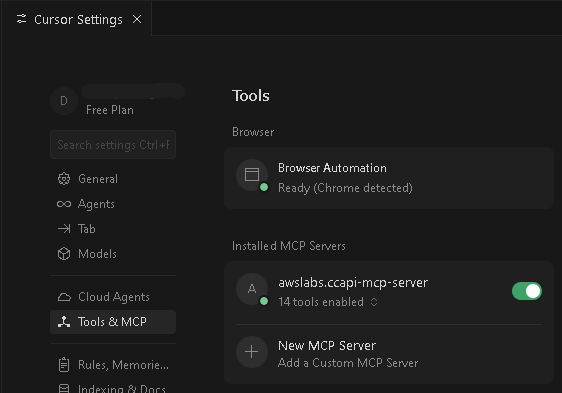
- Once it is saved, it should appear in the Installed MCP Servers and be enabled.
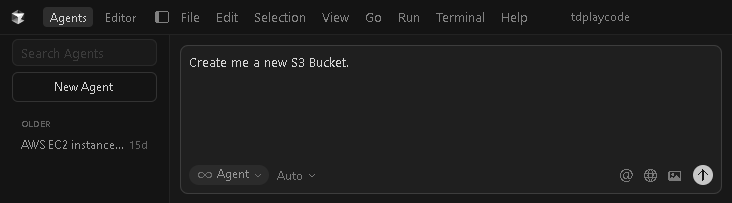
- To test it out, go to Agents tab and try this simple prompt: Create me a new S3 bucket
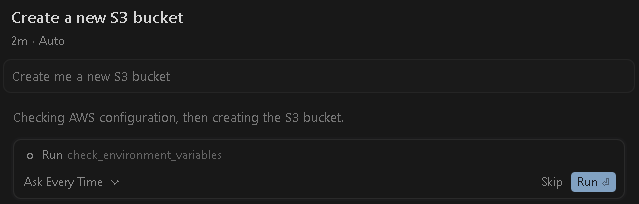
- Whenever asked for permission to execute/run a tool, simply click Run.
- Once finished executing API calls/tools, the newly created S3 Bucket should appear in the list of buckets.
- Quick Activity: Try deleting the S3 Bucket you have just created 🙂

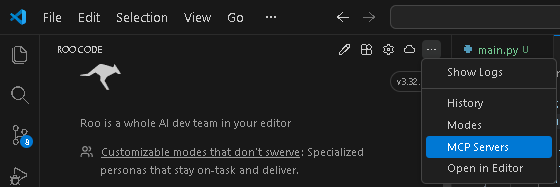
Roo Code:
- Open Roo Code in Visual Studio Code. In the upper right corner of Roo Code’s tab, click the ellipses (…) -> MCP Servers.
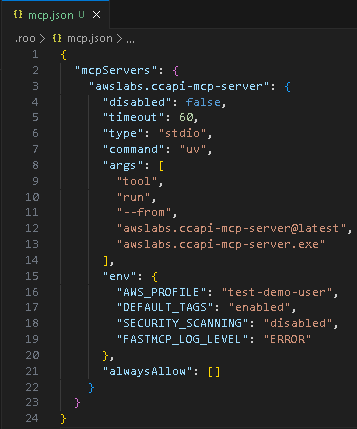
- Click Edit Project MCP, then copy and paste the code below to the mcp.json file (replace the “AWS_PROFILE” with the AWS profile you configured in the pre-requisites and save it:
{
“mcpServers”: {
“awslabs.ccapi-mcp-server”: {
“disabled”: false,
“timeout”: 60,
“type”: “stdio”,
“command”: “uv”,
“args”: [
“tool”,
“run”,
“–from”,
“awslabs.ccapi-mcp-server@latest”,
“awslabs.ccapi-mcp-server.exe”
],
“env”: {
“AWS_PROFILE”: “test-demo-user”,
“DEFAULT_TAGS”: “enabled”,
“SECURITY_SCANNING”: “disabled”,
“FASTMCP_LOG_LEVEL”: “ERROR”
},
“alwaysAllow”: [] }
}
} - It should appear and enabled in the MCP Server list:
- To test it out, try this simple prompt: Create me a new S3 bucket

Amazon Q CLI (Ubuntu):
Pre-requisites:
- Open cmd and install Windows Subsystem for Linux (WSL) on windows via command (this automatically install Ubuntu): wsl –install
- Launch Ubuntu (WSL Distribution) on windows via Start -> Ubuntu
After that, run the command: cd ~
- Install unzip via command: sudo apt install unzip
- Download Amazon Q CLI zip file via command: curl –proto ‘=https’ –tlsv1.2 -sSf https://desktop-release.codewhisperer.us-east-1.amazonaws.com/latest/q-x86_64-linux-musl.zip -o q.zip
- Unzip the installer via command: unzip q.zip
- Navigate to the directory of unzipped q folder via command: cd q
- Once you are inside the q folder, then change the file permission of install.sh to be executable by running the command: chmod +x install.sh
- Execute the install.sh shell script via command: ./install.sh
- Choose option: Yes
- Choose option depending on your account: (in my case, Free with Builder ID)
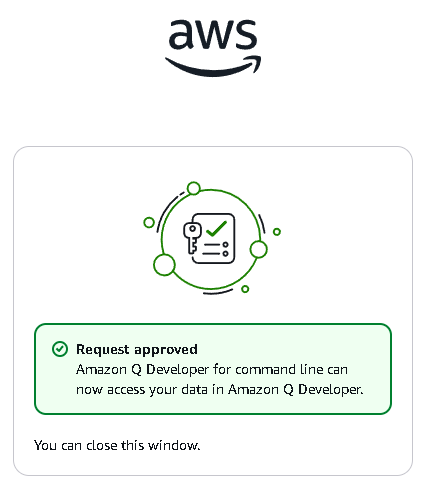
- Next, copy and paste the link into a browser, and confirm that both the code in the terminal and the URL match.
- Approve Amazon Q’s Permission.
- When the process is complete, you should then see a message in the terminal indicating “Device authorized” and “Logged in successfully”. Reload shell config for changes to apply via command: source ~/.bashrc
- To test if it worked, run command: which q
It should show something like: /home/username/.local/bin/q
- Next, navigate back to root directory via command: cd ~
and install AWS CLI V2 by running the command: curl “https://awscli.amazonaws.com/awscli-exe-linux-x86_64.zip” -o “awscliv2.zip”
Then unzip the file: unzip awscliv2.zip
Once finished unzipping, run command: sudo ./aws/install
- Configure AWS profile for Ubuntu environment by running command: aws configure –profile test-demo-user
Input the Access Key ID & Secret Access Key you have created earlier, as well as your preferred Default Region and Default output format


.png)


.png)


Setup:
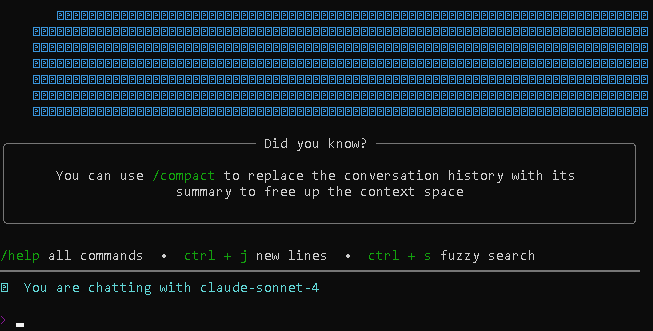
- Launch Amazon Q Developer CLI via command: q chat
It should show something like this:
- To exit Amazon Q chat, simply run command: /quit
- Go to home/root directory via command: cd ~
- Install uv from Astral via command: curl -LsSf https://astral.sh/uv/install.sh | sh
- After that, refresh the shell configuration to apply the changes by running the following command: source ~/.bashrc
- To verify if installation was successful, run command: uv –version
You should see something like this:
- Open or create the mcp.json config file inside the ~/.aws/amazonq/ directory via command: nano ~/.aws/amazonq/mcp.json
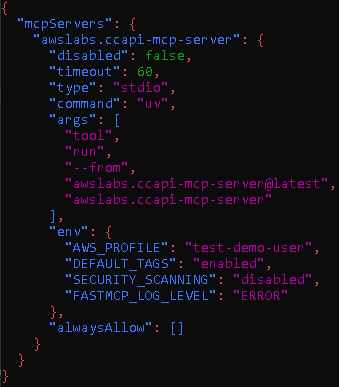
- After you open the mcp.json file, next copy and paste the following code into the file::
{
“mcpServers”: {
“awslabs.ccapi-mcp-server”: {
“disabled”: false,
“timeout”: 60,
“type”: “stdio”,
“command”: “uv”,
“args”: [
“tool”,
“run”,
“–from”,
“awslabs.ccapi-mcp-server@latest”,
“awslabs.ccapi-mcp-server.exe”
],
“env”: {
“AWS_PROFILE”: “test-demo-user”,
“DEFAULT_TAGS”: “enabled”,
“SECURITY_SCANNING”: “disabled”,
“FASTMCP_LOG_LEVEL”: “ERROR”
},
“alwaysAllow”: [] }
}
} - To Save, press CTRL + O -> Enter -> CTRL + X
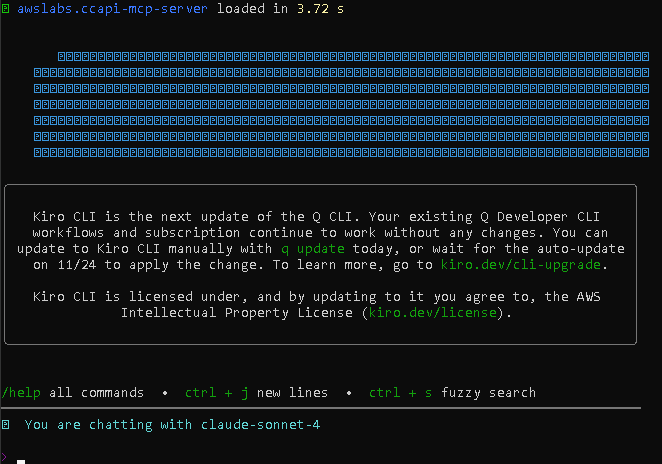
- Launch the Amazon Q CLI via command: q chat
- You should see an indication of initializing something like ‘awslabs.ccapi-mcp-server’
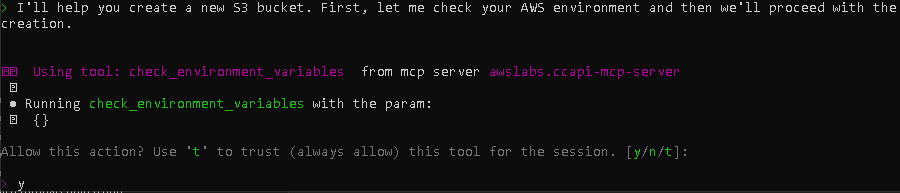
- To test it out, try this simple prompt: Create me a new S3 bucket
- Whenever it asks for a permission to perform/execute a task using its built-in tools, simply type ‘y’
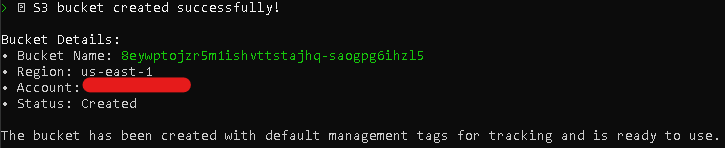
- After executing every tool/API calls a new S3 Bucket should now appear in the AWS Console list of S3 Buckets.
- Quick Activity: Try deleting the S3 Bucket you have just created 🙂
.png)


.png)


Summary
The AWS Cloud Control API MCP Server demonstrates how natural language interfaces can simplify cloud infrastructure management. By bridging LLMs with AWS resources, it allows users to create, update, and monitor cloud environments securely and efficiently without writing traditional code. With built-in security, governance, and declarative workflows, this approach empowers both developers and non-technical users to manage AWS infrastructure confidently, making cloud automation more accessible than ever.
References:
🌸 25% OFF All Reviewers on our International Women’s Month Sale! Save 10% OFF All Subscriptions Plans & 5% OFF Store Credits/Gift Cards!

Learn AWS with our PlayCloud Hands-On Labs

$2.99 AWS and Azure Exam Study Guide eBooks

New AWS Generative AI Developer Professional Course AIP-C01

Learn GCP By Doing! Try Our GCP PlayCloud

Learn Azure with our Azure PlayCloud

FREE AI and AWS Digital Courses

FREE AWS, Azure, GCP Practice Test Samplers


Subscribe to our YouTube Channel

Follow Us On Linkedin


