
Have you ever watched Tony Stark boot up his suits and wished you had your very own J.A.R.V.I.S. to help you code, research, or just manage your day?
If you are just starting out with web development, you have probably noticed that most AI chatbot tutorials look exactly the same. They feature soft, rounded gray-and-white chat bubbles that look exactly like those in a smartphone’s default texting app. They work perfectly fine, but they are a bit… boring.
We are going to fix that.
In this guide, I will show you how to take a standard, generic chatbot template and completely tear down its design. We will strip away the boring bubbles and use Tailwind CSS to build a tactical, glowing, cybernetic interface. By the end of this tutorial, every message you send will look like it is coming straight from the mainframe of the Mark IV armor.
Let’s get your project online.
Phase 1 – J.A.R.V.I.S AI chatbot: Getting Your Project Running
When you are a beginner, building the complex code that makes AI ‘stream’ text word by word is a massive headache. Instead of building from scratch, we will use a high-quality template provided by the team at Vercel. This gives us a solid, working AI brain so we can focus entirely on the design.
Open your terminal and run this command to download the starter files:
npx create-next-app@latest my-jarvis-app --example "https://github.com/vercel/ai-chatbot"
Once that finishes, move into your new folder and install the tools it needs to run:
cd my-jarvis-app
pnpm install
At this point, you have a functional chatbot! But if you try to run it (pnpm dev), it might crash or refuse to send messages. Let’s figure out why.
Phase 2 – J.A.R.V.I.S AI chatbot: Understanding the Common Roadblocks
If your app crashes immediately, don’t worry, you haven’t broken anything. Beginners almost always run into these two invisible walls when starting out.
The Database Issue: When you link a new database to your project, your code can talk to it, but the database is completely empty. Think of it like buying a filing cabinet with no folders inside. If your app tries to save a chat history, it crashes because there are no ‘folders’ (tables) to put the data in. You have to run a command to explicitly build those tables inside your database before the app can function.
The AI Gateway Block: If you hit ‘enter’ and your messages refuse to send, you are likely hitting an AI Gateway restriction. Services like Vercel AI Gateway are amazing for routing messages to AI models, but they require you to verify your identity, usually by adding a payment method to your account just to prove you aren’t a bot spamming their servers. Once verified (even if they don’t charge you), the data will flow freely.
Phase 3 – J.A.R.V.I.S AI chatbot: Powering Up the Arc Reactor
Every JARVIS interface needs that signature electric cyan glow. We control our global colors using a CSS file, which acts as the visual rulebook for your entire app.
Open globals.css. We are going to force the color variables to radiate a high-intensity neon blue. Find the @theme section and update your primary colors:
@theme inline {

--color-primary: oklch(0.72 0.26 225);
--color-ring: oklch(0.72 0.26 225);
--color-border: oklch(0.28 0.09 230);
}
Note: The oklch format is just a very accurate way to tell the computer exactly what shade of blue we want so it displays correctly on every screen.
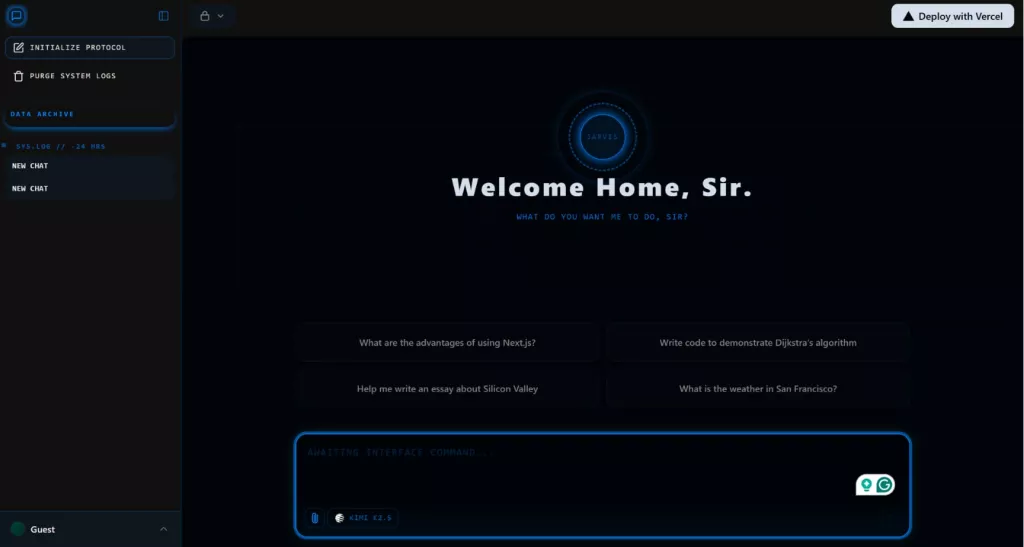
Phase 4 – J.A.R.V.I.S AI chatbot: Holographic Greetings
When you open your app, you want a high-tech system, not a blank screen. We will use a library called Framer Motion (already included in your template) to create a glowing core.
Locate components/chat/greetings.tsx and replace the boring welcome text with this grid:
{/* Cyber Grid Background */}
<div
className="absolute inset-0 pointer-events-none opacity-10"
style={{
backgroundImage: `linear-gradient(to right, var(--color-primary) 1px, transparent 1px), linear-gradient(to bottom, var(--color-primary) 1px, transparent 1px)`,
backgroundSize: '40px 40px'
}}
/>
{/* Glowing Core */}
<motion.div className="relative flex items-center justify-center mb-12">
<div className="absolute w-32 h-32 rounded-full border border-primary/30 animate-pulse shadow-[0_0_15px_var(--color-primary)]" />
<div className="absolute w-24 h-24 rounded-full border-2 border-dashed border-primary/50 animate-[spin_20s_linear_infinite]" />
</motion.div>
Phase 5 – J.A.R.V.I.S AI chatbot: The Command Deck
The box where you type messages needs to look like a military interface, not a text bubble. Find components/chat/multimodal-input.tsx and update your PromptInput styling:
<PromptInput
className="[&>div]:rounded-lg [&>div]:border [&>div]:border-primary/40 [&>div]:bg-background/60 [&>div]:backdrop-blur-md [&>div]:focus-within:shadow-[0_0_20px_rgba(0,230,255,0.15)]"
>
<PromptInputTextarea
className="font-mono text-[13px] tracking-wide placeholder:font-mono placeholder:tracking-widest placeholder:text-primary/25"
placeholder="AWAITING INTERFACE COMMAND..."
/>
</PromptInput>
Adding the font-mono class is the trick here. Monospace fonts are the secret ingredient to making any text look like it belongs on a hacker’s screen.
Phase 6 – J.A.R.V.I.S AI chatbot: Tactical Data Streams
In components/chat/message.tsx, we replace standard bubbles with flat, left-bordered logs. Look for the MessageContent section:
<MessageContent
className={cn("text-[13px] relative", {
"rounded-sm border-l-4 border-l-primary border-y border-r border-primary/20 bg-primary/5 px-4 py-3 font-mono text-primary/90": isUser,
"w-fit max-w-full text-foreground px-1 py-1": isAssistant,
})}
>
And update your 'Thinking' state so the system sounds active:

<div className="text-[12px] font-mono text-primary tracking-widest uppercase">
<Shimmer>PROCESSING COMMAND...</Shimmer>
</div>
Phase 7 – J.A.R.V.I.S AI chatbot: The System Directory
Finally, update components/chat/sidebar-history.tsx to display your chat history like actual system server logs:
<div className="px-2 py-1 text-[10px] font-mono font-bold uppercase tracking-[0.15em] text-primary/80">
SYS.LOG // TODAY
</div>
<div className="px-2 py-1 text-[10px] font-mono font-bold uppercase tracking-[0.15em] text-primary/40 border-t border-primary/10 mt-2 pt-2">
ARCHIVE // -168 HRS
</div>
The Final Takeaway
With your code updated, save your files and run pnpm dev again. Head over to http://localhost:3000. You now have a fully functional AI terminal that makes every coding session feel like you are prepping the suit for launch.
But my biggest takeaway from building this project goes beyond the glowing lights or the monospace fonts. Tony Stark said it best: “If you’re nothing without the suit, then you shouldn’t have it.”
The same logic applies to us as developers. The sleek interface, the flashy animations, and the cybernetic themes, that’s just the suit. The real value is the underlying skill it took to put it together. By taking a standard, generic template and ripping it apart, using resources from the internet, we learned how to navigate a professional codebase, troubleshoot actual infrastructure roadblocks, and apply custom design logic to an existing framework.
Don’t stop here. Now that you have the core system online, try swapping out the AI models, integrating your own custom tools, or adding new animations.
References
🤖 $3.49 eBooks Start Here – Get Up to 30% OFF All AI & Machine Learning Reviewers

Turn Your Team Into Cloud-Ready Professionals Today

Learn AWS with our PlayCloud Hands-On Labs

$2.99 AWS and Azure Exam Study Guide eBooks

New Claude Certified Architect Foundations CCA-F

Learn GCP By Doing! Try Our GCP PlayCloud

Learn Azure with our Azure PlayCloud

FREE AI and AWS Digital Courses

FREE AWS, Azure, GCP Practice Test Samplers


Subscribe to our YouTube Channel

Follow Us On Linkedin


